I have found several very similar to mine if you just type in mini lathe into Google search. Just as an FYI, I have not tried to do any precise work with it. It does have some slop in the mandrels, but it is good for things such as this, I may actually try to turn a spindle with it to try to match one of the spindles in the kit just for the heck of it, I can keep you postedOnline Walmart. I can try to find it. Can you post a link in the forum?
You are using an out of date browser. It may not display this or other websites correctly.
You should upgrade or use an alternative browser.
You should upgrade or use an alternative browser.
Nikitin San Bartolome 1584 A.D. (Kit #35)
- Thread starter Pathfinder65
- Start date
- Watchers 68
ARE YOU SURE WALLMART WHERE CAN I FIND IT ON WALLMART SHOPPING ONLINE. GOD BLESS STAY SAFE YOUN AND YOURS DON
Walmart is no longer carrying it. But if google search mini lathe- Amazon has them as well.ARE YOU SURE WALLMART WHERE CAN I FIND IT ON WALLMART SHOPPING ONLINE. GOD BLESS STAY SAFE YOUN AND YOURS DON
Seen them as low as 38.00 dollars.
So I guess we are allowed to post links in the forum. I did not want to break any rules but glad you posted it for him. It’s a handy little tool.
THANKS ALL, FOR HEALTH REASONS THIS SEEMS PERFECT FORN ME. GOD BLESS STAY SAFE ALL DON
It's the little things that are do or d..
As per the plan several upright "beams" need to be added before going to the next build step.
The build plan.
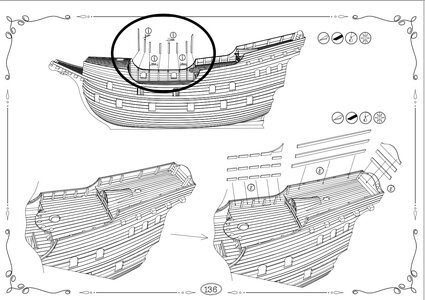
The "beams" are 2 X 4mm pieces. The choice is to sort through all the used flats and find pieces with about the right dimensions that can be cut out, OR, cut the pieces from edges of flats that are 2mm thick, OR, go to my favorite model ship hobby store and order some wood strips.
Yup, yessir, nope, the first two choices are for those guys that can draw straight lines and use that very sharp #11 blade to make those kind of cuts. Jan the "Wimp" went with choice #3.
2 X 4mm roughly equates to 3/32 X 3/16 of an inch. So thanks to the magic of the Internet and my trusty PC the wood strips are on the way to my house.
Another crucial build step resolved
Jan. "The Wimp"
As per the plan several upright "beams" need to be added before going to the next build step.
The build plan.

The "beams" are 2 X 4mm pieces. The choice is to sort through all the used flats and find pieces with about the right dimensions that can be cut out, OR, cut the pieces from edges of flats that are 2mm thick, OR, go to my favorite model ship hobby store and order some wood strips.
Yup, yessir, nope, the first two choices are for those guys that can draw straight lines and use that very sharp #11 blade to make those kind of cuts. Jan the "Wimp" went with choice #3.
2 X 4mm roughly equates to 3/32 X 3/16 of an inch. So thanks to the magic of the Internet and my trusty PC the wood strips are on the way to my house.
Another crucial build step resolved

Jan. "The Wimp"
Last edited:
Good morning Jan. Straight lines….what are those ?Yup, yessir, nope, the first two choices are for those guys that can draw straight lines and use that very sharp #11 blade to make those kind of cuts. Jan the "Wimp" went with choice #3.
 Choice 3 the only one if you are lucky enough to have a decent reasonably priced postal system etc... My kids bought me an “el cheepo ”mini saw for Xmas and this has helped me enormously with straight lines. Was only R2500.00 so $ 135.00. Also Makes me feel like a professional when cutting angles almost spot on
 . Cheers Grant
Indeed, “straight lines” are definitely a mystery. Not part of my skill set. The little bitty sharp blades are handled very carefully. Octogenarian maintenance medications and little sharp blade cuts mean a trip to the “ER”. Then I have to listen to “Ya-da-ya-da-dada” for a week or more.Good morning Jan. Straight lines….what are those ?Choice 3 the only one if you are lucky enough to have a decent reasonably priced postal system etc... My kids bought me an “el cheepo ”mini saw for Xmas and this has helped me enormously with straight lines. Was only R2500.00 so $ 135.00. Also Makes me feel like a professional when cutting angles almost spot on
. Cheers Grant

Jan
- Joined
- Jan 9, 2020
- Messages
- 10,378
- Points
- 938

So the third option is to preserve peace at home!Indeed, “straight lines” are definitely a mystery. Not part of my skill set. The little bitty sharp blades are handled very carefully. Octogenarian maintenance medications and little sharp blade cuts mean a trip to the “ER”. Then I have to listen to “Ya-da-ya-da-dada” for a week or more.
Jan
Yup, I have learned to be ”very” cautious.So the third option is to preserve peace at home!Seriously though Jan, that trip so to the ER is best to be avoided so I concur with your exercised choice.
Jan
Decision time. Follow the plan or follow the video.
The plan.
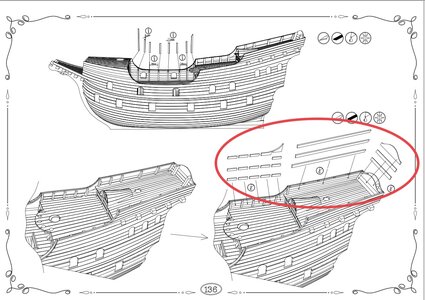
The circled parts have no numbers which means DIY construction.
Or choice number two follow the build steps in the video.
San Bartolome Video #47
Jan the “Wimp” decided the video was a good alternative to having to cut and fit all those little bits.
The start. Pieces of Mahogany left over from other builds.
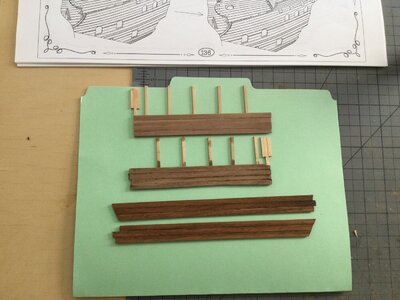
Dry fit in place.
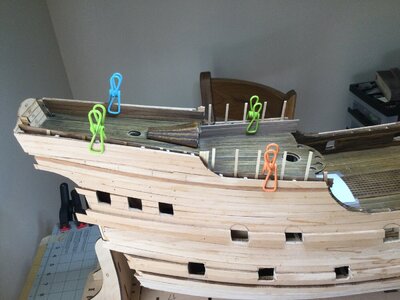
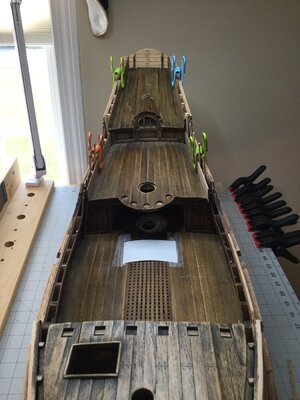
Final gluing will have to wait until my “beam order” arrives and I can finish the work on the main deck.
Jan
The plan.

The circled parts have no numbers which means DIY construction.
Or choice number two follow the build steps in the video.
San Bartolome Video #47
Jan the “Wimp” decided the video was a good alternative to having to cut and fit all those little bits.
The start. Pieces of Mahogany left over from other builds.

Dry fit in place.


Final gluing will have to wait until my “beam order” arrives and I can finish the work on the main deck.
Jan
Good news! My missing plates all arrived today from Ukraine. Denis was great and shipped them two days after I emailed him. I was worried if the thin wood would be damaged in the long journey to Canada, but they packed them so well that all the parts arrived perfectly. I am really impressed with such responsive customer service. Now I can get back to deck planking, after a detour doing cannon ports. A very interesting build, so different from any of my previous models. Glad to see your progress as I slowly follow behind.
@Freddie, Cannon ports were on my agenda yesterday. I spent several hours working on the Main deck ports.
After watching the latest video (#49), I build out the ports the same way.
First adding the backing
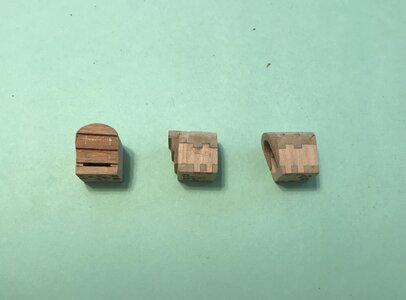
Then sanding and dry fitting each Port to it’s proper location. I would suggest you number the ports because each one will fit differently.
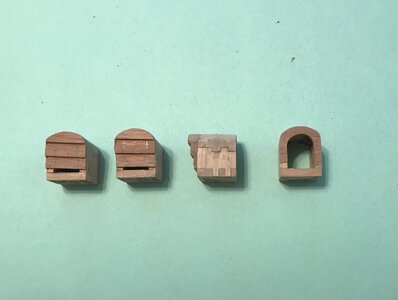
The test fit.
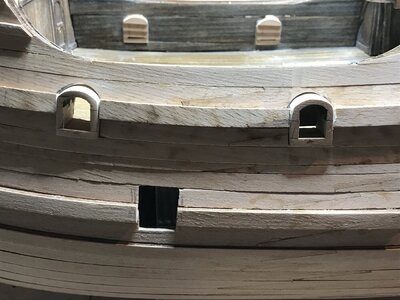
The ports sit even with the Wale, but without adjusting the rear of the port it might not fit all thevway through the hull.
The video explains it much better than I can
Gunport Video
Jan
After watching the latest video (#49), I build out the ports the same way.
First adding the backing

Then sanding and dry fitting each Port to it’s proper location. I would suggest you number the ports because each one will fit differently.

The test fit.

The ports sit even with the Wale, but without adjusting the rear of the port it might not fit all thevway through the hull.
The video explains it much better than I can
Gunport Video
Jan
Hi Heinrich. I had good time working on those, each one is a slightly different fit. It was the old sand-fit-sand-fit routine. Tough weather day here yesterday. Fast moving Thunderstorms all afternoon. We had 1 1/2 inches of rain in three hours. A good excuse to be in the shipyard.The gunports fit beautifully, Jan!
We are headed North to clan reunion this morning. Going to travel 300+ miles and still be in the state of Maine.
Jan
Everything sure is fiddly on this kit! Nicely done.@Freddie, Cannon ports were on my agenda yesterday. I spent several hours working on the Main deck ports.
After watching the latest video (#49), I build out the ports the same way.
First adding the backing
View attachment 388138
Then sanding and dry fitting each Port to it’s proper location. I would suggest you number the ports because each one will fit differently.
View attachment 388140
The test fit.
View attachment 388139
The ports sit even with the Wale, but without adjusting the rear of the port it might not fit all thevway through the hull.
The video explains it much better than I can
Gunport Video
Jan
Good morning Jan. You owned this. This kit is like a 1000 piece jigsaw puzzle of a clear blue sky@Freddie, Cannon ports were on my agenda yesterday. I spent several hours working on the Main deck ports.
After watching the latest video (#49), I build out the ports the same way.
First adding the backing
View attachment 388138
Then sanding and dry fitting each Port to it’s proper location. I would suggest you number the ports because each one will fit differently.
View attachment 388140
The test fit.
View attachment 388139
The ports sit even with the Wale, but without adjusting the rear of the port it might not fit all thevway through the hull.
The video explains it much better than I can
Gunport Video
Jan
Indeed, I’m pleased with my accomplishments when bits come out close to plan specifications. Big learning curve still in progress. The kit is a big puzzle and a great challenge.Good morning Jan. You owned this. This kit is like a 1000 piece jigsaw puzzle of a clear blue sky. Enjoy your clan reunion. Cheers Grant
The clan reunion was a great time. A wonderful meet of in-laws, friends, uncles, cousins and a new crop of youngsters. Lot’s of talk, laughter, teasing and just general fun. We are headed home in about an hour.
Jan


