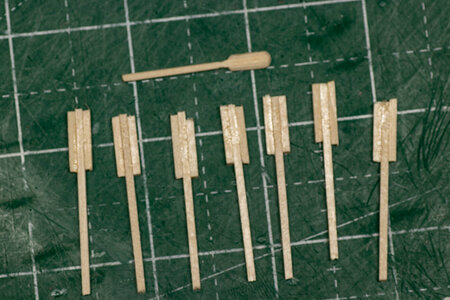
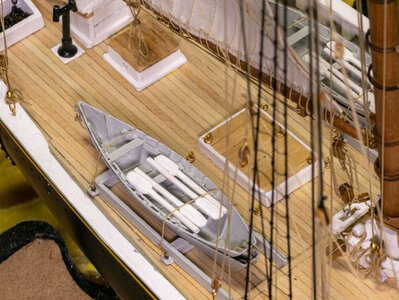
On belaying pins, I add after I've belaid the line. On rails, I thread the line through it before I tie it off. Then I slide it down to position.Once I get the rigging mostly finished I will take some more detailed pictures.
Any suggestions on the best way to add rope coils would be helpful. I have not found a way that I truly like on my other models.
You are using an out of date browser. It may not display this or other websites correctly.
You should upgrade or use an alternative browser.
You should upgrade or use an alternative browser.
Bluenose - Model Shipways MS2130 - 1/64 - By JeffT [COMPLETED BUILD]
True story.Thanks, Grant. The addition of the sails really makes this particular model.
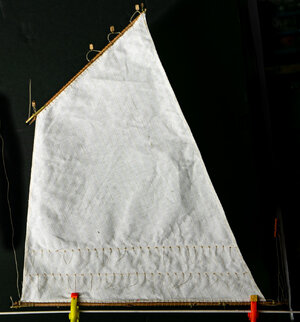
Main sail completed. This is a big sail. Attaching the bolt rope, adding reef lines, and making the gaff and boom were time consuming with lots of metal work on the gaff & boom. I missed taking pictures of the gaff and boom, but they can be seen in the picture. And, yes, the sail was photographed hanging from a clothes drying line and then flipped in post processing. I will straighten the reef lines after the sail in mounted.

Last edited:
A impressive looking main sail, Jeff. Almost ready to catch the wind.Main sail completed. This is a big sail. Attaching the bolt rope, adding reef lines, and making the gaff and boom were time consuming with lots of metal work on the gaff & boom. I missed taking pictures of the gaff and boom, but they can be seen in the picture. And, yes, the sail was photographed hang from a clothes drying line and then flipped in post processing. I will straighten the reef lines after the sail in mounted.
View attachment 389099
Regards, Peter
Good morning Jeff. Nice one. I like the rope hanks as well. When you have plenty of hanks all over, it looks awesome. Cheers GrantMain sail completed. This is a big sail. Attaching the bolt rope, adding reef lines, and making the gaff and boom were time consuming with lots of metal work on the gaff & boom. I missed taking pictures of the gaff and boom, but they can be seen in the picture. And, yes, the sail was photographed hanging from a clothes drying line and then flipped in post processing. I will straighten the reef lines after the sail in mounted.
View attachment 389099
- Joined
- Sep 3, 2021
- Messages
- 4,250
- Points
- 688

Jeff, making the sails and attaching them is definitely a painstaking and long process. Nevertheless, you pulled this one off rather nicely. Hoist it, pull tight the sheet and off to unknown destinations.Main sail completed. This is a big sail. Attaching the bolt rope, adding reef lines, and making the gaff and boom were time consuming with lots of metal work on the gaff & boom. I missed taking pictures of the gaff and boom, but they can be seen in the picture. And, yes, the sail was photographed hanging from a clothes drying line and then flipped in post processing. I will straighten the reef lines after the sail in mounted.
View attachment 389099
All of the sails are in place. I need to do some more rigging (primarily jib sheets), rope coils and straighten reef ropes on the main sail to finalize the rigging & sails. I still need to mount anchors and the dories on the ship. I haven't yet decided on a 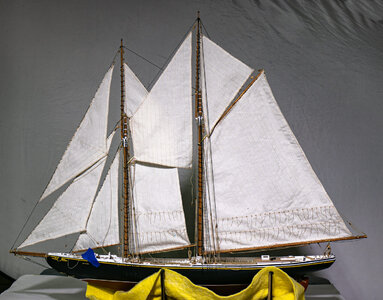 stand and will need to do that soon as well.
 stand and will need to do that soon as well.
You gave done a impressive rigging job, Jeff.All of the sails are in place. I need to do some more rigging (primarily jib sheets), rope coils and straighten reef ropes on the main sail to finalize the rigging & sails. I still need to mount anchors and the dories on the ship. I haven't yet decided on a View attachment 391352stand and will need to do that soon as well.
Regards, Peter
Good morning Jeff. Lovely sails. I love pics of the whole ship and your BN is great. Cheers GrantAll of the sails are in place. I need to do some more rigging (primarily jib sheets), rope coils and straighten reef ropes on the main sail to finalize the rigging & sails. I still need to mount anchors and the dories on the ship. I haven't yet decided on a View attachment 391352stand and will need to do that soon as well.
Thanks for the kind and encouraging words, Grant. I should be in a position to take final pictures in a few weeks or so. I haven't figured out how to deal with the wrong Canadian flag supplied with the kit and still need to finalize thoughts and construction of a stand (along with a few more details like mounting the anchors and making oars for the dories). Maybe it will be more that a few weeks?!Good morning Jeff. Lovely sails. I love pics of the whole ship and your BN is great. Cheers Grant
Last edited:
- Joined
- Apr 8, 2023
- Messages
- 185
- Points
- 103

Simply beautiful. I’ll be anxiously waiting for to see how you mount it as I haven’t decided yet what to do with my BN. My wife has suggested a simple wooden stand instead of the brass posts.All of the sails are in place. I need to do some more rigging (primarily jib sheets), rope coils and straighten reef ropes on the main sail to finalize the rigging & sails. I still need to mount anchors and the dories on the ship. I haven't yet decided on a View attachment 391352stand and will need to do that soon as well.
Coming to an end - with some more steps - a beautiful model
I am leaning toward a simple cradle type of stand as well. I have already cut one out, but I not sure I will use it.Simply beautiful. I’ll be anxiously waiting for to see how you mount it as I haven’t decided yet what to do with my BN. My wife has suggested a simple wooden stand instead of the brass posts.
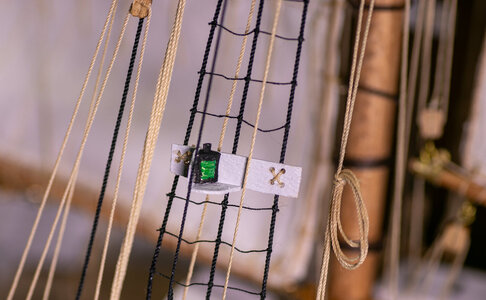
I have installed the running lights. The plans and book show these and the lights are included as metal parts, however, the brackets need to be fashioned from wood strips. I used 1/64" planking strips from another model to make them. The one on the port side is painted red.
I hung the full anchor on the port side using blackened chain left over from a previous build. The anchor chain is wrapped around the windlass and terminates in the chain box behind the motor casing. The other (unassembled) anchor is lying on the starboard side of the deck.
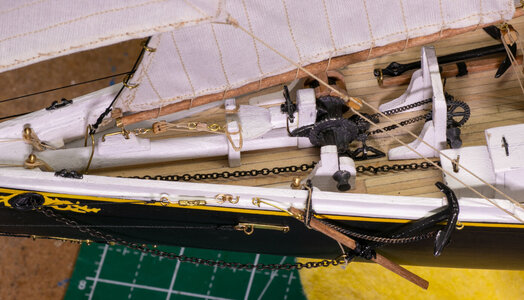

I hung the full anchor on the port side using blackened chain left over from a previous build. The anchor chain is wrapped around the windlass and terminates in the chain box behind the motor casing. The other (unassembled) anchor is lying on the starboard side of the deck.

Good evening Jeff. Nice touch the lights. Green starboard and red port right???I have installed the running lights. The plans and book show these and the lights are included as metal parts, however, the brackets need to be fashioned from wood strips. I used 1/64" planking strips from another model to make them. The one on the port side is painted red.
View attachment 392138
I hung the full anchor on the port side using blackened chain left over from a previous build. The anchor chain is wrapped around the windlass and terminates in the chain box behind the motor casing. The other (unassembled) anchor is lying on the starboard side of the deck.
View attachment 392140
 . The anchor looks cool and it is good to see a close up of all your detail on the fore deck again. Cheers Grant
Green starboard and red port as I it remember from small boat handling class at Culver Summer School. Also, from the instructions on the plans!
Finishing making the oars in the next couple of days and working on a stand. I also have a proper flag to make. The maple leaf flag (supplied with the kit) was not the official flag of Canada until 1965.
Finishing making the oars in the next couple of days and working on a stand. I also have a proper flag to make. The maple leaf flag (supplied with the kit) was not the official flag of Canada until 1965.
I thought green was for go and red was for stop!Green starboard and red port as I it remember from small boat handling class at Culver Summer School. Also, from the instructions on the plans!
Finishing making the oars in the next couple of days and working on a stand. I also have a proper flag to make. The maple leaf flag (supplied with the kit) was not the official flag of Canada until 1965.
- Joined
- Sep 3, 2021
- Messages
- 4,250
- Points
- 688

That might be different on the other side of the equator, but in the northern hemisphere we do green starboard and red port nav lights...Green starboard and red port right???.


