- Joined
- Aug 30, 2020
- Messages
- 639
- Points
- 308

Thank you PaulFantastic Richie! An impressive display of modeling!

Thank you PaulFantastic Richie! An impressive display of modeling!
Good afternoon Richie- I like it loads. Great work. Cheers GrantHmm, it's been a while since I last posted an update, perhaps intimidated by many of the fine builders showing their work on the same forum as I dare to show this.
Having a bit of a love hate relationship with the materials and my skills but some progress has been made.
Trying to figure out this kit is a challange for me, the 1-1 plans and a booklet with a few line drawings don't give me much help.
Here is the hull now with a planked deck in place, I used the supplied strips and after a finishing coat it highlights a mottled look, guess it's growing on me.
View attachment 430775
The hull has been planked with a first layer, not pretty at the moment but hopefully the second layer hides all my sins.
View attachment 430776
To mix things up a bit I did some work on the grating, the parts supplied have the whole thing made out of plywood sheets, even for me that wasn't going to cut it.
So in line with my low budget for this build I have used leftover parts from the Revenge to construct new grating, at least it's an improvment on the kit parts.
I did a test with the plywood bow piece but it's not good so it will also get a makeover.
View attachment 430777
And finally some deck furniture has been constructed, the supplied basic plywood sheet that just made flat boxes so I tried to improve on that using any leftover materials I had to spare.
View attachment 430778

Thank you GrantGood afternoon Richie- I like it loads. Great work. Cheers Grant


Thank you Peter.Your project is really coming together. I like the armed schooners of this type and period. There was a lot of cross pollination between the French craft of this type and the Baltimore Clippers of which I am so fond. I look forward to how she develops.

Sounds familiar.Thank you Peter.
I have looked at a few completed builds online of this ship and I don't think any 2 were alike.
So true to form mine will probably end up being a cross polination as well given I am using mostly parts on hand.

Thank you Heinrich, yes there will be some imagination involved, I am sure I have spent much more time staring at this build rather than any actual building while searching for some inspiration.Hi Richie. I like this build of yours lots. I like the idea of working with an old kit that you have the opportunity to modify and make after your own hand (and imagination). Keep up the good work!

Welcome @rbaylis, I too started with building some metal earth kits that were given to me a few years ago and have progressed to wooden ships.Newbie builder to wooden ships here. My previous experience is with Metal Earth kits (laser etched thin metal parts with tab and slot assembly) and plastic model kits. A lady who visits our local library heard that I was a model builder and asked if I would complete a model of La Toulonnaise by Billing Boats that her late husband had not finished before he passed away around ten years ago. I'm regretting it now as there are parts missing, which included the Assembly guide, although the large sheet of plans were still with it. I've downloaded the assembly manual from the Billings website and I have to say I've never seen such a vague and unhelpful set of directions. It doesn't help that the download has a heavy watermark diagonally across the pages.
It seems that he completed the build of the hull and as per the info on page 3 relating to 'Decks' elected to leave the deck sections as printed and not with part 91 (0.5 x 5mm strip). He therefore also didn't put part 88 (0.3 x 3mm strip) on the raised aft deck as indicated on the plan, probably to be consistent with his main decking area. He appears to have lacquered them so they look light to medium oak although the instructions indicate they should be mahogany stained. He's made up and stuck down the deck furniture which is a shame as I agree that the kit printed parts look very unconvincing.
He's also painted the entire hull black, contradicting the plan which shows mahogany stained wood again above the water line and presumably the black colour below represents a tarred wooden finish? What should be the correct finish for the hull? The plan also seems to indicate that access to lower deck that has a sliding hatch on it should be painted white and only the hatch and rails are mahogany. Which I'd have thought was an error and it should also be mahogany as the superb custom built furniture I saw earlier in this thread.
Even with the list of parts on p22-25 I'm having trouble working out which numbered pieces are those printed in outline on a piece of wood and which ones have to be cut and shaped from strip wood, which seems to be any number of pieces numbered 74-78, 81-89 and 91-95. Without a lot of work to establish that, as well as what he has already assembled that I don't have to concern myself with, I can't be sure what pieces I'm missing. I can buy more strip wood easily enough but the pieces that are shapes to cut out of outlined sections will be nigh impossible to replicate from scrap wood without an accurate pattern to cut them from.
Is there are scale diagram anywhere of all the pieces as laid out on the various thicknesses and types of wood that anyone has found? It'd help to identify ones I am definitely missing and cut new ones. It's going to take me long enough to measure and count all the various strips of wood to work out which ones refer to which parts.
I can see from the picture kindly posted by Richie on Oct 26 2023 that he's made an error in assembling four pieces numbered 59 that goes round the upper masts. He must have used all the long rectangular pieces, ignored the oddly shaped pieces which are obviously the sides and aren't in the box, and left me with just the two shorter narrow rectangular pieces. Why include four long rectangular pieces any way, as you only need two? Once again, without a pattern to cut new pieces from it'll be complete guess work and I have to assume what he has put on the mast is at least the right length for the longest edge and hope I can remove his pieces without damaging the mast. Also pieces 24 and 24a are a concern. He has either cut them out badly or attempted to create replacements from scratch but the two square holes the masts pass through are not lined up as they are shown in the plans.
I also can't make out the assembly on P15 at all. There are pieces labelled 57 that again are shown on Richie's picture that I don't have and the rest seems to be a very confusing layering of strip wood pieces and shapes you file into a shape from a rectangular strip wood (73 and 87) but with little clue as to exactly what the shape should be. Has anyone completed this part of the build and can shed some light on it? I'm hoping that the gentleman had built these and put them aside somewhere separate to the rest of the model and they can be found. The pieces 32, 33 and 35 on the aft are all described as planking strip but being shaped I'm assuming were outlined pieces to cut out of 1mm plywood as suggested on the parts list.
Fortunately I do have the fittings kit, but there may be missing pieces as it has been opened to get the two larger lifeboats/dinghies out. Why he did that when that is a much later stage of construction is a mystery and the smaller lifeboat has gone missing. I did find a website that seemed to have a lot of the generic pieces for these kits, including various dinghies so I can at least replace the lost smaller one. He has attempted to paint the two dinghies which did not go well and the plan implies that you clad these with 91 (0.5 x 5mm strip) as per the main deck (if used). Have others got to that point and can confirm that is what you are supposed to do?
The part number 96 is listed as the benches for the smaller lifeboat and I have that. But I do have two larger pieces that aren't shown or listed as having a part number as far as I can see. They are similar to those shown on the large plan sheet but the circle indicating where the pieces from the fixings kit attaches is in a different place at the fore and completely absent at the aft. Very confusing. Also, I presume you are supposed to cut out the internal outlined sections to leave benches and show reveal the inside of the dinghy. He's just crudely painted them black to suggest a hole which looks bad.
I also found a lot of the rigging diagrams confusing. Some rigging on the large plan sheet just end in an arrow pointing downwards and must terminate somewhere, but where? Perhaps there's a trick to reading these diagrams and possibly cross referencing different views? As an example too, on page 21 I find it utterly impossible to work out what A, B and C are representing, and although I can work out that S10 and S11 are rigging lines that go through a double block from the fittings kit I can't make out where anything attaches due to the confusion of lines also on there for S5, S8 and A. Is it round the mast or part 24. I presume the blocks are tied to something with a separate line because the ones designate with the S number go through the block and back down. Which is the confusion I mentioned above in that every such line as it heads down the mast just ends up not showing where it goes, just has an arrow.
I really hope there's a good guide on how to read such diagrams and rig ships in general as I obviously need one, never having done it before.
Lastly, at no point does it mention cutting holes in the sides above the deck for the cannon to protrude. There's a diagram on p.18 that seems to be suggesting that you glue paper temporarily to something in order to cut squares out, which I understand is a technique to stop splintering, but the gentleman seems to have missed this step as he's already glued the side pieces on. Any suggestions? I'm thinking I'll have to use a small drill to mark out the corners and then carefully use a very thin fine serrated blade to cut in a line with a sawing motion from each corner hole.
Sorry for the length of the post and it may indicate that I am way out of my depth and I should give the model back as not something I can complete but I don't like to admit defeat. Especially as it has taken me all evening to type this with the need to constantly refer back and forth to those awful 'instructions' and parts lists.
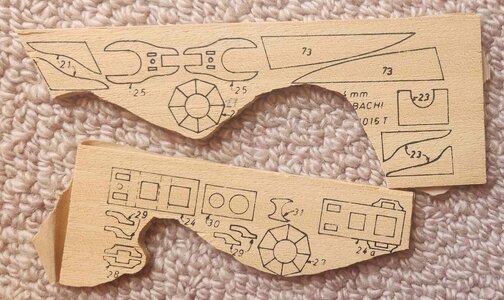
Thank you for your swift response and welcome. Please accept my apologies for that badly worded part of my posting. What I meant to say was that from the picture you posted of the large sheet that had the deck and other parts, I deduced that the gentleman who had part built the kit had made an error. I've taken a section of your photo and highlighted in red the two pieces I have left of part 59. I don't have any of the shapes (two of which I've outlined in green), nor does it seem they have been used in 'boxing around' the upper mast as shown in the lower right corner of P.21 of the assembly booklet. I say this because all the sides are even length so it looks like it has been constructed using all four of the pieces I've highlighted in blue.Welcome @rbaylis, I too started with building some metal earth kits that were given to me a few years ago and have progressed to wooden ships.
Yes these instructions(and many others) leave a lot to interpretation, it's definitley not a Lego set where everything will fall together.
I will see if I can answer all you queries later, but here are a few things to start with.
Do an internet search of this ship for other builds/images and you will find many different examples, the picture on the box is not always the only way.
I wasn't sure if you were saying I made a mistake or the one you have has the mistakes.
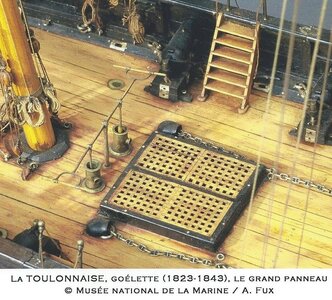
See the images for part 27 and a completed model which is not mine, this actually sits on top of the deck and goes around the mast.
View attachment 432871View attachment 432872


Yes as you mention you could run with what has been started or create new pieces from any material you have spare, many modelers will reject kit parts and make their own if they want to try and improve them, much like my attempt at some of the deck furniture.Thank you for your swift response and welcome. Please accept my apologies for that badly worded part of my posting. What I meant to say was that from the picture you posted of the large sheet that had the deck and other parts, I deduced that the gentleman who had part built the kit had made an error. I've taken a section of your photo and highlighted in red the two pieces I have left of part 59. I don't have any of the shapes (two of which I've outlined in green), nor does it seem they have been used in 'boxing around' the upper mast as shown in the lower right corner of P.21 of the assembly booklet. I say this because all the sides are even length so it looks like it has been constructed using all four of the pieces I've highlighted in blue.
I can probably fashion the correct pieces from a virgin piece of ply that is the same thickness, but it is frustrating when there were parts provided in the original kit. But in truth it'd probably be easier to just use four pieces of equal length and just duplicate what he had done on the upper mast already completed.
I don't have any problems with part 27. Those are both present and cut out correctly. Do most people use a fine toothed coping saw to cut pieces out, and a scalpel knife (or drill if circular) for removing removing internal areas, such as the ones on part 24 in your picture?
I will certainly start looking for images online of this ship to see the variations in finish that have been done and arrive at a decision about how to complete this one.
Answers to the other (many) questions I posed in my OP will be appreciated, as I know you said you would respond to those later when you can decipher what I meant!
View attachment 432884
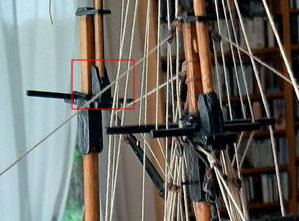

Good progress you are doing well, the hull looks pretty good in the picture, you might be able to improve the finish if you desire.More 'detective work' looking at the parts list, matching them to the diagrams and the pieces I do have, means I'm close to understanding what parts I am missing and how I may be able to cut new pieces from plain plywood to approximate to the originals.
Richie, in the picture you posted in #90 I can now see that part 73 is already shaped like a scalpel blade which answered one point of confusion in para 7 of my first post. It seems it just needs filing down from the 4mm abachi sheet to remove material on the outer edge and create the profile shown in the diagram. But again, I don't have that piece, nor part 57 which was on the 1.8mm plywood sheet that had the decking. If the widow can't turn up these pieces and any other bits I'll have to fashion my own.
So if you still have part 73 and 57, and pretty much any others on P15 of the assembly guide I'd be super grateful if you could post either a picture of them or a tracing, with dimensions to help me create approximations of these missing pieces.
I'm going to buy the plans that Maxipoo linked on posting #16 on this thread. As you said, the more reference sources the better! I've also decided to fashion my own replacements for pieces 59 that I referenced in my previous post so it is a more accurate reflection of that part. I've circled a detail from a picture that Maxipoo posted to show the difference between how parts 59 should look when correctly assembled, vs what the previous owner of the kit did. I'll have to be careful removing his work but at least he didn't get around to doing the same on the other mast.
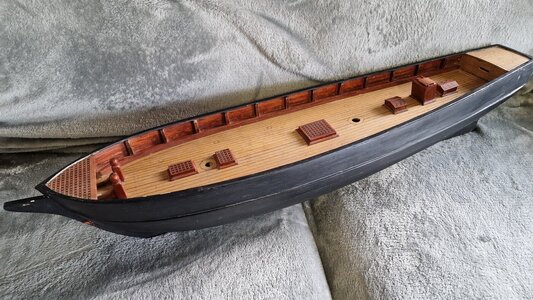
Lastly a picture of the assembled hull as I received it. I think it is too late to do planking on the deck as he's already stuck down the furniture pieces. Working round them will inevitably 'bury' some of the bases of those pieces, although I might 'dry fit' a few planks to see if it could work. Parts 53 and 54, the upper deck and bulkhead would certainly benefit from the improved look - at the moment they look even more 'drawn on' than the main decking. I have concerns that the black paint applied to the hull will have penetrated too far to be able to sand it back and stain it wood coloured on the upper part. So I guess I'll have to live with it being all black, which is a valid option judging from Maxipoo's pictures.
View attachment 433060
View attachment 433061
View attachment 433062
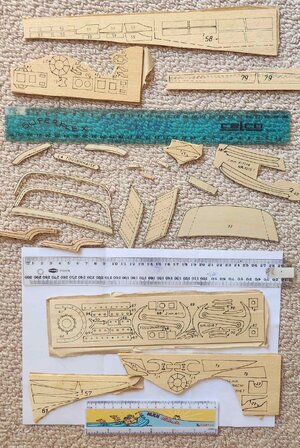
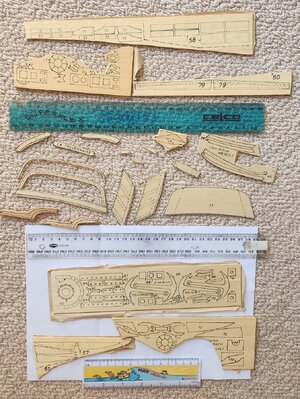
Good progress you are doing well, the hull looks pretty good in the picture, you might be able to improve the finish if you desire.
Here are some images of the parts all rough cut at the moment, you may notice one of the skinny stern gallery parts is broken so I will need to do something there, not to far away from that stage once the second layer of planking has been fitted.
Some of the other parts I think are just are wood strips, I will check them soon.
View attachment 433193View attachment 433194
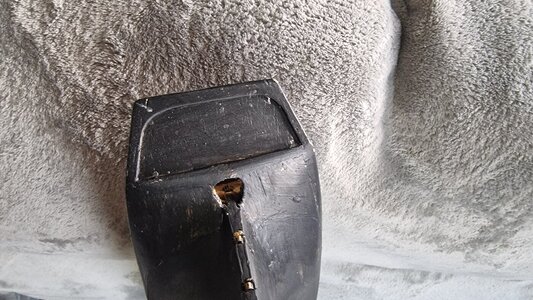

Yes your stern image isn't as per the plans.A massive thank you Richie. Using your pictures I'll be able to highlight the parts I have yet to need for the model and pass it to the lady who gave me the kit so she knows exactly what she is looking for. Obviously if they aren't found and I have to fashion them myself it'll be tricky but with trial and error I should be able to. The strips are currently all in a bundle together and I've yet to separate them and match them against the parts list and your picture. I've purchased some 4mm and 2mm plywood for making new pieces. I couldn't find 1.8mm ply anywhere so the 2mm (which is used for some pieces) will have to do and I'll sand it down if the 0.2mm difference is critical.
Neither could I find 1mm plywood, only balsawood which I'm guessing will have a more grainy surface and not look right. I know I'm going to need 1mm plywood because most of the missing parts are from that piece. Any ideas on where I might source that?
Specifically, missing are parts 32, 33, and 35 (that all glue together to form the rear piece of the stern but I do have parts 39 which cover the edges once glued together to hide the laminations). I can determine the shape and size of 32 from piece 52 (which on p17 is shown being glued to the stern. But as you can see from the picture I've attached I think the gentleman goofed and stuck piece 33 onto piece 52, instead of using it to form the assembly on page 15.
Part 36 (2 pieces of) parts listed as being on the 1mm plywood but they aren't referenced on page 15 where most of the other pieces are used, nor could I find it on any other page, nor does it seem to be in your photo, and I don't have it. On the list it just says 'formed pieces, stem'. Maybe that's a phantom piece!
I don't have the two pieces marked 37, which will probably be the trickiest to replicate, not do I have the four pieces 57, nor the two pieces 73.
Piece 45 is a simple rectangle, also missing, that the pump sits on so that'll be easy to fashion a replacement.
But at least now I have an image where I can circle the missing pieces, identify how thick they are, and provide that for the widow to go looking. Maybe they'll turn up.
View attachment 433215
I figured he couldn't work out the diagrams on page 15 or thought it too much effort, so he went with just creating one level of relief using part 33 by sticking it to 52. Then sanded it flush it overhanging which would be necessary for the side pieces to attach to the other side of part 32. My thoughts, if the missing parts turn up or I can replicate them, is to sand off what he's done at the stern and do it properly. If nothing else it'll reveal if sanding the upper part of the hull to remove the black acrylic is practical in order for me to stain it as I'd prefer to see it.Yes your stern image isn't as per the plans.
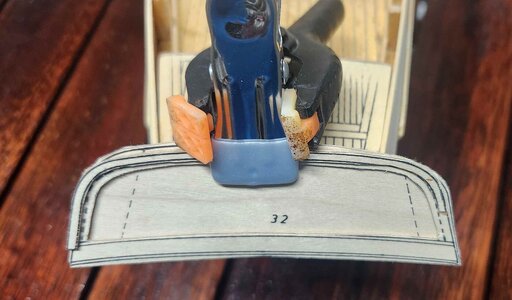
Parts 32, 33, and 35 should overhang the rear stern like my picture allowing you to make the sides to go around the hull, this is what the other parts you mention above are for, I suspect the original owner decided not to go ahead building that part of the ship and threw those parts away, refer to the picture on the box for the finished view.
What you do from here is up to you really, do you dismantle and make all new parts from scratch or try to modify it a little or leave that rear as is and move on.
View attachment 433324
,
I don't know about part 36, seems like it wont be on my ship either.
