
Good afternoon. Brilliant work! Cheers GrantJ'ai quasi terminé le ponçage des 29 membranes. Il me reste a attaquer ceux de la proue et de la poupe qui a mon avis seront plus délicats.
La carlingue est installée. Cela file pas mal.
View attachment 408789
View attachment 408790
View attachment 408791
View attachment 408792
View attachment 408793

You are using an out of date browser. It may not display this or other websites correctly.
You should upgrade or use an alternative browser.
You should upgrade or use an alternative browser.
La Belle 1682 1/48 Kit CAF par Cathber
you are on a very good way

Bonjour,
Poursuite de la construction après 1 semaine d'arrêt pour mon autre passion le modélisme ferroviaire à vapeur vive.
Je suis en train de construire les pièces d'écubiers de 'La Belle'.
J'ai construit les gabarits, commencer à travailler les pièces d'écubiers mais j'ai un problème de compréhension sur la position axiale de ces pièces sur les gabarits.
Est-ce que les traits laser des pièces doivent être alignés sur le point 1 ou le point 2 ou entre les 2 (voir photo) ? Il n'y a aucune indication ni sur les gabarits ni sur les plans) ?
Merci d'avance.
Pour illustrer ma question, il manque sur les gabarits de 'la Belle' les traits laser que l'on voit sur les gabarits de 'la Salamandre' (voir photo) et donc je n'ai pas de repère axiale pour positionner les couples.
Merci d'avance pour votre aide.

Merci d'avance pour votre aide.

Hello Cathber,


vous montez le côté bâbord! Si a1 et S4 sont superposés sur le contour extèrieur, c'est parfait.
They're mounting the port side! If a1 and S4 are on top of each other at the outer contour, it is perfect.
Thomas
vous montez le côté bâbord! Si a1 et S4 sont superposés sur le contour extèrieur, c'est parfait.
They're mounting the port side! If a1 and S4 are on top of each other at the outer contour, it is perfect.
Thomas

Poursuite de la construction. J'ai collé provisoirement les couples avant avec du Fixo-gum afin de voir comment cela se présente sur le bateau
Je les ai installé provisoirement (avant ponçage extérieur). Cela file pas trop mal.
Il reste encore beaucoup de ponçage et d'ajustement.
Continuing construction. I temporarily glued the front couples with Fixo-gum to see how it looks on the boat
I installed them temporarily (before exterior sanding). It's not going too bad.
There's still a lot of sanding and adjusting to be done.
Last edited by a moderator:
God work - you are on a good way
Bonjour, petite question indépendante de la construction de 'La Belle'.
J'ai acheté quelques tonneaux qui équiperont 'La Belle'. Ils sont en bois et je cherche une peinture ou teinture pour les décorer.
Avez-vous une idée sur ce que je pourrai utiliser pour imiter une couleur bois pour tonneau ?
Merci d'avance et bonne journée.
Hello, small question independent of the construction of 'La Belle'.
I bought a few barrels which will equip 'La Belle'. They are made of wood and I am looking for a paint or stain to decorate them.
Do you have any idea what I could use to imitate a barrel wood color?
Thank you in advance and good day.
Last edited by a moderator:
Bonjour, petite question indépendante de la construction de 'La Belle'.
J'ai acheté quelques tonneaux qui équiperont 'La Belle'. Ils sont en bois et je cherche une peinture ou teinture pour les décorer.
Avez-vous une idée sur ce que je pourrai utiliser pour imiter une couleur bois pour tonneau ?
Merci d'avance et bonne journée.
Hello, small question independent of the construction of 'La Belle'.
I bought a few barrels which will equip 'La Belle'. They are made of wood and I am looking for a paint or stain to decorate them.
Do you have any idea what I could use to imitate a barrel wood color?
Thank you in advance and good day.
Good idea to bring some lif into the model with some barrels
You could stain the wood, but you will have every time the problem with the iron rings, which have to be also painted - and I do not think, that the size will fit to your scale of 1:48
Take a look f.e. at these barrels from @CAFmodel which are much more realistic

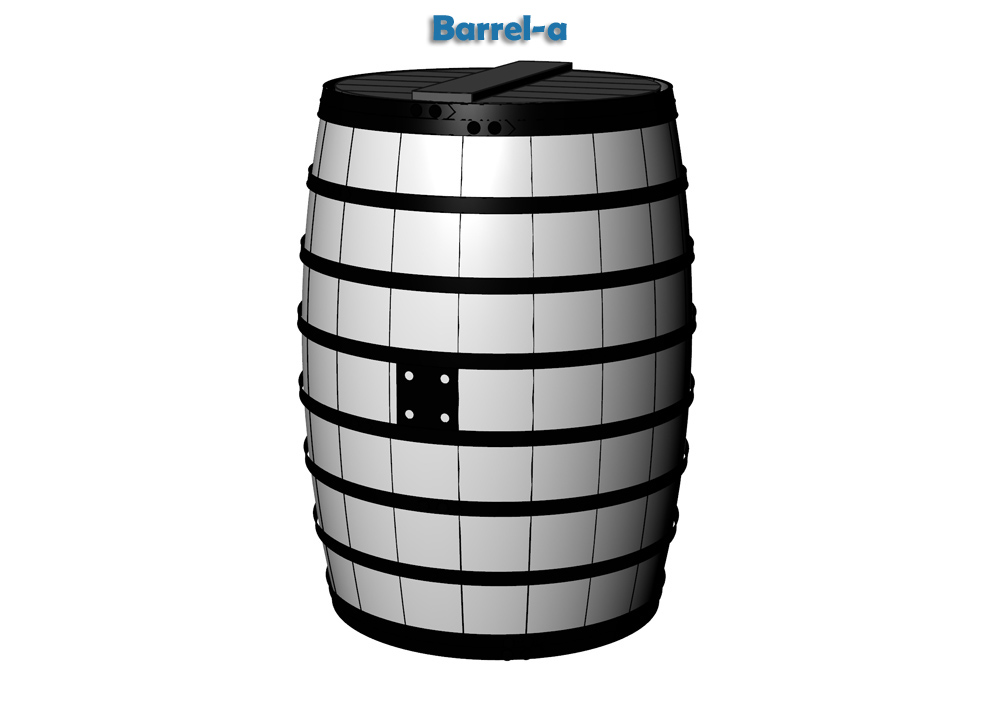
Butt 1:48
1:48 Butt-a (4 buckets) Butt-b (5 buckets) Butt-c (5 buckets) Butt-d (5 buckets)
I have some of a similar series from CAF installed in the hold of my Le Coureur


Bonjour,
J'ai un problème sur la construction du tableau arrière de 'La Belle'. Jusqu'à maintenant les différentes pièces étaient trés proches des côtes finales (juste un peu d'ajustement une fois le charbon enlevé).
En lisant le plan pour la construction de ce tableau arrière, si je comprends, il faudrai que je colle les poutres W5 & W6 dans les positions 1, 2, 3, 4. Dans ce cas il me faudra couper énormément les poutres W08 et W09 . C'est bizarre, à mon goutte il y a trop a enlever, ce qui me fait dire que j'ai peut être mal compris le plan.
Pouvez-vous m'aider ?
Merci d'avance
Good morning,
I have a problem with the construction of the transom of 'La Belle'. Until now the different pieces were very close to the final dimensions (just a little adjustment once the coal was removed).
Reading the plan for the construction of this transom, if I understand, I will have to glue the beams W5 & W6 in positions 1, 2, 3, 4. In this case I will have to cut the beams W08 and W09 a lot . It's strange, in my opinion there is too much to remove, which makes me say that I may have misunderstood the plan.
Can you help me ?
Thanks in advance
Last edited by a moderator:
Hello
You first need to install W5 and W6 and ensure that they are symmetrical
Then install W7, 8, 9,
At this point, you need to polish both sides of W789 appropriately, little by little,
Don't be in a hurry
Tom
You first need to install W5 and W6 and ensure that they are symmetrical
Then install W7, 8, 9,
At this point, you need to polish both sides of W789 appropriately, little by little,
Don't be in a hurry
Tom
Merci Tom pour votre réponse, service-après vente au TOP.
Je vais positionner toutes les pièces de la poupe sur la quille dans le gabarit avec du Fixo-gum pour ajustement au plus près.
Quand cela filera correctement je collerai définitivement.
Thank you Tom for your response, TOP after-sales service.
I will position all the parts of the stern on the keel in the template with Fixo-gum for a close fit.
When it runs correctly I will definitely stick it.
Last edited by a moderator:
Hello Cathber,

On the large blueprint is an assembly drawing on a scale of 100%.

In the booklet you can see W5, W6 and the top tail beam. So you have an exact width of the construction. W7, W8 and W9 have to be fitted in between.


Unfortunately, the upper tail beam is no longer visible under the planks and trim. The bow and stern sections are difficult to make and need to be sanded and adjusted slowly and very carefully. As Tom wrote - take their time -!!!
Best regards
Thomas
On the large blueprint is an assembly drawing on a scale of 100%.
In the booklet you can see W5, W6 and the top tail beam. So you have an exact width of the construction. W7, W8 and W9 have to be fitted in between.
Unfortunately, the upper tail beam is no longer visible under the planks and trim. The bow and stern sections are difficult to make and need to be sanded and adjusted slowly and very carefully. As Tom wrote - take their time -!!!
Best regards
Thomas
Last edited:
Poursuite de la construction. J'ai construit la proue, et la partie basse de la poupe.
Je n'ai toujours pas compris comment se monte les cadres 30 et 31.
En attendant je vais commencer à fabriquer la partie haute de la poupe.
Continuing construction. I built the bow, and the lower part of the stern.
I still don't understand how frames 30 and 31 are mounted.
In the meantime I'm going to start making the upper part of the stern.
Last edited by a moderator:
Bonjour, après un arrêt de quelques semaines pour préparer les fête de fin d'année, je continue la construction. Les couples sont collés ainsi que les premières pièces de fond de cale. Cela se passe bien.
La prochaine étape est le début de la construction des ponts.
Avez-vous une technique particulière pour le cintrage d'une pièce carré en bois (3mmx3mm).
J'ai pensé à bien détremper dans de l'eau chaude la pièce de bois et à la positionner petit à petit à blanc avant son collage. Je n'ai pas de fer à chauffer.
Est-ce une bonne idée ? avez vous une autre technique ?
Merci et bonne journée
Hello, after a break of a few weeks to prepare for the end of year celebrations, I am continuing the construction. The couples are glued as well as the first bilge pieces. It went well.
The next step is the start of the construction of the bridges.
Do you have a particular technique for bending a square piece of wood (3mmx3mm).
I thought about soaking the piece of wood in hot water and positioning it little by little before gluing it. I don't have an iron to heat.
Is it a good idea ? do you have another technique?
Thank you and good day
Last edited by a moderator:
Looking very good - it depends really how much you have to bend the square timber?Do you have a particular technique for bending a square piece of wood (3mmx3mm).
I thought about soaking the piece of wood in hot water and positioning it little by little before gluing it. I don't have an iron to heat.
Is it a good idea ? do you have another technique?
Thank you and good day
Which part of the ship is it?
But latest when you come to the inner and outer planking a bending iron would be very helpful
Latetely I tried this tool on my bending for the outer planking of my Granado and it is working well - enough heat with some patience, but easy to handle and cheap
Or with some Euros more such one like from Kolderstock which is working very well, even better.
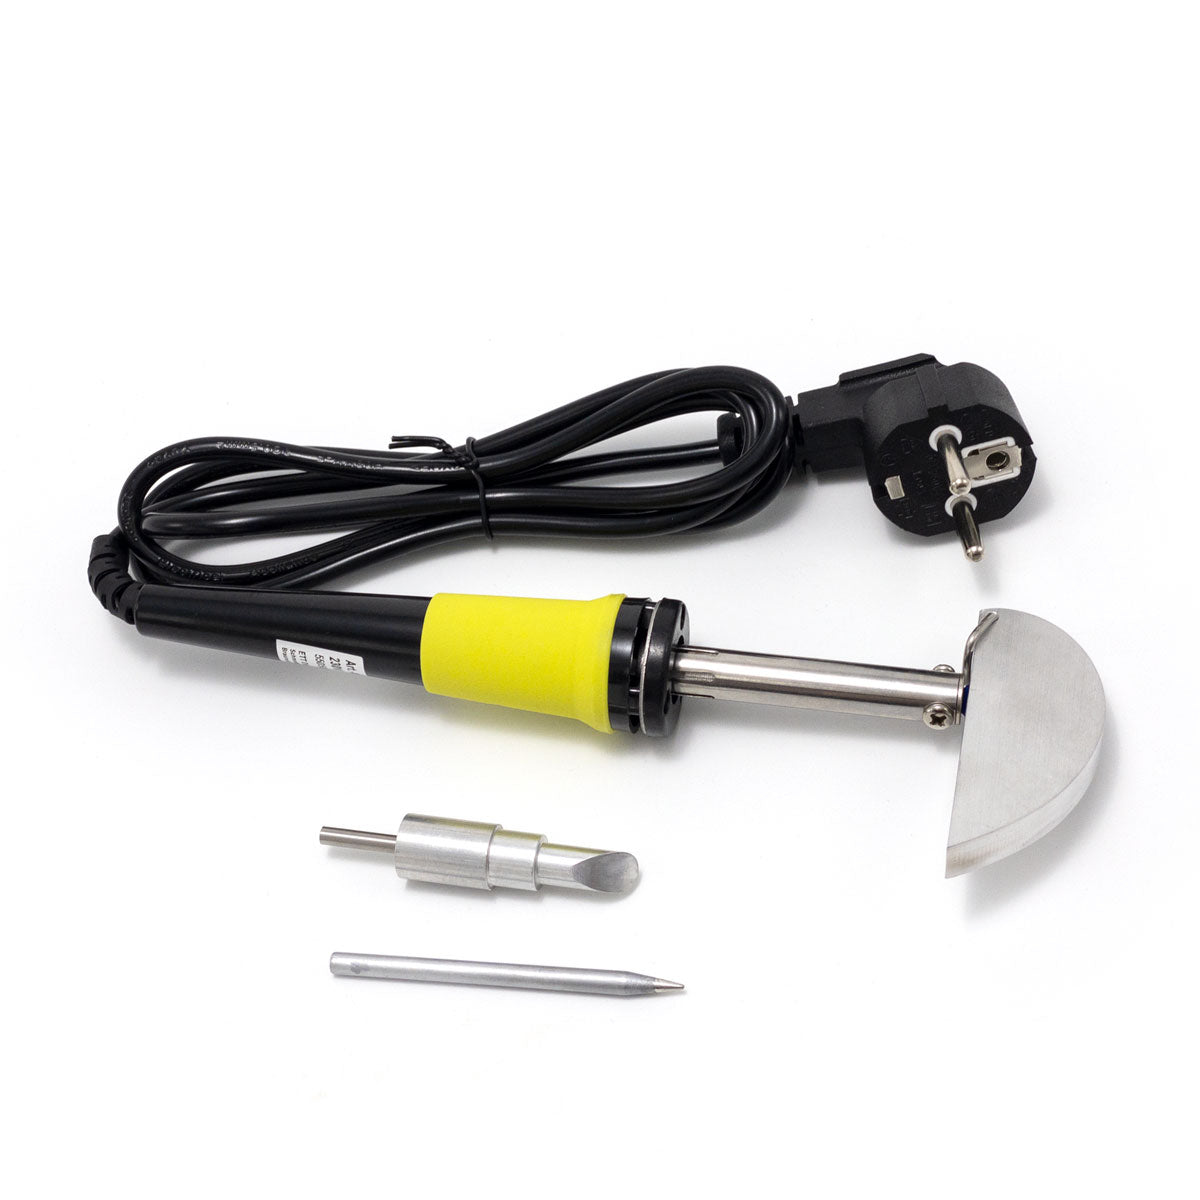
Electric plank bender
Usually ships within 2-3 days High-quality electric plank bender made in Germany, 230 V, 30 W, 50 Hz. Even thicker planks can be bent effortlessly into the correct curve by wetting the wooden planks, then making the fibre structure more flexible with this plank bender. Ship builders applied the...
 kolderstok.com
Once you will need and buy one - so better earlier than too late
Bonjour, merci pour votre aide sur ma construction.
J'ai mis une photo sur ce que je dois cintrer.
Je viens d'acheter la cintreuse électrique. Il me semble l'avoir déjà vu sur un message dans SoS.
Maintenant je recherche des serres joints en bois pour tenir la pièce lors du collage. C'est pareil j'en ai vu sur le forum SoS mais je ne sais plus ou ?
Hello, thank you for your help on my build.
I put a photo of what I need to bend.
I just bought the electric bender. I seem to have already seen it on a message in SoS.
Now I'm looking for wooden clamps to hold the piece during gluing. It's the same, I saw some on the SoS forum but I don't know where?
Last edited by a moderator:
This video might be of help...Now I'm looking for wooden clamps to hold the piece during gluing. It's the same, I saw some on the SoS forum but I don't know where?
Bonjour, reprise de la construction. Je rencontre un problème pour l'installation d'un pont.
Lorsque je mesure la longueur du pont sur le plan il fait 38mm (cote bleu sur la photo), alors que la pièce de bois fait 47mm (cote rouge sur la photo). La différence entre les 2 cotes est énorme (9mm).
De plus pour visualiser mon incompréhension on voit sur la seconde photo que sur le plan le plancher est au niveau de la cote 26 alors que sur la photo du fascicule le plancher est au niveau de la cote 25.
Est ce que vous avez déjà rencontré cette différence et surtout qu'elle est la bonne référence, le plan ou les pièces de bois qui correspondent au fascicule ?
Hello, construction is resuming. I'm having a problem installing a bridge.
When I measure the length of the bridge on the plan it is 38mm (blue dimension in the photo), while the piece of wood is 47mm (red dimension in the photo). The difference between the 2 dimensions is enormous (9mm).
Furthermore, to visualize my incomprehension, we see in the second photo that on the plan the floor is at the level of dimension 26 while in the photo in the booklet the floor is at the level of dimension 25.
Have you ever encountered this difference and above all what is the correct reference, the plan or the pieces of wood that correspond to the booklet?