Thanks PaulPrecise construction as always. This is a real showpiece in the making.
You are using an out of date browser. It may not display this or other websites correctly.
You should upgrade or use an alternative browser.
You should upgrade or use an alternative browser.
Good morning Mark. Wow who would have thought one would have needed a block and tackle for the span. Yep I’m with you we just neatly have them tied off to a strake or an eye- can you imagine getting this right on a small scale modelView attachment 392755
Thanks Grant! I found this diagram of a gunport lid installation which may or may not be of some use to you.
Luckily I only saw it after I had finished my own port lids; it would have taken me a week just to do one of these
Here's a link to the post that contained this diagram, you'll find our Uwe's name all over it
Gun port lids, were they held with one or two ropes?
Hi, this is my fist post here so I hope I placed it in the right category. I am working on the Heller le Soleil Royal and I am working on the gun ports. I want to make it a somewhat accurate model and I was going to put 2 holes in the lids for 2 ropes. But with every little thing I want to do I...shipsofscale.com
The headworks are made up of a variety of multi-shaped components that are arranged to form the headrail and cathead assembly. Blu Tack is a useful agent to get an idea of how all the pieces hang together.
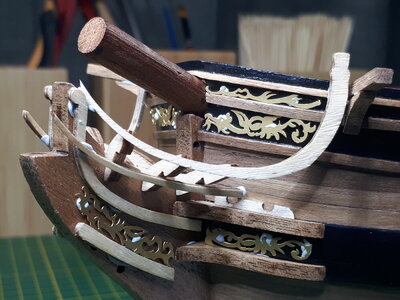
My starting point was to join and fix the upper and lower cheeks and the upper prow rail. The pieces are generously oversized, fortunately, as they all need to be cut, bevelled and shaped to fit together seamlessly and follow the curvature of the hull gracefully.
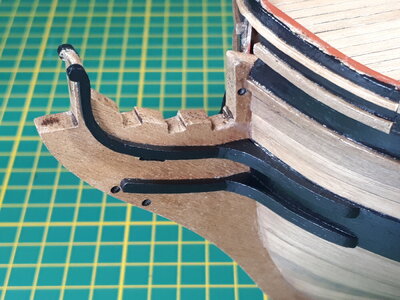
Care must be taken to size the lower cheek extension piece so that it doesn't interfere with the heels of the figurehead!
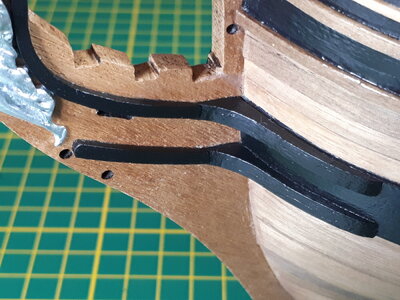
A mortise is created on either side of the prow to accomodate the catheads between the bulwarks and the rail, and deep enough to ensure that the capping rails will sit smoothly on top of the bulwarks. The cathead is also bolted to the deck for extra stability.
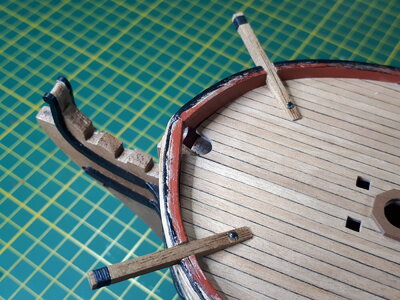
The hawse hole bolsters are used to position the hawse holes on the hull and were shaped, very carefully, in a progression of increasing drill bit sizes to a diameter that can eventually accommodate the anchor cables.
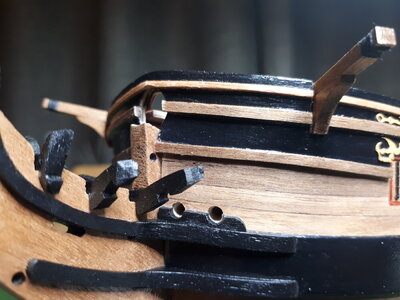
The three head timbers are installed on the prow and their ends are all angled to accommodate the bow head rail that will lie flat against them when installed later on. It is also a good time to install the remaining frieze work decorations which could otherwise be tricky to position with the headrails in the way.
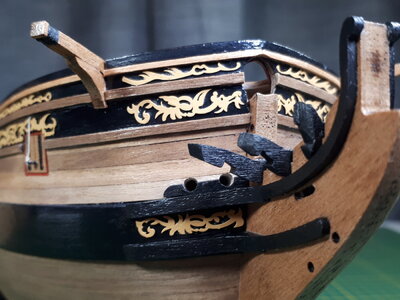
The lower rail is bevelled at one end to fit snugly against the hull, and passes through the three notches of the head timbers until it comes to rest against the sloping curve of the upper prow rail.
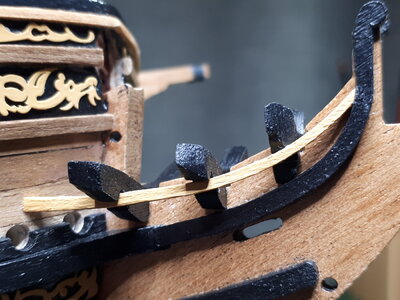
The kit provides a decorative brass strip to serve as the eking rail, the extension that runs from the lower rail to the underside of the cathead support. I'm not sure why they do this as it seems at odds with the other rails, and I opted instead to create my own from template scraps. The only tricky bit was using a heating rod to slightly bend the lower half of the rail to conform to the curvature of the hull. Perhaps this is why a bendable brass strip was supplied in the kit.
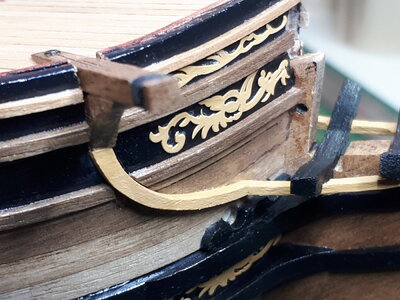
Getting there. The lower and eking rails are in place, just the bow head rails to go. Symmetry is everything in this game.
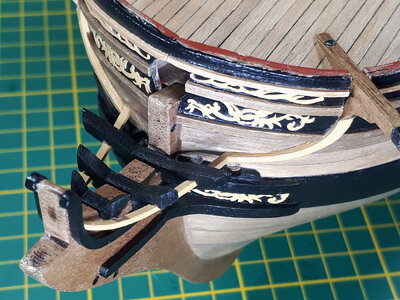
The bow head rail flows from the top of the upper prow rail to the top of the bulwark right next to the cathead assembly, lying flush against the head timber edges along the way. The angle at which the rail terminates against the bulwark is a bit tenuous at best and was bolted to the sheer rail for good measure.
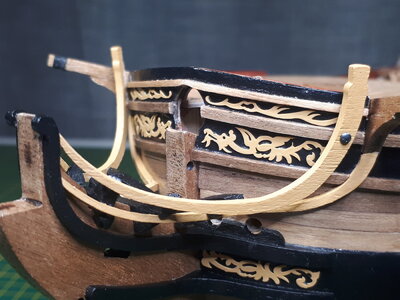
Getting the bow head rails to fit flush against the head timbers is quite imperative as there is little else to hold it securely in position.
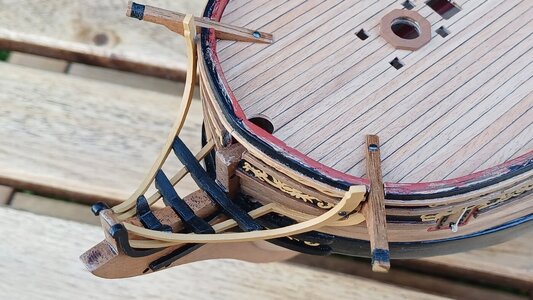
I have taken some license in this headrail and cathead assembly. I understand the outer ends of the catheads should have sheaves, although this was not mentioned in the kit and I bound them with black rope instead for effect. I also kept the paintwork simple and did not install many of the decorations supplied in the kit ... too much bling for my liking
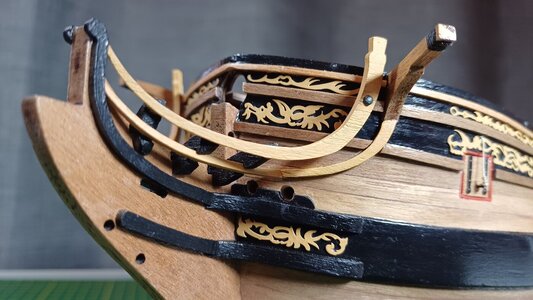
Thanks for checking in
Mark

My starting point was to join and fix the upper and lower cheeks and the upper prow rail. The pieces are generously oversized, fortunately, as they all need to be cut, bevelled and shaped to fit together seamlessly and follow the curvature of the hull gracefully.

Care must be taken to size the lower cheek extension piece so that it doesn't interfere with the heels of the figurehead!

A mortise is created on either side of the prow to accomodate the catheads between the bulwarks and the rail, and deep enough to ensure that the capping rails will sit smoothly on top of the bulwarks. The cathead is also bolted to the deck for extra stability.

The hawse hole bolsters are used to position the hawse holes on the hull and were shaped, very carefully, in a progression of increasing drill bit sizes to a diameter that can eventually accommodate the anchor cables.

The three head timbers are installed on the prow and their ends are all angled to accommodate the bow head rail that will lie flat against them when installed later on. It is also a good time to install the remaining frieze work decorations which could otherwise be tricky to position with the headrails in the way.

The lower rail is bevelled at one end to fit snugly against the hull, and passes through the three notches of the head timbers until it comes to rest against the sloping curve of the upper prow rail.

The kit provides a decorative brass strip to serve as the eking rail, the extension that runs from the lower rail to the underside of the cathead support. I'm not sure why they do this as it seems at odds with the other rails, and I opted instead to create my own from template scraps. The only tricky bit was using a heating rod to slightly bend the lower half of the rail to conform to the curvature of the hull. Perhaps this is why a bendable brass strip was supplied in the kit.

Getting there. The lower and eking rails are in place, just the bow head rails to go. Symmetry is everything in this game.

The bow head rail flows from the top of the upper prow rail to the top of the bulwark right next to the cathead assembly, lying flush against the head timber edges along the way. The angle at which the rail terminates against the bulwark is a bit tenuous at best and was bolted to the sheer rail for good measure.

Getting the bow head rails to fit flush against the head timbers is quite imperative as there is little else to hold it securely in position.

I have taken some license in this headrail and cathead assembly. I understand the outer ends of the catheads should have sheaves, although this was not mentioned in the kit and I bound them with black rope instead for effect. I also kept the paintwork simple and did not install many of the decorations supplied in the kit ... too much bling for my liking

Thanks for checking in

Mark
Last edited:
Fabulous achievement Mark! you are a perfectionist
Thanks Robert. Not too sure about the perfectionist bit thoughFabulous achievement Mark! you are a perfectionist
This is just superb work Mark on some very fiddly bits. The 3D geometry and getting everything to flow just right is no easy accomplishment. Impressed.
Good morning Mark. Great post. All those terms - it was good to be reminded again. You pulled this off brilliantly and no doubt it was good to remake the eking rail. Bending those and keeping the symmetry - kudos. Cheers GrantThe headworks are made up of a variety of multi-shaped components that are arranged to form the headrail and cathead assembly. Blu Tack is a useful agent to get an idea of how all the pieces hang together.
View attachment 399534
My starting point was to join and fix the upper and lower cheeks and the upper prow rail. The pieces are generously oversized, fortunately, as they all need to be cut, bevelled and shaped to fit together seamlessly and follow the curvature of the hull gracefully.
View attachment 399535
Care must be taken to size the lower cheek extension piece so that it doesn't interfere with the heels of the figurehead!
View attachment 399536
A mortise is created on either side of the prow to accomodate the catheads between the bulwarks and the rail, and deep enough to ensure that the capping rails will sit smoothly on top of the bulwarks. The cathead is also bolted to the deck for extra stability.
View attachment 399537
The hawse hole bolsters are used to position the hawse holes on the hull and were shaped, very carefully, in a progression of increasing drill bit sizes to a diameter that can eventually accommodate the anchor cables.
View attachment 399538
The three head timbers are installed on the prow and their ends are all angled to accommodate the bow head rail that will lie flat against them when installed later on. It is also a good time to install the remaining frieze work decorations which could otherwise be tricky to position with the headrails in the way.
View attachment 399539
The lower rail is bevelled at one end to fit snugly against the hull, and passes through the three notches of the head timbers until it comes to rest against the sloping curve of the upper prow rail.
View attachment 399540
The kit provides a decorative brass strip to serve as the eking rail, the extension that runs from the lower rail to the underside of the cathead support. I'm not sure why they do this as it seems at odds with the other rails, and I opted instead to create my own from template scraps. The only tricky bit was using a heating rod to slightly bend the lower half of the rail to conform to the curvature of the hull. Perhaps this is why a bendable brass strip was supplied in the kit.
View attachment 399541
Getting there. The lower and eking rails are in place, just the bow head rails to go. Symmetry is everything in this game.
View attachment 399542
The bow head rail flows from the top of the upper prow rail to the top of the bulwark right next to the cathead assembly, lying flush against the head timber edges along the way. The angle at which the rail terminates against the bulwark is a bit tenuous at best and was bolted to the sheer rail for good measure.
View attachment 399543
Getting the bow head rails to fit flush against the head timbers is quite imperative as there is little else to hold it securely in position.
View attachment 399544
I have taken some license in this headrail and cathead assembly. I understand the outer ends of the catheads should have sheaves, although this was not mentioned in the kit and I bound them with black rope instead for effect. I also kept the paintwork simple and did not install many of the decorations supplied in the kit ... too much bling for my liking
View attachment 399545
Thanks for checking in
Mark
A beautiful outcome of this 3 dimensional part, Mark.The headworks are made up of a variety of multi-shaped components that are arranged to form the headrail and cathead assembly. Blu Tack is a useful agent to get an idea of how all the pieces hang together.
View attachment 399534
My starting point was to join and fix the upper and lower cheeks and the upper prow rail. The pieces are generously oversized, fortunately, as they all need to be cut, bevelled and shaped to fit together seamlessly and follow the curvature of the hull gracefully.
View attachment 399535
Care must be taken to size the lower cheek extension piece so that it doesn't interfere with the heels of the figurehead!
View attachment 399536
A mortise is created on either side of the prow to accomodate the catheads between the bulwarks and the rail, and deep enough to ensure that the capping rails will sit smoothly on top of the bulwarks. The cathead is also bolted to the deck for extra stability.
View attachment 399537
The hawse hole bolsters are used to position the hawse holes on the hull and were shaped, very carefully, in a progression of increasing drill bit sizes to a diameter that can eventually accommodate the anchor cables.
View attachment 399538
The three head timbers are installed on the prow and their ends are all angled to accommodate the bow head rail that will lie flat against them when installed later on. It is also a good time to install the remaining frieze work decorations which could otherwise be tricky to position with the headrails in the way.
View attachment 399539
The lower rail is bevelled at one end to fit snugly against the hull, and passes through the three notches of the head timbers until it comes to rest against the sloping curve of the upper prow rail.
View attachment 399540
The kit provides a decorative brass strip to serve as the eking rail, the extension that runs from the lower rail to the underside of the cathead support. I'm not sure why they do this as it seems at odds with the other rails, and I opted instead to create my own from template scraps. The only tricky bit was using a heating rod to slightly bend the lower half of the rail to conform to the curvature of the hull. Perhaps this is why a bendable brass strip was supplied in the kit.
View attachment 399541
Getting there. The lower and eking rails are in place, just the bow head rails to go. Symmetry is everything in this game.
View attachment 399542
The bow head rail flows from the top of the upper prow rail to the top of the bulwark right next to the cathead assembly, lying flush against the head timber edges along the way. The angle at which the rail terminates against the bulwark is a bit tenuous at best and was bolted to the sheer rail for good measure.
View attachment 399543
Getting the bow head rails to fit flush against the head timbers is quite imperative as there is little else to hold it securely in position.
View attachment 399544
I have taken some license in this headrail and cathead assembly. I understand the outer ends of the catheads should have sheaves, although this was not mentioned in the kit and I bound them with black rope instead for effect. I also kept the paintwork simple and did not install many of the decorations supplied in the kit ... too much bling for my liking
View attachment 399545
Thanks for checking in
Mark
Regards, Peter
- Joined
- Mar 1, 2022
- Messages
- 246
- Points
- 113

I'm sure pump handles hadn't any rope peel. Much more likely, they got wood rollers pre-threaded onto the iron bars to prevent skin grazes or need to change the grip repeatedly.Before fixing the upper decks in place I needed to make sure that anything requiring access beneath the decks were dealt with first. The mid deck gangways, supports and ladders, for instance, although not directly beneath the quarterdeck were easier to install without the deck in the way.
View attachment 392634
It seemed a good time to address the port lids as well. The lids themselves are external to the hull and not necessarily hampered by the upper decks, but the ropes (which I understand to be called 'spans') used to open the lids need to be tied off inside the hull and underneath the decks somewhere.
View attachment 392635
There are more elaborate ways of rigging the span ropes to the hull interior using hooks, blocks and tackle, but I was satisfied with a simple eyebolt in the bulkhead to tie off the span rope and keep the port lid open. Either way, it is certainly an exercise which must be completed before the upper decks are glued in place.
View attachment 392636
The port lid configuration I have gone with was to shut the foremost lids at the bow (below), no lids at the portholes in the open waist, and open lids at the three aftermost portholes at the ship's stern.
View attachment 392637
Of course, with the protrusion of the delicate port lids there are now a few more reasons for something to snag on them and they will always have to be kept in mind when working on other sections of the ship
View attachment 392638
Thanks for checking in
- Mark
Really nice work Mark, I will have to locate something like your Blu Tack, what a great idea. I did the same thing you did, replacing the brass strip with a scratch build of the lower curved railing. I don't know what they were thinking with the brass...The headworks are made up of a variety of multi-shaped components that are arranged to form the headrail and cathead assembly. Blu Tack is a useful agent to get an idea of how all the pieces hang together.
View attachment 399534
My starting point was to join and fix the upper and lower cheeks and the upper prow rail. The pieces are generously oversized, fortunately, as they all need to be cut, bevelled and shaped to fit together seamlessly and follow the curvature of the hull gracefully.
View attachment 399535
Care must be taken to size the lower cheek extension piece so that it doesn't interfere with the heels of the figurehead!
View attachment 399536
A mortise is created on either side of the prow to accomodate the catheads between the bulwarks and the rail, and deep enough to ensure that the capping rails will sit smoothly on top of the bulwarks. The cathead is also bolted to the deck for extra stability.
View attachment 399537
The hawse hole bolsters are used to position the hawse holes on the hull and were shaped, very carefully, in a progression of increasing drill bit sizes to a diameter that can eventually accommodate the anchor cables.
View attachment 399538
The three head timbers are installed on the prow and their ends are all angled to accommodate the bow head rail that will lie flat against them when installed later on. It is also a good time to install the remaining frieze work decorations which could otherwise be tricky to position with the headrails in the way.
View attachment 399539
The lower rail is bevelled at one end to fit snugly against the hull, and passes through the three notches of the head timbers until it comes to rest against the sloping curve of the upper prow rail.
View attachment 399540
The kit provides a decorative brass strip to serve as the eking rail, the extension that runs from the lower rail to the underside of the cathead support. I'm not sure why they do this as it seems at odds with the other rails, and I opted instead to create my own from template scraps. The only tricky bit was using a heating rod to slightly bend the lower half of the rail to conform to the curvature of the hull. Perhaps this is why a bendable brass strip was supplied in the kit.
View attachment 399541
Getting there. The lower and eking rails are in place, just the bow head rails to go. Symmetry is everything in this game.
View attachment 399542
The bow head rail flows from the top of the upper prow rail to the top of the bulwark right next to the cathead assembly, lying flush against the head timber edges along the way. The angle at which the rail terminates against the bulwark is a bit tenuous at best and was bolted to the sheer rail for good measure.
View attachment 399543
Getting the bow head rails to fit flush against the head timbers is quite imperative as there is little else to hold it securely in position.
View attachment 399544
I have taken some license in this headrail and cathead assembly. I understand the outer ends of the catheads should have sheaves, although this was not mentioned in the kit and I bound them with black rope instead for effect. I also kept the paintwork simple and did not install many of the decorations supplied in the kit ... too much bling for my liking
View attachment 399545
Thanks for checking in
Mark
COOL
Just a quick update, and a note to explain my absence ... the Admiral and I have gone away on holiday for a few weeks. We caught a flight from Sydney to Honolulu, and after a couple of days splashing about in Waikiki we boarded a ship the size of a small country to take us back across the Pacific, over the course of three weeks, with stops in French Polynesia and New Zealand.
Here's a distant picture of the ship where it docked in Tahiti...
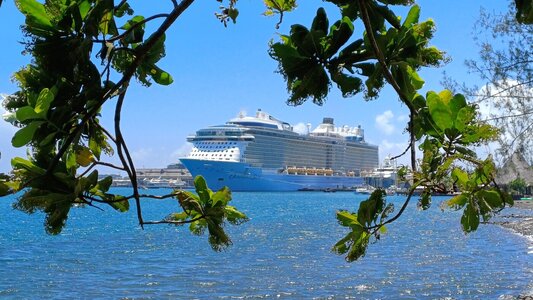
It looks nothing like the HMS Fly I'm trying to build. It also has a huge mechanical arm with a capsule attached to hoist you up and give you 360 views of the surroundings. It was an activity to at least break the tedium of five uninterrupted days of sailing with nothing but the Pacific - and an occasional Albatross - to look at
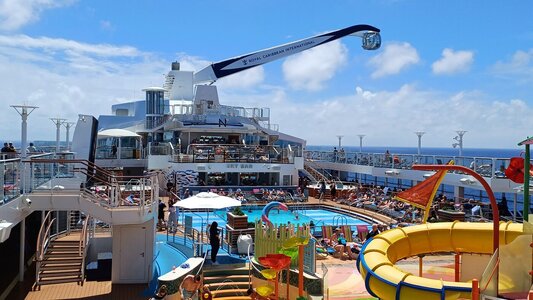
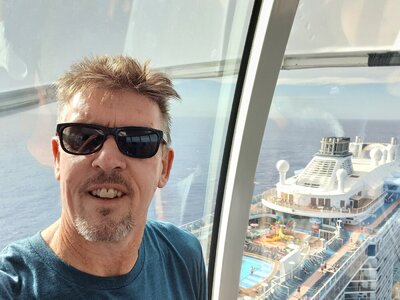
We've crossed the equator and returned to the southern hemisphere and are currently making our way towards New Zealand. No sea sickness to report ... yet.
Thanks for checking in
Here's a distant picture of the ship where it docked in Tahiti...

It looks nothing like the HMS Fly I'm trying to build. It also has a huge mechanical arm with a capsule attached to hoist you up and give you 360 views of the surroundings. It was an activity to at least break the tedium of five uninterrupted days of sailing with nothing but the Pacific - and an occasional Albatross - to look at


We've crossed the equator and returned to the southern hemisphere and are currently making our way towards New Zealand. No sea sickness to report ... yet.
Thanks for checking in
Nice pictures out of the capsule, Mark. Must be a amazing experience. Enjoy you stay!Just a quick update, and a note to explain my absence ... the Admiral and I have gone away on holiday for a few weeks. We caught a flight from Sydney to Honolulu, and after a couple of days splashing about in Waikiki we boarded a ship the size of a small country to take us back across the Pacific, over the course of three weeks, with stops in French Polynesia and New Zealand.
Here's a distant picture of the ship where it docked in Tahiti...
View attachment 402792
It looks nothing like the HMS Fly I'm trying to build. It also has a huge mechanical arm with a capsule attached to hoist you up and give you 360 views of the surroundings. It was an activity to at least break the tedium of five uninterrupted days of sailing with nothing but the Pacific - and an occasional Albatross - to look at
View attachment 402793
View attachment 402796
We've crossed the equator and returned to the southern hemisphere and are currently making our way towards New Zealand. No sea sickness to report ... yet.
Thanks for checking in
Regards, Peter
- Joined
- Sep 3, 2021
- Messages
- 4,256
- Points
- 688

That sounds like a terrific vacation to me!Just a quick update, and a note to explain my absence ... the Admiral and I have gone away on holiday for a few weeks. We caught a flight from Sydney to Honolulu, and after a couple of days splashing about in Waikiki we boarded a ship the size of a small country to take us back across the Pacific, over the course of three weeks, with stops in French Polynesia and New Zealand.
Here's a distant picture of the ship where it docked in Tahiti...
View attachment 402792
It looks nothing like the HMS Fly I'm trying to build. It also has a huge mechanical arm with a capsule attached to hoist you up and give you 360 views of the surroundings. It was an activity to at least break the tedium of five uninterrupted days of sailing with nothing but the Pacific - and an occasional Albatross - to look at
View attachment 402793
View attachment 402796
We've crossed the equator and returned to the southern hemisphere and are currently making our way towards New Zealand. No sea sickness to report ... yet.
Thanks for checking in
Next time on a four mast barque?
That's not a ship Mark...that's a large island or a small country. Have a great voyage back home!
Good afternoon Mark. Great holiday. Quite the experience. Relaxation, sun, surf?/sea,Admiral…nothing better. Cheers GrantJust a quick update, and a note to explain my absence ... the Admiral and I have gone away on holiday for a few weeks. We caught a flight from Sydney to Honolulu, and after a couple of days splashing about in Waikiki we boarded a ship the size of a small country to take us back across the Pacific, over the course of three weeks, with stops in French Polynesia and New Zealand.
Here's a distant picture of the ship where it docked in Tahiti...
View attachment 402792
It looks nothing like the HMS Fly I'm trying to build. It also has a huge mechanical arm with a capsule attached to hoist you up and give you 360 views of the surroundings. It was an activity to at least break the tedium of five uninterrupted days of sailing with nothing but the Pacific - and an occasional Albatross - to look at
View attachment 402793
View attachment 402796
We've crossed the equator and returned to the southern hemisphere and are currently making our way towards New Zealand. No sea sickness to report ... yet.
Thanks for checking in
Of course, this happened just a day before our ship docked in New Zealand. We were fortunate to be able to watch the final on the ship, but emotions were a bit frayed in the Howard camp by full-time and, my wife being a Kiwi, I was under strict orders not to use the words 'rugby' or 'Springboks' in domestic conversation, on the ship, anywhere in New Zealand, or not for the next four years really ...


Last edited:
Good morning Mark. Brilliant!!! Have you and the Admiral kissed and made upOf course, this happened just a day before our ship docked in New Zealand. We were fortunate to be able to watch the final on the ship, but emotions were a bit frayed in the Howard camp by full-time and, my wife being a Kiwi, I was under strict orders not to use the words 'rugby' or 'Springboks' in domestic conversation, on the ship, anywhere in New Zealand, or not for the next four years really ...
View attachment 405210
 . Controversial and close one for sure. SA is still celebrating
 . Cheers Grant
Howzit Grant. It didn't help that South Africa gave New Zealand a drubbing in their World Cup cricket clash just a few days later. Our domestic bliss has taken a bit of a pounding lately. But SA losing so badly to India has at least balanced the scales somewhat and taken the attention away from the admiral's rugby woes. But wow, three one-point wins on the trot is remarkable, each one going our way. Unreal. The final itself was a bit ordinary as they always are, and how SA won after that dismal second half is anyone's guess. But I know how much this means to South Africa and its people so let's enjoy it while it lastsGood morning Mark. Brilliant!!! Have you and the Admiral kissed and made up. Controversial and close one for sure. SA is still celebrating
. Cheers Grant


