Thanks Johan!It's obvious: an awful lot of TLC went into your current build; chapeau!
You are using an out of date browser. It may not display this or other websites correctly.
You should upgrade or use an alternative browser.
You should upgrade or use an alternative browser.
Thanks Grant. Actually, the furnishings are still dry-fit, as are the decks themselves. I'm not confident to cement anything down just yet. Chances are good that, after fixing the decks in place, I'll find I missed something that should be done beneath decks but is now inaccessible. One of Murphy's Laws I thinkGood morning Mark. Those are tiny hatches. The joinery is fantastic especially considering the size. You must have the measurements for the top decks exact to start the fittings prior to placement. I would be hesitant to do it this way as I would probably break off the fittings when gluing the deck on. A really wonderful rendition of the Fly you are building. Cheers Grant
Thanks Daniel. I searched high and low for some sort of workstation when I started with ship modeling a couple of years ago but could not find anything of real use. In the end I'm using my daughter's old room as the shipyard, her study desk as my workstation, and the containers are simply bamboo holders that I found for a few dollars apiece at the local hardware storeVery precise work Mark. I love your color management, especially with the grate combings.
Also, I'm just noticing your tool storage boxes in the background, nice.
Thanks Paul. I think there is a fine line between 'care' and 'petrified I'll make a mistake' thoughI love the care you are taking to make sure everything is just right!
Thanks Heinrich. I only hope I can stick to the 'historical accuracy' agenda as the build progresses. I suspect notLovely work Mark and great work on the half lap joints of the gratings - absolutely true to historical accuracy, which I like lots.
Thanks Peter!Nicely added parts on the deck, Mark. In terms of construction and painting.
Regard, Peter
Hi Nomad, I was not here in yoour thread since a long time. I am returning now and want to begin my fly in parallel to my Belem. I will take a lot of your idea since you did a great job. Thanks.
Hi Fish&Chip, no problems whatsoever! I'd love to think that what I've done so far can benefit you in some way or the other as you make a start with your HMS Fly. My shipyard is on a go-slow at the moment and it is quite likely that you will present your completed Fly in a display cabinet by the time I get round to stepping my main mastHi Nomad, I was not here in yoour thread since a long time. I am returning now and want to begin my fly in parallel to my Belem. I will take a lot of your idea since you did a great job. Thanks.
 . Seriously though, it is a lovely model to build and I'm enjoying it immensely. I sometimes think I'm taking it slowly because I don't want it to end, there being a distinct anti-climax in finishing a model that you have poured heart and soul into, not to mention the hundreds of hours that should probably have been spent on more productive household chores
 Hi Nomad, I have to take it cool, fireplace renovation and hearth stroke recovery. However, health recovery goes well, but time for hobby is restrain. But, seeing your built gives me the gots to begin the Fly, even if it will be slow. This will be a changing of my mind from the Belem.
Good morning Mark. “Productive” and household chores are not synonymous…probably have been spent on more productive household chores
 Cheers Grant
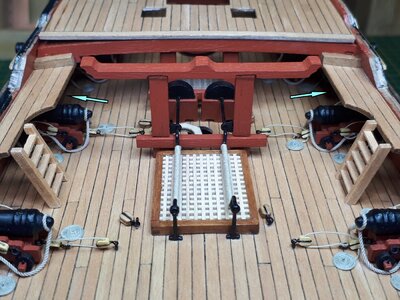
Before fixing the upper decks in place I needed to make sure that anything requiring access beneath the decks were dealt with first. The mid deck gangways, supports and ladders, for instance, although not directly beneath the quarterdeck were easier to install without the deck in the way.
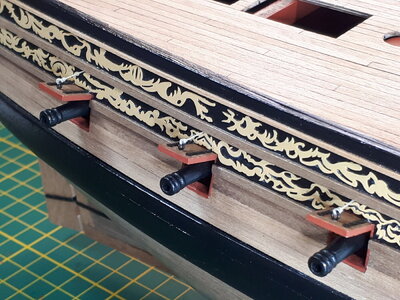
It seemed a good time to address the port lids as well. The lids themselves are external to the hull and not necessarily hampered by the upper decks, but the ropes (called 'spans' apparently) used to open the lids need to be tied off inside the hull and underneath the decks somewhere.
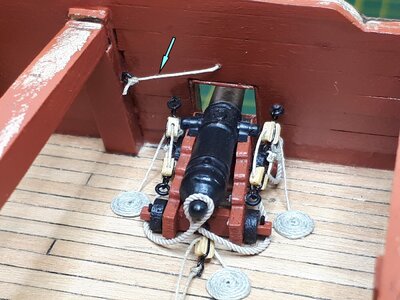
There are more elaborate ways of rigging the span ropes to the hull interior using hooks, blocks and tackle, but I was satisfied with a simple eyebolt in the bulkhead to tie off the span rope and keep the port lid open. Either way, it is certainly an exercise which must be completed before the upper decks are glued in place.
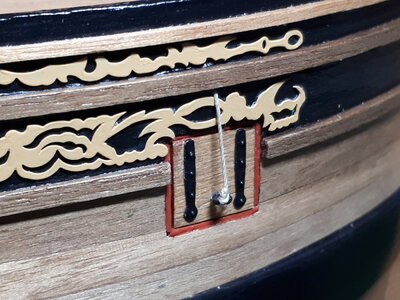
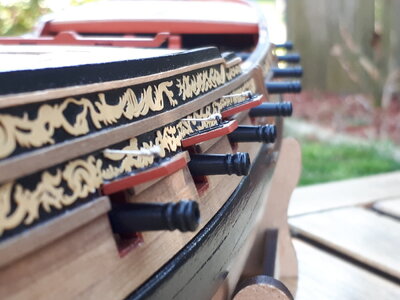
The port lid configuration I have gone with was to shut the foremost lids at the bow (below), no lids at the portholes in the open waist, and open lids at the three aftermost portholes at the ship's stern.
Of course, with the protrusion of the delicate port lids there are now a few more reasons for something to snag on them and they will always have to be kept in mind when working on other sections of the ship
Thanks for checking in
- Mark

It seemed a good time to address the port lids as well. The lids themselves are external to the hull and not necessarily hampered by the upper decks, but the ropes (called 'spans' apparently) used to open the lids need to be tied off inside the hull and underneath the decks somewhere.

There are more elaborate ways of rigging the span ropes to the hull interior using hooks, blocks and tackle, but I was satisfied with a simple eyebolt in the bulkhead to tie off the span rope and keep the port lid open. Either way, it is certainly an exercise which must be completed before the upper decks are glued in place.

The port lid configuration I have gone with was to shut the foremost lids at the bow (below), no lids at the portholes in the open waist, and open lids at the three aftermost portholes at the ship's stern.

Of course, with the protrusion of the delicate port lids there are now a few more reasons for something to snag on them and they will always have to be kept in mind when working on other sections of the ship

Thanks for checking in
- Mark
Last edited:
Good morning Mark. Good thinking Batman. There is clearly a lot of thought going into your process and it is paying huge dividends. I was wondering how the spans are tied off on the inside as I also went this method on my Xebec. There is not much around to show us. (Maybe one of the boffins can tell usBefore fixing the upper decks in place I needed to make sure that anything requiring access beneath the decks were dealt with first. The mid deck gangways, supports and ladders, for instance, although not directly beneath the quarterdeck were easier to install without the deck in the way.
View attachment 392634
It seemed a good time to address the port lids as well. The lids themselves are external to the hull and not necessarily hampered by the upper decks, but the ropes (which I understand to be called 'spans') used to open the lids need to be tied off inside the hull and underneath the decks somewhere.
View attachment 392635
There are more elaborate ways of rigging the span ropes to the hull interior using hooks, blocks and tackle, but I was satisfied with a simple eyebolt in the bulkhead to tie off the span rope and keep the port lid open. Either way, it is certainly an exercise which must be completed before the upper decks are glued in place.
View attachment 392636
The port lid configuration I have gone with was to shut the foremost lids at the bow (below), no lids at the portholes in the open waist, and open lids at the three aftermost portholes at the ship's stern.
View attachment 392637
Of course, with the protrusion of the delicate port lids there are now a few more reasons for something to snag on them and they will always have to be kept in mind when working on other sections of the ship
View attachment 392638
Thanks for checking in
- Mark
- Joined
- Jan 9, 2020
- Messages
- 10,378
- Points
- 938

Hi Mark. Great work on the gunport lids, the way you are tying them off and obviously the thought that went into the whole process re the deck installation. She is certainly going to be a colorful ship with all the beautiful frieze work.
Beautiful Mark just beautiful! I don't know but I wonder if they may have used cleats as a tie off for the 'spans'?
Precise construction as always. This is a real showpiece in the making.
Good morning Mark. Good thinking Batman. There is clearly a lot of thought going into your process and it is paying huge dividends. I was wondering how the spans are tied off on the inside as I also went this method on my Xebec. There is not much around to show us. (Maybe one of the boffins can tell us). Your work is stunning ! I love the way the close portlid closes perfectly with the red framing. Cheers Grant
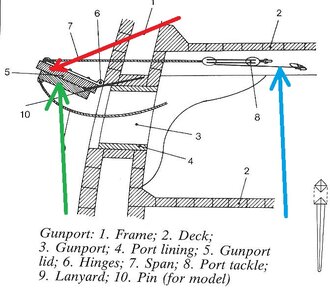
Thanks Grant! I found this diagram of a gunport lid installation which may or may not be of some use to you.
Luckily I only saw it after I had finished my own port lids; it would have taken me a week just to do one of these

Here's a link to the post that contained this diagram, you'll find our Uwe's name all over it
Gun port lids, were they held with one or two ropes?
Hi, this is my fist post here so I hope I placed it in the right category. I am working on the Heller le Soleil Royal and I am working on the gun ports. I want to make it a somewhat accurate model and I was going to put 2 holes in the lids for 2 ropes. But with every little thing I want to do I...
shipsofscale.com
Thanks JohanMark,
Obviously a lot of advance planning went into this part of the build, good thinking.
The results speak for themselves; once completed this "Fly" deserves a place of honor.
Kind regards,
Johan

Thanks Heinrich!Hi Mark. Great work on the gunport lids, the way you are tying them off and obviously the thought that went into the whole process re the deck installation. She is certainly going to be a colorful ship with all the beautiful frieze work.
Beautiful Mark just beautiful! I don't know but I wonder if they may have used cleats as a tie off for the 'spans'?
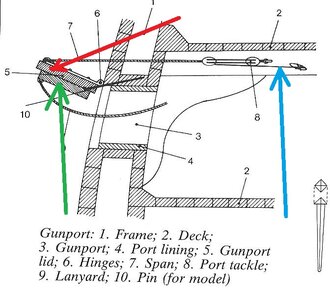
Thanks Daniel! Yes, they did indeed use cleats, or a combination of cleats and eyebolts apparently.
Here is a diagram that describes the gunport lid rigging. Luckily I only discovered it after I had finished my own port lids, saving myself a lot of extra work


