Hi Sasha. I agree, to blacken the first two steps is as it should be according to the instructions. I left them in their natural walnut to see what the effect would be against the black (wale) background and I'm not too disappointed with that either. I'll keep bearing it in mind and hopefully come to a final decision before the end of the buildMark, good job.
And if these two steps are painted black, like velvet, it will be even better.
You are using an out of date browser. It may not display this or other websites correctly.
You should upgrade or use an alternative browser.
You should upgrade or use an alternative browser.
Thanks Paul. Ah yes, rigging. The word alone gives me the shivers. I purchased a book a while ago called Rigging Period Ship Models by Lennarth Petersson which I understand to be a good pictorial source of truth for modellers such as myself who is still desperately trying to understand what the mass of ropes and blocks on a sailing ship are designed to do, and hopefully it will cover any gaps that are missing in Amati's rigging instructionsHi Mark,
This surely is a fantastic build! Will you be following the Amati rigging instructions on this one?
Last edited:
Thanks JohanI think you outdid yourself with this one Mark, my compliments.
Hi Aussierob and thanks for the compliment! I bought my HMS Fly model and upgrade kit at the same time from an outfit called Cornwall Model Boats in the UK. Even with the exchange rate and shipping costs you are bound to get it cheaper than your quote from Italy.Hi Nomad, beautiful work! I'm looking to start doing the Fly myself and your thread will be of invaluable help to me. I'm currently getting together some bits and pieces. Where did you get the Upgrade Kit from? I'm yet to find a supplier in OZ that has the upgrade kit in stock. I can get it from Italy but the quoted shipping price is ridiculous ($255 + the cost of the kit). When questioned they stand by the quote, which is the same shipping price they quote for the whole HMS Fly kit?!. Anyway... Also who is your preferred go-to supplier in Oz for tools and accessories? Thank you so much for sharing your knowledge and skills. I'll go back to lurking.
Here's the link: Cornwall Model Boats - HMS Fly Upgrade Kit
I have used online stores such as Hobby Tools and Frontline Hobbies for tools and accessories here in Oz, although I've often been obliged to look at overseas for specific items which aren't always available here. Online stores such as Dry-Dock Model & Parts for blocks and deadeyes and Ropes of Scale for good quality ropes. There is also Signomatic that allows you to design and purchase brass plaques for your display case or stand.
Good luck and I look forward to seeing your progress with your HMS Fly
Thanks JimMark, you are doing an excellent job assembling your Fly! Great job!
Thanks Jeffabsolutely beautiful !
Grant, totally agree ...Good afternoon Mark. It is so good.
The kit suggests that the estimated build time for the HMS Fly is 'between 100 to 120 hours


you are doing an excellent job assembling your Fly! Great job!Mark, good job.
And if these two steps are painted black, like velvet, it will be even better.View attachment 423056
Congratulations for this beautiful build model - great result
Do you have a series of images that I can put your ship in the Gallery?
Hi Donnie, I'm afraid my HMS Fly is very far from completed. I estimate that I am only roughly halfway at this stage, with all the rigging still to come. I am not sure how the misunderstanding came about, are you able to correct it? ThanksDo you have a series of images that I can put your ship in the Gallery?
Looks great Mark! 
Thank you Nomad for your response. I think it speaks for itself that you are not completed with this model yet. We will continue to follow your progress !
- Joined
- Jan 9, 2020
- Messages
- 10,378
- Points
- 938

Hi Mark. Boy, am I glad that your build is not finished yet - that would have denied me the opportunity of following along on one of the great builds on SOS. You have built a gloriously beautiful ship young man - the devil is in the details and here are plenty of those to peruse. Some models on this forum look so good and inviting that I wish I could have stepped aboard. Yours is one of them! Congratulations on a great job, my friend!
Hi Jacob, and thanks for the kind words! I am glad to see that another Fly is underway on this forum and I will be sure to follow your progress. Yes, I am very far from completing my own Fly and estimate that I'm roughly halfway now, all that rigging still to come. The [Completed Build] in the title is misleading and has yet to be corrected, not sure how that happens? Anyway I am glad that you find my log of some use, although I only get around to the shipyard every other day and my progress is rather sluggish. You will likely - as others have - pass me by at some point. Probably during the night, as ships doHi Nomad, I just wanna say great build with high precision and lots of thought put into it. I use the log for inspiration for my own Fly build.
By the way, the title says completed, but will you continue with the masts and rigging?

Last edited:
Howzit Heinrich, so good to hear from you again! (Especially when you say all those nice thingsHi Mark. Boy, am I glad that your build is not finished yet - that would have denied me the opportunity of following along on one of the great builds on SOS. You have built a gloriously beautiful ship young man - the devil is in the details and here are plenty of those to peruse. Some models on this forum look so good and inviting that I wish I could have stepped aboard. Yours is one of them! Congratulations on a great job, my friend!

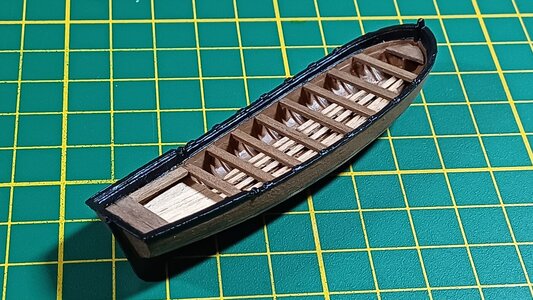
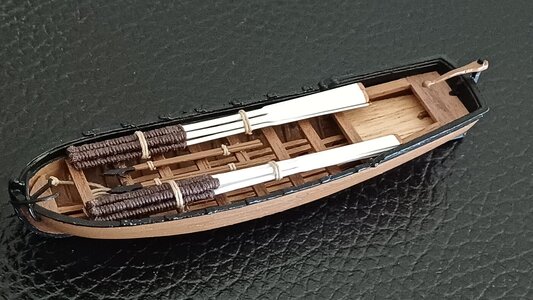
I used the intermission between the hull and rigging efforts to assemble a small lifeboat that came with the Fly's upgrade kit. The hull was a metal affair and various lengths and shades of wood made up the bottom boards, thwarts and sternsheets.
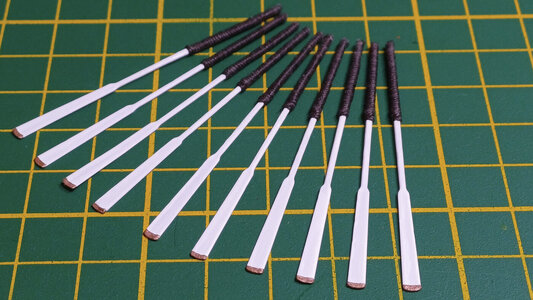
The oars were decorated as per instructions, brown handles (rope in this instance), white shafts, and alluring copper guards for the tips.
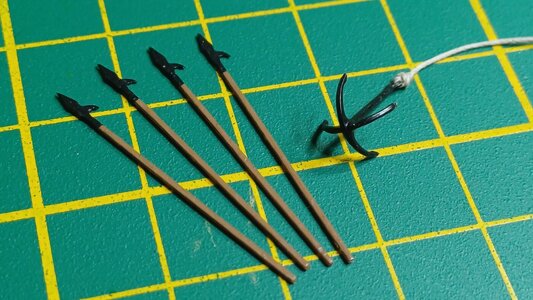
A single kedge anchor and four boarding pikes, also painted to specification to emulate wooden shafts and iron tips.
The oars and pikes are bundled together, and, along with the anchor, bundled aboard and secured in the lifeboat.
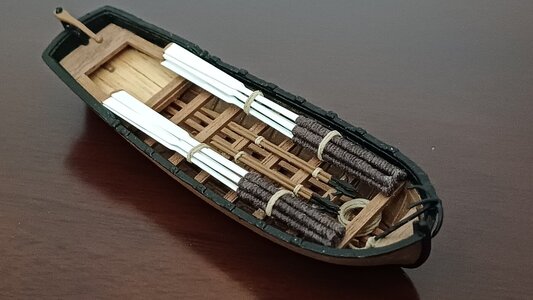
The lifeboat will ulimately be lashed to a pair of spare topmasts and suspended in the open air above the waist. This is likely to interfere with the rigging at this stage and will be installed later on. Probably much, much later on, given the current level of my rigging skills and expertise
Thanks for checking in
Mark

The oars were decorated as per instructions, brown handles (rope in this instance), white shafts, and alluring copper guards for the tips.

A single kedge anchor and four boarding pikes, also painted to specification to emulate wooden shafts and iron tips.

The oars and pikes are bundled together, and, along with the anchor, bundled aboard and secured in the lifeboat.

The lifeboat will ulimately be lashed to a pair of spare topmasts and suspended in the open air above the waist. This is likely to interfere with the rigging at this stage and will be installed later on. Probably much, much later on, given the current level of my rigging skills and expertise


Thanks for checking in
Mark
Last edited:
Good morning Mark. Way to go. Love the details - oars “binded” with rope nogal…. Cheers GrantI used the intermission between the hull and rigging efforts to assemble a small lifeboat that came with the Fly's upgrade kit. The hull was a metal affair and various lengths and shades of wood made up the bottom boards, thwarts and sternsheets.
View attachment 427311
The oars were decorated as per instructions, brown handles (rope in this instance), white shafts, and alluring copper guards for the tips.
View attachment 427312
A single kedge anchor and four boarding pikes, also painted to specification to emulate wooden shafts and iron tips.
View attachment 427313
The oars and pikes are bundled together, and, along with the anchor, bundled aboard and secured in the lifeboat.
View attachment 427314
The lifeboat will ulimately be lashed to a pair of spare topmasts and suspended in the open air above the waist. This is likely to interfere with the rigging at this stage and will be installed later on. Probably much, much later on, given the current level of my rigging skills and expertise
View attachment 427315
Thanks for checking in
Mark


