I use essentially the same method for rope coils. Instead of a round handle I from them between to small nails. I give them a generous coat of fabric glue (nearly the same as white PVA glue) and wait for them to dry. I hang over the pin and add a small drop of CA to keep the coil in place. I have had some success with wetting the coil with a bit of water using a brush and them using a set of normally closed tweezers to hold the coil down while the water dries and the glue resets. I cannot seem to get acceptable results with the method described by Peter in this thread. I probably need more practice.Hello again. Here’s an update on my version of rope coils. These can be very awkward to fit in place and getting them to hang looking natural due to the restricted access caused by all the rigging. Peters’ way didn’t work for me, I liked the concept but couldn’t get the coils to hang as I'd like so I used a more simple method. I know that it is technically wrong but at this scale they look ok to me. I made up the coils, by wrapping the cord around a scalpel handle, a touch of cyno was used to stop them unravelling. As you can see from my picture of my rigging tools I have a very long handled pair of locking forceps, I use these to just hang the whole coil over the belaying pin then put downwards pressure on it, I put a drop of cyno on the pin rail edge which then holds it down in a natural hanging position, simple. By using this type of forceps along with the curved ones that I’ve shown you don’t need to get your hand into the rigging which for me often caused issues.
I’ll have all the coils finished by the end of the day, meanwhile I’m waiting in for a rather exciting parcel, watch this space!
View attachment 392779
View attachment 392780
View attachment 392781
View attachment 392782
You are using an out of date browser. It may not display this or other websites correctly.
You should upgrade or use an alternative browser.
You should upgrade or use an alternative browser.
HMS Ajax 38 gun frigate. Euromodel [COMPLETED BUILD]
- Thread starter Ken
- Start date
- Watchers 36
-
- Tags
- ajax completed build euromodel
These rope coils are hanging also very natural, Ken. Well done!Hello again. Here’s an update on my version of rope coils. These can be very awkward to fit in place and getting them to hang looking natural due to the restricted access caused by all the rigging. Peters’ way didn’t work for me, I liked the concept but couldn’t get the coils to hang as I'd like so I used a more simple method. I know that it is technically wrong but at this scale they look ok to me. I made up the coils, by wrapping the cord around a scalpel handle, a touch of cyno was used to stop them unravelling. As you can see from my picture of my rigging tools I have a very long handled pair of locking forceps, I use these to just hang the whole coil over the belaying pin then put downwards pressure on it, I put a drop of cyno on the pin rail edge which then holds it down in a natural hanging position, simple. By using this type of forceps along with the curved ones that I’ve shown you don’t need to get your hand into the rigging which for me often caused issues.
I’ll have all the coils finished by the end of the day, meanwhile I’m waiting in for a rather exciting parcel, watch this space!
View attachment 392779
View attachment 392780
View attachment 392781
View attachment 392782
Regards, Peter
- Joined
- Dec 16, 2016
- Messages
- 1,009
- Points
- 493

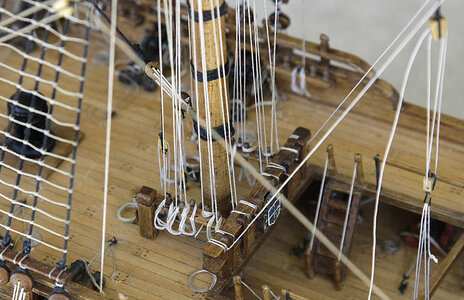
Hello, I've now finished all the rope coils, I'm rather pleased with how they came out, All that is needed is a bit of a tidy up of some of the coiled canon hauls then the deck is complete.
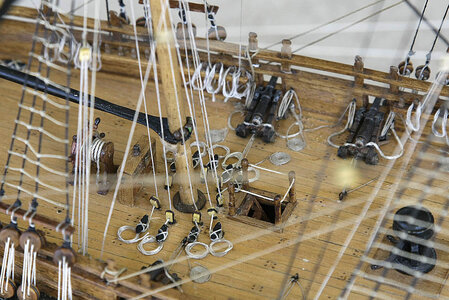
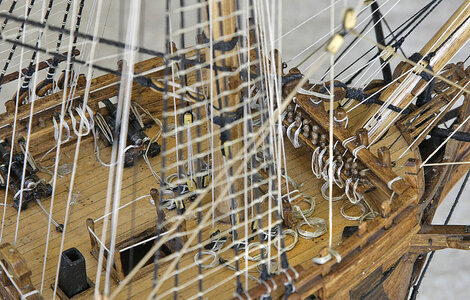
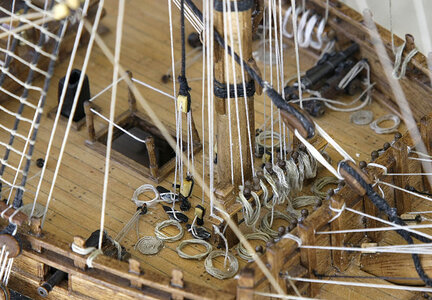
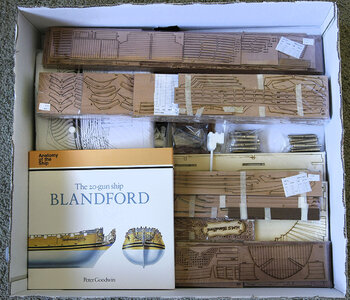
Yesterday I mentioned that I was expecting a parcel, well it did arrive, I've only had a quick peek at the contents and already feel a bit daunted, a new era of ship modelling is awaiting me.
I have been led astray by members that have posted their build images of their POF models, every one of them without exception leaves me in awe. You know who you are and I blame you all for tempting me to the darker side, so does Mrs Ken.

Twice a hurray: for the rope coils and for the new package! Nice choice, Ken.Hello, I've now finished all the rope coils, I'm rather pleased with how they came out, All that is needed is a bit of a tidy up of some of the coiled canon hauls then the deck is complete.
View attachment 392943
View attachment 392944
View attachment 392945
View attachment 392946
Yesterday I mentioned that I was expecting a parcel, well it did arrive, I've only had a quick peek at the contents and already feel a bit daunted, a new era of ship modelling is awaiting me.
I have been led astray by members that have posted their build images of their POF models, every one of them without exception leaves me in awe. You know who you are and I blame you all for tempting me to the darker side, so does Mrs Ken.
View attachment 392947
Regards, Peter
GenauTwice a hurray: for the rope coils and for the new package! Nice choice, Ken.
Regards, Peter
I am fully with you
Good morning Ken. They have that effect on us these POF chapsI have been led astray by members that have posted their build images of their POF models,
 . Lovely rope coils, finishing off your AJAX beautifully. Cheers Grant
- Joined
- Dec 16, 2016
- Messages
- 1,009
- Points
- 493

Hello and welcome. Again thanks for your likes and comments, most appreciated.
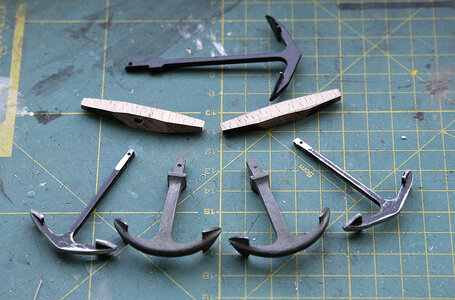
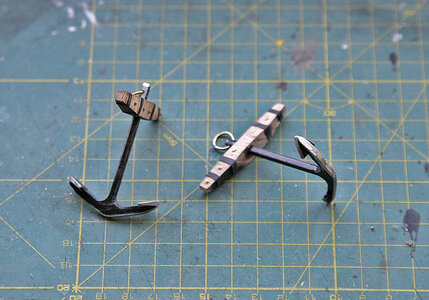
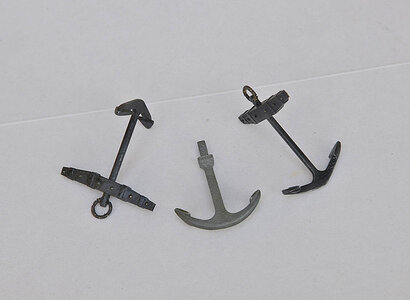
After the euphoria of looking at the super quality of the Modelship Dockyard Blandford kit I now have to return to the reality of my Ajax kit, again what a let down from Euromodel. This time it’s the anchors, what’s supplied is the wrong shape, the wrong size and much too chunky, it looks more like a Viking battle axe than an anchor. I’ve attached a picture showing what is supplied and for comparison an anchor from a similar scale Victory, you can see that the one supplied would look so noticeably wrong and could not be used. I have two Victory anchors and as I’ve shown I cut their shafts down to the correct size, filed the flukes to shape and made these up. For the iron bands I just used heat shrink wrap tubing. I’ve shown the completed anchors along with the useless ones supplied; I’m pleased with the result.
After the euphoria of looking at the super quality of the Modelship Dockyard Blandford kit I now have to return to the reality of my Ajax kit, again what a let down from Euromodel. This time it’s the anchors, what’s supplied is the wrong shape, the wrong size and much too chunky, it looks more like a Viking battle axe than an anchor. I’ve attached a picture showing what is supplied and for comparison an anchor from a similar scale Victory, you can see that the one supplied would look so noticeably wrong and could not be used. I have two Victory anchors and as I’ve shown I cut their shafts down to the correct size, filed the flukes to shape and made these up. For the iron bands I just used heat shrink wrap tubing. I’ve shown the completed anchors along with the useless ones supplied; I’m pleased with the result.


Last edited:
- Joined
- Dec 16, 2016
- Messages
- 1,009
- Points
- 493

Hi Richard, I’ve just tried that download, I had no success either. There’s a member, Peter Coward, I think piratepete007 who coordinates with Euromodel and has much input on their site, if you are interested perhaps a message to him would assist. Ken.
Last edited:
Ken,
I was doing a bit of research on the euromodel site and came across this link but it doesn't seem to work. I was wondering if anyone had a copy.
"download ajax.resource,v.04."
thanks
RichardView attachment 393182
Here you go...Ken,
I was doing a bit of research on the euromodel site and came across this link but it doesn't seem to work. I was wondering if anyone had a copy.
"download ajax.resource,v.04."
thanks
RichardView attachment 393182
Attachments
Viking battle axe ...... I agree with your opinion - the alternative is much much better
- Joined
- Dec 16, 2016
- Messages
- 1,009
- Points
- 493

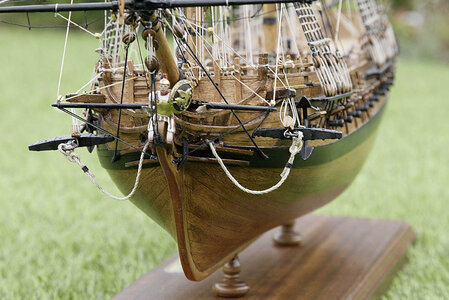
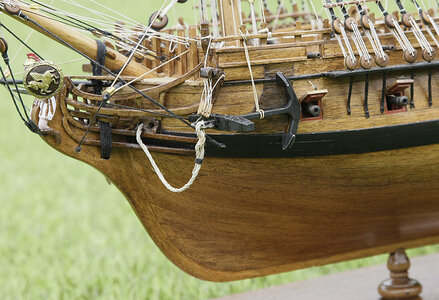
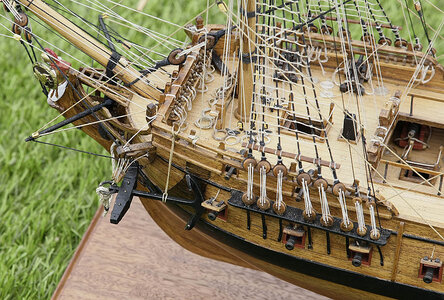
Hello, Welcome and thanks for following. Today I’m showing the anchors mounted, there are only two at the moment, I’ll need to source others and I can fit these at any time in the future.
One thing about the kit supplied anchors is that there are four but there are two sizes. The plan distinctly shows that all the anchors are the same size, I thought that two were always carried as spares or for stern warping, and that they were the same in case they were needed as replacements!
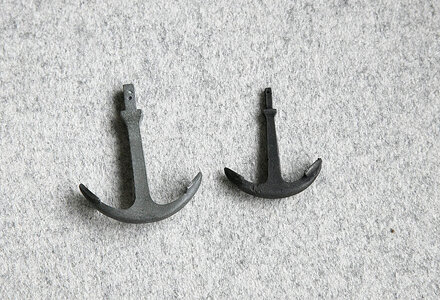
One thing about the kit supplied anchors is that there are four but there are two sizes. The plan distinctly shows that all the anchors are the same size, I thought that two were always carried as spares or for stern warping, and that they were the same in case they were needed as replacements!


- Joined
- Jan 1, 2018
- Messages
- 51
- Points
- 68

Ken,
As always, your work is impressive ... but to clarify your previous comment, Plan sheet 4 for this ship shows the two larger 'ancora di speranza' i.e. sheet anchors but also the two smaller 'ancora di posta' i.e. bow anchors. Euromodel correctly supplies the two different sized anchors. Having said that, both sizes did have to be reduced in their dimensions.
As always, your work is impressive ... but to clarify your previous comment, Plan sheet 4 for this ship shows the two larger 'ancora di speranza' i.e. sheet anchors but also the two smaller 'ancora di posta' i.e. bow anchors. Euromodel correctly supplies the two different sized anchors. Having said that, both sizes did have to be reduced in their dimensions.
- Joined
- Dec 16, 2016
- Messages
- 1,009
- Points
- 493

Hi Pete, Thanks very much for your constructive comment, I know that I’ve criticised some of the kit’s contents but I was only giving my opinion as to what I found as a modeller. I will however say in its favour that it‘s turning out to be a very nice looking model, even with all its faults and without some of the refinements of newer kits it is still gives me pleasure whenever I look at it, probably more so because much of it is my own work. KenKen,
As always, your work is impressive ... but to clarify your previous comment, Plan sheet 4 for this ship shows the two larger 'ancora di speranza' i.e. sheet anchors but also the two smaller 'ancora di posta' i.e. bow anchors. Euromodel correctly supplies the two different sized anchors. Having said that, both sizes did have to be reduced in their dimensions.
Last edited:
- Joined
- Dec 16, 2016
- Messages
- 1,009
- Points
- 493

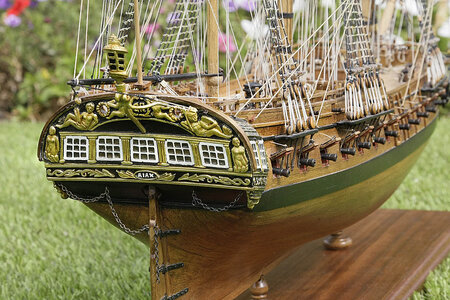
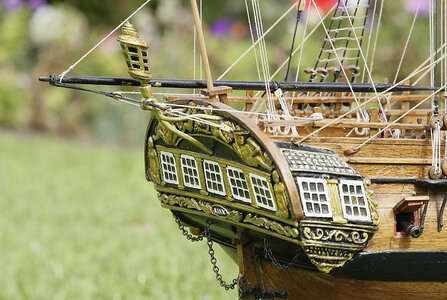
Hello, Again just a little more progress, today it's the completion of the ships lantern. The lantern itself was easy, just needed painting, at first I thought the mount was going to be an issue, it looked like brittania casting, over size with lots of flash and was flat not shaped, I imagined that when bent to shape it would just snap. I found that it was instead a fairly soft, pliable metal, a bit like lead, it bent to shape easily and I was able to carve most of the flash off and file it down quite a bit without any problems. It's not highly detailed but I think that it's in keeping with the rest of the model and looks ok. I'm now playing with some flags and scratching my head over the ships boat.


- Joined
- Apr 20, 2020
- Messages
- 5,164
- Points
- 738

so beautifulHello, Again just a little more progress, today it's the completion of the ships lantern. The lantern itself was easy, just needed painting, at first I thought the mount was going to be an issue, it looked like brittania casting, over size with lots of flash and was flat not shaped, I imagined that when bent to shape it would just snap. I found that it was instead a fairly soft, pliable metal, a bit like lead, it bent to shape easily and I was able to carve most of the flash off and file it down quite a bit without any problems. It's not highly detailed but I think that it's in keeping with the rest of the model and looks ok. I'm now playing with some flags and scratching my head over the ships boat.
View attachment 393386
View attachment 393387
- Joined
- Dec 16, 2016
- Messages
- 1,009
- Points
- 493

Hello, Again thanks for following and your likes.
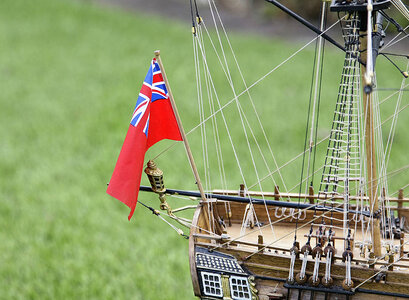
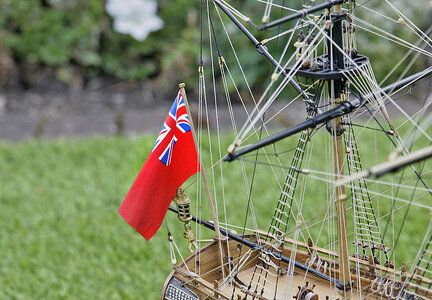
Today’s episode relates to the stern flag and ships boat. First the flag, the quality of these is as good as I’ve encountered in any kit and is better than most. I usually use spray starch on them and hang a weight on the bottom to get a good droop, I had no starch ( I think that my wife used it all up on my underpants after I told her that I’d bought my new Blandford kit ) so I use diluted PVA instead which worked reasonably well.
Now the ships boat. Two were supplied with the kit; I decided to fit just the one as both only just fit and would look overcrowded. As you can see they look more like dug out canoes, the clinker was way too heavy and had no sheer, they looked way too chunky so a bit of work was needed. I sanded the hull smooth so that I could add a realistic sheer then ground out the inside to as thin as was possible, the ledge was sanded away and I introduced a sheer, then I added a keel. I put a styrene strip around the outside and again using this strip I made up the internal frame and added floor boards before painting the inside. It’s coming along nicely and I’m enjoying this small project. I believe that their new kits now have resin boats which are I suppose an improvement but I wouldn’t have had the same satisfaction as tackling these boats.
I took pictures of my whole work process on this but lost them when transferring them to my PC. An automatic importing update happened; I found it confusing, thinking that all had gone ok I ended up deleting my camera images, AARG!
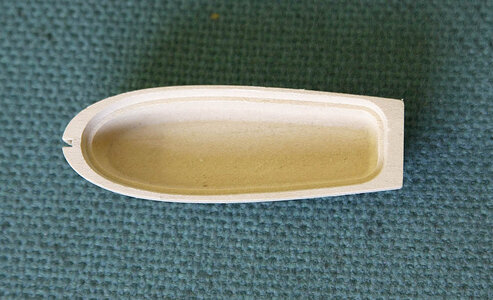
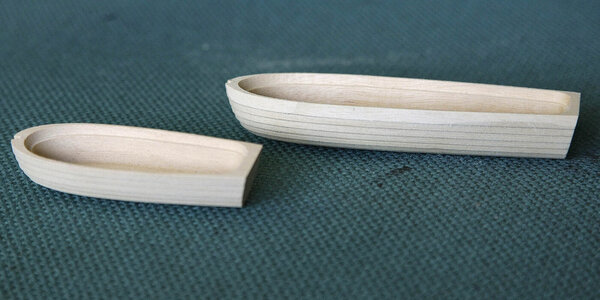
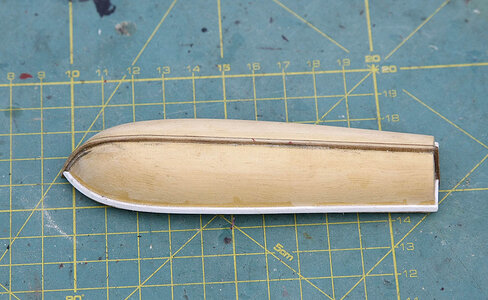
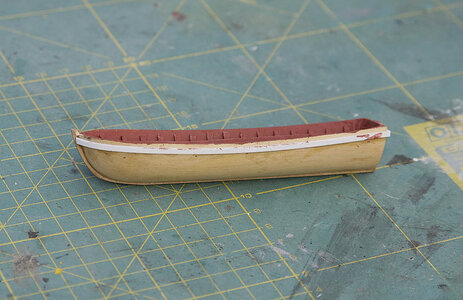
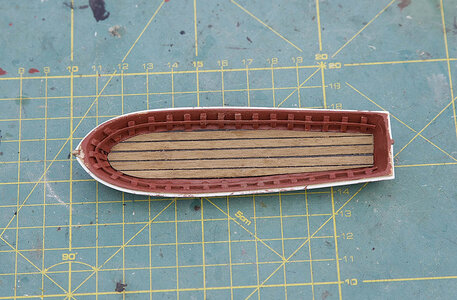
Today’s episode relates to the stern flag and ships boat. First the flag, the quality of these is as good as I’ve encountered in any kit and is better than most. I usually use spray starch on them and hang a weight on the bottom to get a good droop, I had no starch ( I think that my wife used it all up on my underpants after I told her that I’d bought my new Blandford kit ) so I use diluted PVA instead which worked reasonably well.


Now the ships boat. Two were supplied with the kit; I decided to fit just the one as both only just fit and would look overcrowded. As you can see they look more like dug out canoes, the clinker was way too heavy and had no sheer, they looked way too chunky so a bit of work was needed. I sanded the hull smooth so that I could add a realistic sheer then ground out the inside to as thin as was possible, the ledge was sanded away and I introduced a sheer, then I added a keel. I put a styrene strip around the outside and again using this strip I made up the internal frame and added floor boards before painting the inside. It’s coming along nicely and I’m enjoying this small project. I believe that their new kits now have resin boats which are I suppose an improvement but I wouldn’t have had the same satisfaction as tackling these boats.
I took pictures of my whole work process on this but lost them when transferring them to my PC. An automatic importing update happened; I found it confusing, thinking that all had gone ok I ended up deleting my camera images, AARG!


Last edited:
- Joined
- Dec 16, 2016
- Messages
- 1,009
- Points
- 493

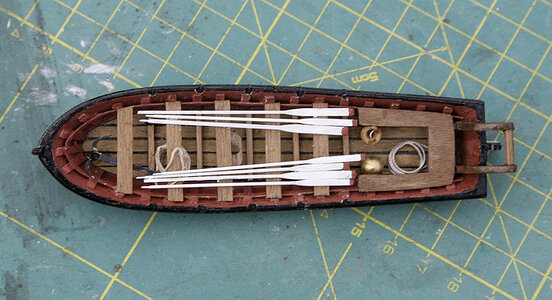
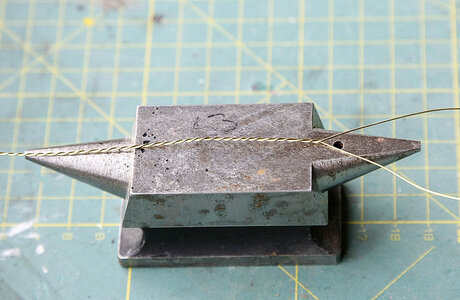
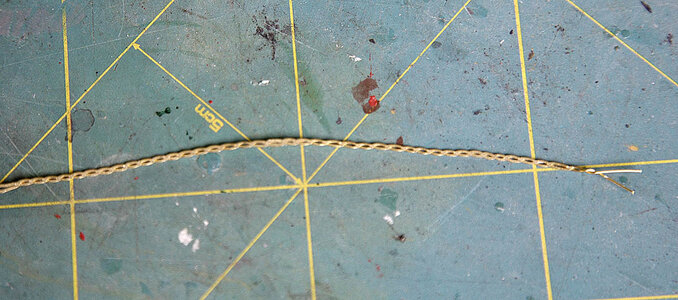
Hello All. More progress, today it is the completion of the ships boat. As you can see I added a bit of bling around the hull to give it a bit of a lift. I made this by twisting two pieces of brass together then hammering them flat, a simple and effective way of making decorative strip.
My initial reaction when I saw what the kit provided for a boat was to just bin it but I thought that I would at least give it a try and I’m glad that I did, a swan has emerged from an ugly duckling This little project has been the most fun of any part of this build and now I wouldn’t have had it any other way, I’m rather pleased with myself.
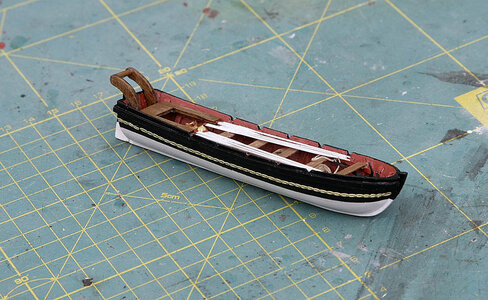
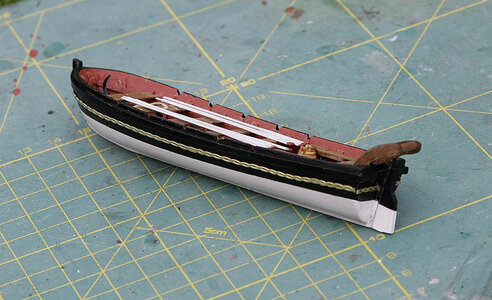
My initial reaction when I saw what the kit provided for a boat was to just bin it but I thought that I would at least give it a try and I’m glad that I did, a swan has emerged from an ugly duckling This little project has been the most fun of any part of this build and now I wouldn’t have had it any other way, I’m rather pleased with myself.


Last edited:


