Bluenose - Model Shipways MS2130 - 1/64 - By JeffT [COMPLETED BUILD]

I have nearly completed the deck structures. There is a platform next to the ship's wheel that needed to be fabricated. I used some 1/64 square stock from a previous build for this. I glued strips and spacers together and then cut it to size. After sanding it was mounted to the deck next to the wheel. I was suprised now much difficulty this little piece gave me. I think I made 3 versions to get the final piece.
View attachment 377260

Here it is on the ship with other stern deck structures.
View attachment 377261

The fife rail was constructed according to plans and using laser-cut, stock square wood, and metal pedestals. I still need to add the piece under the rail for the foresail boom crutch to set in. After looking at the picture I set the rail knees onto to the deck as opposed to the raised position shown in the picture.
View attachment 377263

Here's the completed machinery on the fore deck. It was a lot of work, but I am pleased with the overall appearance. Just noticed that I lost my lever in the gearbox. I'll have to replace that. Also I need a bit of deck cleanup under the gears.
View attachment 377262

And finally, the bow to stern view of the deck as it is today. I have not assembled the catheads or anchors yet. The catheads appear to be quite fragile and I am certain I would bend/break them while rigging. I hope to add them after most of the rigging has been completed.
View attachment 377264
Beautiful, well done, you are amazing
 
Good evening Jeff. All the little details are adding to your BN. It is a busy Schooner as of stating to look so. Well done. Cheers Grant
It is getting pretty busy looking. I still have the dories to add, but I think I will wait for a while on those.
 
I finished the building of the hull some time ago. Here's what it looked like after applying the first coat of primer and then another round of putty.
View attachment 373212

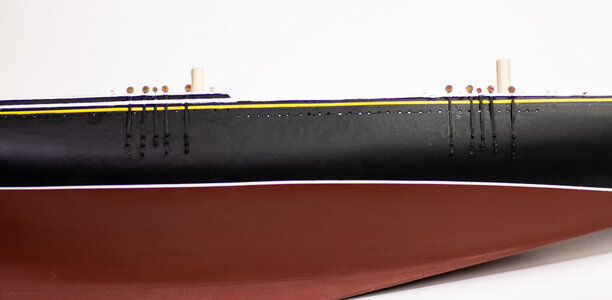
Today was a milestone day. I have puttied, sanded, primed, painted and varnished the hull. Here's a few pictures of the hull.
View attachment 373215View attachment 373216View attachment 373217View attachment 373218

I thought I was going to have to strip the entire hull after my first coat of varnish. I applied a coat of matte acrylic varnish that I have used
successfully numerous times before, but it caused cloudy coating to form over the paint. I intended to apply a couple of coats of the matte and then a couple of coats of Vallejo Premium Acrylic Polyurethane Satin Varnish. Before sitting in a corner to cry, I decided to apply a coat of the Vallejo varnish. Amazingly (and thankfully!) it dealt with the cloudy finish well and the pictures are of the hull after 5 coats of the Vallejo.
View attachment 373219

The yellow scrollwork at the bow was printed on a 3D printer at about 0.5mm thickness, painted and glued in place. The "hawse lips" were added after the scrollwork was attached.
Simply beautiful. What shade of red did you use?

Was order of colors (red, white, black, yellow) did you paint in? I’m thinking black, then red, the white and finally yellow.
 
Simply beautiful. What shade of red did you use?

Was order of colors (red, white, black, yellow) did you paint in? I’m thinking black, then red, the white and finally yellow.
Initially I painted the lower part of the hull Red Oxide,, but the paint I used never hardened properly. I ended up sanding that paint off (big mess) and then used ModelExpo MS-4814 Hull Copper Red. This is the color that Model Shipways suggests.

The order of painting:
  1. Mask off the deck and rails
  2. White band at the waterline (ca. 2 inches wide).
  3. Mark the waterline in pencil about 1/16 inch higher than I wanted the final line.
  4. Using 1/16 inch "Fineline Tape" I laid out the waterline below the marked line. I then masked off the area above the waterline tape.
  5. Paint the lower red section of the hull
  6. Paint the yellow section of the hull (about 3/4 inch wide)
  7. Apply the "Fineline Tape" over the yellow strip and mask off the red lower hull (without removing the waterline tape).
  8. Paint the black portion of the hull
  9. Mask off everything but the protruding main rail on the stern half of the ship and paint it white
  10. Remove all masking, touch up a few places where some paint seeped under the tape
  11. Brush all of the outer hull with Vallejo acrylic satin varnish - 5 coats
I did the yellow and white early since I needed them to be a consistent width. If I would have done them last, I would have had to use 2 masking strips instead of one.
Thanks for the details Jeff. I’m getting really close to painting the hull and think yours looks great.
 
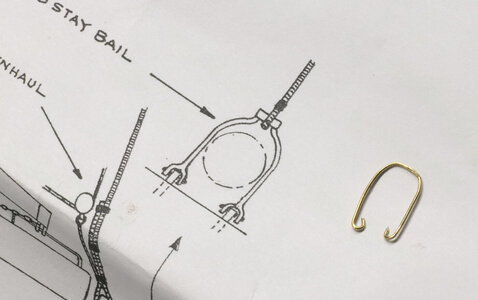
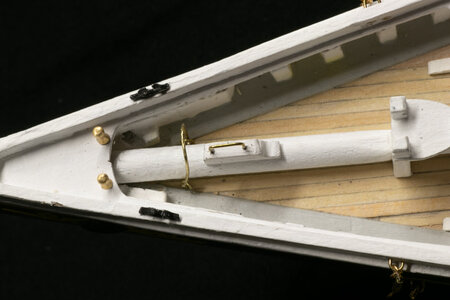
Jumbo Jib Stay Bail was fabricated next. The first picture shows the drawing in the plans and what I ended up making. I installed 2 eyebolts and bent the ends of the bail so that they went through the eyebolts. After a bit of struggling, I managed to bend the ends up so that they created hooks in the eyebolts. The second picture shows the bail in place over the bowsprit.
IMG_7311.jpgIMG_7312.jpg
 
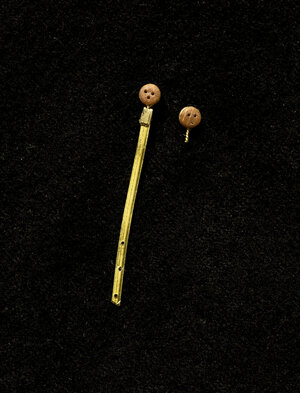
Another job that has caused some trepidation during the build has been completed - Building and Mounting the deadeyes and chain plates. I followed the method used by The Suburban Modeler to make a simplified version of the connection of deadeyes to chainplates. I used wire to surround the deadeyes and twisted it to form a tail on the deadeye. I drilled a hole near the end of the brass strip used for the chain plate, inserted the tail into the hole and bent over the end of the brass strip to hold the tail in place. I crimped the folded portion as tight I as could.
IMG_7319.jpg

Next I drilled 3 holes for the nails used to hold the assembly to the hull and finally trimmed the lower end to a point (not yet completed fully in the first picture).

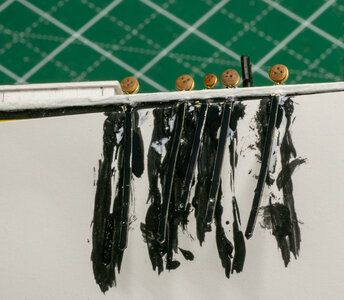
Now the part that had been causing me worries for some time. I drilled 2 holes in the edge of the rail and cut out between them with a new knife blade. This turned out to be fairly easy for the foremast deadeyes as there was only one rail to go through. The holes for the mainmast deadeyes had to go through both the upper rail and the main rail. After some repairs to the hull rails where I was either too far outboard or inboard and I had all chain plates through the rails. Major sigh of relief on my part here. I painted the chain plates with primer and then black using a piece of thick (photo) paper under the plates.
IMG_7309.jpg

Finally, the chain plates were nailed & glues to the hull using brass nails (0.5 mm) and touch up painting was completed. The starboard side is shown in the last picture of this post. I put on a few coats of satin varnish after taking the picture.
IMG_7321.jpg

Not all of the deadeyes are properly aligned, but they can still be turned in the wire loop to the desired orientation when the deadeye lanyards are attached. Other than the catheads and anchors, this completes the hull and deck fittings of the Bluenose.
 
Another job that has caused some trepidation during the build has been completed - Building and Mounting the deadeyes and chain plates. I followed the method used by The Suburban Modeler to make a simplified version of the connection of deadeyes to chainplates. I used wire to surround the deadeyes and twisted it to form a tail on the deadeye. I drilled a hole near the end of the brass strip used for the chain plate, inserted the tail into the hole and bent over the end of the brass strip to hold the tail in place. I crimped the folded portion as tight I as could.
View attachment 379790

Next I drilled 3 holes for the nails used to hold the assembly to the hull and finally trimmed the lower end to a point (not yet completed fully in the first picture).

Now the part that had been causing me worries for some time. I drilled 2 holes in the edge of the rail and cut out between them with a new knife blade. This turned out to be fairly easy for the foremast deadeyes as there was only one rail to go through. The holes for the mainmast deadeyes had to go through both the upper rail and the main rail. After some repairs to the hull rails where I was either too far outboard or inboard and I had all chain plates through the rails. Major sigh of relief on my part here. I painted the chain plates with primer and then black using a piece of thick (photo) paper under the plates.
View attachment 379787

Finally, the chain plates were nailed & glues to the hull using brass nails (0.5 mm) and touch up painting was completed. The starboard side is shown in the last picture of this post. I put on a few coats of satin varnish after taking the picture.
View attachment 379789

Not all of the deadeyes are properly aligned, but they can still be turned in the wire loop to the desired orientation when the deadeye lanyards are attached. Other than the catheads and anchors, this completes the hull and deck fittings of the Bluenose.
A nice completion of this part of the hull, Jeff.
Regards, Peter
 
Another job that has caused some trepidation during the build has been completed - Building and Mounting the deadeyes and chain plates. I followed the method used by The Suburban Modeler to make a simplified version of the connection of deadeyes to chainplates. I used wire to surround the deadeyes and twisted it to form a tail on the deadeye. I drilled a hole near the end of the brass strip used for the chain plate, inserted the tail into the hole and bent over the end of the brass strip to hold the tail in place. I crimped the folded portion as tight I as could.
View attachment 379790

Next I drilled 3 holes for the nails used to hold the assembly to the hull and finally trimmed the lower end to a point (not yet completed fully in the first picture).

Now the part that had been causing me worries for some time. I drilled 2 holes in the edge of the rail and cut out between them with a new knife blade. This turned out to be fairly easy for the foremast deadeyes as there was only one rail to go through. The holes for the mainmast deadeyes had to go through both the upper rail and the main rail. After some repairs to the hull rails where I was either too far outboard or inboard and I had all chain plates through the rails. Major sigh of relief on my part here. I painted the chain plates with primer and then black using a piece of thick (photo) paper under the plates.
View attachment 379787

Finally, the chain plates were nailed & glues to the hull using brass nails (0.5 mm) and touch up painting was completed. The starboard side is shown in the last picture of this post. I put on a few coats of satin varnish after taking the picture.
View attachment 379789

Not all of the deadeyes are properly aligned, but they can still be turned in the wire loop to the desired orientation when the deadeye lanyards are attached. Other than the catheads and anchors, this completes the hull and deck fittings of the Bluenose.
Nice work (as always). I look forward to your updates as I’m several steps behind you and you always give me both good ideas and something to shoot for.

Newbie question… where do you get the 0.5 mm brass nails?
 
Another job that has caused some trepidation during the build has been completed - Building and Mounting the deadeyes and chain plates. I followed the method used by The Suburban Modeler to make a simplified version of the connection of deadeyes to chainplates. I used wire to surround the deadeyes and twisted it to form a tail on the deadeye. I drilled a hole near the end of the brass strip used for the chain plate, inserted the tail into the hole and bent over the end of the brass strip to hold the tail in place. I crimped the folded portion as tight I as could.
View attachment 379790

Next I drilled 3 holes for the nails used to hold the assembly to the hull and finally trimmed the lower end to a point (not yet completed fully in the first picture).

Now the part that had been causing me worries for some time. I drilled 2 holes in the edge of the rail and cut out between them with a new knife blade. This turned out to be fairly easy for the foremast deadeyes as there was only one rail to go through. The holes for the mainmast deadeyes had to go through both the upper rail and the main rail. After some repairs to the hull rails where I was either too far outboard or inboard and I had all chain plates through the rails. Major sigh of relief on my part here. I painted the chain plates with primer and then black using a piece of thick (photo) paper under the plates.
View attachment 379787

Finally, the chain plates were nailed & glues to the hull using brass nails (0.5 mm) and touch up painting was completed. The starboard side is shown in the last picture of this post. I put on a few coats of satin varnish after taking the picture.
View attachment 379789

Not all of the deadeyes are properly aligned, but they can still be turned in the wire loop to the desired orientation when the deadeye lanyards are attached. Other than the catheads and anchors, this completes the hull and deck fittings of the Bluenose.
Those deadeyes are at best worrisome parts and very time consuming if you want to have something looking convincing.
You succeeded in obtaining a very believable deadeyes installation. Thumbsup
 
Nice work (as always). I look forward to your updates as I’m several steps behind you and you always give me both good ideas and something to shoot for.

Newbie question… where do you get the 0.5 mm brass nails?
In retrospect, they may not be brass but only look brass. I have quite a few of these little nails. Most of the kits that I have built have included them for nailing the first layer of hull planking, but I haven't used them for that during those builds.
 
Those deadeyes are at best worrisome parts and very time consuming if you want to have something looking convincing.
You succeeded in obtaining a very believable deadeyes installation. Thumbsup
They were time consuming. I really worried about the main mast ones, but finally just figured that I could probably fix what ever mistakes I made and started drilling and cutting. I found that I could use the drill bit (in a sideways movement) that I used to make the holes in the main rail to open the space between the 2 drilled holes. This seemed to be the real trick as I couldn't figure how to use a knife successfully.
 
They were time consuming. I really worried about the main mast ones, but finally just figured that I could probably fix what ever mistakes I made and started drilling and cutting. I found that I could use the drill bit (in a sideways movement) that I used to make the holes in the main rail to open the space between the 2 drilled holes. This seemed to be the real trick as I couldn't figure how to use a knife successfully.
The YQ-kit differs in this respect such that they provide slots in both the main- and buffalo rail through which to insert the chainplates. Now one has to accurately align the slots in the main- and buffalo rails. Add paint to the mix and you're in for some long nights.
 
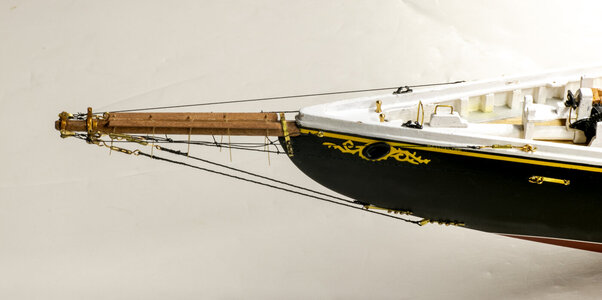
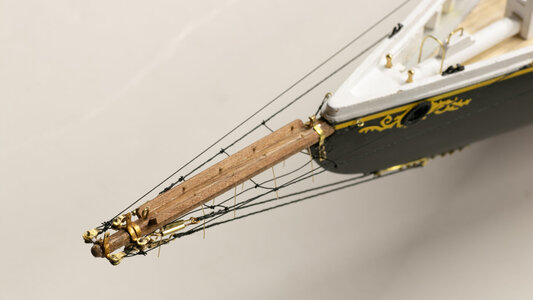
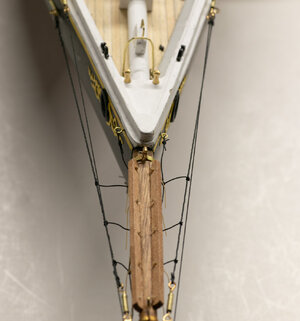
Here's the bowsprit. The Bluenose bowsprit is made a bit more difficult in that it is flat on the bottom and tapered from the uppers surface to the end of the bowsprit. In the picture, you can see the taper starting at around 14 cm.
IMG_7227.jpg

The bowsprit has 2 step downs at its forward end and is square at the aft end. There are a number of brass fittings that need to be made for the forward end as well. These were quite challenging to make, and I used a lot of the provided brass strip to make them. So much in fact that I had to request more from Model Expo who was great in providing them to me at no cost except $5 shipping for the 3 additional strips I requested. I stained the forward end of the bowsprit and painted the aft end from where the piece enters the hull.
EOSR1121.jpg

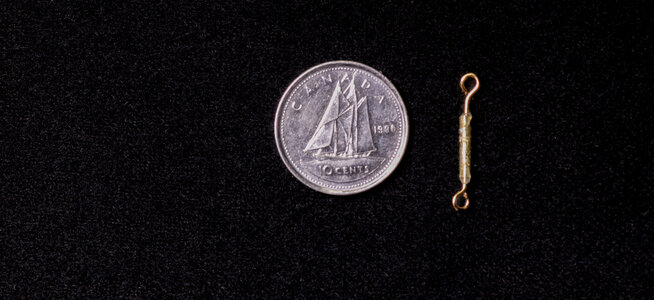
Next up was the initial stages of rigging for the ship. I made the turnbuckles from brass tubing and eyebolts. I think I needed 6 of these. My first attempts were too large and I ended up making them smaller.
IMG_7316.jpg

Attaching the stays, guys and footropes was fairly straight forward. Note the pieces added to the top of the bowsprit through which the jib stops pass.
IMG_7313.jpgIMG_7314.jpgIMG_7315.jpg
 
Here's the bowsprit. The Bluenose bowsprit is made a bit more difficult in that it is flat on the bottom and tapered from the uppers surface to the end of the bowsprit. In the picture, you can see the taper starting at around 14 cm.
View attachment 380503

The bowsprit has 2 step downs at its forward end and is square at the aft end. There are a number of brass fittings that need to be made for the forward end as well. These were quite challenging to make, and I used a lot of the provided brass strip to make them. So much in fact that I had to request more from Model Expo who was great in providing them to me at no cost except $5 shipping for the 3 additional strips I requested. I stained the forward end of the bowsprit and painted the aft end from where the piece enters the hull.
View attachment 380502

Next up was the initial stages of rigging for the ship. I made the turnbuckles from brass tubing and eyebolts. I think I needed 6 of these. My first attempts were too large and I ended up making them smaller.
View attachment 380507

Attaching the stays, guys and footropes was fairly straight forward. Note the pieces added to the top of the bowsprit through which the jib stops pass.
View attachment 380504View attachment 380505View attachment 380506
Good evening Jeff. That is so good. Your metal work is spot on. Great turnbuckles. Cheers Grant
 
Good evening Jeff. That is so good. Your metal work is spot on. Great turnbuckles. Cheers Grant
Thanks for the comment about the metal work. I am not sure I fully agree, but I'll take the complement anyway. Those pieces at the end of the bow were difficult to say the least. I still have not mastered how to make bands for masts of which there are many on this build.
 
Back
Top