Another Hayling 1760 build

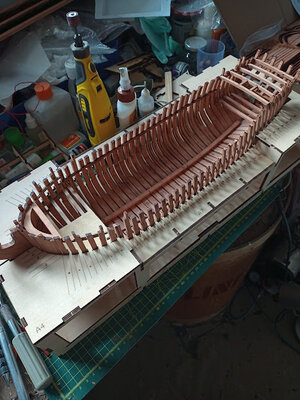
I am no where near as far advanced as yourself, but am wondering how to get the hull out of the jig. It seems very tight at the "widest" point(yes I know, probably not the correct terminology) The deck is lower that the "widest point" making it so the frames will have to squeeze out of the jig deck.
 
The template have a slot at the bottom of it, and should be placed on the false keel keelson, so you are right with that. But you see, on this image, i place the template on where it should be, add the height of the bottom end of L2, and it fits, just like the previous one i sent you.
View attachment 334155
It's all wrong. Why do you have a cut out for the keelson when THE KEELSON IS NOT USED BY THE TEMPLATE?????
Your instructions are total rubbish, your templates are just a waste of time to be honest. Give us a plan with accurate dimensions and a clear view and then I would call this an excellent kit.
I think I should get my money back because this is NOT a proper kit. It's an excellent set of parts that might or might not go together - IF YOU CAN SECOND GUESS the instructions. Oh, please, I've really had enough. :mad: :mad:. :mad:
 
I am no where near as far advanced as yourself, but am wondering how to get the hull out of the jig. It seems very tight at the "widest" point(yes I know, probably not the correct terminology) The deck is lower that the "widest point" making it so the frames will have to squeeze out of the jig deck.
That's why I think I was very lucky in that I didn't glue it together Colin (also something that the instructions should mention).
But for all those wondering about if I've built it wrong, yes it DOES go back in the jig easily.....
IMG_20221013_155934_184.jpg
 
It's all wrong. Why do you have a cut out for the keelson when THE KEELSON IS NOT USED BY THE TEMPLATE?????
Your instructions are total rubbish, your templates are just a waste of time to be honest. Give us a plan with accurate dimensions and a clear view and then I would call this an excellent kit.
I think I should get my money back because this is NOT a proper kit. It's an excellent set of parts that might or might not go together - IF YOU CAN SECOND GUESS the instructions. Oh, please, I've really had enough. :mad: :mad:. :mad:
I don't think i get what you mean, like i said, the template should be placed on the keelson, so there's a slot at the bottom.
 
I don't think i get what you mean, like i said, the template should be placed on the keelson, so there's a slot at the bottom.
OK, Sorry, I see what you mean - we are talking at cross purposes. It's all my fault in not explaining myself properly. Redface

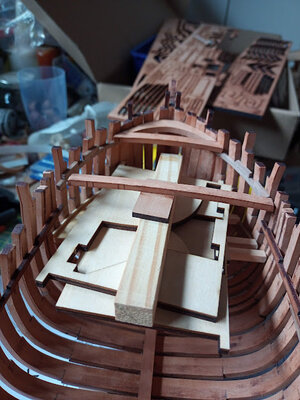
I did build it as you said but I still have a problem with this:

IMG_20221013_143444_149.jpg

I still have a gap.
 
Hi i have found the issue, it is my problem, the deck clamp L1 and L2 were being marked inversely on the instruction, so that now the beam is being placed more towards the back.
I will change it on the instruction immediately, also i will send you a new pair of L1 from UK tomorrow. So sorry for this.
 
Guys don't call it false keel, it is the keelson ;-) The false keel is somewhere else ... Correct wording is important imo. Don't get me wrong pls :cool:

Dirk
Totally agree! The false Keel is the tiny streak of wood bolted beneath the so called true keel and inteded to prevent it from major damages in case of running aground.
 
Last edited:
Hi i have found the issue, it is my problem, the deck clamp L1 and L2 were being marked inversely on the instruction, so that now the beam is being placed more towards the back.
I will change it on the instruction immediately, also i will send you a new pair of L1 from UK tomorrow. So sorry for this.
Don't bother sending replacements, I'm not going to pull apart (and probably wreck) all the work I've done just for that. Send me a new kit and I might be happier. Then I can incorporate all the modifications and have a less frustrating build.
 
Totally agree! The false Keel is the tiny strike of wood bolted beneath the so called true keel and inteded to prevent it from major damages in case of running aground.
It's all my fault guys, I was so fed up with things that I got a bit short tempered and confused myself with the whole 'keel' thing when I wa writing the log.
Sorry Redface
 
Don't bother sending replacements, I'm not going to pull apart (and probably wreck) all the work I've done just for that. Send me a new kit and I might be happier. Then I can incorporate all the modifications and have a less frustrating build.
There’s still ways of solving this if you don’t want to have the pull apart the parts. You can try cut the top part and make the deck clamp flat, and then you can fit the beams on.
 
There’s still ways of solving this if you don’t want to have the pull apart the parts. You can try cut the top part and make the deck clamp flat, and then you can fit the beams on.
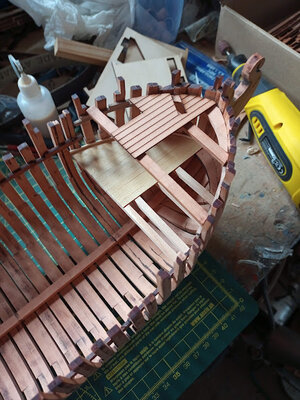
Yes, see what you mean. I also realise that J1-1, when in place, covers from the stem to the deck beam so by placing it, I can work out where the beam needs to be:
IMG_20221014_133339_888.jpg

Tom
 
JUST MY INFLATIONARY 25 CENTS CALM DOWN, KNOW SENCE HAVING A SHOUTING MATCH, ONLY GOD AND HIS SON ARE PERFECT WE ARE NOT TAKING THINGS APART I HAVE DONE THIS SO MANY TIMES CAN NOT COUNT THEM WITH A LITTLE PATIENCE YOU CAN TAKE THINGS APART WITHOUT ANY DAMAGE I HAVE DONE IT WITH PVA, AND CA JUST GET 100% ACOTONE BRUSH IT ON THE JOINT THEN CAREFULLY PRY IT APART, YOU MAY HAVE TO APPLY 2 OR MORE COATS ON THE JOINT IT WILL COME APART WITHOUT ANY DAMAGE JUST BE CAREFULL. GOD BLESS STAY SAFE ALL DON
 
That's about what I would expect Colin. I hope your build goes a lot better than mine.... then again, it should do because I've snagged all the bad work (up to now, anyway). Thumbsup
 
JUST MY INFLATIONARY 25 CENTS CALM DOWN, KNOW SENCE HAVING A SHOUTING MATCH, ONLY GOD AND HIS SON ARE PERFECT WE ARE NOT TAKING THINGS APART I HAVE DONE THIS SO MANY TIMES CAN NOT COUNT THEM WITH A LITTLE PATIENCE YOU CAN TAKE THINGS APART WITHOUT ANY DAMAGE I HAVE DONE IT WITH PVA, AND CA JUST GET 100% ACOTONE BRUSH IT ON THE JOINT THEN CAREFULLY PRY IT APART, YOU MAY HAVE TO APPLY 2 OR MORE COATS ON THE JOINT IT WILL COME APART WITHOUT ANY DAMAGE JUST BE CAREFULL. GOD BLESS STAY SAFE ALL DON
Thanks for the acetone tip Don. Really, though, I don't expect to have to purchase 100% acetone and to do a re-build after following the manufacturers instructions. What if the item I bought was electrical? And I followed their instructions and someone got electrocuted? Begs the question who's not done their proper due diligence?
Tom
 
Don't bother sending replacements, I'm not going to pull apart (and probably wreck) all the work I've done just for that. Send me a new kit and I might be happier. Then I can incorporate all the modifications and have a less frustrating build.
Hi Tom,
Sorry to be involved in discussions late, but your tone is arrogant here. Victor is trying to help you resolve your mistakes, and you are asking to ship a new kit instead of thanking him. I don't think it is appropriate.
Maybe you should post questions before attempting to assemble, or simply wright up an email to the kit manufacturer with questions. I am, sure you would have support from either source. If you want to trash it, it is only your choice, but maybe you can sell it to someone at a discount price? Perhaps, you should try to repair it as per Victor's suggestion.

Hope you understand, and happy modeling!
Hello Jim,
I should have put a smiley face at the end and you would have realised I was not being very serious, sorry.

Yes, Victor is very helpful but I still think that this model should not have been marketed yet because it's obvious that it had never been built using the instructions supplied. However, I am not planning to give in yet and will keep on going.

BTW, my aim is to build it as a hull only model with some small detail changes (because I'm rapidly running out of storage space :().

Cheers
Tom
 
Back
Top