
You are using an out of date browser. It may not display this or other websites correctly.
You should upgrade or use an alternative browser.
You should upgrade or use an alternative browser.
ZHL Royal Caroline Kit, scale 1/30
- Thread starter neptune
- Start date
- Watchers 56
-
- Tags
- royal caroline


This one works well if you can get it:
http://www.railroomelectronics.co.uk/Service-Aids-Tools/Service-Aids/Metal-Blackening/Product-79514.aspx
http://www.railroomelectronics.co.uk/Service-Aids-Tools/Service-Aids/Metal-Blackening/Product-79514.aspx

the Casey black is available at any gunsmiths stores as well. Its primarily meant for gun collectors to burnish their metal black.
G'day John
Your don't need to get me some tissues!
:greetings-clapyellow:
I've decided to get my own RC very soon. I'll be doing some major changes to the kit and it will take me a long time to redraw my plans to suit the carvings.

Thanks gentlemen for giving us all the information about blackening brass.
Happymodelling everyone
:banana-dance:
Greg
Your don't need to get me some tissues!
:greetings-clapyellow:
I've decided to get my own RC very soon. I'll be doing some major changes to the kit and it will take me a long time to redraw my plans to suit the carvings.
Thanks gentlemen for giving us all the information about blackening brass.
Happymodelling everyone
:banana-dance:
Greg

Peglegreg said:G'day John
Your don't need to get me some tissues!
:greetings-clapyellow:
I've decided to get my own RC very soon. I'll be doing some major changes to the kit and it will take me a long time to redraw my plans to suit the carvings.
Thanks gentlemen for giving us all the information about blackening brass.
Happymodelling everyone
:banana-dance:
Greg
Greg,thats goingt to be an interesting project,looking foreward to it.
G'day Greg I second what Zoly said, so are they letting you buy the bits you want, or do you have to buy the complete kit, I think you will enjoy it either way,
best regards John.
best regards John.
G'day John
I'm buying the whole kit and that will be the foundation of my redraw as well.
Max has been great but he's working on another very interesting project. Can't say any more.
Havagooday tomorrow mate
Greg
I'm buying the whole kit and that will be the foundation of my redraw as well.
Max has been great but he's working on another very interesting project. Can't say any more.
Havagooday tomorrow mate
Greg

These are the three main components for building the Companion ways
on both sides of the front of the main cabin, the two lower ones are Pear wood and the top piece is plywood
which will be planked over and then have the trim added around the top.

This shows the two companion ways glued up, in the photos they show hinges on the doors, I have not been able to find any in the kit, but there is some brass tubing and I think you have to make the hinges from this, I have to go through the videos and have a look

The port side companion way, they have to be cleaned up yet before varnishing or waxing.

The starboard side companion way
Last edited:
Peglegreg said:G'day John
I'm buying the whole kit and that will be the foundation of my redraw as well.
Max has been great but he's working on another very interesting project. Can't say any more.
Havagooday tomorrow mate
Greg
I think you will like it a lot, I sent him a message earlier on asking for the English instructions and parts list, most of the big stuff you can work out, but its the smaller parts, so hopefully will get them soon, have you asked for the English Instructions as well,
best regards John.
A
Aussie048
Guest
Hi John
They are very nice features to an excellent kit and build.
Cheers
Geoff
They are very nice features to an excellent kit and build.
Cheers
Geoff

Laser cut stairs, there are 15 parts, three parts to each step,
eight of the parts have been glued together to make four of the steps and you can see two more
that have to be glued, the five dark pieces are glued onto the top of each of the steps to make
the tread

The first step in place, they are quite clever using the
moulding on the side of the copanion way to locate each step.

All the steps glued in place.

The top has been planked and the trim added around the top,
Just has to be cleaned up for varnishing.

After a coat of varnish.

Close up view.
Last edited:

For a change I decided to start trimming the extra wood from the
bulwarks so the capping rails and the trims could be fixed, this shows the area to be trimmed, at the
far right of the pic.

To help with the curves etc they include some wood laser cut,
see next pic.

All the wood around the carvings down to the line of the top of
the bulwarks has to be removed, so the piece in the pic can sit down on top of the mouldings.

The circles have to be cut to go around the ends of the lower moulding

After trimming away the excess wood

and the laser cut part sitting in place, a bit more sanding to do yet.

working out where the carving would go and glueing them in place

Test fitting all the carvings and port wreaths to make sure they will fit,
had to do a bit of juggling and trimming but all ok in the end, when I checked their pics they had done the same

trimming on the focsle rails

and the laser cut part in place, these are not yet glued
as they have to be sanded to match the thickness of the rails.
Attachments
Last edited:
Thank you Janos, yes I think the western kit manufacturers have a bit of catching up to do, if they want to stay in the game,
best regards John.
best regards John.

The hancing piece painted and glued in place.

The rail behind the hancing piece glued in place and the hancing piece
sanded down to the thickness of the rail, also the lower drop piece is in placeThe building board

The rail assembly painted, still has to have another coat yet.
Last edited:

I use a toothbrush to apply the wax to the carvings,
then use a hairdryer to liquidize the wax, and then a soft toothbrush to remove the excess wax,
then when dry I use a soft nylon brush in a Dremel Rotary to buff the carving.

The carving after buffing.

And glued in place under the rail, the rail is not glued yet.
Last edited:

The lower rail carving has been soaked in
hot water and is clamped in position, when dry it will be cut to size, waxed and glued around the bow.

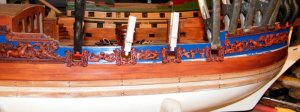
The port wreaths have been glued in position, and I am now
trimming the lower rail pieces that go between the ports

The three pieces trimmed and just sitting in place, they will
be removed and waxed, and then glued in place.

The three pieces in place and the carvings between
the ports have also been glued in place, you can see to the far right of the pic that I have
also cut to size and trimmed the forward lower rail, this will be waxed and glued in place in the next couple days.
Last edited:
John ,I can't say it enough these carvings ,the kit and your job is amazing!!
Thank you Zoly, my plan was to do the transom and then go down along one side, learning as I go, so if by chance I make any mistakes, I can learn from them and hopefully not repeat them on the other side, so far things have been going well, and I put much of that down to the way the kit has been designed and manufactured, but as I have already said, I do not think this one is for beginners, but for sure it is a Dream to build,
Thank you for your visit,
best regards John.
Thank you for your visit,
best regards John.

anchors after varnishing the stocks

after painting the black

close up

general view of all four anchors
Last edited: