
Starting wit the bevels....


I just bought the wen disc sander and drilling rotary tool. Has the three ft flex cable. Bout the rotary tool and the 300 piece accessory kit from lowe's for less than $45.00 This kind of work is exactly what this rotary was designe d for.Hello,
I' have a rather important question, eg to be 100% sure.
In the provided plans, eg drawings, they marked the aerea for beveling the bulkheads.
They proposed to mark this on each bulkhead and bevel....
But, should I start beveling on top in corner A?
I'm afraid of sanding or cutting too much. After all, it is the intention that the planks/strips follow the curvature of the hull.
But at the HMS FLY I have taken too much away, especially at the bow side....
And, they suggest doing this in advance...so completely dependent on the measurements on the drawings
Thx in advance
View attachment 384742
View attachment 384743

You're the correct path. It's looking good. I like the joint reinforcements.Yesterday evening (it's now 7 pm in Brussels area), I glued the Keel parts together and placed some enforcements on top of the joints.
Also the keel parts are glued.....
Now finishing the bevel of the part below the Bearding line and starting to prepare the Bulkheads.
View attachment 384998

Hello,HMSFly,
I have the same kit in my personal stock so thank you for sharing your build, it will be a great help to me when that one has its turn to be built. How are the ropes and blocks in that kit, would you upgrade them?
What did you think about the Amati HMS Fly kit?
Also, that dimpleing tool - I can't seem to locate a supplier for it. I checked the Ages of sail web site, they carry Amati - but not that tool,
seems like the correct way to make those copper plates somewhat accurately....
And to Uwek - thanks so much for that planking down load! So much info and a great help!
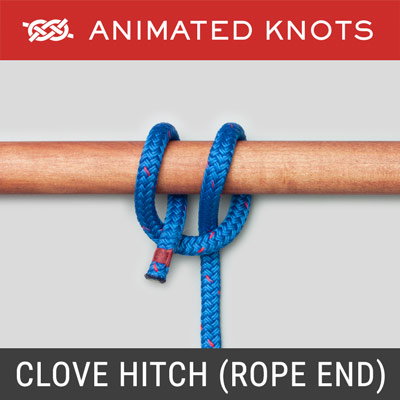
Can any one point me in the correct direction to learn how to tie a clove hitch?
And seizing (?) Ropes ...when and where would they be used?
Enough questions for a Sunday night...
Thank you,
I care about and appreciate all you guys!!

Try this link for an animated version of tying a clove hitch: https://www.animatedknots.com/clove-hitch-knot-rope-endHMSFly,
I have the same kit in my personal stock so thank you for sharing your build, it will be a great help to me when that one has its turn to be built. How are the ropes and blocks in that kit, would you upgrade them?
What did you think about the Amati HMS Fly kit?
Also, that dimpleing tool - I can't seem to locate a supplier for it. I checked the Ages of sail web site, they carry Amati - but not that tool,
seems like the correct way to make those copper plates somewhat accurately....
And to Uwek - thanks so much for that planking down load! So much info and a great help!
Can any one point me in the correct direction to learn how to tie a clove hitch?
And seizing (?) Ropes ...when and where would they be used?
Enough questions for a Sunday night...
Thank you,
I care about and appreciate all you guys!!
Here you go, remember you will be doing them horizontally not vertical as shown, but same basis. Just tie one side like shown and keep going across the width of shrouds. I have practiced a bit on some temp strings for test shrouds. Use a pair of tweezers to keep tension on help pull slack as you progress.Can any one point me in the correct direction to learn how to tie a clove hitch?
.
Thank you,
I care about and appreciate all you guys!!
 www.animatedknots.com


