
You are using an out of date browser. It may not display this or other websites correctly.
You should upgrade or use an alternative browser.
You should upgrade or use an alternative browser.


Re: OcCre Santisima Trinidad Build Log
<t>Everything looks really ship shape.</t>
<t>Everything looks really ship shape.</t>
Re: OcCre Santisima Trinidad Build Log
<t>Remarkable work Donnie, she looks very nice!</t>
<t>Remarkable work Donnie, she looks very nice!</t>

Re: OcCre Santisima Trinidad Build Log
<t>Just simply beautiful modeling skills you have Donnie. Looks fantastic....<br/>
<br/>
<br/>
<br/>
cheers Mario</t>
<t>Just simply beautiful modeling skills you have Donnie. Looks fantastic....<br/>
<br/>
<br/>
<br/>
cheers Mario</t>
C
CharlesEdward
Guest
Re: OcCre Santisima Trinidad Build Log
<t>You are doing very well with the Trini, keep it up and soon you will be finished. I am taking notes here and refering back to this log and others as I will be encountering the same situations that you have on the Montanes, Wappen and Royal William. Even if I have six kits in process, (all in the first planking stage), I am really trying to concentrate on the Montanes right now. I do attach one or two planks on the Wappen and two Albatross kits from time to time and actually the Albatross (either one) would be finished quicker if I decided to do those instead. It depends on where my muse leads me each weekend. BTW I am getting ready to move out my mini-lathe from the hobby room into the garage proper in anticipation of milling down the mast pieces of most of my kits this summer. If I have the lather out and ready instead of under my shelf, I would be able to taper those mast and yard pieces when I want to instead of moving the heavy lathe out from under the shelf to run and then cleaning the shop and pushing the lathe back under the shelf. It all depends on what work bench I can get and assemble in the next couple of weeks.</t>
<t>You are doing very well with the Trini, keep it up and soon you will be finished. I am taking notes here and refering back to this log and others as I will be encountering the same situations that you have on the Montanes, Wappen and Royal William. Even if I have six kits in process, (all in the first planking stage), I am really trying to concentrate on the Montanes right now. I do attach one or two planks on the Wappen and two Albatross kits from time to time and actually the Albatross (either one) would be finished quicker if I decided to do those instead. It depends on where my muse leads me each weekend. BTW I am getting ready to move out my mini-lathe from the hobby room into the garage proper in anticipation of milling down the mast pieces of most of my kits this summer. If I have the lather out and ready instead of under my shelf, I would be able to taper those mast and yard pieces when I want to instead of moving the heavy lathe out from under the shelf to run and then cleaning the shop and pushing the lathe back under the shelf. It all depends on what work bench I can get and assemble in the next couple of weeks.</t>


Re: OcCre Santisima Trinidad Build Log
<t>Beautiful work Donnie. I totally understand the need for a break now and then. We're entitled. We all work fast and furious on a new model and sooner or later we all hit the wall and need a diversion. Mine is playing guitar or working on the house. Seems like that's a never ending task there. Then I ready to get back to the ship building, renewed and refreshed.</t>
<t>Beautiful work Donnie. I totally understand the need for a break now and then. We're entitled. We all work fast and furious on a new model and sooner or later we all hit the wall and need a diversion. Mine is playing guitar or working on the house. Seems like that's a never ending task there. Then I ready to get back to the ship building, renewed and refreshed.</t>
Re: OcCre Santisima Trinidad Build Log
<t>Thanks Bob.<br/>
I have to work on it when I have a clear mind - which is getting harder these days. I have been struggling lately with some things.</t>
<t>Thanks Bob.<br/>
I have to work on it when I have a clear mind - which is getting harder these days. I have been struggling lately with some things.</t>
Re: OcCre Santisima Trinidad Build Log
<r>I understand that one and aree with Anna. Great job on the shoroud. Now there is a reason to say, <QUOTE><s>
<r>I understand that one and aree with Anna. Great job on the shoroud. Now there is a reason to say, <QUOTE><s>
</e></QUOTE></r></s>That's a lot of bees wax.<e>
Re: OcCre Santisima Trinidad Build Log
<t>A little more done. (I decided this time to make up all the shroud lines), then do the lanyards later.)</t>


<t>A little more done. (I decided this time to make up all the shroud lines), then do the lanyards later.)</t>
Last edited:
C
CharlesEdward
Guest
Re: OcCre Santisima Trinidad Build Log
<t>Donnie, I meant to ask you how you tappered your masts and yards after I saw a picture of your assembled masts for this kit? You know that I do have a ShopFox mini tabletop lathe, but to use it I have to move it out from under a shelf in my hobby room. So I use the old Craftsman electric drill and sandpaper / leather gloves to taper rods. Unfortunately my chuck is almost maxed out at 12mm rods so I have to be very careful when using it as the rod slips out of the chuck easily, and I have broken several rods in half. Any rod of a less diameter works better but I still have more difficulty with this method for yards which are tapered at either end. One end is fine but the other has to almost be done by hand. <br/>
The reason I am asking is because I broke away from planking my Montanes for a few weekends and decided to assemble the masts. I have the lower and upper foremast rods shaped and looking pretty good for not using the lathe. I dislike that in the Montanes kit, unlike the Trinidad, the instructions call for 1.0 mm brass rods to be used for the mast top railing supports and for 19 to be made. I only see five plus six plus five for the fore, main and mizzen mast tops which is 16 not 19. I much prefer what is included in the kit for use on the main deck railings and apparently what OcCre gave you in the Trinidad, those nice U-shaped top metal fittings, in black. I think that the brass rods will be too maleable and am considering using 2mm basswood rods painted black for those supports. Brass is hard to pain black also in my experience at trying to paint metal fittings. I found spray paint works the best.<br/>
BTW you have inspired me to get some beeswax for my rigging. I have never used it before and I now see how using the wax makes the rigging easier to handle, especially those shrouds and deadeye assemblies.</t>
Re: OcCre Santisima Trinidad Build Log
<t>Hi John,<br/>
thanks for your response - let me see. Well, actually, I tried to use a hand drill (craftsman) and I made a cradle for it. I called it the ugly lathe. I have that photo on my trinidad build log on the main sos site. It is really hideous looking. As a matter of fact, the drill turned too slow and I did not really accomplish anything worth while with it. <br/>
I am not sure if I can explain it or not how I tapered my mast, but I shall try. First, the tool. I used a Mini hand plane. I think Model Expo still carries one. I held this in my right hand. I laid the dowel in a fashion from left to right (--+-------------). With my left hand PALMS down where the + mark is, this is what I did.<br/>
I pressed my palm down on the dowel and the dowel is on a clear open space, so I used my left hand to rotate the dowel on the table. The dowel stays on the table, while my palm moves upward and backward to provide the rotating motion. Now, while this is going on, I take the mini hand plane and start tapering the (right side going towards the middle of the dowel) -- with the right side of the dowel is going to get trimmed down a lot !!! It is tricky, but actually not too bad once you get both hands coordinated. I would stop frequently to check my measurements. I put a DOT on the right end of the dowel to mark center. <br/>
I am not sure if this helps any, I might need to put up another video on this. I have all my yards that I will do like this - unless I get a lathe. The yards should work fine on a mini lathe, but the mast are quite long.<br/>
I wish I could get the Micro Mark 16" lathe. I am thinking that the chuck should take about another inch or so - so that would allow to me possibly insert at least an 18" stock.<br/>
I hope this helps some.</t>
C
CharlesEdward
Guest
Re: OcCre Santisima Trinidad Build Log
<t>Donnie, Thanks for the reply, I think I can visualize it. <br/>
<br/>
Regarding most hobby mini-lathes that many hobby shops sell, you are correct they are all way to small for the likes of the kits that you and I are doing. I mean the two chucks you need to get, one rotating for the tailstock and one fixed for the headstock, can take up to five inches away from your working space, leaving only 11" of a 16" working space. That is why I started looking at actuall desktop mini-lathes, but you also need an extention bed for that. <br/>
<br/>
ShopFox is one brand that to me had the ideal solution, and it was like under $300.00, but let me find the invoice and let you know for sure what the entire lathe, extension bed, steady-rest and chucks all cost. Although the extension bed is a ful 18" long, making the "mini-lathe" about 45" long, and you wind up only using about five or six inches of the extension bed, but it is five or six inches that you REALLY need to have. Plus I additionall bought a steady-rest support just in case. It is a awkward looking contraption that consists of three or more wheels and a support arm that has a base attached to the track bed of the lathe. You place the middle of the rod through it and adjust the wheels so they firmly support the center of the rod, the wheels will turn with the lathe. <br/>
<br/>
Since I had NEVER worked a lathe before I also purchased an good instruction dvd and it helped a lot. You also have to get mini-lathe tools, not the HUGE tools used on full size lathe, and those can be found even on the full-size lathe sites. <br/>
<br/>
I have only tapered about three or four rods for the Royal William as a test and as nervous as I was I actually tapered one end of the rod down to an incredible 2mm and it did not break. I was quite pleased with it, I just have to set the lathe up on its own workbench to be more easier to use.</t>
Re: OcCre Santisima Trinidad Build Log
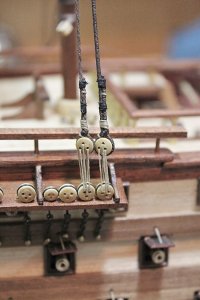
<t>This one is going a little quicker. This detail closeup just shows how I used one line from the knot behind the Deadeye all the way up to the upper shroud. There are no knots. The upper lighter colored line is actually tied to the shroud via a black thread. The shot is from inboard the ship of course.</t>


<t>This one is going a little quicker. This detail closeup just shows how I used one line from the knot behind the Deadeye all the way up to the upper shroud. There are no knots. The upper lighter colored line is actually tied to the shroud via a black thread. The shot is from inboard the ship of course.</t>
Last edited:
Re: OcCre Santisima Trinidad Build Log
<t>Very nice progress Donnie and clear photos !! All deadeyes on one line and good rigging.</t>
<t>Very nice progress Donnie and clear photos !! All deadeyes on one line and good rigging.</t>
Re: OcCre Santisima Trinidad Build Log
<t>Is this the way they showed how to attach the upper part of the lanyard deadeye? I have not seen that in any book or kit. It is usually a clove hitch at this scale at the bottom. The method of pulling the lanyard between the deadeye and the shroud, back under itself with a half hitch, then 3 round turns around the bottom of the shroud and stopped to the outside of one shroud is too cumbersome and looks blobby at this scale.</t>
<t>Is this the way they showed how to attach the upper part of the lanyard deadeye? I have not seen that in any book or kit. It is usually a clove hitch at this scale at the bottom. The method of pulling the lanyard between the deadeye and the shroud, back under itself with a half hitch, then 3 round turns around the bottom of the shroud and stopped to the outside of one shroud is too cumbersome and looks blobby at this scale.</t>
Re: OcCre Santisima Trinidad Build Log
<t>After some research on a few books I have, one in particular is Lennarth Petterson, I was able to find specific details about rigging the lanyard. At the beginning, I did not know if I wanted to follow this method as it does require a lot more effort. The close up shot does look messy, but in real life, it looks very decent.<br/>
I wrote some instructions below of how I did this, but I think it is too hard to write what I did to the lanyards, but I will try.<br/>
1) Beginning with the first hole of the deadeye mounted on the shroud the line goes through there and a knot "stops' the line. This part is always practiced as the standard. <br/>
2)Then the line makes it way looping through the lower and upper deadeyes. This part is always practiced as the standard.<br/>
3) With the line passing through the last "bottom" deadeye, I then use a needle threader to push it into the tiny space where the deadeye meets the shroud "wrapping". <br/>
4) I pull the line through towards me and then loop around the same at the back, then make my 4 passes around the lower shroud, make a half hitch and then carry that up to the next mid section and run the line through that and then on up to the top and tie off. <br/>
The written instructions are quite hard to put into words and I am tempted to put a video online showing what I do. Me personally, I am satisfied with my technique as I feel comfortable in the research I have done. However, at the same time, I do appreciate all the feedback.</t>
C
CharlesEdward
Guest
Re: OcCre Santisima Trinidad Build Log
<t>Do you secure the half-hitch with CA glue at all? Or just use a well tied half-hitch. I must practice more.</t>
<t>Do you secure the half-hitch with CA glue at all? Or just use a well tied half-hitch. I must practice more.</t>
Re: OcCre Santisima Trinidad Build Log
<t>John,<br/>
I do put just a "tad" (if that is a word) on them and let it sit there for about 5 seconds and then press the place with my finger to kind of press the glue in and that also removes the shine. The tad of glue is really a very small amount. Again, I am thinking about posting a video, but I have to get the Admiral in shape to do it. The video would last about 7 min as this is about how long it takes to perform one rigging. <br/>
ps. If I do post a video, I will report it.</t>
C
CharlesEdward
Guest
Re: OcCre Santisima Trinidad Build Log
<t>Since I am always in need of rigging assistance, no matter how long I do these kits, I look forward to that video, but knowing how much time and detail a video takes, I won't remind you but just keep checking back from time to time, daily of course. Does the beeswax stop the CA from adhereing (spelling) to the rigging?</t>
<t>Since I am always in need of rigging assistance, no matter how long I do these kits, I look forward to that video, but knowing how much time and detail a video takes, I won't remind you but just keep checking back from time to time, daily of course. Does the beeswax stop the CA from adhereing (spelling) to the rigging?</t>