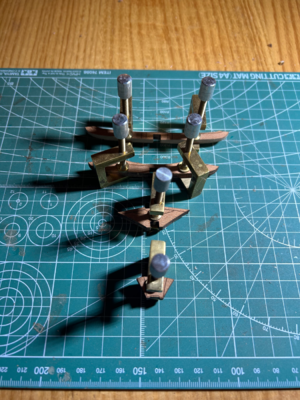
Love itThanks to everyone for visiting my diary. Progress is slow, but steady…
Here is the finished stem section.
View attachment 378278
You are using an out of date browser. It may not display this or other websites correctly.
You should upgrade or use an alternative browser.
You should upgrade or use an alternative browser.
La Salamandre 1752 1:48 (CAF) by Salty
- Thread starter Salty
- Start date
- Watchers 23
-
- Tags
- caf model la salamandre
- Joined
- Mar 1, 2023
- Messages
- 107
- Points
- 213

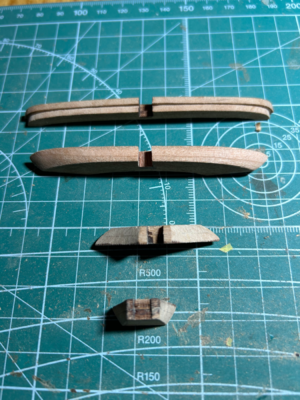
There is quite a substantial middle section joining the stem and the stern.
There is a backbone, but then these two pieces with notches for the frames which sit on top.
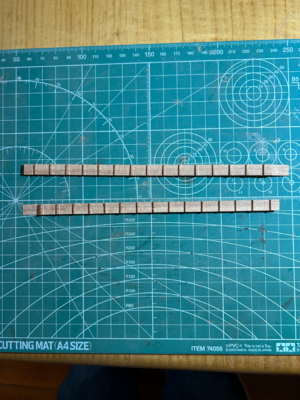
Cleaning and defining the notches took a few hours and are probably some of the more delicate parts that I have seen so far. The tips of the scarf joints are wafer thin. There is a small repair needed to the middle notch on the lower piece…
I probably didn’t need to go to the lengths that I did as they won’t be very visible, but I am sure that some of you will appreciate it when I say I did it because I would know they hadn’t been cleaned…
There is a backbone, but then these two pieces with notches for the frames which sit on top.

Cleaning and defining the notches took a few hours and are probably some of the more delicate parts that I have seen so far. The tips of the scarf joints are wafer thin. There is a small repair needed to the middle notch on the lower piece…
I probably didn’t need to go to the lengths that I did as they won’t be very visible, but I am sure that some of you will appreciate it when I say I did it because I would know they hadn’t been cleaned…
- Joined
- Mar 1, 2023
- Messages
- 107
- Points
- 213

Thanks to all of you who have visit my diary.
I have found a small issue with the keel before gluing up:
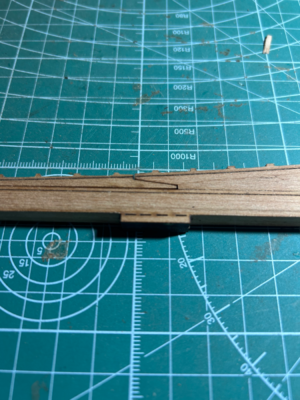
After checking the plan, I think that left notched section is too thin where it meets the right notched section. I don’t think the right section should be lowered as this seems to match the plan in its current state.
The solution is to make a thin wedge an about 5 cm long and about 0.5 mm high at the scarf. I can make the wedge from the left over material in the billet where these keel pieces came from.
If I do a good job with the glue joint, it hope it won’t be very visible and it will be hidden partially by the rabbet.
I have to say I seem to have found very few issues where the pieces haven’t matched the plan in this kit - fingers crossed!
I have found a small issue with the keel before gluing up:

After checking the plan, I think that left notched section is too thin where it meets the right notched section. I don’t think the right section should be lowered as this seems to match the plan in its current state.
The solution is to make a thin wedge an about 5 cm long and about 0.5 mm high at the scarf. I can make the wedge from the left over material in the billet where these keel pieces came from.
If I do a good job with the glue joint, it hope it won’t be very visible and it will be hidden partially by the rabbet.
I have to say I seem to have found very few issues where the pieces haven’t matched the plan in this kit - fingers crossed!
- Joined
- Mar 1, 2023
- Messages
- 107
- Points
- 213

The next step is to cut the rabbet.
The plan shows the various profiles as it changes along the length of the keel:
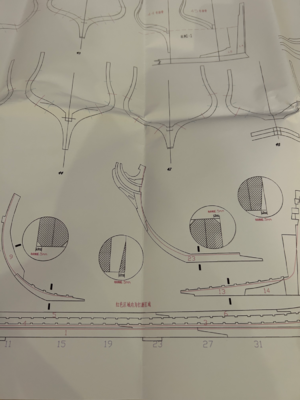
The red lines are marked in laser on the parts in the kit.
Boudroit and Berti also show cross-sections of the hull at various points and these also indicate the profile of the rabbet.
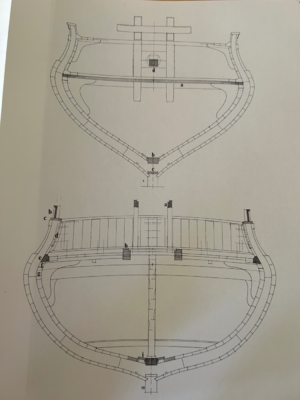
A little bit daunting as there are no second chances with these parts.
The plan shows the various profiles as it changes along the length of the keel:

The red lines are marked in laser on the parts in the kit.
Boudroit and Berti also show cross-sections of the hull at various points and these also indicate the profile of the rabbet.

A little bit daunting as there are no second chances with these parts.
- Joined
- Mar 1, 2023
- Messages
- 107
- Points
- 213

Here is the final result for the stern
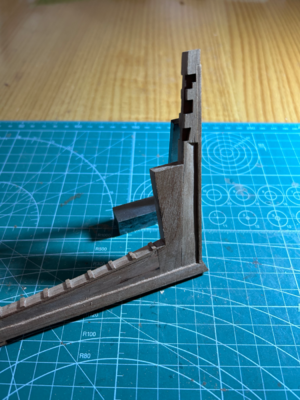
I used a Gem razor blade to define the outer edges and 2 and 5 mm chisels to remove the waste. In the end, it was a more straightforward than I imagined it might be as I didn’t get too excited and gradually worked my way down to the required depth with lots of shallow cuts (sounds a bit silly as the finished depth is only 1.5 mm). I cut a short length of planking to use as a depth gauge as I went along.

I used a Gem razor blade to define the outer edges and 2 and 5 mm chisels to remove the waste. In the end, it was a more straightforward than I imagined it might be as I didn’t get too excited and gradually worked my way down to the required depth with lots of shallow cuts (sounds a bit silly as the finished depth is only 1.5 mm). I cut a short length of planking to use as a depth gauge as I went along.
- Joined
- Mar 1, 2023
- Messages
- 107
- Points
- 213

Thanks again to everyone who has been following my progress. I must admit to really looking forward to working on La Salamandre each night. I went away for a couple of nights last week and it was good but I was glad to get home.
Although I don’t post much outside of this thread, I do visit other logs quite a bit and think it’s great so many people get so much enjoyment out of this pastime.
Here is the bow section:
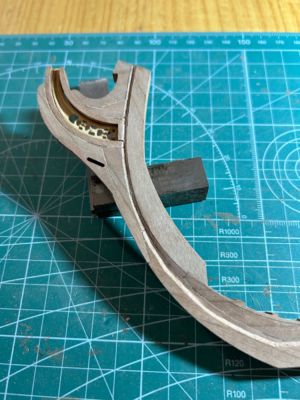
I used a 2 mm chisel for the most part because of the curves in the stem. I think it looks quite reasonable all things considered.
Although I don’t post much outside of this thread, I do visit other logs quite a bit and think it’s great so many people get so much enjoyment out of this pastime.
Here is the bow section:

I used a 2 mm chisel for the most part because of the curves in the stem. I think it looks quite reasonable all things considered.
Last edited:
- Joined
- Mar 1, 2023
- Messages
- 107
- Points
- 213

Over the weekend, I finished the rabbet for the middle section.
Here is the keel in the jig with the five finished frames (see post #29):
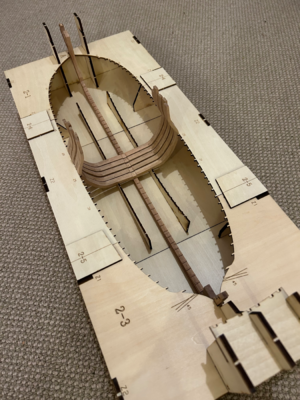
The keel is still in three pieces because I want to be able to check the hawse pieces and the stern structure before final assembly.
Everything went together with little fuss, so I must be on the right track.
Here is the keel in the jig with the five finished frames (see post #29):

The keel is still in three pieces because I want to be able to check the hawse pieces and the stern structure before final assembly.
Everything went together with little fuss, so I must be on the right track.
- Joined
- Mar 1, 2023
- Messages
- 107
- Points
- 213

The next step is fitting frames 44 and 45 to the keel and building the rest of the stern.
The first step is to bevel the frames in the usual way. Here is frame 44:
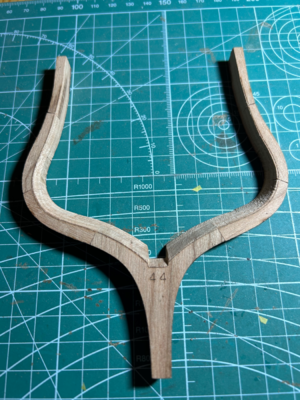
I haven’t finished the floor timbers on frames 45. This is because there are two filler blocks that need to be installed on either side of the deadwood. The frames and filler blocks are then faired to created a smooth transition from the frames to the deadwood.
The first step is to bevel the frames in the usual way. Here is frame 44:

I haven’t finished the floor timbers on frames 45. This is because there are two filler blocks that need to be installed on either side of the deadwood. The frames and filler blocks are then faired to created a smooth transition from the frames to the deadwood.
- Joined
- Mar 1, 2023
- Messages
- 107
- Points
- 213

Thanks to everyone for your support - Uwek, Norway, Shota70, GrantTyler, dockattner, Jimsky to name but a few who I can see have visited, as well as everyone else who has been following.
The forward face of frame 45 needs to be flattened so that it can butt up against the aft face of frame 44.
The CAF plans and Bourdoit and Berti seem to be different:
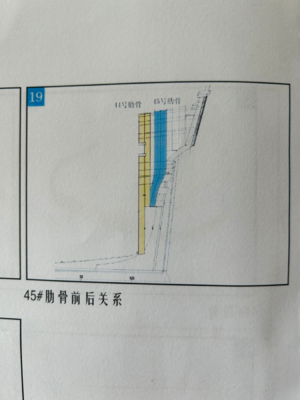
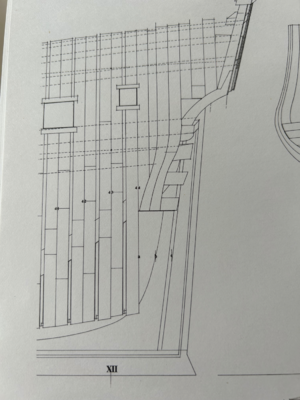
CAF seems to use 2 mm (same as all the other frames), but the instructions are not to scale. I cannot find anything in any other material from CAF that directly says 2 mm. On the other hand Boudroit and Berti use 4 mm (and 2 mm for all other frames). Other logs on this site have all used 4 mm (as far as I can see). So I have decided to try 4 mm.
This means removing 1 mm from the front face as the raised section of floor timber is 5 mm deep (see post 43). This seems right because the top transom timber seems to fit between the stern post and the aft face of frame 45.
Here is the result:
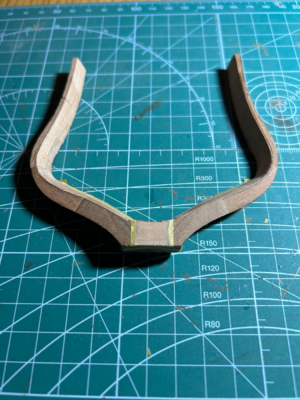
If I am not right then I can always remove more…
The forward face of frame 45 needs to be flattened so that it can butt up against the aft face of frame 44.
The CAF plans and Bourdoit and Berti seem to be different:


CAF seems to use 2 mm (same as all the other frames), but the instructions are not to scale. I cannot find anything in any other material from CAF that directly says 2 mm. On the other hand Boudroit and Berti use 4 mm (and 2 mm for all other frames). Other logs on this site have all used 4 mm (as far as I can see). So I have decided to try 4 mm.
This means removing 1 mm from the front face as the raised section of floor timber is 5 mm deep (see post 43). This seems right because the top transom timber seems to fit between the stern post and the aft face of frame 45.
Here is the result:

If I am not right then I can always remove more…
- Joined
- Jan 31, 2021
- Messages
- 556
- Points
- 353

Looking good!I think before I go any further I need to make up the transom timbers.
The transom timbers glued up
View attachment 382833
And bevelled:
View attachment 382832
- Joined
- Mar 1, 2023
- Messages
- 107
- Points
- 213

Fitting the transom timbers to frame 45 was relatively straightforward in the end.
The frame is 10 mm wide, but has to taper to 5 mm (or thereabouts) at the base. The top timber fitted without any adjustment, but the next timber down required a small adjustment. So I tapered the aft face of the frame starting from just below where the top timber met it straight down to a point at the base.
The next timber down when into place OK, and the bottom two timbers needed a bit more adjustment, but eventually fitted. Here is the result:
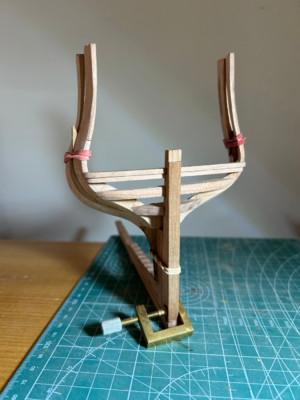
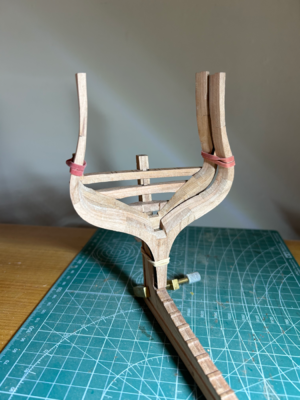
I haven’t fixed anything in place yet as there are to filler blocks still to be fitted either side of the deadwood. This will involve some adjustments to the floor timbers.
You are right if you are suspicious about how little time this appears to have taken (for me at least). I have been confined to home with a case of shingles in my left eye (!!). The vision in that eye is very blurred, I can still see OK with my right eye… Fortunately, the worst has passed and there’s no lasting damage, although I will have to take eye drops for a few months.
The frame is 10 mm wide, but has to taper to 5 mm (or thereabouts) at the base. The top timber fitted without any adjustment, but the next timber down required a small adjustment. So I tapered the aft face of the frame starting from just below where the top timber met it straight down to a point at the base.
The next timber down when into place OK, and the bottom two timbers needed a bit more adjustment, but eventually fitted. Here is the result:


I haven’t fixed anything in place yet as there are to filler blocks still to be fitted either side of the deadwood. This will involve some adjustments to the floor timbers.
You are right if you are suspicious about how little time this appears to have taken (for me at least). I have been confined to home with a case of shingles in my left eye (!!). The vision in that eye is very blurred, I can still see OK with my right eye… Fortunately, the worst has passed and there’s no lasting damage, although I will have to take eye drops for a few months.
- Joined
- Apr 20, 2020
- Messages
- 5,176
- Points
- 738

I wish you a full and complete recovery, from my mother's experience I know that it is very, very unpleasant. You are doing a great job!!!Fitting the transom timbers to frame 45 was relatively straightforward in the end.
The frame is 10 mm wide, but has to taper to 5 mm (or thereabouts) at the base. The top timber fitted without any adjustment, but the next timber down required a small adjustment. So I tapered the aft face of the frame starting from just below where the top timber met it straight down to a point at the base.
The next timber down when into place OK, and the bottom two timbers needed a bit more adjustment, but eventually fitted. Here is the result:
View attachment 383307
View attachment 383308
I haven’t fixed anything in place yet as there are to filler blocks still to be fitted either side of the deadwood. This will involve some adjustments to the floor timbers.
You are right if you are suspicious about how little time this appears to have taken (for me at least). I have been confined to home with a case of shingles in my left eye (!!). The vision in that eye is very blurred, I can still see OK with my right eye… Fortunately, the worst has passed and there’s no lasting damage, although I will have to take eye drops for a few months.
Praying for a full and uneventful recovery Salty!
- Joined
- Mar 1, 2023
- Messages
- 107
- Points
- 213

Thank you for your concern, Dockattner and Shota70. The eye drops have had an immediate effect so fingers crossed.
The roughly shaped deadwood fillers:
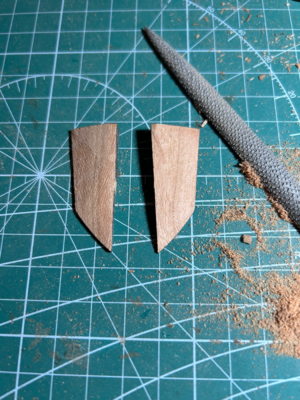
The rasp - bought from the instrument making section at www.dictum.com - is becoming a favourite.
The roughly shaped deadwood fillers:

The rasp - bought from the instrument making section at www.dictum.com - is becoming a favourite.
- Joined
- Mar 1, 2023
- Messages
- 107
- Points
- 213

Thanks again to all who have been checking on my progress.
It seems the stern structure is one of the more difficult areas in POF models and I am finding it no different.
There is a lot to get right - the frames and the deadwood have to be fair and it seems most of the work needs to be done prior to final assembly. So the last few days have been an endless cycle of sand, assemble (with rubber bands), check, mark areas that need work, disassemble, sand, repeat. I am probably being over-cautious, but it would be easy to make a mistake and regret for it.
- Joined
- Mar 1, 2023
- Messages
- 107
- Points
- 213

Here is frame 44 and 45 on the keel, together with the transom timbers and filler blocks.
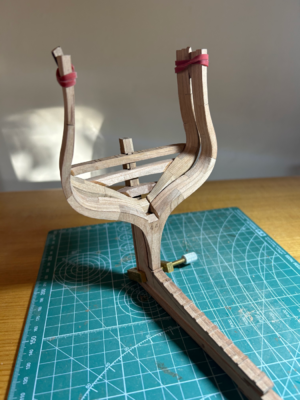
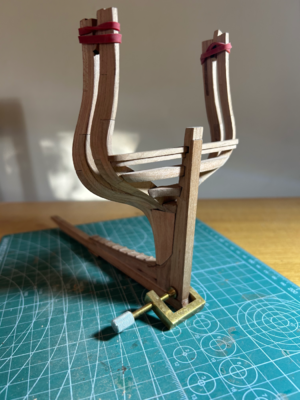
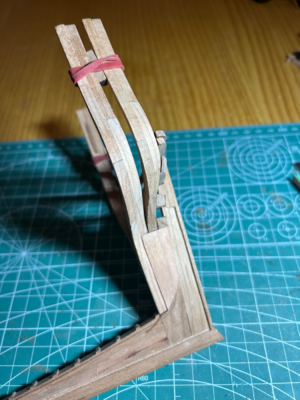
I am reasonably happy with the result. There were a few moments when I thought the worst. There are no modifications to the plans (as vague as they are) and I don’t think there is anything obviously wrong to my eye.
The whole structure is quite fragile, so I have not done anything to it in the way of sanding after assembly. Once incorporated in the rest of the hull, I might do some further refining. There is a small amount of material that could be removed from the top of the filler blocks where they meet frame 44.
I have to say thanks to Uwek and the others who have built this kit and generously posted logs on this forum. It would have been just that much harder without them documenting what they did.
Hi Salty, I really struggled with this section on my current build. Your work looks good to my eye as well.
- Joined
- Aug 14, 2018
- Messages
- 486
- Points
- 323

Work of art Salty. Cheers JJ.JHere is frame 44 and 45 on the keel, together with the transom timbers and filler blocks.
View attachment 384942
View attachment 384943
View attachment 384945
I am reasonably happy with the result. There were a few moments when I thought the worst. There are no modifications to the plans (as vague as they are) and I don’t think there is anything obviously wrong to my eye.
The whole structure is quite fragile, so I have not done anything to it in the way of sanding after assembly. Once incorporated in the rest of the hull, I might do some further refining. There is a small amount of material that could be removed from the top of the filler blocks where they meet frame 44.
I have to say thanks to Uwek and the others who have built this kit and generously posted logs on this forum. It would have been just that much harder without them documenting what they did.
Good morning Salty. Looks perfect to my layman eyes. Beautiful work. Cheers GrantHere is frame 44 and 45 on the keel, together with the transom timbers and filler blocks.
View attachment 384942
View attachment 384943
View attachment 384945
I am reasonably happy with the result. There were a few moments when I thought the worst. There are no modifications to the plans (as vague as they are) and I don’t think there is anything obviously wrong to my eye.
The whole structure is quite fragile, so I have not done anything to it in the way of sanding after assembly. Once incorporated in the rest of the hull, I might do some further refining. There is a small amount of material that could be removed from the top of the filler blocks where they meet frame 44.
I have to say thanks to Uwek and the others who have built this kit and generously posted logs on this forum. It would have been just that much harder without them documenting what they did.

