HMS PANDORA 1:72 - Modelship Dockyard

This anchor stock planking is "only" at the wales and the first 6 planking rows lower - so possible to handle
If necessary, f.e. because of some too much sanding etc. you can easily adjust in the row 7 and further - I guess it will be interesting to handle.
BTW: positive will be the fact, that the pieces of planks are relatively short - so you will have no big problem of correct bending the planks
A new challenge but I am sure no need for sleepless nights :cool:
Thank you very much for the re-assurance, Uwe. You are 100% right about the planks being relatively short which should help a lot. I am sure that once I get going, it will be business as usual.
 
Hello Heinrich,

The base planking is nicely accomplished my friend.

Offered in the spirit of helpfulness as I am in no way qualified to teach you anything about model ship building... I also had top/butt planks within and below the wales, and I found they were easily accomplished AFTER I had a thorough think of what is being depicted (and also after a few failed attempts). The tricky bit is that the ends fall on frames (or 'pretend' frames in your case) - but so do the 'tips of the triangles.' Noteworthy is that half of the time the tip points up, and half of the time the tip points down.

I found it helpful to think of two rows of top/butt planks as a unit. Two rows, followed by two rows, followed by... You will see a straight run every two planking rows and once I had that in my head the construction made more sense to me.

My concern for your build is that the pieces are laser precut. As cutting these odd planks was very challenging until I came up with a system (I burned through quite a kindling pile until I had that sorted) having them pre-cut will be a real boon. BUT you don't have extras (unless they are provided) so great care must be taken with char removal. Over or under shaping will make the fit rather sloppy and throw off the pattern.

I think you say 'holding thumbs'...
What an insightful comment, Paul. It is greatly appreciated and bookmarked. I love your tip of regarding a completed section as every two rows. I can well see how managing it that way, makes the planking more ... well ... manageable.

Also, the char removal is for sure something that needs to be accounted for. As you say, removing too much material will create ill-fitting joints and that would be a terrible shame if that happens. I think a good idea would be to lay out two rows on some masking tape to dry fit the joints and to see the effect of the char on the planks. On some builds (not Pandora, mind you) I have seen builders leave the char between the planks which created a very natural caulking effect. That is also something to consider, provided, of course, that the char is not too pronounced.

Please hold both thumbs, my friend and please comment, critique and give advice as you see fit. It will be most welcome.
 
Those joints are already giving me sleepless nights, my friend. I know one should always read and look ahead, but I fear one might become a bit overwhelmed if you did it in this case. So, for now, I am following the principle of walking to Beijing by first placing one foot in front of the other!

I know what you mean about reading and looking ahead. Sometimes after completing a fixture I find I want to get it fixed in position as soon as possible. A mental warning bell now sounds in my head warning me to “turn the page” and read ahead in case my enthusiasm affects other parts that need to be placed first.

An interesting and informative interaction between you and Paul. There’s always something to learn reading through various build threads.
I am exactly the same, Roger. As soon as I have finished a part, I want to fix it into position, but alas, that is not the way to go. Best practice is to read ahead (at least until the end of the section of work that you are busy with) to see what else needs to be done. Abut the interaction on SOS - that is what truly sets this forum apart from others and what makes our members so special.
 
Thank you, Richie. The hull is relatively straightforward to plank - however towards the stern and bow, the strakes have a sharper sweep than meets the eye. A few inserts and dropped planks were required to pull the planking line straight.
I see this planking arrangment is a little different from what I know so will watch with interest how you progress, sorry I wont be any help though.
 
I see this planking arrangment is a little different from what I know so will watch with interest how you progress, sorry I wont be any help though.
Richie, it is VERY different and conforms to no rules, whatsoever! ROTF I am just planking to get the hull closed without following any pattern. However, I am paying great attention to how the planks butt up against each other to ensure I have smooth and even lines and that the run of the planking remains unforced. As I mentioned before, my only goal is to ensure a good base for that second (final layer) of planking.
 
Hard at work in the Nantong Shipyard. Hull has been closed, the resin filler pieces have been fitted and above deck work construction has started. Pictures will follow over the weekend.
It is still a long way until the ship can be launched ...... like on the John Cleveley painting of the 6th rate you showed
 
Dear Friends

I promised you that photographs would follow and here we go.

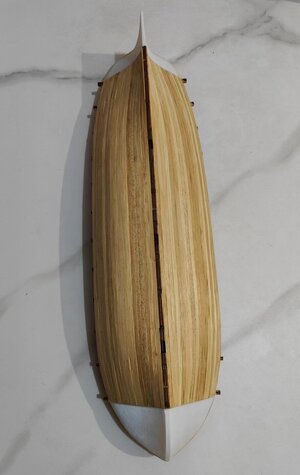
Closing up the hull on the Port Side went relatively quickly which meant that the first-layer planking was completed. Whilst the temptation to sand the planked portion was great, I resisted as I realized that first adding the resin filler pieces would provide me with a much clearer picture of the run of the hull. I have always said that successful planking depends on how well you can “read” the hull - I am not sure if this makes any sense to anyone else, but to me it is very important.

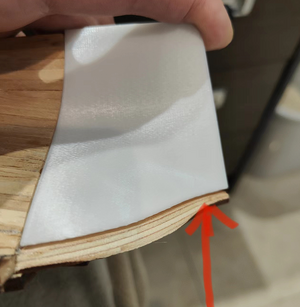
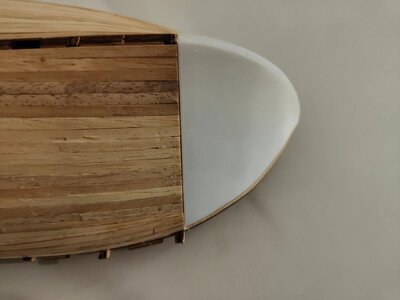
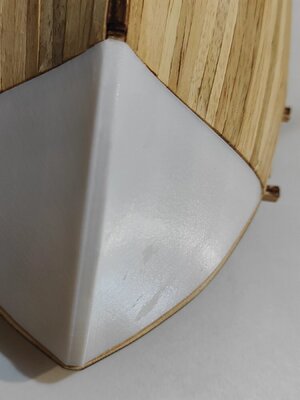
This also meant that it was now time to install the much spoken about resin filler pieces. I quickly learnt just how accurately this kit is designed when I encountered a challenge fitting the stern piece. Pushed into position (dry-fit, of course) a peculiar situation arose. With the filler piece properly butted up against the wooden planking, the fit was great, BUT I had a gap at the bottom.

Bottom Gap.png
Note the gap at the bottom between the filler piece and the false deck when the resin filler was pushed against the planked surface.

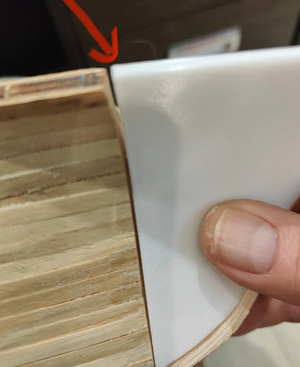
Conversely, if I pressed it flat against the bottom, there would be a gap between the filler piece and the planking culminating in a very noticeable and large gap at the top.

Top Gap.png
Note the gap between the filler piece and the planked section when the filler piece was pressed flat against the false deck at the bottom.

A quick WeChat message to @wuxiaomeng Wuxi resulted in an instantaneous diagnosis of the problem and two possible solutions. The problem was diagnosed as a CA glue spill which I found hard to imagine could have such a big effect. And yet, when the glue spill was sanded away, the fit was about 90% perfect. Therefore, a note to prospective Pandora builders: Make sure there are no glue spills – no matter how small.

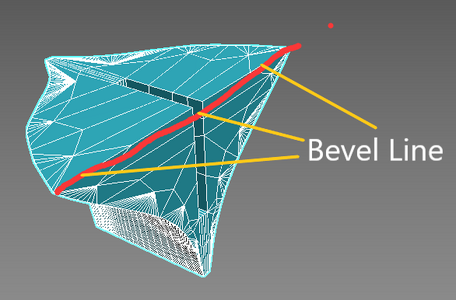
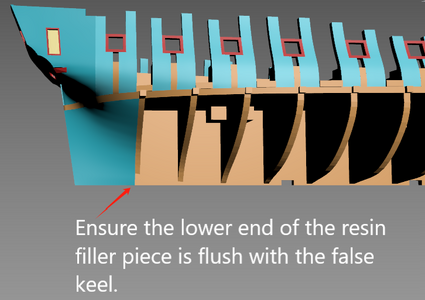
I mentioned that the fit was now about 90% of what I wanted it to be, but not yet at 100%. The second suggestion Wuxi made was to put a very slight bevel at the bottom edge of the filler piece that butts up against the planking. (See illustration below).

Rear Filler Bevel.png
The red line indicates where I had to put a small bevel on the filler piece. Actually, "bevel" is the wrong word - it was more like than one or two passes with a flat file.

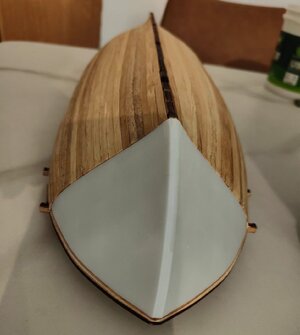
And Voila! With that done, I was very happy with the fit. The bow filler piece slotted into a perfect fit right from the word go with no extra work needed.

微信图片_20240315181518.jpg

微信图片_20240315181528.jpg

Flush.png

Mission accomplished!

微信图片_20240315181611.jpg

Please note that I do NOT beautify, photoshop or use filters on any of my pictures.

微信图片_20240315102245.jpg

微信图片_20240315102229.jpg

微信图片_20240315181544.jpg
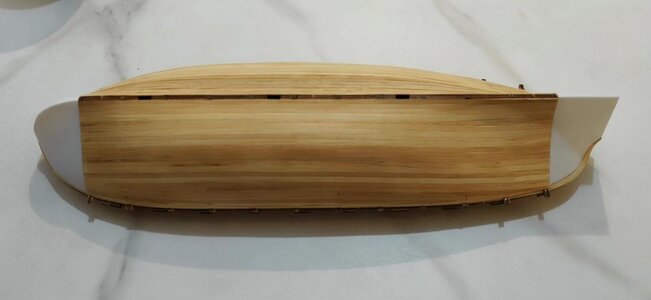
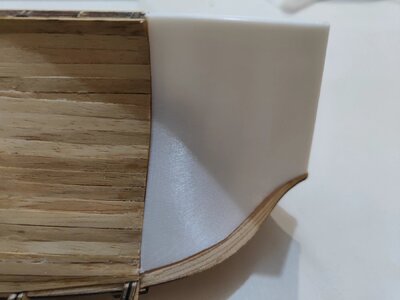
And this is exactly what I had aimed for - note the planking protruding ever so slightly above the filler piece. Just imagine, sanding from the resin piece at the bow towards the stern, how easy it will be to make the fit between planking and resin piece seamless. Delightful, I tell you! ROTF
 
Dear Friends

I promised you that photographs would follow and here we go.

Closing up the hull on the Port Side went relatively quickly which meant that the first-layer planking was completed. Whilst the temptation to sand the planked portion was great, I resisted as I realized that first adding the resin filler pieces would provide me with a much clearer picture of the run of the hull. I have always said that successful planking depends on how well you can “read” the hull - I am not sure if this makes any sense to anyone else, but to me it is very important.

This also meant that it was now time to install the much spoken about resin filler pieces. I quickly learnt just how accurately this kit is designed when I encountered a challenge fitting the stern piece. Pushed into position (dry-fit, of course) a peculiar situation arose. With the filler piece properly butted up against the wooden planking, the fit was great, BUT I had a gap at the bottom.

View attachment 435076
Note the gap at the bottom between the filler piece and the false deck when the resin filler was pushed against the planked surface.

Conversely, if I pressed it flat against the bottom, there would be a gap between the filler piece and the planking culminating in a very noticeable and large gap at the top.

View attachment 435077
Note the gap between the filler piece and the planked section when the filler piece was pressed flat against the false deck at the bottom.

A quick WeChat message to @wuxiaomeng Wuxi resulted in an instantaneous diagnosis of the problem and two possible solutions. The problem was diagnosed as a CA glue spill which I found hard to imagine could have such a big effect. And yet, when the glue spill was sanded away, the fit was about 90% perfect. Therefore, a note to prospective Pandora builders: Make sure there are no glue spills – no matter how small.

I mentioned that the fit was now about 90% of what I wanted it to be, but not yet at 100%. The second suggestion Wuxi made was to put a very slight bevel at the bottom edge of the filler piece that butts up against the planking. (See illustration below).

View attachment 435078
The red line indicates where I had to put a small bevel on the filler piece. Actually, "bevel" is the wrong word - it was more like than one or two passes with a flat file.

And Voila! With that done, I was very happy with the fit. The bow filler piece slotted into a perfect fit right from the word go with no extra work needed.

View attachment 435079

View attachment 435081

View attachment 435082

Mission accomplished!

View attachment 435083

Please note that I do NOT beautify, photoshop or use filters on any of my pictures.

View attachment 435084

View attachment 435085

View attachment 435086
And this is exactly what I had aimed for - note the planking protruding ever so slightly above the filler piece. Just imagine, sanding from the resin piece at the bow towards the stern, how easy it will be to make the fit between planking and resin piece seamless. Delightful, I tell you! ROTF
Good afternoon Heinrich. Delightful it is. Voila it all just works perfectly- some sanding and I can’t wait for your second layer- this ship has a beautiful planking pattern. Cheers Grant
 
The same technique with wooden parts will be a really good choice. I avoid working with CA glue as much as possible, so the printed resin parts are nothing for me.

Very good description of your progres, Hermann. It is helpful for everyone who likes to build this kit.
 
This is incredible Heinrich; you now have a solid base to work from in the bow and stern which are properly shaped. Just curious weather a light sanding with a very fine grit sandpaper on the resin pieces would produce better adhesion. You have some tight looking bends to contend with and will need all the grip you can get from the CA.
 
Now it’s getting even more interesting as you show the potential issues and then solution to the interface between the resin pieces and the wood.

However, a question: How critical is it ensure that tight fit since it will all be covered with the second planking? I’m thinking of the small gaps not the smooth alignment of the wood and resin pieces.
 
Good afternoon Heinrich. Delightful it is. Voila it all just works perfectly- some sanding and I can’t wait for your second layer- this ship has a beautiful planking pattern. Cheers Grant
I am just as itchy to start sanding, but on this ship the final sanding and fairing takes place from the gun ports to the waist and then to the hull. Remember, there are also resin parts that go on top of the false keel and then have to be brought into line with the waist of the ship which forms a crucial part in the whole planking exercise. Therefore, I have to be patient and wait until I'm done with all the above deck parts too.
 
Back
Top