- Joined
- Jan 9, 2020
- Messages
- 10,378
- Points
- 938

Dear Friends
Welcome to my build log of the Modelship Dockyard HMS Pandora. This log will be very different from my past efforts as it will focus solely on the actual build process of the model. The fact that the model has been very thoroughly researched at the hand of very reputable and officially LICENSED sources, are more than good enough for me and as such I will not be conducting any further research on the subject; nor will there be any attempt on my part to modify the kit or alter its design. If I do change anything, it will be for aesthetic purposes only and not for the sake of historical accuracy.
Historical Background and Research
@Modelship Dockyard based their historical research of the Pandora on three types of resources:
https://shipsofscale.com/sosforums/threads/pob-1-72-hms-pandora-1779-by-modelship-dockyard.10600/
Unboxing & Kit Review:
I will not do be doing an unboxing either – that has already been done by @Donnie.
https://shipsofscale.com/sosforums/threads/hms-pandora-1-72-by-modelship-dockyard.11731/
As the build progresses, I will obviously comment on the kit design, instructions, quality of the materials, fitment and the overall pleasure/frustration factor involved in building the model.
There is a ton of source material on the Pandora available on the internet, but if you want to know more, you can find additional information here:
https://www.bing.com/search?pglt=41...NIBCDUzODRqMGoxqAIAsAIA&FORM=ANNTA1&PC=SCOOBE
The Build
And with that, all the paraphernalia and pre-amble is out of the way, and I can start building.
The first step was to glue two platforms into two specially provided slots in the false keel. (See below)
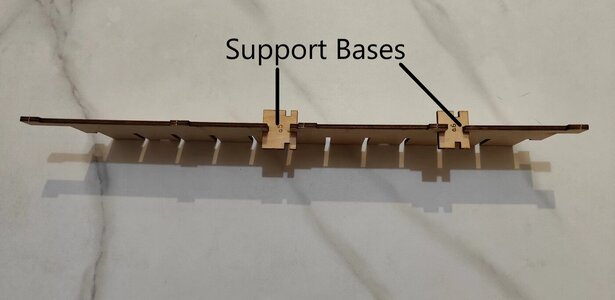
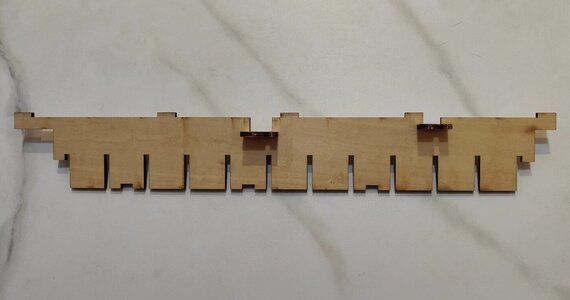
I do know that they will later form the “floor” of two boxes that will be constructed around the bulkheads #6 and #10. I would assume that these two “boxes” are intended to simulate two compartments in the hold later on, but that is just speculation at this stage.
Next on the agenda is part the deck (or I suppose more accurately) false deck construction. This was new to me as it consists of two completely different-looking deck-parts which have to be glued together to form the false deck.
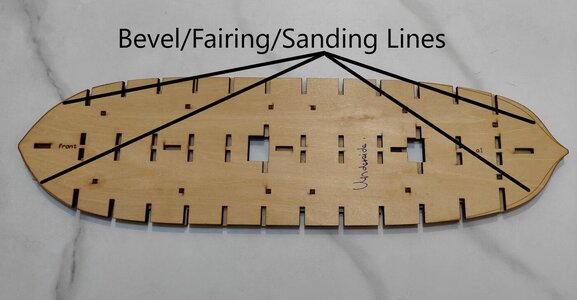
This picture shows the first one of the two false-deck components. Note the fairing lines which are clearly visible as they are on all of the bulkheads. Even though I have faired/beveled my fair share of hulls on gut feel alone, I really appreciate this touch as it expedites the fairing process and improves the overall accuracy.
At first glance, I thought it was going to be a nightmare to align these two pieces for gluing, but a quick look at the instructions, showed a very novel way adopted by @Modelship Dockyard to make this a walk in the park. Both parts contain 12 x 4mm square holes into which 12 x 4mm square pegs are driven. (see the instructions below)
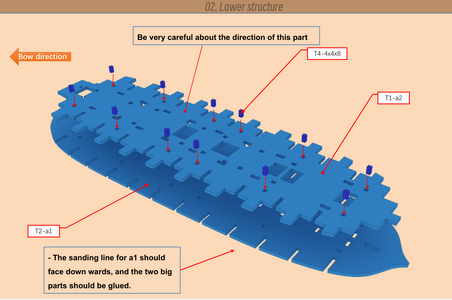
Note the 12 pegs which fit into corresponding slots in the two separate deck pieces.
Care obviously has to be taken when inserting the first two pegs (I inserted one at either end of the deck diagonally opposite from each other), but after that, it probably took me a minute to hammer in the remaining 10. The result – two perfectly aligned deck pieces.
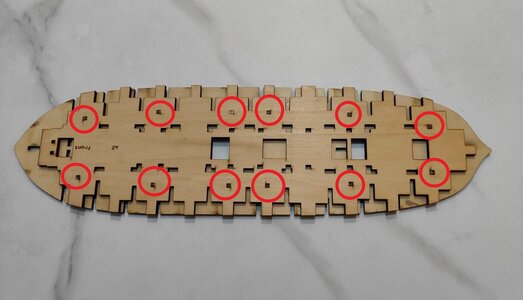
This picture shows the two false-deck components glued. The red circles indicate the positions of the 12 square pegs used to join the two sections.
Thereafter I faired the underside of the false deck and glued the false keel to the deck (upside down of course).
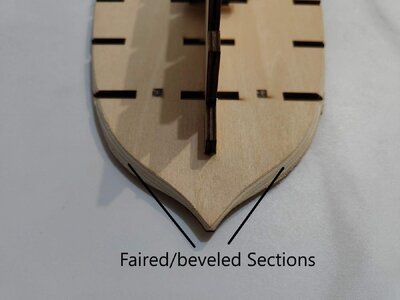
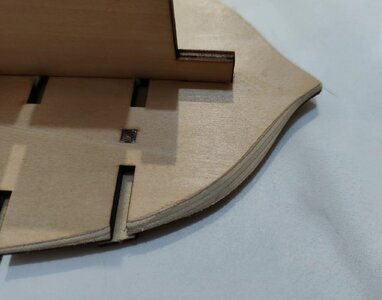
Close-ups of the faired deck-section (Above and Below)
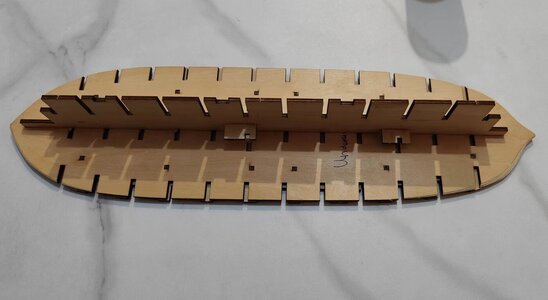
False keel glued to false deck.
Next it was a case of finishing the two “boxes” by gluing the walls around the previously installed floor sections. Unfortunately, I only took photographs of the boxes after I started installing the bulkheads, but this is what they look like.
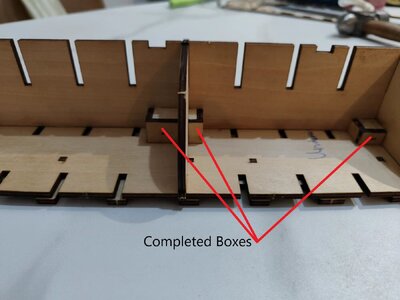
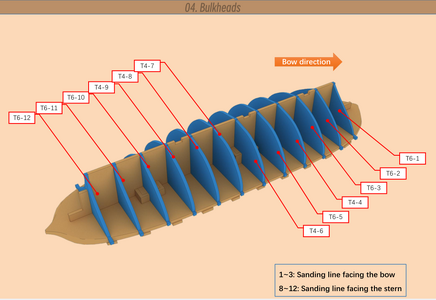
Now came a part I was really looking forward to: installing the bulkheads. Fairing the bulkheads was a breeze. As mentioned earlier, the bevel lines are clearly inscribed on the bulkheads and there was actually very little beveling that needed to be done. This obviously bears testimony to very accurately shaped bulkheads and I was duly impressed. NOTE to future builders: Care needs to be taken as to how the frames need to be placed. Bulkheads #1-3 are place with the sanding line facing the bow and bulkheads #8-12 with the sanding line facing the stern. How you place bulkheads #4-7 does not matter. This is all very clearly detailed in the instructions though.
But if I was impressed by the accuracy of the bulkheads, I was blown away by how they fitted onto the false keel and into the false deck. I am used to polishing the bulkheads’ slots a little, file a bit here, sand a bit there and so forth, but THIS!
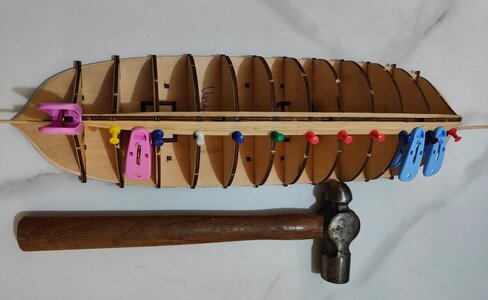
I did not even take the sandpaper out of my tool drawer (I used my small files for all the fairing). It was simply a case of starting the bulkheads in their respective slots and lightly tapping them into position with my hammer. (A word on my hammer. Contrary to most model builders who use a small, light hammer, I use a full-sized, heavy hammer as I find I have more control over and a better feel of the exact force that I am exerting.) The tabs at the bottom of the bulkheads slotted fully home into the slots provided for them in the false deck while the tops are PERFECTLY level with the top of the false keel. No more lego blocks to ensure the bulkheads are square to the keel and no more squares to make sure they are perpendicular. Gotta love it!
And, before I knew it, I could start the planking!
I want to thank in advance each and every one of you who will visit this log. You are warmly invited to critique, comment, advise, give a thumbs-up when you like something, or, just pop in for a chat - exactly as per the Willem Barentsz log. So far, I am enjoying the kit a lot and I am looking forward to see what Pandora conjures up. Please join me for the ride.
Welcome to my build log of the Modelship Dockyard HMS Pandora. This log will be very different from my past efforts as it will focus solely on the actual build process of the model. The fact that the model has been very thoroughly researched at the hand of very reputable and officially LICENSED sources, are more than good enough for me and as such I will not be conducting any further research on the subject; nor will there be any attempt on my part to modify the kit or alter its design. If I do change anything, it will be for aesthetic purposes only and not for the sake of historical accuracy.
Historical Background and Research
@Modelship Dockyard based their historical research of the Pandora on three types of resources:
- The book “The 24-gun Frigate PANDORA (Anatomy of the Ship)" by John McKay and Ron Coleman. (For those of you interested in this publication, Uwe did a comprehensive review of this book which can be found here
https://shipsofscale.com/sosforums/...-the-ship-by-john-mckay-and-ron-coleman.3522/
- RGM archival sources, and
- Fully-licensed NMM drawings.
https://shipsofscale.com/sosforums/threads/pob-1-72-hms-pandora-1779-by-modelship-dockyard.10600/
Unboxing & Kit Review:
I will not do be doing an unboxing either – that has already been done by @Donnie.
https://shipsofscale.com/sosforums/threads/hms-pandora-1-72-by-modelship-dockyard.11731/
As the build progresses, I will obviously comment on the kit design, instructions, quality of the materials, fitment and the overall pleasure/frustration factor involved in building the model.
There is a ton of source material on the Pandora available on the internet, but if you want to know more, you can find additional information here:
https://www.bing.com/search?pglt=41...NIBCDUzODRqMGoxqAIAsAIA&FORM=ANNTA1&PC=SCOOBE
The Build
And with that, all the paraphernalia and pre-amble is out of the way, and I can start building.
The first step was to glue two platforms into two specially provided slots in the false keel. (See below)


I do know that they will later form the “floor” of two boxes that will be constructed around the bulkheads #6 and #10. I would assume that these two “boxes” are intended to simulate two compartments in the hold later on, but that is just speculation at this stage.
Next on the agenda is part the deck (or I suppose more accurately) false deck construction. This was new to me as it consists of two completely different-looking deck-parts which have to be glued together to form the false deck.

This picture shows the first one of the two false-deck components. Note the fairing lines which are clearly visible as they are on all of the bulkheads. Even though I have faired/beveled my fair share of hulls on gut feel alone, I really appreciate this touch as it expedites the fairing process and improves the overall accuracy.
At first glance, I thought it was going to be a nightmare to align these two pieces for gluing, but a quick look at the instructions, showed a very novel way adopted by @Modelship Dockyard to make this a walk in the park. Both parts contain 12 x 4mm square holes into which 12 x 4mm square pegs are driven. (see the instructions below)

Note the 12 pegs which fit into corresponding slots in the two separate deck pieces.
Care obviously has to be taken when inserting the first two pegs (I inserted one at either end of the deck diagonally opposite from each other), but after that, it probably took me a minute to hammer in the remaining 10. The result – two perfectly aligned deck pieces.

This picture shows the two false-deck components glued. The red circles indicate the positions of the 12 square pegs used to join the two sections.
Thereafter I faired the underside of the false deck and glued the false keel to the deck (upside down of course).

Close-ups of the faired deck-section (Above and Below)


False keel glued to false deck.
Next it was a case of finishing the two “boxes” by gluing the walls around the previously installed floor sections. Unfortunately, I only took photographs of the boxes after I started installing the bulkheads, but this is what they look like.

Now came a part I was really looking forward to: installing the bulkheads. Fairing the bulkheads was a breeze. As mentioned earlier, the bevel lines are clearly inscribed on the bulkheads and there was actually very little beveling that needed to be done. This obviously bears testimony to very accurately shaped bulkheads and I was duly impressed. NOTE to future builders: Care needs to be taken as to how the frames need to be placed. Bulkheads #1-3 are place with the sanding line facing the bow and bulkheads #8-12 with the sanding line facing the stern. How you place bulkheads #4-7 does not matter. This is all very clearly detailed in the instructions though.

But if I was impressed by the accuracy of the bulkheads, I was blown away by how they fitted onto the false keel and into the false deck. I am used to polishing the bulkheads’ slots a little, file a bit here, sand a bit there and so forth, but THIS!
I did not even take the sandpaper out of my tool drawer (I used my small files for all the fairing). It was simply a case of starting the bulkheads in their respective slots and lightly tapping them into position with my hammer. (A word on my hammer. Contrary to most model builders who use a small, light hammer, I use a full-sized, heavy hammer as I find I have more control over and a better feel of the exact force that I am exerting.) The tabs at the bottom of the bulkheads slotted fully home into the slots provided for them in the false deck while the tops are PERFECTLY level with the top of the false keel. No more lego blocks to ensure the bulkheads are square to the keel and no more squares to make sure they are perpendicular. Gotta love it!
And, before I knew it, I could start the planking!

I want to thank in advance each and every one of you who will visit this log. You are warmly invited to critique, comment, advise, give a thumbs-up when you like something, or, just pop in for a chat - exactly as per the Willem Barentsz log. So far, I am enjoying the kit a lot and I am looking forward to see what Pandora conjures up. Please join me for the ride.


