Hayling Hoy: POF kit [COMPLETED BUILD]

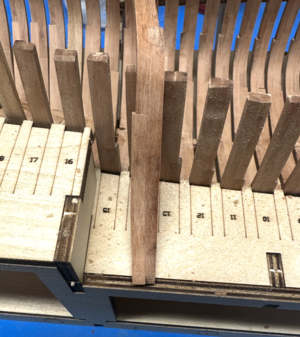
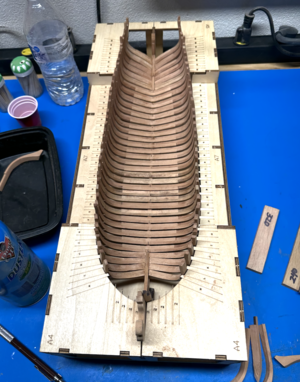
One more view of the frames with the new ones in place. Everything feels better and the run along the inside is more even. The angle on the aft half frame is better now that I measured the angle off the jig and transferred to the disc sander table. It turns out the bevel was about right in this case, but it's easier to cut the bevel right the first time with the measurement.
1692887512983.png
 
I have a new problem.

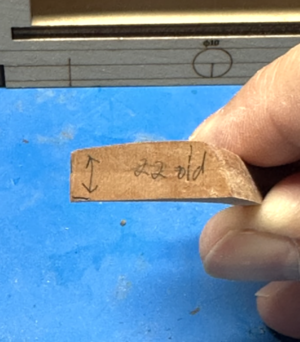
When affixing the frames, the aft starboard frames no longer fit. There were a couple that seemed to be too thick. This is despite many test fits. I don't know if the glue swelled a piece or two, the fit was very tight to start with. I tried thinning the pieces a bit. I had to do that on one forward half frame. I got over jealous and ended up ruining the clean look of the foot of frame 23, the aft most where the thicknesses had added up. Bummer! I just redid all of those frames! I tried frame 22 but that one is missing by a hair on thickness as well. Frame 21 looks ok after some thinning.
It sucks, but I decided to redo the frames. I would always see the foot of that frame 23 in the admiralty style display and wish I had taken a second pass. Plus, I just know that some of the error would transfer to the transom assembly, which is always tough for me, and others, to get right on any model.
I decided to draw and recut both side of frames 21-23, hopefully avoiding setting up again. The gantry of the laser cutter takes up a lot of room and everything has to be cleared to put it down. It's easy to set up, but I hate repeat work. I have hooks for a bicycle on my walls where I can hang up the cutter and the board I use under it.
Here's frame 23 from Illustrator.
1692888264800.png
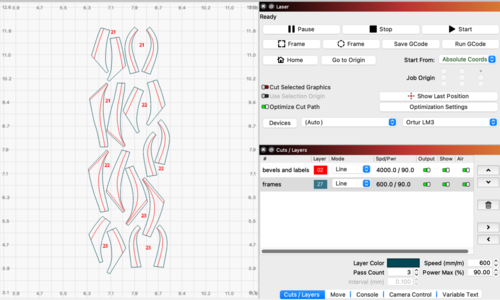
And the cuts from the 5/32" stock in Lightburn. (To use the laser cutter, you need something like Lightburn to run it, another cost but not too bad.)
1692888402593.png
Had some intrique getting the 5/32" cuts and the board wasn't entirely clear which led to some re-cuts, but I eventually got everything I needed.
 
Last edited:
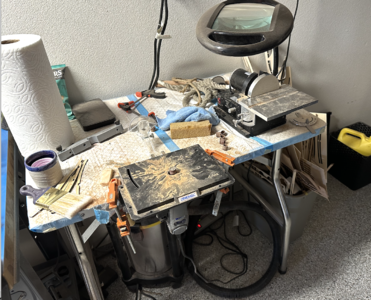
Here's what I use to shape the frames.
1692888523823.png
I made my own spindle sander out of a Dremel in a Dremel routing table. For the highly angled pieces, I use the Dremel tool up all the way and the bit as far out in the collett as I can.
I realize this is a weird time to drop this information, now that all the frames are close to done. But I spent a lot of time at this and thought I would pass along what I learned.
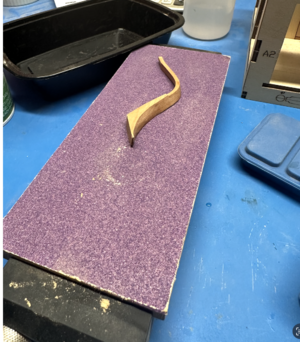
Using the Dremel with the drum sander isn't so simple. The finish on the wood after using the different grits isn't what you would expect using typical sandpaper. 80 grit leaves very deep grooves. You can actually shape with 320 grit. I had luck putting on 120 grit to get close on the shape for large bevels and 400 grit to finish the bevels. I stuck to 320 or 400 for smaller bevels and 400 for just removing the char on the mid frames. The wood still will look nicer if you come back with sanding sticks/dowels using 150 grit and 220 grit paper to finish.
I bought a huge package of sanding drums from Amazon. It was a good move. You go through a lot more of those sanding drums than you think. You can try to keep them in good shape using an eraser or an abrasive rubber stick used for belt and disc sanders, but ultimately they will foul when you are roughing off the char. I think the char and glue on the outside turn into a sticky resin and clogs the paper, especially in the middle. You quickly loose cutting power and, worse, in specific locations in the cut. Also, you can sand at too high a speed which leads to smooth burns that are very difficult to get out. Finally, you can get into trouble tighting the sanding material into the drum. As you screw down the drum to secure, the band bulges, leading to some misshapened surfaces.
Recommendations: get the economy pack of bands ( I paid $21 on Amazon for 50+ each of various sizes and grits, including the drums https://www.amazon.com/dp/B086WCHHDS?psc=1&ref=ppx_yo2ov_dt_b_product_details) and watch for gunk buildup on the bands. Try to clear with a block eraser but be generous in replacing. Barely tighten the drum, if at all. The rubber surface seems to keep the band from slipping or coming off even when loose enough to slip on. Don't push the piece onto the drum too hard, let the drum do the work or you will burn the wood and shorten the lifetime of the drum. Do your final shaping with 400 grit; coarser grits lead to deep groves that are hard to get out. Watch your speed. I found half speed for your standard Dremel motor is plenty. (What I wouldn't give to talk Jim Byrnes into making an oscillating drum sander.)
I used the disc sander for convex surfaces where I could get the angle right. It leaves a really nice finish.

Interested in other tested approaches to this work.
 
I removed the bow frame parts from the sheets and glued them up. It took a bit of puzzling to figure this out. Make sure you have the two different sides per pair of sheets for gluing. I am most nervous about these frames. Looking it over and getting started, I'm not sure if I can get some nice looking frames instead of some brown, mangled chicklets. The instructions and renderings that come with the kit are very limited so a lot is left to the imagination. I'm going to see if I can't find some references with more pictures. The one thing I did do was pull the angle off the last half frame that the bow timbers will abut to. It's ~18degrees. I nervously tried F5, the most highly shaped piece at that angle and got a will mated surface in that plane. Boy, they really want you to grind down that F5 small piece a lot to fit in the jig. So much so that the amount of material you start with seems like total overkill.
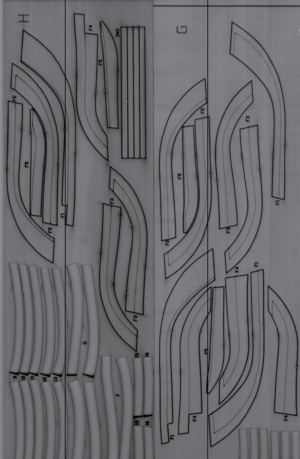
I'm not taking chances. I took the sheets with the pieces for the bow timbers and put them on my little 4-in-1 Brother printer-scanner-copier-fax before I removed them from the sheet. Might as well get these and be willing to re-cut if I mangle them. I feel there is probably a big learning curve here. I have to take extra precautions when I am stretching this much on my building skills.
1692890730138.png
Today I'm on vacation/staycation. I'm going to finish up the replacement half frames and try the treacherous chicklets.
 
HI GLENN A TIP FROM THIS OLD ONE ABOUT DEBONDING PARTS I HAVE POSTED THIS BEFORE MOST HAVE NOT TRIED IT BUT HERE IT IS I HAVE USED THIS FOR YEARS AS I DEBOND REGURLY WITH MY MISTAKES IT HAS BEEN 95% OK WHAT I DO IS GET NAIL POLISH REMOVER IT HAS TO HBE 100% ACOTONE I BRUSH IT ON THE JOINT AND VERY CAREFULLY PRY IT APART YOU PROBALLY NEED TO DO IT A COUPLE OF TIME IT WILL COME APART WITH NO DAMAGE IT WORKS ON CA AND PVA GLUES TRY IT ON SCRAP. GOD BLESS STAY SAFE YOU AND YOURS DON
A quart of acetone at Home Depot will probably cost less than a small bottle of nail polish remover
 
I removed the bow frame parts from the sheets and glued them up. It took a bit of puzzling to figure this out. Make sure you have the two different sides per pair of sheets for gluing. I am most nervous about these frames. Looking it over and getting started, I'm not sure if I can get some nice looking frames instead of some brown, mangled chicklets. The instructions and renderings that come with the kit are very limited so a lot is left to the imagination. I'm going to see if I can't find some references with more pictures. The one thing I did do was pull the angle off the last half frame that the bow timbers will abut to. It's ~18degrees. I nervously tried F5, the most highly shaped piece at that angle and got a will mated surface in that plane. Boy, they really want you to grind down that F5 small piece a lot to fit in the jig. So much so that the amount of material you start with seems like total overkill.
I'm not taking chances. I took the sheets with the pieces for the bow timbers and put them on my little 4-in-1 Brother printer-scanner-copier-fax before I removed them from the sheet. Might as well get these and be willing to re-cut if I mangle them. I feel there is probably a big learning curve here. I have to take extra precautions when I am stretching this much on my building skills.
View attachment 391099
Today I'm on vacation/staycation. I'm going to finish up the replacement half frames and try the treacherous chicklets.
Here are some links on this site which I've found useful in building a Hayling Hoy (first model ever, so still making some mistakes)

Tom of All Trades
https://shipsofscale.com/sosforums/threads/another-hayling-1760-build.10580/
( step by step construction – read before each step )

Ornholt
https://shipsofscale.com/sosforums/threads/hayling-1760-1-48-from-modelship-dockyard.10544/
( some step by step construction – read before each step )

Arne Schippers
https://shipsofscale.com/sosforums/threads/pof-hayling-hoy-1760-modelship-dockyard.10354/
( step by step construction – read before each step )

Modelship Dockyard - very detailed by the kit manufacturer
https://shipsofscale.com/sosforums/threads/pof-1-48-hayling-hoy-1760-by-modelship-dockyard.9728/
( step by step construction by manufacturer – read before each step )

Jimsky
https://shipsofscale.com/sosforums/...y-modelship-dockyard.10304/page-4#post-262295
( mostly unboxing )

Andris
https://shipsofscale.com/sosforums/threads/hayling-1760-my-first-kit.10745/
( pictures of finished model )

Novichok
( step by step construction – read before each step )
 
I started cleaning up frames. I used a disc sander for the outside as much as I could and a Dremel for the inside.
View attachment 390915
The hand-held Dremel was a disaster. It lead to all sorts of chaos: erratic edges, thin spots, unwanted bevels, and boo-boos of various kinds. I reduced the grit from 120 to 400 and it helped, but it was still a bit erratic. I ruined frames, 0, 2, 3 B, and C right from the get-go with frame 0 being the worse. That frame was so far gone that I would have never gotten a fair looking clamp in there.
I was ready to give up. I could try to fair the inside of the frames, despite the instructions recommending against it (and then suggesting it again later). But the difference in thickness was too much I thought, it would be too much thinning and work to get a smooth run. I decided to give up.
But then I decided I could do better. I was going to fabricate the frames from the drawings.
Hello Glenn,

Nice to see you posting your build progress here on SOS.
I'm also building a Chinese POF-model and I can tell you, I'm hooked.

One of the things I found when building the frames was that no allowance was given to the bond layer: you have to take about 0,2mm into account for every single bond layer present.
For the sanding of the frame I used a fixed Dremel set-up, so I only moved the frame and not the Dremel. Still very sensitive to overdoing, but with far better results. Since I don't own a disc-sander I was obliged to use the Dremel for all frame surfaces.

Your laser cutter is one heck of a tool, wish I had one when doing the frames.

Enjoy your build,

Johan
 
Thanks for the gluing and debonding tips. If the Titebond Quick & Tight is iffy to de-bond., What (if any) PVA would you recommend?
Liquid hide glue holds well when dry, cleans up and de-bonds easily with warm water every time. But its' set time is slow as snake $**+, which is fine if you are assembling Windsor chairs, but not for anyone in a hurry. Is there a PVA that is a happy medium?
Hi Peter,

I like Titebond Quick & Thick too. It's still PVA but sets faster. You can use Aleene's Tacky Glue as well, but I think the formulation is similar to the Quick & Thick. I like the shorter working time of these glues (~2-3 minutes) and the close to full strength bond (~1hr) but it really seems to be best to set up overnight for sanding the joints. Even with the overnight drying time, the glue seems to be a little gummy. It's worth removing any excess glue before sanding edges. Regular Titebond (white) or even Elmer's white glue is good for longer working time.

For removal, your best bet is isopropanol. The chemistry is specific to PVA. You can use 70% isopropanol (rubbing alcohol) for joints that are still a little wet, 100% for those that are set, or mixtures to suit yourself. Both 70% and 100% are super cheap and deliverable by mail/package. David Antscherl recommends soaking the part with the joint in 100% isopropanol, putting it in a ziploc, and letting it sit overnight. Obviously you can't put a keel with assembled frames into a ziploc so I just slather on the isopropanol with a brush every few minutes, scraping away any excess along the side. Most joints are a little cold welded if you formed them right so it might take a little twist. Sometimes I slide a sharp scalpel into the joint, being careful not to mar it in any way, and get the job started. Be patient and it will come out nicely. It's also a nice solvent to soften glue enough to scrape cleanly.

For a good discussion on adhesives, check this out. Everyone has their favorites. One factor to consider is the de-bonding solvent and fumes.
Just to be a nerdy chemist, I drew reactions and solvents for it.

Thanks,
Glenn
 
Hello Glenn,

Nice to see you posting your build progress here on SOS.
I'm also building a Chinese POF-model and I can tell you, I'm hooked.

One of the things I found when building the frames was that no allowance was given to the bond layer: you have to take about 0,2mm into account for every single bond layer present.
For the sanding of the frame I used a fixed Dremel set-up, so I only moved the frame and not the Dremel. Still very sensitive to overdoing, but with far better results. Since I don't own a disc-sander I was obliged to use the Dremel for all frame surfaces.

Your laser cutter is one heck of a tool, wish I had one when doing the frames.

Enjoy your build,

Johan
Thanks Johan,
The laser cutter is a lot of fun. It's the only fancy tool I have. The cutter, Illustrator, and a scanner have given me so many second chances along the way. Plus it's fun.
Glenn
 
Here are some links on this site which I've found useful in building a Hayling Hoy (first model ever, so still making some mistakes)

Tom of All Trades
https://shipsofscale.com/sosforums/threads/another-hayling-1760-build.10580/
( step by step construction – read before each step )

Ornholt
https://shipsofscale.com/sosforums/threads/hayling-1760-1-48-from-modelship-dockyard.10544/
( some step by step construction – read before each step )

Arne Schippers
https://shipsofscale.com/sosforums/threads/pof-hayling-hoy-1760-modelship-dockyard.10354/
( step by step construction – read before each step )

Modelship Dockyard - very detailed by the kit manufacturer
https://shipsofscale.com/sosforums/threads/pof-1-48-hayling-hoy-1760-by-modelship-dockyard.9728/
( step by step construction by manufacturer – read before each step )

Jimsky
https://shipsofscale.com/sosforums/...y-modelship-dockyard.10304/page-4#post-262295
( mostly unboxing )

Andris
https://shipsofscale.com/sosforums/threads/hayling-1760-my-first-kit.10745/
( pictures of finished model )

Novichok
( step by step construction – read before each step )
This is extremely helpful, thanks Van! I don't know why I feel the need to re-invent the wheel instead of just reading up on others' experiences. RTFM, right?
 
A bit of a disaster that is going to back me up. I test fitted all the frames 7-8 times, fully assembled 3-4 time. I went to glue in the frames and by the time I got to the aft cant frames on the starboard side, the frames seemed too wide. The full set didn't fit and they were exceeding the width of their recess on the keel. This led to a frustrated panic. I tried to thin the frames a bit and had some success getting the third to last to fit better. But the trouble started with the two last frames. I had to thin them so much that I accidently ruined them. Now the heel of the frame was tapered and led to a very amateurish fit to the stepping line.
1693149735486.png
1693150381143.png
This is despite my commitment to using sanding blocks, bring the work to the sanding rather than the other way around.
1693149811449.png
I think that the aggresive bevels led to some rolling of the part as I moved across the block. Anyway, I will need new frames. Bummer, but not intractable. I can at least celebrate a commitment to the details. I traced out frames 21-23, port and starboard in Illustrator, took to my cutter with the extra 1/8" cherry stock I ordered. glued up and bevelled. I only had to use 22 and 23, starboard only, the wood is a pretty nice match and I was able to get 21 to fit in nicely while I waited for the glue. Glued them in and then marvelled at the work. I left the foremost frame unglued to help with the bollard timber assembly.
 
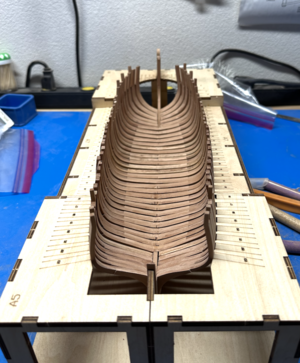
Here it is assembled, this time all frames are affixed. After reading other blogs, I wish I had used some spacers, but maybe with a creative installation of clamps, I can get the small tweaks to make all the frames perfectly perpendicular to the building board. But they are pretty darn close.
1693150624127.png
I was pretty diligent getting the bevels right after my incident with the mid-ship frames. The interior requires very little shaping and I don't think I have any areas that are missing material.
I had some issues with getting the heels of the half frames to mate well with the keel. I had been pretty careful with taking angles off the building board for the disc sander, but there were still gaps. A diagram of the frames from above would have helped a lot, it's hard to get in there with a protractor on the jig. I had to chisel off thin slices of wood and wedge them into a few of the worst matings and then cut out the excess with the chisel after dried. They turn out to be hard to spot. Most of this will be covered by the keelson, so I'm not going to back up in steps. There's attention to detail and then there is nuts. No big rush, but I need to finish the model within the lifetime of the universe.

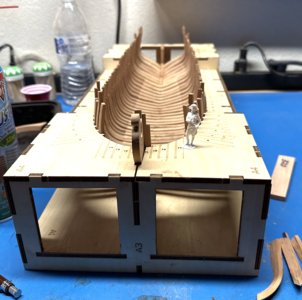
Lord Nelson was kind enough to visit the construction of this humble Hoy at the dockyard.
1693151110101.png
I am very sorry I can't credit the kind person who designed the figure and shared the .stl on this site (I believe). My searches have proven fruitless to find the user name. If it's you, please step up and take credit. He gets a bit hairy and floppy at 1:48 scale on my entry level printer. Or my brother-in-law's printer on long term loan.
 
Hi Peter,

I like Titebond Quick & Thick too. It's still PVA but sets faster. You can use Aleene's Tacky Glue as well, but I think the formulation is similar to the Quick & Thick. I like the shorter working time of these glues (~2-3 minutes) and the close to full strength bond (~1hr) but it really seems to be best to set up overnight for sanding the joints. Even with the overnight drying time, the glue seems to be a little gummy. It's worth removing any excess glue before sanding edges. Regular Titebond (white) or even Elmer's white glue is good for longer working time.

For removal, your best bet is isopropanol. The chemistry is specific to PVA. You can use 70% isopropanol (rubbing alcohol) for joints that are still a little wet, 100% for those that are set, or mixtures to suit yourself. Both 70% and 100% are super cheap and deliverable by mail/package. David Antscherl recommends soaking the part with the joint in 100% isopropanol, putting it in a ziploc, and letting it sit overnight. Obviously you can't put a keel with assembled frames into a ziploc so I just slather on the isopropanol with a brush every few minutes, scraping away any excess along the side. Most joints are a little cold welded if you formed them right so it might take a little twist. Sometimes I slide a sharp scalpel into the joint, being careful not to mar it in any way, and get the job started. Be patient and it will come out nicely. It's also a nice solvent to soften glue enough to scrape cleanly.

For a good discussion on adhesives, check this out. Everyone has their favorites. One factor to consider is the de-bonding solvent and fumes.
Just to be a nerdy chemist, I drew reactions and solvents for it.

Thanks,
Glenn
Thaks so much for such a thorough and thoughtful response. Looks like no matter what you use patience is a critical factor. In restoring period antique furniture I and my associates always used liquid hide glue because of its' slow set work time and easy reversibility. Plus, it was compatible with the original glue which was mostly hide glue. The pieces we worked on were almost exclusively 18th and early 19th c. Some even a lot earlier. I mentioned Windsor chairs in my post because we got a lot of those and with some regularity discovered that one of very many spindles got replaced upside down. A time when we were eternally grateful for the very slow set time and reversibility of the glue!:rolleyes:

Thanks again, PeteThumbsup
 
A bit of a disaster that is going to back me up. I test fitted all the frames 7-8 times, fully assembled 3-4 time. I went to glue in the frames and by the time I got to the aft cant frames on the starboard side, the frames seemed too wide. The full set didn't fit and they were exceeding the width of their recess on the keel. This led to a frustrated panic. I tried to thin the frames a bit and had some success getting the third to last to fit better. But the trouble started with the two last frames. I had to thin them so much that I accidently ruined them. Now the heel of the frame was tapered and led to a very amateurish fit to the stepping line.
View attachment 391669
View attachment 391671
This is despite my commitment to using sanding blocks, bring the work to the sanding rather than the other way around.
View attachment 391670
I think that the aggresive bevels led to some rolling of the part as I moved across the block. Anyway, I will need new frames. Bummer, but not intractable. I can at least celebrate a commitment to the details. I traced out frames 21-23, port and starboard in Illustrator, took to my cutter with the extra 1/8" cherry stock I ordered. glued up and bevelled. I only had to use 22 and 23, starboard only, the wood is a pretty nice match and I was able to get 21 to fit in nicely while I waited for the glue. Glued them in and then marvelled at the work. I left the foremost frame unglued to help with the bollard timber assembly.
Murphy's second law: "Nature sides with the hidden flaw." Cautious
 
Bollard timbers. I'm sure glad I scanned in the carrier sheet of parts before I cut them away and went with the one try at the timbers.
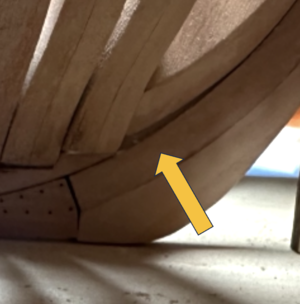
Here's where my lack of knowledge and skill have caught up to me. These timbers present some very complex angles and require lots of things being aligned at once. And there are simple things as well. On my first attempt, I added a little curve to the outboard side of the port side bow timbers, but it was too much and looked like a human rib. Whoops. Otherwise, they were ok.
I was able to get the 18 degree angle from the building jig to mate to the forward most frame. The frame against the keel didn't seem hard until I looked at how it mated to the keel after shaping.
1693317325441.png
I checked carefully and this is built into the part. I'm sure this it the result of some errors adding up somewhere but with the building jig it shouldn't be too much of a problem. I tried a couple of more times, but i always end up with a similar fit. I increased the angle at the heel that meets the canted frame and got the fit I wanted but the top of the timber is now to low.
So I took matters into my own hands and re-drew the part a little.We'll see how that plays out.
1693317856618.png
 
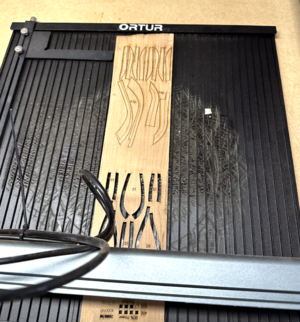
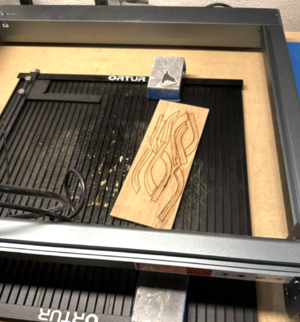
As I mentioned, the bollard timbers/ not-a-hawse pieces were, in fact, predictabily difficult and I had to rely on a little trial on error that would get better as a went along but may be catastrophic for the first pieces. Here's a few pieces rolling off the laser cutter (not really rolling, that would be nice though).
1693318384854.png
1693318428033.png
The top one is cut into leftovers from the frame redos. Along the top of that sheet are a whole bunch of shots at that external timber. I drove myself nuts trying to get that one right.

I'm a big believer in second chances. I am definitely punching below my weight for this project, so it helps with the unfortunate end of the learning curve. I'm spending a lot on wood though. I consider this a self led tutorial with great advice with the community here.
 
Thaks so much for such a thorough and thoughtful response. Looks like no matter what you use patience is a critical factor. In restoring period antique furniture I and my associates always used liquid hide glue because of its' slow set work time and easy reversibility. Plus, it was compatible with the original glue which was mostly hide glue. The pieces we worked on were almost exclusively 18th and early 19th c. Some even a lot earlier. I mentioned Windsor chairs in my post because we got a lot of those and with some regularity discovered that one of very many spindles got replaced upside down. A time when we were eternally grateful for the very slow set time and reversibility of the glue!:rolleyes:

Thanks again, PeteThumbsup
Always glad to pass along the little I do know. Furniture restoration sounds awesome! I could have used a little of the hide glue getting all the frames exactly right, but it turned out ok with the shorter setting time. A little touch and go there though and several pieces needed to be debonded, tougher for the glue I used. Live and learn although it's great to have lots of voices here on the forum. :)
 
Back
Top