Cazador Xebec 1750 - OcCre - scale 1:60 [COMPLETED BUILD]

Making sails

Hi guys,
Thank you all for following and for all the positive messages. I have been studying on the running rigging and it's not that easy to figure it out. I need more time to really understand the way the rigging works. In the mean time I have to take on another hurdle, making the sails. So I started with simply draw the design of the sails on a piece of paper. The picture below shows the sail of the main mast. It's the biggest of the 3 sails this ship has.

photo 581586


photo 581587


Next step is to make them out of a piece of cloth. Luckily I found some very fine woven cloth in England and ordered some. Cloth found and can be taken off the list.

photo 581588


Next is a sewing machine. I found one in the attic of our home. My Admiral have one, but can't handle the machine. :(
I have to learn how to operate this "thing"..... I know now much more of threat tension, bobbins, needles, straight stitches, cross stitches......the things I always dreamt of wanting to learn.....Speechless

Anyway....after filling the swear jar a couple of times, I start to try it out with the sail of the Mizzenmast. It's the smallest of the three. First step is to draw all the lines on the cloth. All these lines need to be stitches with a straigt stitch. Never.....NEVER start with a very fine, thin and delicate woven cloth. It's one of the most difficult cloths to work with. I don't have the luxury that sails were made of jeans or something....


photo 581589


photo 581590


This was my first run on this type of cloth. Made some test runs on different types of cloth so I learned how to operate this hellish machine....
After this I didn't make pictures, but made the seams separate from the main body of the sail. I made it so that the seam is visible from both sides of the sail.
Then I aged the sail with diluted bitumen. The sail I've made does not make it on te ship and still is a learning piece. The needle that's in the machine is actually to thick and so I have troubles keeping the line straight when sewing the seams on the body of the sail. So I'll go experiment with a much thinner needle.

photo 581591


Until the next update with hopefully 3 finished and hopefully better finished sails.

regards,
Peter
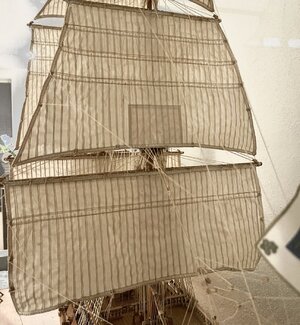
Hi Peter. Indeed it is very difficult to make sails in this scale on a sewing machine. As you wrote, the most important is the threat tension. In most of the machines it is adjustable. I made these sails myself on my admirals machine for almost 40 years ago and then the tensions support was already on those machines:
IMG_8304.jpeg
All with double lines. So, it is possible. And perhaps turn your fabric a quarter. The direction of the woven lines is important (schering&inslag).
Good luck and hope to see your results soon.
Regards, Peter
 
Making sails

Hi guys,
Thank you all for following and for all the positive messages. I have been studying on the running rigging and it's not that easy to figure it out. I need more time to really understand the way the rigging works. In the mean time I have to take on another hurdle, making the sails. So I started with simply draw the design of the sails on a piece of paper. The picture below shows the sail of the main mast. It's the biggest of the 3 sails this ship has.

photo 581586


photo 581587


Next step is to make them out of a piece of cloth. Luckily I found some very fine woven cloth in England and ordered some. Cloth found and can be taken off the list.

photo 581588


Next is a sewing machine. I found one in the attic of our home. My Admiral have one, but can't handle the machine. :(
I have to learn how to operate this "thing"..... I know now much more of threat tension, bobbins, needles, straight stitches, cross stitches......the things I always dreamt of wanting to learn.....Speechless

Anyway....after filling the swear jar a couple of times, I start to try it out with the sail of the Mizzenmast. It's the smallest of the three. First step is to draw all the lines on the cloth. All these lines need to be stitches with a straigt stitch. Never.....NEVER start with a very fine, thin and delicate woven cloth. It's one of the most difficult cloths to work with. I don't have the luxury that sails were made of jeans or something....


photo 581589


photo 581590


This was my first run on this type of cloth. Made some test runs on different types of cloth so I learned how to operate this hellish machine....
After this I didn't make pictures, but made the seams separate from the main body of the sail. I made it so that the seam is visible from both sides of the sail.
Then I aged the sail with diluted bitumen. The sail I've made does not make it on te ship and still is a learning piece. The needle that's in the machine is actually to thick and so I have troubles keeping the line straight when sewing the seams on the body of the sail. So I'll go experiment with a much thinner needle.

photo 581591


Until the next update with hopefully 3 finished and hopefully better finished sails.

regards,
Peter
Good morning Peter. Good to see some more of your amazing Xebec. OK…..now I’m thinking no sails for Grants Xebec ;) . This is the aspect which I fear the most (never done them before). Once again I’m happy to take in from your experience and the advice from the guys here. Good luck with your sewing learning curve but I know you will “own it” pretty soon. Cheers Grant
 
That’s actually a nice first effort. My wife does upholstery for vehicles, for a living. She typically uses the large industrial machines (Juki) that can sew through leather. But also uses a regular machine for smaller stuff.
She looked at the picture and said you need to adjust the tension to be less and use a smaller needle and thread. Tension is typically adjusted on the thread, the bobbin, and the foot, depending on machine. Too much tension on either of those can cause issues. It’s a variable of material thickness, thread type and size, and needle size. For a soft thin material you want to go light on everything. Hope that helps!

Ps - you can do a search online to find out how to make adjustments to your sewing machine. If you get lucky there might even be a video available. ;)
Thanks Dean, and please thank your wife for the tips. I will set the threat tension to minimal and use the smallest needle I can find. Let's go for "artistic light"
Hi Peter. Indeed it is very difficult to make sails in this scale on a sewing machine. As you wrote, the most important is the threat tension. In most of the machines it is adjustable. I made these sails myself on my admirals machine for almost 40 years ago and then the tensions support was already on those machines:

All with double lines. So, it is possible. And perhaps turn your fabric a quarter. The direction of the woven lines is important (schering&inslag).
Good luck and hope to see your results soon.
Regards, Peter
Those sails look absolutly stunning. I'm walking to the post office today and send you all my materials and drawings :p
I was working on sails too. And discovered that a sewing machine does no good to these tin clichés. So I took a very small needle (prym pearlneedle / prym parelnaalden) en rijgde de draad in het weefsel.

Post in thread 'VOC ship The Prins Willem (scale 1:75) Year 1651' https://shipsofscale.com/sosforums/...-willem-scale-1-75-year-1651.6761/post-265596

That worked out perfect.
Well, it's mostly my ability not operating that machine properly. You did an excellent job tho.

Hello Peter,

I've PM'd you my measurements. I thought we would start with a simple oxford. Slim fit but not crazy (I'm no hipster). Pinpoint with button down collars...
ROTFROTFROTF
.
Good morning Peter. Good to see some more of your amazing Xebec. OK…..now I’m thinking no sails for Grants Xebec ;) . This is the aspect which I fear the most (never done them before). Once again I’m happy to take in from your experience and the advice from the guys here. Good luck with your sewing learning curve but I know you will “own it” pretty soon. Cheers Grant
You have a sewing service at hand, you should put the sails on and they will be better than mine for sure. ;)
 
Making the sails

Hello friends,
I had to dig up my buildlog, it's been a while. I had to figure out some things of the running rigging and making the sails. The last one almost got me on my knees. The swear jar has been filled multiple times, but I've come to an acceptable result so far. Working on the boltrope at the moment. But first let me show you the process....
Thanks to @Dean62 for advising on the threat tension and needle....

photo 582392


photo 582393


photo 582391


photo 581590


The seam is made separately and has been folded a couple of time so it can be placed around the edge of the cloth. The seam is then visible on both sides of the cloth. It's a bit time consuming, but in the end hopefully worth it.

photo 582394


photo 582396


photo 582395


I decided to age the sails with Bitumen. I had to dilute the bitumen with "odorless" Turpentine and it gave a "pleasant" smell....
Mixed it in a glass jar and let the cloth dry in the open air.

photo 582397


photo 582398


photo 582399


photo 582402


The bolt rope is attached with needle and threat. It's done entirely by hand and the needle is going through the bolt rope and not around. This gives it a little more authentic look.

photo 582401


photo 582400


Well, this is where I'm at the moment. Just somewhere halfway with the main sail. I forgot the serve the rope for extra strength in the corner where a loop is made in the rope. I corrected this afterwards...

photo 582404


photo 582412


Well, that's it so far...
Until next time with hopefully fully finished sails.

regards,
Peter
 
This build is one of the most amazing displays of master craftmenship I have ever seen. Humbling to see what is possible, and benchmark of excellence one can only admire and take as inspiration to improve. Just in awe of your skills. Thank you for sharing this phenomenal build. What a gifted talent!
 
This build is one of the most amazing displays of master craftmenship I have ever seen. Humbling to see what is possible, and benchmark of excellence one can only admire and take as inspiration to improve. Just in awe of your skills. Thank you for sharing this phenomenal build. What a gifted talent!
True story
 
Making the sails

Hello friends,
I had to dig up my buildlog, it's been a while. I had to figure out some things of the running rigging and making the sails. The last one almost got me on my knees. The swear jar has been filled multiple times, but I've come to an acceptable result so far. Working on the boltrope at the moment. But first let me show you the process....
Thanks to @Dean62 for advising on the threat tension and needle....

photo 582392


photo 582393


photo 582391


photo 581590


The seam is made separately and has been folded a couple of time so it can be placed around the edge of the cloth. The seam is then visible on both sides of the cloth. It's a bit time consuming, but in the end hopefully worth it.

photo 582394


photo 582396


photo 582395


I decided to age the sails with Bitumen. I had to dilute the bitumen with "odorless" Turpentine and it gave a "pleasant" smell....
Mixed it in a glass jar and let the cloth dry in the open air.

photo 582397


photo 582398


photo 582399


photo 582402


The bolt rope is attached with needle and threat. It's done entirely by hand and the needle is going through the bolt rope and not around. This gives it a little more authentic look.

photo 582401


photo 582400


Well, this is where I'm at the moment. Just somewhere halfway with the main sail. I forgot the serve the rope for extra strength in the corner where a loop is made in the rope. I corrected this afterwards...

photo 582404


photo 582412


Well, that's it so far...
Until next time with hopefully fully finished sails.

regards,
Peter
Good morning Peter. Wow. “Almost Being on your knees” and a full swear jar has been worth it. Beautiful sails my friend. So good to see your work again. Cheers Grant
 
Wonderful, Peter! Very authentic appearing sails not lacking for details!
Thanks Paul, the macro pictures are killing me however the details are shown....appreciate you stopped by!

This build is one of the most amazing displays of master craftmenship I have ever seen. Humbling to see what is possible, and benchmark of excellence one can only admire and take as inspiration to improve. Just in awe of your skills. Thank you for sharing this phenomenal build. What a gifted talent!
Wow, I'm lost for words and humbly say thank you TimV. Thanks for the kind words and hopefully you stay till the end of this build. :)

WOW Peter! Your sails look well done and in line with the quality and detail of your woodwork. I can't tell you how impressed I am with your bolt rope attachment, just awesome!
Thanks Daniel, the attachment of the bolt rope is pretty labor intensive..... :rolleyes:
Beautiful Peter! These are excellent! ;)
Thanks Dean, and again for your help earlier!

Good morning Peter. Wow. “Almost Being on your knees” and a full swear jar has been worth it. Beautiful sails my friend. So good to see your work again. Cheers Grant
Thanks Grant, good to be "back" with an update.....;)

Peter
 
Making the sails

Hello friends,
I had to dig up my buildlog, it's been a while. I had to figure out some things of the running rigging and making the sails. The last one almost got me on my knees. The swear jar has been filled multiple times, but I've come to an acceptable result so far. Working on the boltrope at the moment. But first let me show you the process....
Thanks to @Dean62 for advising on the threat tension and needle....

photo 582392


photo 582393


photo 582391


photo 581590


The seam is made separately and has been folded a couple of time so it can be placed around the edge of the cloth. The seam is then visible on both sides of the cloth. It's a bit time consuming, but in the end hopefully worth it.

photo 582394


photo 582396


photo 582395


I decided to age the sails with Bitumen. I had to dilute the bitumen with "odorless" Turpentine and it gave a "pleasant" smell....
Mixed it in a glass jar and let the cloth dry in the open air.

photo 582397


photo 582398


photo 582399


photo 582402


The bolt rope is attached with needle and threat. It's done entirely by hand and the needle is going through the bolt rope and not around. This gives it a little more authentic look.

photo 582401


photo 582400


Well, this is where I'm at the moment. Just somewhere halfway with the main sail. I forgot the serve the rope for extra strength in the corner where a loop is made in the rope. I corrected this afterwards...

photo 582404


photo 582412


Well, that's it so far...
Until next time with hopefully fully finished sails.

regards,
Peter
Just a big WOW :D, Peter. That are very beautiful and realistic sails! What some patience and practice can do.
Regard, Peter
 
Back
Top