
I agree 100%

You are using an out of date browser. It may not display this or other websites correctly.
You should upgrade or use an alternative browser.
You should upgrade or use an alternative browser.
ZHL Royal Caroline Kit, scale 1/30
- Thread starter neptune
- Start date
- Watchers 55
-
- Tags
- royal caroline

Maarten post_id=23535 time=1507722509 user_id=4818 said:Hi John,
Just joining your log which I very much like.
I am currently also building the 1/30 Royal Caroline from ZHL in the boxwood version which I bought from Max directly, although slightly lagging behind compared to your build. It is indeed an exceptional model kit and I enjoy it every moment, all the small details is what make this a beautiful model.
I am building the vessel according the drawings which come from the book of "Anatomy of the Ship" this means I made some deviations to the standard kit, and am also adding the captains cabin at the stern of the vessel. I started the build in June and am currently tree nailing the hull with about 4500 wooden nails (beech wood cocktail sticks) which will take me a few weeks.
Would be very interesting to see your vessel sailing in the future, are you also fitting RC controlled winches etc? The large scale would offer this opportunity.
If there is any interest and I don't mess up your log I can post some pictures as well.
Regards, Maarten
G'day Marten, I would love to see some of your photos of your Royal Caroline,
it sounds quite interesting,
best regards John.
Some pics of the wood parts and plans and instruction book of the cross section of the Bon Homme Richard


Last edited:
And this is the kit of the Le Belle


Last edited:
Ahoy John,
Avery impressive kit. I understand that ZHL kits come from China. I wonder if they are only for export or are available in China? I will check with family in Shanghai. :handgestures-thumbup:
Avery impressive kit. I understand that ZHL kits come from China. I wonder if they are only for export or are available in China? I will check with family in Shanghai. :handgestures-thumbup:

Hello Mike,they sell them in China too,more than goes to export ,they have 2 billion customers who could buy.
:text-lol:
:text-lol:
Ahoy Zolly,
I have a large family in Shanghai, my wife's brothers and sister. I will ask them to hook me up. I really like there kits. :handgestures-thumbup:
I have a large family in Shanghai, my wife's brothers and sister. I will ask them to hook me up. I really like there kits. :handgestures-thumbup:

Hi Neptune, I also have the Bonhomme Richard cross section kit same as yours. Mine is is sold under the UNICORN MODEL brand. Interestingly on the box it says this kit is not to be sold outside of China. I was quite stunned at the exceptional quality of the wood, fittings, accurate razor fine laser cutting and attention to detail. For such a small model there appears an enormous amount of material. The instructions are sparse and in Chinese’s but the photo book has plenty of visual information. The materials provided are far better than what is pictured in the book. Should not be much trouble for an experienced builder. These kits are on another level higher compared to what has been available in the past.
G'day Paul, yes these kits are at a whole new level to what is normally available, very precise, beautiful wood and fittings, I will not be building mine for awhile yet as I have several other projects under way, have you started yours yet, it would be nice to see some photo's, I have also bought two of the barrel kits, there are 10 barrels of various sizes in each kit and also the upgraded carved rail and belfry, hope you enjoy your self on the forum,
best regards John.
best regards John.
Thanks John, I have recently discovered your entire RC build log and was highly impressed with it. That’s where I found you have the Bonhomme Richard kit and decided to buy one as it appears a manageable introduction to these highly detailed complex Chinese kits. Since it is small it is also suitable for my current work environment. I will be starting it after Christmas and will post a build log. I expect at least a good six months effort to complete. If satisfied I may buy one of the full ship kits or if not then build some of my stash next. I also bought the pear rail and belfry upgrade and may consider the barrels later.

Attaching the carvings on the port side, the wreath for the fourth port back from the bow is clamped in place over the gun port, this is where the lower decorative rail will start and then run back to the Gallery window.

then the planking that goes over the tops of the cabin windows is attached, the lower edge of the planking guides the upper decorative rail.

planks in place.

Then it is a case of looking at the photo's etc provided and working out the positions of the various rails, windows etc

Just gradually nibbling the carving to fit the window shape, this pic and the next two

In this pic the ship is on its side just to show how the carvings will fit to each other, all I can say is take your time and be patient with yourself, you only got enough carvings for one go.

Checking for fit


On this pic you can see the extra wood you have to carve away, not only around the outside of the carving but also some areas in the carving have to be opened up.

Last edited:
I have now attached the main carvings along the side of the hull and also the Gallery window, and I now will finish attaching the upper decorative rail along the top and between the windows


Last edited:
Hi John,
Really nice work. Very artistic.
Really nice work. Very artistic.
Last edited by a moderator:

Port gallery

starb gallery

midship upper rails in place

These last two pics show the boarding steps, this is where the hull could have done with being a bit longer, as the steps are rather cramped, next pic shows their photo of the same area, I think it should be at least another 1/2 inch longer, I might have to make some modifications.

Last edited:
This set of pics shows the Focsle rails being installed, thanks for looking, any questions just ask.


Last edited:

That is a lot of work to get it to fit right. really nice work.
fabulous work as usual John.
G'day John
AGAIN mate another in-depth analysis of your GREAT progress. I thank you so much, because you have given me 2 areas to be completely sure of BEFORE I even start my model.
I can see what you mean about 3 planks going to 2 above the top wale. I havta think very hard about that and also extending the hull.
You have given all of the future RC builders your wisdom and your 'if I could do it over again' foresight, freely. This is an example that I will endeavour to do in my own log.
Thank you again my friend.
Hope you talk to you soon.
Havagooday
Greg
Hi John,
Good to see in all your projects that the RC is also progressing rapidly, you are leading the way for us.
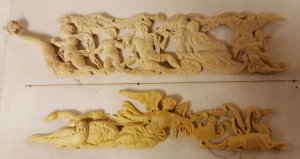
You mentioned on the carvings that indeed opening have to be opened up, I am in the mean time also working on these on the side, see this picture. I also try to enhance the 3d effect of these by also shaping the reverse side of the carvings of legs, arms etc. It realy takes hours and hours to get the carvings right, but its realy worth the process
I have seen differences in the thickness of the carvings and was thinking the adjust the thickness on my band sander, have you considered this or done this? For the carvings on the lower end of the stern I have done some tests with replacing them with paintings which I printed on decall paper, but this wasn't a succes, so i now have the idea to sand these back to a real thin carving and shape them round on the aft side to nicely fit them on the lower part of the stern. Maybe you already had a look at these also as you're way ahead in the building process.
regs Maarten
Good to see in all your projects that the RC is also progressing rapidly, you are leading the way for us.
You mentioned on the carvings that indeed opening have to be opened up, I am in the mean time also working on these on the side, see this picture. I also try to enhance the 3d effect of these by also shaping the reverse side of the carvings of legs, arms etc. It realy takes hours and hours to get the carvings right, but its realy worth the process
I have seen differences in the thickness of the carvings and was thinking the adjust the thickness on my band sander, have you considered this or done this? For the carvings on the lower end of the stern I have done some tests with replacing them with paintings which I printed on decall paper, but this wasn't a succes, so i now have the idea to sand these back to a real thin carving and shape them round on the aft side to nicely fit them on the lower part of the stern. Maybe you already had a look at these also as you're way ahead in the building process.
regs Maarten
Attachments
Excellent work Maarten. This is what I'm going to do, if it's possible for me.
Happymodeling
Greg
Happymodeling
Greg