RCMP St Roch - Build log

Joined
Sep 25, 2021
Messages
79
Points
88

Location
Nowra, NSW, Australia
Greetings All,
I have decided to bravely go where this man has not gone before - I will post my build log. The St Roch is my second model. The first was the newly completed Norfolk sloop. It came with very detailed instructions - the St Roch comes with almost no instructions. I am therefore hoping that those of you with more knowledge then me (just about all of you) will jump in and cast your expert knowledge upon the waters of my ignorance. The kit was a gift and I feel obligated to do my very best.
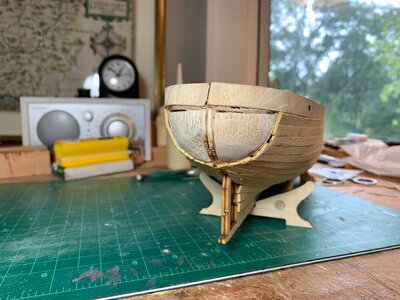
For a start I have inserted balsa blocks to help support the planking. I felt that the very thin bulkheads would offer very little. I am thinking that every second space should provide sufficient support, but am open to suggestions. I will be joining the two sides together before I start planking. I am also going to paint bits and pieces as I go to avoid trying to make a fair job in tight spaces further on. I will be using water-based acrylic paint.Balsa support.jpg
 
Smart move. I like to use spuce blocks cut from 1 x 3 bought at the home supply for this purpose. It is cheap, easy to cut and carve, and the advantage over balsa is that it holds planking nails better.
 
I built this kit about a year ago, and yes, the instructions are abysmal. The balsa blocks are a good idea. I also glued the 2 sides together before planking. Check out the search function in SOS. I found another member's build log and it was very helpful. I can't remember who it was, but if you can't find it let me know.
 
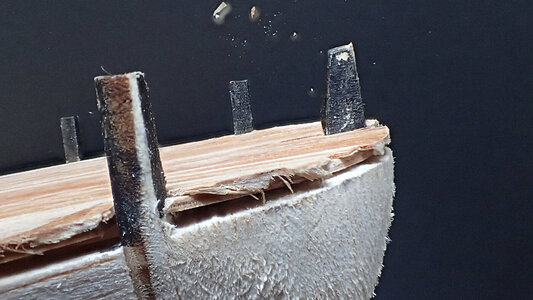
Also, I added balsa right at the stern (see photo), but somehow I thought this was to provide a nailing surface for the planks that would extend all the way from bow to stern. As you can see from the photo, I cut down the blocks to allow the planks to be nailed on top. But the planks are not long enough! . The surface of the blocks need to be flush with the edges of the planks, not recessed like I did. In the end I had to plank all the way around with shorter pieces. it worked OK, but it was a pain.IMG_3118.JPG
 
Also, I added balsa right at the stern (see photo), but somehow I thought this was to provide a nailing surface for the planks that would extend all the way from bow to stern. As you can see from the photo, I cut down the blocks to allow the planks to be nailed on top. But the planks are not long enough! . The surface of the blocks need to be flush with the edges of the planks, not recessed like I did. In the end I had to plank all the way around with shorter pieces. it worked OK, but it was a pain.View attachment 326594
Thank you very much for that valuable piece of information. However, it raises an issue in my mind. If the balsa blocks at the stern are cut to meet the level of planking on the sides, what happens at the stern? If that idea is continued, one comes to the ply the keel, which will be lower. Or do you shape the balsa to meet the ply? If so, are you now out of step with the bulwark? Do you have a photo of the next stage at the stern?
 
Smart move. I like to use spuce blocks cut from 1 x 3 bought at the home supply for this purpose. It is cheap, easy to cut and carve, and the advantage over balsa is that it holds planking nails better.
Thanks for your reply. I would like to use spruce, but I have yet to find a source in Australia.
 
Hi Digger,
I have purchased timber planking material from ZHL MODEL in China. They do great mail order to Australia at a very reasonable rate.
 
Thank you very much for that valuable piece of information. However, it raises an issue in my mind. If the balsa blocks at the stern are cut to meet the level of planking on the sides, what happens at the stern? If that idea is continued, one comes to the ply the keel, which will be lower. Or do you shape the balsa to meet the ply? If so, are you now out of step with the bulwark? Do you have a photo of the next stage at the stern?
Sorry but I don't have a photo. What I did do, is just fill in the "naked" space (see my photo above) with shorter pieces of planking (bent to fit the curvature) and then sand it flush with the rest of the hull planking. I think what is supposed to happen is that the balsa blocks are sanded completed flush with the side planking and cracks filled and the whole thing painted.
 
Greetings All,
I have decided to bravely go where this man has not gone before - I will post my build log. The St Roch is my second model. The first was the newly completed Norfolk sloop. It came with very detailed instructions - the St Roch comes with almost no instructions. I am therefore hoping that those of you with more knowledge then me (just about all of you) will jump in and cast your expert knowledge upon the waters of my ignorance. The kit was a gift and I feel obligated to do my very best.
For a start I have inserted balsa blocks to help support the planking. I felt that the very thin bulkheads would offer very little. I am thinking that every second space should provide sufficient support, but am open to suggestions. I will be joining the two sides together before I start planking. I am also going to paint bits and pieces as I go to avoid trying to make a fair job in tight spaces further on. I will be using water-based acrylic paint.View attachment 325741
Hallo @Digger
we wish you all the Best and a HAPPY BIRTHDAY
Birthday-Cake
Are you still working on the St. Roch? Maybe you have an update for us.....
 
Hallo @Digger
we wish you all the Best and a HAPPY BIRTHDAY
Birthday-Cake
Are you still working on the St. Roch? Maybe you have an update for us.....
Thanks for the birthday wishes. I am working on the St Roch, but very slowly. It gets interrupted by medical issues and has long delays as I try to figure out, in my mind, a number of issues that I would normally expect to be covered in the instructions. I hope to post an update soon.
 
Thanks for the birthday wishes Uwek. I have been somewhat distracted with medical issues recently and have not done much ship building. However, life goes on so I will try and advance the cause.
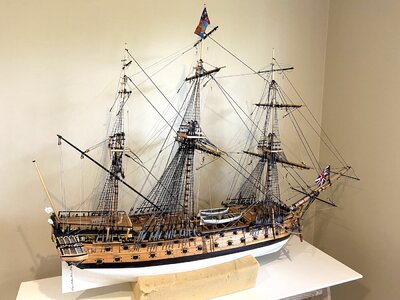
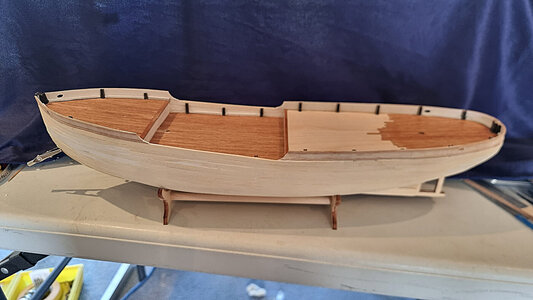
I am currently at the stage in the photo. I am about to attach the bulwarks but I have an issue. The rib at the stern is inset from the edge of the deck. When the bulwark is installed (1mm ply) it is level with the hull. The other ribs are flush with the hull. When the first plank (1.8mm) is laid down there is a serious difference between it and the bulwark at the stern. I hope I have explained this adequately. My solution is to pack out the rib at the stern. I would like to hear and other solutions, especially from those who have previously built the St Roch.Stern 1.jpg

Deck Planking.jpg
 
Now that my interest has veered from cancer treatment back to the important issue of model building, I am getting serious about further work on my St Roch. A lovely ship but sadly lacking in instructions from Billings. I am currently trying to work out the business of the steering cables. They run from the upper deck, past the life boats, down to the main deck and disappear under a structure. My issues are:
1. What is the start point on the upper deck?
2. Some builders simply run a cable along the deck while other use a brass rod passing through rings on the boat boat supports. Which is correct?
3. The pulleys/rollers that change the direction of the cable from upper deck to lower deck, and then to horizontal appear to be double-sided brass supports, but what mechanism is used for the final change of direction to the mysterious disappearance of the cable to the rudder?
4. Finally, just where does that cable disappear to?
Any assistance would be greatly appreciated by this novice (frustrated) builder. I must say that building this model has proven to be a wonderful distraction from real-world issues.

20230514_092202.jpg
 
Welcome back to the world of model-building and I hope your recovery goes well!

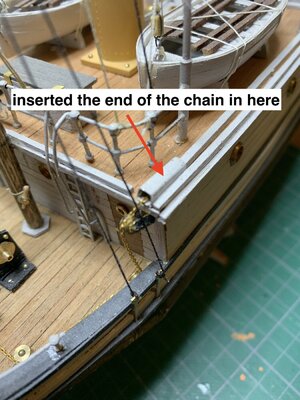
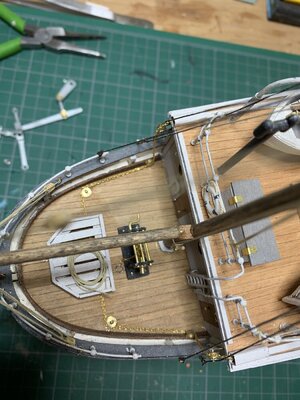
I'm not sure what I was supposed to do, but this is what I did. I did not run a chain the length of the wheelhouse and past the lifeboats. I added a small housing at the end of the wheelhouse and inserted about an inch or so of the chain in there and glued it. I then ran it down the side of the wheelhouse, then turned it horizontal and had it end inside the grating. See photos. Let me know if you need any additional clarificIMG_5892.jpgIMG_5891.jpgation.
 
Thanks very much for your prompt reply. A couple of questions come to mind. What is the nature of the housing on the upper deck where you started the chain? I was going to bend pieces of brass to create the supports for the rollers/pulleys on the upper deck and the lower deck below it. You seem to have some other method. Are there pieces in the kit or are they your own invention? What is the support mechanism for the third set of rollers? Finally, how did you terminate the chain at the aft end?
In one of your photos I can glimpse the funnel and note that you have the appearance of rows of rivets. I have seen this with some other modellers and have wondered how the effect is achieved. I love such fine details.
 
Back
Top