Proxxon FET fence upgrade

Joined
Sep 20, 2020
Messages
20
Points
48

Hi everyone,

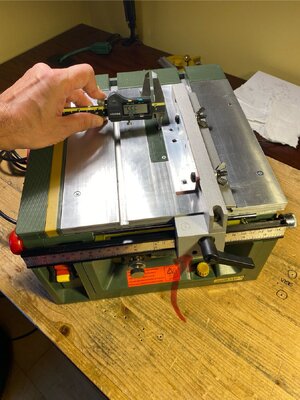
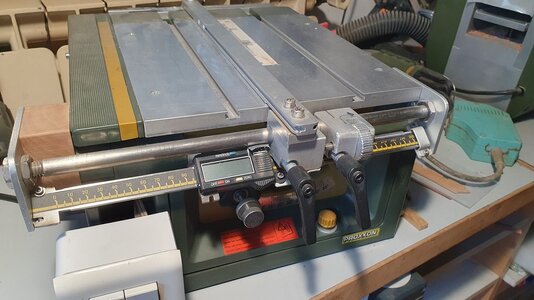
I’m sharing pictures of my Proxxon FET saw fence upgrade.
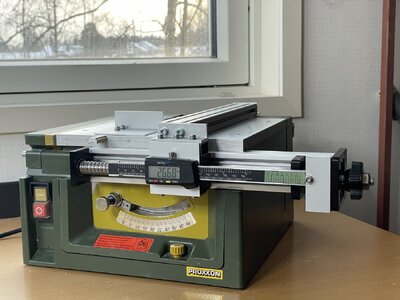
UPPGRADE.JPG

For the longest time I’ve been driven crazy by the inability to get consistently even cuts with the saw, or to be able to quickly and reliably adjust the width of the cut.

The heart of the upgrade is this:

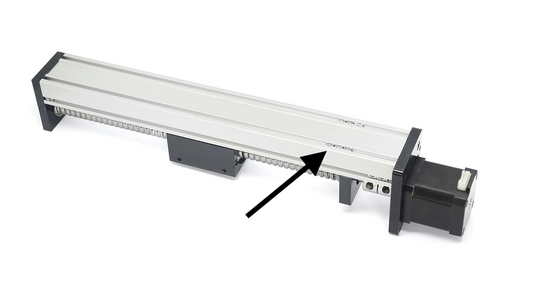
Befenybay 200mm linear rail
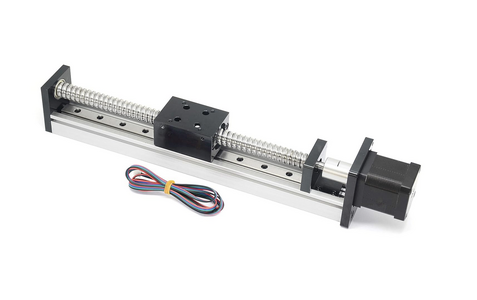
Screenshot 2023-12-27 at 12.11.04.png


I used the 200mm NEMA 17 -version, but even the 250mm version should fit. As a CNC linear rail it is very accurate and has zero play in the screw thread. For my purposes the electric motor was not necessary so I removed it.

ASSEMBLY:

I’m afraid I only have pictures of the finished upgrade, but I’ll try and explain the process.


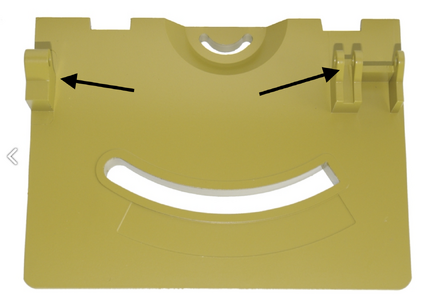
I removed the Proxxon FET fence and gauge assembly, removed the yellow front plate and sawed off the brackets using an angle grinder.
Front plate.png
Using graph paper lightly glued to the back of the front plate, I marked and then drilled the holes for the linear rail.
The linear rail has t-nuts at the back which make it very easy to attach and slide into the right position.
T-nuts.png

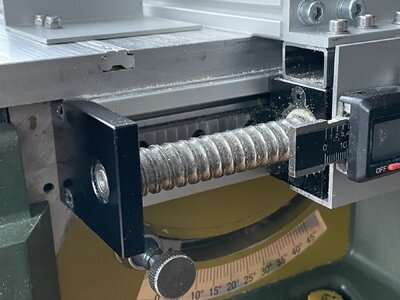
Some of the green plastic of the top cover has to be removed for it to fit, but it does not affect the integrity of the green plastic cover.
Fit.JPG

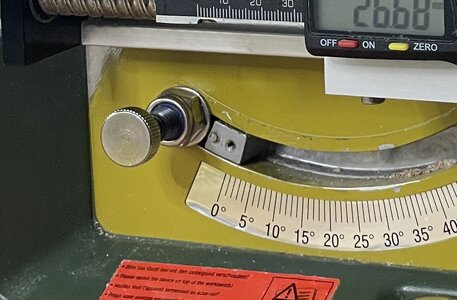
I have no use for angled cuts and only want guaranteed square cuts, so I removed the black adjusting wheel and tightened it square with a nyloc nut. By removing the height locking screw I am also able to get more height when using a 50mm saw blade.

Nyloc.JPG
Note that the rail has to fit all the way past the table so that the fence is clear of the table when opening the cover (for changing blades etc):Clearance.JPG
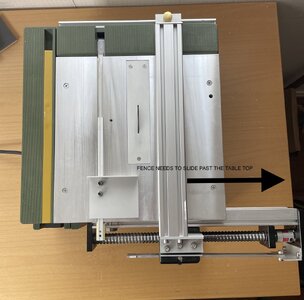
The linear rail sits very nicely under the table. The gap between the top of the rail and the table is almost exactly 15mm.
I attached a piece of standard 15x25mm steel tubing to the rail using M4 screws, and then made M4 screw holes on the top of the tubing for the L-bracket for the fence.
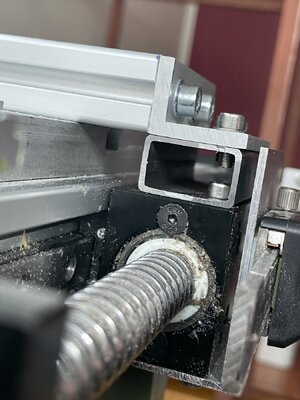
15mm attachment.JPG
The fence itself is a length of aluminium rail which is guaranteed straight, but it could be any straight piece of metal.
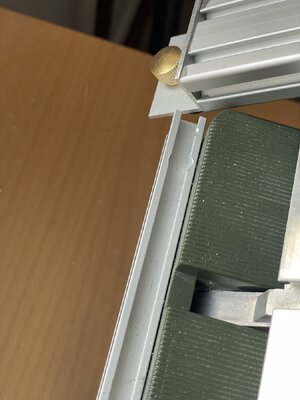
At the other end of the fence is another bracket for the tightening thumb screw M6 to lock down the fence. The thumb screw is perhaps not strictly necessary as there is no play in the linear rail, but it gives extra reliability when cutting:
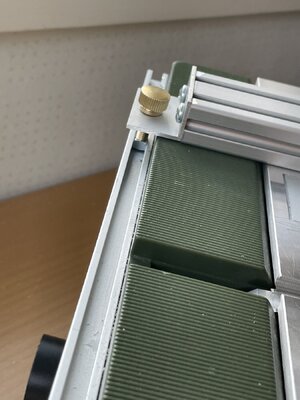
Back rail.JPG
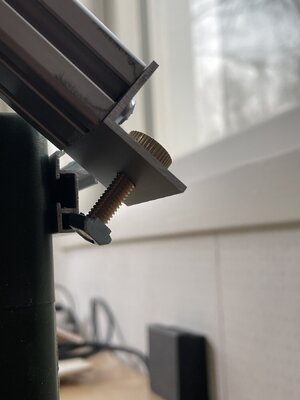
The thumb screw has a t-nut that runs along the rail at the back. I used the FET’s mitre fence to make the rail. The rail is attached to the back of the saw by drilling holes through the fence and screwing it on. There is just enough space to attach nuts from the inside.
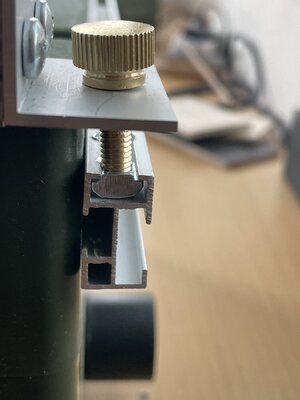
T-nut slide.JPG

NOTE: The whole fence assembly needs to clear the table for opening the saw and changing blades:
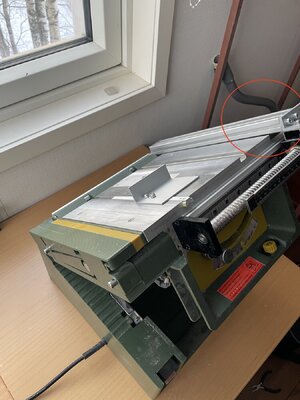
Clearance 2.JPGClearance 3a.JPGClearance 3b.JPG


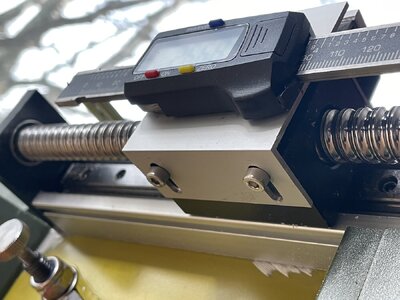
The simplest part is attaching the digital caliper. I sawed off the jaws and attached it with simple bracket and M4 screws to the underside of the linear rail. It slides along with the fence allowing for easy adjustment of cuts. It only take seconds to adjust the width of the cut!
digital attachment.JPG
I hope this is of some use!!

UPPGRADE.JPG
 
Hi everyone,

I’m sharing pictures of my Proxxon FET saw fence upgrade.

View attachment 416682

For the longest time I’ve been driven crazy by the inability to get consistently even cuts with the saw, or to be able to quickly and reliably adjust the width of the cut.

The heart of the upgrade is this:

Befenybay 200mm linear rail

View attachment 416693


I used the 200mm NEMA 17 -version, but even the 250mm version should fit. As a CNC linear rail it is very accurate and has zero play in the screw thread. For my purposes the electric motor was not necessary so I removed it.

ASSEMBLY:

I’m afraid I only have pictures of the finished upgrade, but I’ll try and explain the process.


I removed the Proxxon FET fence and gauge assembly, removed the yellow front plate and sawed off the brackets using an angle grinder.
View attachment 416675
Using graph paper lightly glued to the back of the front plate, I marked and then drilled the holes for the linear rail.
The linear rail has t-nuts at the back which make it very easy to attach and slide into the right position.
View attachment 416676

Some of the green plastic of the top cover has to be removed for it to fit, but it does not affect the integrity of the green plastic cover.

View attachment 416677

I have no use for angled cuts and only want guaranteed square cuts, so I removed the black adjusting wheel and tightened it square with a nyloc nut. By removing the height locking screw I am also able to get more height when using a 50mm saw blade.


View attachment 416674
Note that the rail has to fit all the way past the table so that the fence is clear of the table when opening the cover (for changing blades etc):View attachment 416684
The linear rail sits very nicely under the table. The gap between the top of the rail and the table is almost exactly 15mm.
I attached a piece of standard 15x25mm steel tubing to the rail using M4 screws, and then made M4 screw holes on the top of the tubing for the L-bracket for the fence.
View attachment 416685
The fence itself is a length of aluminium rail which is guaranteed straight, but it could be any straight piece of metal.
At the other end of the fence is another bracket for the tightening thumb screw M6 to lock down the fence. The thumb screw is perhaps not strictly necessary as there is no play in the linear rail, but it gives extra reliability when cutting:
View attachment 416686
The thumb screw has a t-nut that runs along the rail at the back. I used the FET’s mitre fence to make the rail. The rail is attached to the back of the saw by drilling holes through the fence and screwing it on. There is just enough space to attach nuts from the inside.
View attachment 416681

NOTE: The whole fence assembly needs to clear the table for opening the saw and changing blades:
View attachment 416680View attachment 416678View attachment 416679


The simplest part is attaching the digital caliper. I sawed off the jaws and attached it with simple bracket and M4 screws to the underside of the linear rail. It slides along with the fence allowing for easy adjustment of cuts. It only take seconds to adjust the width of the cut!
View attachment 416683
I hope this is of some use!!

View attachment 416682
That's quite the lead screw for that saw huh? At least you didn't keep the stepper motor (as shown in the picture). You know, wood moves. And such accuracy in you cuts, while nice, is not needed when making wood pieces. But that is my opinion.
 
That's quite the lead screw for that saw huh? At least you didn't keep the stepper motor (as shown in the picture). You know, wood moves. And such accuracy in you cuts, while nice, is not needed when making wood pieces. But that is my opinion.
The linear rail might look like overkill, but its advantage is that it is a finely machined, widely available and affordable package that bolts right onto the saw. Simple to set up and consistently accurate with no play in the thread.

As for the need for accuracy - well, I guess that depends on one’s standards and what is acceptable or pleasing to the individual's eye. I’m sure we’ve all found that when working at 1/48 scale and smaller even the tiniest difference in say the thickness of a board or an off-square joint gets magnified many times. Even 0.2mm is a big difference, as anybody who has tried to decide on the width of the deck caulking will attest :)

So far in life I have never had the problem that a tool is too accurate. I would have loved to have a Byrnes saw, but with shipping and customs tax it was just too expensive. This was my compromise.
 
I’m sharing pictures of my Proxxon FET saw fence upgrade.

Hi, ,Jweb, your upgrade looks fantastic. Thanks for sharing your design. The digital readout might be an overkill but it would never hurt.
I also am an owner of Proxxon FET saw. I attest that this saw ripping fence design is absolutely horrible. If I knew it is like that I would not buy this saw. The so called "precise" fence adjustment dial mechanism is useless as fence far end wobbles a few millimeters side to side when it is getting locked . I had to fix this problem by totally disabling the fence adjustment screw. I had to machine out some major fence parts for the fence to be just acceptable. I now can lock the fence without it wobbling. Now it is just OK. I am very surprised Proxxon continues selling such a crap.
 
Last edited:
Hi, ,Jweb, your upgrade looks fantastic. Thanks for sharing your design. The digital readout might be an overkill but it would never hurt.
I also am an owner of Proxxon FET saw. I attest that this saw ripping fence design is absolutely horrible. If I knew it is like that I would not buy this saw. The so called "precise" fence adjustment dial mechanism is useless as fence far end wobbles a few millimeters side to side when it is tightened. I had to fix this problem by totally disabling the fence adjustment screw. I had to machine out some major fence parts for the fence to be just acceptable. I now can tighten the fence without it wobbling. Now it is just OK. I am very surprised Proxxon continues selling such a crap.
In Europe(at least in Poland) there's not much to choose from if you want to buy a precise machines for modeling. Byrnes with all cost of shipning, accesories an taxes is just too expensive and you're left with construction machinery or some local second-hand old tools. From this perspective upgrading proxxon is not that bad option
 
This is my “modifications” to FET. Note the jamming screw locking the horizontal ruler to the fence lock is removed. Aluminium angle added. Now I can measure a distance to the blade with calliper. Angle ending at about centre of the blade reduces possibility of working piece jamming and kickback. I also recently discovered that applying a beewax paste to the saw table and fence rubbing parts makes whole saw operation much easier.


IMG_0259.jpeg
 
Hi, ,Jweb, your upgrade looks fantastic. Thanks for sharing your design. The digital readout might be an overkill but it would never hurt.
I also am an owner of Proxxon FET saw. I attest that this saw ripping fence design is absolutely horrible. If I knew it is like that I would not buy this saw. The so called "precise" fence adjustment dial mechanism is useless as fence far end wobbles a few millimeters side to side when it is getting locked . I had to fix this problem by totally disabling the fence adjustment screw. I had to machine out some major fence parts for the fence to be just acceptable. I now can lock the fence without it wobbling. Now it is just OK. I am very surprised Proxxon continues selling such a crap.
My heartfelt agreement. With the sad passing of Jim there is a huge gap in the market for an accurate saw. The FET is categorically not it!
All I wanted was to accurately cut planks of a required size. After setting the thickness (luck not judgement!) you get a saw that binds because of the appalling give in the fence. I found, after experimenting with a number of different blades, that the Proxxon 36 tooth was the one that gave me the best results....but.....the kerf was wider than the plank. A lot of very expensive boxwood now a pile of powder!
So I had a Byrnes shipped to the UK for £940. A lot of money but seriously worth it.
I plan to upgrade the FET, it's always good the have a backup for other purposes. Cutting planks will not be one of it's functions!
 
Hi everyone,

I’m sharing pictures of my Proxxon FET saw fence upgrade.

View attachment 416682

For the longest time I’ve been driven crazy by the inability to get consistently even cuts with the saw, or to be able to quickly and reliably adjust the width of the cut.

The heart of the upgrade is this:

Befenybay 200mm linear rail

View attachment 416693


I used the 200mm NEMA 17 -version, but even the 250mm version should fit. As a CNC linear rail it is very accurate and has zero play in the screw thread. For my purposes the electric motor was not necessary so I removed it.

ASSEMBLY:

I’m afraid I only have pictures of the finished upgrade, but I’ll try and explain the process.


I removed the Proxxon FET fence and gauge assembly, removed the yellow front plate and sawed off the brackets using an angle grinder.
View attachment 416675
Using graph paper lightly glued to the back of the front plate, I marked and then drilled the holes for the linear rail.
The linear rail has t-nuts at the back which make it very easy to attach and slide into the right position.
View attachment 416676

Some of the green plastic of the top cover has to be removed for it to fit, but it does not affect the integrity of the green plastic cover.

View attachment 416677

I have no use for angled cuts and only want guaranteed square cuts, so I removed the black adjusting wheel and tightened it square with a nyloc nut. By removing the height locking screw I am also able to get more height when using a 50mm saw blade.


View attachment 416674
Note that the rail has to fit all the way past the table so that the fence is clear of the table when opening the cover (for changing blades etc):View attachment 416684
The linear rail sits very nicely under the table. The gap between the top of the rail and the table is almost exactly 15mm.
I attached a piece of standard 15x25mm steel tubing to the rail using M4 screws, and then made M4 screw holes on the top of the tubing for the L-bracket for the fence.
View attachment 416685
The fence itself is a length of aluminium rail which is guaranteed straight, but it could be any straight piece of metal.
At the other end of the fence is another bracket for the tightening thumb screw M6 to lock down the fence. The thumb screw is perhaps not strictly necessary as there is no play in the linear rail, but it gives extra reliability when cutting:
View attachment 416686
The thumb screw has a t-nut that runs along the rail at the back. I used the FET’s mitre fence to make the rail. The rail is attached to the back of the saw by drilling holes through the fence and screwing it on. There is just enough space to attach nuts from the inside.
View attachment 416681

NOTE: The whole fence assembly needs to clear the table for opening the saw and changing blades:
View attachment 416680View attachment 416678View attachment 416679


The simplest part is attaching the digital caliper. I sawed off the jaws and attached it with simple bracket and M4 screws to the underside of the linear rail. It slides along with the fence allowing for easy adjustment of cuts. It only take seconds to adjust the width of the cut!
View attachment 416683
I hope this is of some use!!
View attachment 416682
Excellent upgrade. I’ve already ordered the linear rail since, as others have stated, the factory fence is crap and I’ve been trying various work around solutions to try and make it usable. Thanks for this idea and post!
 
Will be receiving my FET next week. Think I will start with making birdhouses and see how it goes, before any upgrades. Purchased for model making, so I think I will eventually need better fence because factory rail does look like crap. Hope I enjoy it! Was looking at Micro-Mark?
 
Excellent upgrade. I’ve already ordered the linear rail since, as others have stated, the factory fence is crap and I’ve been trying various work around solutions to try and make it usable. Thanks for this idea and post!
Great! Feel free to message me if you have any questions when setting it up.
 
This is in case one decides having a locking screw at the North side of the fence which even the design author considers unnecessary.
You mean and have a short fence that does not go to the end? Yes, you could, but I still think it is better to have a locking screw at the end - that way there is no pressure on the fence during sawing that make it move out of alignment. 200mm of rail movement is the minimum to clear the table.
 
Last edited:
Hello,
I also made some modifications to my FET.
This can be done without machine tools.

This allows the cutting guide to be positioned on either side of the blade.

regles_01.jpg

Bernard
 
You mean and have a short fence that does not go to the end? Yes, you could, but I still think it is better to have a locking screw at the end - that way there is no pressure on the fence during sawing that make it move out of alignment. 200mm of rail movement is the minimum to clear the table.
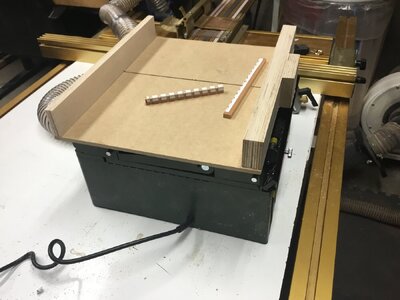
Having the fence clear the top also will allow me to use the crosscut sled I made without having to remove the fence.

IMG_8064.jpeg
 
Back
Top