Happy Birthday, Richie!!


Gran trabajo Richie!. Saludos desde España. Estoy realizando el mismo kit que tu, aunque voy mas retrasado que tu. Tus fotos y comentarios me ayudan mucho en mi trabajo. Ánimo!!El progreso se ha ralentizado un poco a medida que se acerca el momento de la manipulación y lo estoy posponiendo sabiendo que será un desafío para mí.
Trabajó en los mástiles y largueros marcando primero todas las piezas, luego teniendo cuidado de anotar las longitudes de cada componente de la clavija asegurándose de que encajara en las longitudes provistas, esto requirió un poco de malabarismo, mezcla y combinación, pero todo funcionó bien.
View attachment 257663
Las pequeñas partes de madera, como árboles en cruz, se hicieron a mano y se mantuvieron juntas como un conjunto, el ahusamiento de la clavija se hizo solo con un taladro eléctrico y papel de lija.
Comencé a ensamblar el nido de cuervos de abajo hacia arriba y luego me di cuenta de que no se pueden colocar las siguientes piezas debido al ángel de la estructura, así que tuve que desengancharlo demasiado y esta vez ensamblar las dos piezas del medio juntas primero, luego el Se podrían agregar las partes superior e inferior.
View attachment 257664
Mantener todo junto como un conjunto hasta que se hayan agregado y ensamblado todos los bloques.
View attachment 257665View attachment 257666
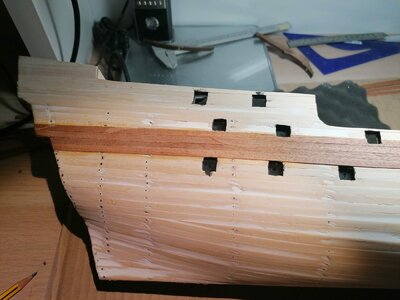
Your ship is coming on nicely, I felt the same way about the rigging but it not that bad once you get started. I found the best way to learn was to practice tying blocks off the model, there are different ways of tying them find the best method that works for you.Progress has slowed a little as it's getting close to rigging time and I am putting it off knowing it will be a challenge for me.
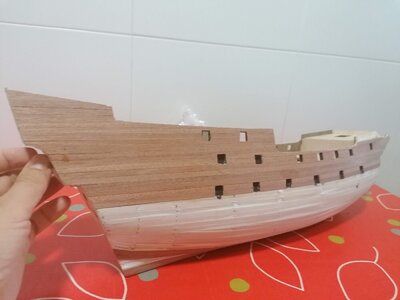
Worked on the masts and spars by firstly marking all the pieces, then taking care noting the lengths of each dowel component making sure it will fit on the lengths provided, this required a bit of juggling mixing and matching but it all worked out ok.
View attachment 257663
The small wood parts like cross trees were crafted and kept together as a set, the dowel tapering was done just with an electric drill and sandpaper.
I started assembling the crows nest from the bottom up then realized you can't put the next pieces in due to the angel of the structure, so I had too un-glue it and this time assemble the two middle pieces together first, then the top and bottom parts could be added.
View attachment 257664
Keeping everything together as a set until they have had all the blocks added and assembled.
View attachment 257665
Thank you for your kind words Gravina, this is the main reason I decided to do this log hoping it might help someone in a similar position to me so glad it helps you.Great job Richie! Greetings from Spain. I am making the same kit as you, although I am more behind than you. Your photos and comments help me a lot in my work. Cheer up!!
Thanks Tony, I think my main issue is how much do I just follow the plans or try to push it for some more accuracy as I think the original plans are somewhat simplified.Your ship is coming on nicely, I felt the same way about the rigging but it not that bad once you get started. I found the best way to learn was to practice tying blocks off the model, there are different ways of tying them find the best method that works for you.


.jpg")
.jpg")
.jpg")
.jpg")
.jpg")


.jpg")

.jpg")
Looks like you are doing a great job, it doesn't seem that long ago I was at the same place you are now, keep up the good work and keep the updates coming.Estas haciendo un fantástico trabajo. Las mejores que vas haciendo aportan mas vistosidad y enriquecen el modelo original. Yo sigo con mi propio Revenge, mucho más lento que tu.View attachment 263567
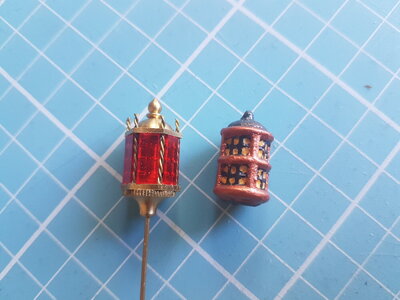
Thank you yes I agree with your feedback. The casting mold definitely had seen better days, I know the figurehead is awful, I will strip the paint off it and try to redo it in a different colour as well as trying to fix the casting somehow, just don't know how yet, lucky it is one of those things that won't hold up the build.Hard call on the lantern. The red one certainly looks nicer but does it fit with your ship? I happen to like your anchors very much - the casting for the figurehead - not so much. Looks like the mold has seen better days...
My thoughts too I wasn't immediately sold on it suiting the ship, see my reply to Paul, or I might look into modifying the new prefabricated one slightly, any idea if the new ones style is from a certain period.Like Paul said, I am not sure the prefabricated lantern suits your ship. I would go for your spruced-up one.