Occre - HMS Revenge 1577 - scale 1/85, 2nd build and why

Joined
Aug 30, 2020
Messages
639
Points
308

Hi All,

As a member of this ship modeling group thought it was about time I posted something.
This will be my second build after enjoying the process on my Port Jackson Schooner which can be seen in the showcase if interested.

I often wonder why modelers choose to build the particular ships they do, a common reason I see is there is some personal attachment to a particular ship but other than that I guess the reasons are as varied as there are models to build.

For my second build I wanted it to be quite a bit different to the first one, that is I wanted to try a lot of techniques the schooner didn't include.
Firstly the local admiralty ordered that if I build a second ship it had to include sails, ok can't disobey an order so that was the number one priotity and wont get into the modelers debate if they should or shouldn't include them.
Some other reasons are I wanted it to be a multi deck warship from around the period 1500's to 1800's as this seems to be where my interest lies, so naturally this includes some canons and gun ports but didn't want to dive to deep with more than say 20 for now.
I also wanted to try doing some ratlines and painting colours in the details, also didn't want it too expensive (in case I lost motivation)or too difficult for my still novice skills and just to have some visual appeal to me, a good back story also adds to the interest.

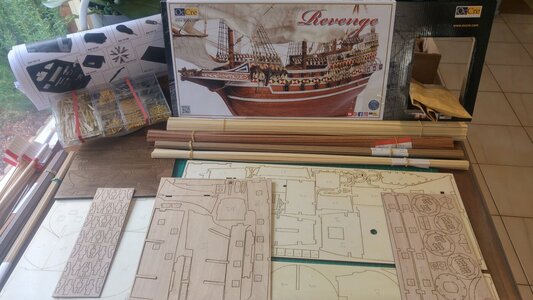
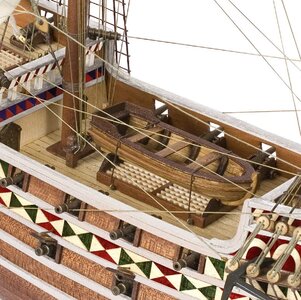
As I am in Australia Modelers central have a filter for skill level on their kits so I was looking in the mid range of about three and with the above criteria the list go a lot smaller so I settled on HMS Revenge from Occre.

I am happy with my choice and is turning out about the right level of challenge for me.
My thoughts on the kit, I think it is more of a representation of the actual ship than an accurate historical model, but I am ok with that as the kit template follows a couple of other ships in the Occre line up, guess this is where some costs are kept in check but I will attempt a few tweaks and additions to some areas along the way where I thought it lacked a bit of detail.

I haven't found many build logs for this particular ship so hopefully this will help someone else to see a way of doing things while I learn as I go or maybe equally how not to do things.

Pictures and updates to follow soon, happy for anyone to add any suggestions or corrections to something I may have missed but a bit nervous to put my mistakes out there for everyone to see, the work produced by everyone in this forum is just amazing and I am in awe and wonder how someone can produce models to such perfection.

Modelers central website: https://www.modelerscentral.com/model-ship-kits/occre/hms-revenge/
From the Occre website: https://catalog.occre.com/model-ship/ship/hms-revenge.html
 
Good kit choice. I am building the “Victory Models Kit Revenge 1577 Race Built Galleon scale 1/64” so you can check out my build log of the same title. The Revenge is a galleon style period ship so there is a lot of ornamentation and decoration that is typical. Take your time with all the decorations. So have fun and always ask questions if needed!
 
Ok thanks guys, lets start.

This wont really be a how to guide on perhaps how a master modeler would build it, but rather my journey as a beginner modeler, hmm interesting question when when do you move from being a beginner to experienced.

I have read or maybe seen on one of the many YouTube how to videos I have watched you should always start with a parts inventory and mark off everything included in the kit.
This process actually took quite a while with all the cross checking and measuring sizes and lengths needed from the plans, identifying wood types and labeling everything.
Some quantities and descriptions didn't match up, for example the parts list had 12 front and 12 back wheels for the cannon trolleys and that they were made of brass where actually there were 14 of each and they were made of wood, the photos also showed them as brass colour.
One thing that was clear I didn't have any 4mm dowel lengths and there should have been quite a few, a close check also revealed there wasn't enough lengths on a couple of dowel sizes as well as a few other wood pieces.
Also I may not have been able to correctly identify different wood types as per the plans, I concluded if I had enough length of a certain size even though different wood types were specified I marked it as good and will figure it out as I go.
Now with parts check done and my missing parts list in hand I went to the Occre web site and completed the parts request form, one point to note, rather than list that I needed say 2 lengths of 400mm dowel you have to write every individual part number that was missing and they would work out the lengths.
I did this a little while back and have since received the new parts so full credit to Occre for after sales service it was excellent and very happy to recommend then as a kit supplier.
Written instructions were limited to one sheet with photos and diagrams giving the main reference on what to do but not a lot on actually how to do it, this is where some additional research on tutorials may benefit, my first and only other model had good written how to instructions which was good for me as it was pre internet and I had absolutely no idea.

Building starts next.
 

Attachments

  • Kit.jpg
    Kit.jpg
    236.8 KB · Views: 81
  • Parts.jpg
    Parts.jpg
    414.7 KB · Views: 80
  • Masts.jpg
    Masts.jpg
    225.4 KB · Views: 79
Good kit choice. I am building the “Victory Models Kit Revenge 1577 Race Built Galleon scale 1/64” so you can check out my build log of the same title. The Revenge is a galleon style period ship so there is a lot of ornamentation and decoration that is typical. Take your time with all the decorations. So have fun and always ask questions if needed!
Thank you, yes I have seen your log and it actually gave me the inspiration to write something about mine as it would be a good comparison of the same model from different manufactures, I think your model being the larger scale also has better detail.
I like the look and the story of the Revenge.
 
I'm closing in on completing my first build, and have already started looking at kits for my second. Looking forward to watching this one, maybe it's something to put on the list!
 
I made a base board for the keel and bulkheads and started assembly.
For some reason my mind goes off piste and I try some novel techniques instead of following tried an true methods of construction.
My theory was to pin the sides and the have deck weighted in place to hold it down while the glue dries on the skeleton, then everything should fit back in place when it came time to glue those parts.
Well it didn't quite work out that way, when the glue dried 2 of the ribs had moved slightly so the other parts wouldn't fit back in properly without some pressure, perhaps a bit too much weight.
So this required a bit of glue loosening and work to get them back into the correct position, I glued and fitted some extra bracing on the keel to square them back up.
Picture of test fit to show what I mean.
 

Attachments

  • Skeleton.jpg
    Skeleton.jpg
    223.1 KB · Views: 52
Decking and rookie mistake.
The instructions called for the deck planking to be done on each deck piece before joining them to the hull, this was different to my first build where the deck planking was done on the ship.
So this was completed with all the notches cut out as well, unfortunately I then realised my error they were not supposed to be cut out where all the bulkheads are, no photos of this part.
This meant several planks on both sides of each deck needed to be removed and re-planked again careful to only cut out notches where required, this redo took longer than the original job first time.
Also I had a few spare planks so an extra I decided to do was plank the false decks under the hatch's and also stained wherever it might be visible if looking through them.

Decking 1.jpgDecking 2.jpgDecking 3.jpg
 
Hi Richie,

I'll pull up a chair to watch as well. I resonate with something you said about posting your work for others to see - it's not always easy to post your marginal stuff but I have resigned myself to the reality that I can't do what more experienced / talented modelers can do. And every time I received feedback it was done helpfully rather than critically. What I am saying is: don't worry about it! The folks on this forum know the struggles you are facing and are more sympathetic than judgmental. Looking forward to following your build.
 
Nice start good to see the deck planking worked out OK . What method did you use to highlight the planks and treenails?
Thank you.
I rubbed a pencil along the edges of the planks for simulated caulking and for the tree nails I used a pointer to mark and indent them first and a brown colouring pencil to colour them, once a clear coat is applied hopefully this will highlight them nicely.

One thing I forgot to mention was the planking on the walls between the decks.
The first picture from the box appears to show no planking at all.
The Occre plans showed it layed vertically but I didn't really like the way it looked.
So I decided to take my queue from the Golden Hind replica from around the same era and make them horizontal, although they look overlapping it wasn't going to work for my stick on brass doors unless I built a frame around them so I just layed them flat as seen in my picture.
 

Attachments

  • Deck.jpg
    Deck.jpg
    295.8 KB · Views: 59
  • Occre Plan.jpg
    Occre Plan.jpg
    280.3 KB · Views: 57
  • Golden Hind Rep.png
    Golden Hind Rep.png
    721.5 KB · Views: 54
  • Golden Hind Rep2.png
    Golden Hind Rep2.png
    612.5 KB · Views: 58
Hi Richie,

I'll pull up a chair to watch as well. I resonate with something you said about posting your work for others to see - it's not always easy to post your marginal stuff but I have resigned myself to the reality that I can't do what more experienced / talented modelers can do. And every time I received feedback it was done helpfully rather than critically. What I am saying is: don't worry about it! The folks on this forum know the struggles you are facing and are more sympathetic than judgmental. Looking forward to following your build.
Thank you for your kind words Paul.
Yes I marvel at how a master modeler can make any task look easy and with such precision but when I try to do it I don't yield the same result.
There are a lot of amazing builds on this forum but figured if I add mine to the list on how a more modest modeler goes about it maybe it will help someone else along the way.
I also don't think I will ever reach a high level but if I can keep learning and improving along the way then that will be enough for me.
PS. My build is a bit ahead of the posts here and there are more mistakes coming upRedface
 
Good day Richie,
There are a few links of high quality galleon models which could be usefull for you during your own galleon building...
as source of information :)))... hull construction and elements, rigging matters ,etc

Very interesting Reconstruction of small english galleon based on Raymond Aker design and model made by Evgeny T.
I haven't seen these sites, lots of great reference there thank you although a couple seem to need logins.
 
Bulwarks and my biggest mistake:oops:

Something I didn't realise at the time until it was too late was the critical placement of these effects the whole build, I had already glued and nailed them so any chance of a repair was probably going to destroy them.
I am now left with a slight difference between the height of them on the middle deck, I decided to accept it for what it is and move on perhaps compensating somewhere down the track.
You can see there is some latitude for adjustment in exactly where they are placed, it's possible the deck may not have been glued square and flat or I just wasn't paying proper attention that they should be measured to ensure equal height on both sides, I know this now.:(
They are quite fragile pieces too as I broke one, luckily they will be covered up, also as per the instructions I stained inside the bulwarks.
The plans show the gun port backing plates are also attached, I decided to leave this until after the gun port cutouts were all done, pretty sure having them in place would make it difficult to cut them out.
So on to my biggest ship building nightmare let the planking begin.
 

Attachments

  • Bulwarks (1).jpg
    Bulwarks (1).jpg
    185.9 KB · Views: 73
  • Bulwarks (2).jpg
    Bulwarks (2).jpg
    189.2 KB · Views: 69
  • Bulwarks (3).jpg
    Bulwarks (3).jpg
    176.9 KB · Views: 69
  • Bulwarks (4).jpg
    Bulwarks (4).jpg
    164.7 KB · Views: 74
Back
Top