I have only built just 2-3 ships basically by following the manufacturers instructions,reading related how-to books, this website and youtube videos. The kit instructions outline how to assemble each of the components but when it comes time to the final assembly e.g. masts,sails,rigging,etc. the instructions are minimal. I've read through a few books such as Rigging Period Ship Models, Ship Models-How to build them Ship Modeling Simplified,etc. but the books describe assembly of each component but none cover the full assembly sequence in any detail. Is there anything out there that covers final assembly or is it specific to the model ship you are building?
You are using an out of date browser. It may not display this or other websites correctly.
You should upgrade or use an alternative browser.
You should upgrade or use an alternative browser.
I've always tried to use the sequence for building my models as was used in building the real ship providing nothing I do is going to block my hands at a later stage. An example of this would be to attach all fittings that will be required on the inside of the bulwark and deck before permanently attaching deck houses. All fittings and stages for mast and yard construction are completed off of the ship while the mast is held in a clamp allowing lots of room to work. When it comes to rigging, standing rigging, shrouds and stays should be applied first. Personally, I've always done the shrouds first to keep the dead eyes perfectly in line. When doing the running rigging I suggest doing as much research as possible on the type or period of model you are building as sometimes plans are a bit misleading when two or three lines come together as a black blob with no detailed explanation for attachment. My opinion only, hope this helps.
From an older post on rigging sequence (saves me some typing):
There is a careful balance in choosing your assembly steps between ease of assembly and ease of installation. Some modelers do hang all the ropes for the standing and running rigging from the masts, but are very meticulous in labelling each line with tags. Doing it this way can turn into a tangled mess if you are not careful. Most people set the masts in place after installing all the blocks on the yards, and sometimes with the running rigging attached to the mast assemblies, and then rig the standing rigging with all the running rigging lines hanging out of the way until later.
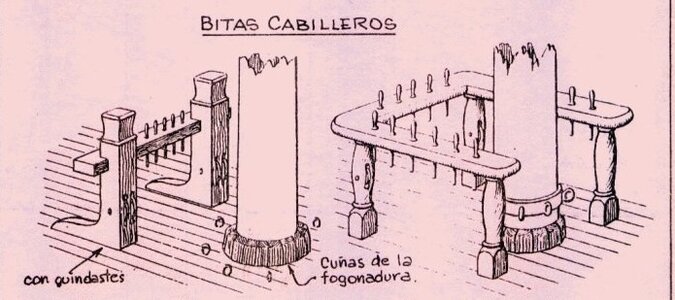
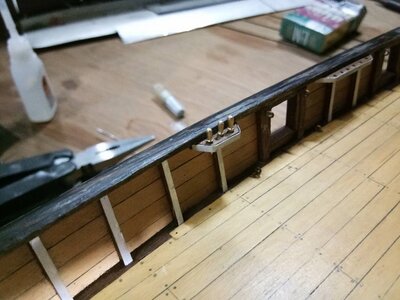
It becomes difficult to tie the lines to the belaying points on the rails, knightheads, and belaying pin racks while keeping the lines at the proper tension. It is much easier to secure the bottom ends of each running rigging line to the belaying point, and tie the opposite end to where it attaches to a yard or stay up higher, and the tension you want is easily maintained.
The best way I know takes a LOT of planning ahead and labelling the running rigging lines with paper tags. before setting the masts, ensure all blocks are attached to the yards, and the yards are installed. Also, tie all the running rigging lines to their belaying points on the hull. Use some thread to temporarily hold these loose ropes in groups hanging over the side so they don't get tangled. Install the masts and yards, rig the standing rigging, then start running the running rigging ropes for lifts and ties to support yardarms, and cargo hoists up through the blocks to their tie off points on the yards/staylines/whatever. Then attach the sails and rig sheets, clewlines, bowlines, and other lines used to control the sails. Yes, the shrouds and ratlines will become and obstruction to accessing the deck, and there's no getting around that. Start rigging with the highest sails and work downward, which will allow you the most access to the deck and belaying points for a longer time in the process, since the courses make access even worse. I usually rig the sails on the bowsprit, then the foremast, mainmast, and mizzen mast in that order. because of the difficulty in rigging a lateen sail on the mizzen mast, you may rig that before you rig the main course so you have more access with your tools and fingers to the deck that way. Always rig brace lines for controlling the angle of the yardarms last, since they would get in the way if rigged earlier.
Note: If you are angling your yardarms at an angle other than perpendicular to the hull, you should use a length of thread to install temporary braces to hold the yardarms in position at the proper angle and you rig the running rigging, or the running rigging will not have the correct tension. I usually tie a length of thread to a yard arm and run it forward, tying the other end to a mast or top or whatever works, and tension it to provide the desired yard angle. Then install running rigging. That way, all the yard on a mast have the same angle from top to bottom, and there is no stress on the yardarms and consequently its corresponding lifts, ties, and parrel. You don't want to break anything.
No matter what order you use on the first ship, you will change your order slightly for the next one in order to avoid some of the difficulties in access to tie-off points and running the ropes through tops and between the tangle of lines as things get closer to the end. I use a length of wire with a narrow loop bent on one end to draw lines through the tops. It's an invaluable tool to fishing the lines through places you can no longer get your fingers, tweezers, or forceps into. May the gods of patience be with you, and may fortune ever be in your favor.
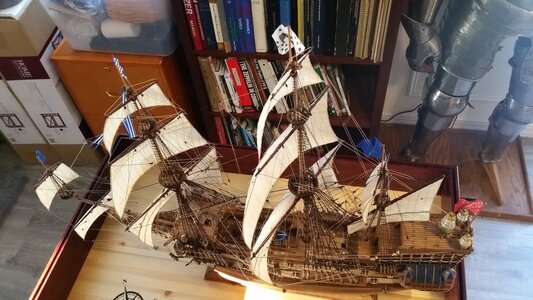
La Couronne with yards set for wind from the port quarter, as evidenced by the flags and pennant. Angling the yards and sails allows a better view of the deck from one side of the model, plus it adds realism. Some choose not to rig sails because it can block your view of the rigging and other features.

Last edited:
Thank you for the advice. One thing this hobby does teaches you is patience!
Some good advice here. In general, it's standing rigging first, then running rigging and I try to work bow to stern, bottom to top and inside out, but there will always be some lines that give you a special challenge.
I'm going to follow your sequence on my current build. Measuring and cutting the running rigging and starting the rigging at the belaying points makes perfect sense after stuggling on all my builds with belaying the lines last.From an older post on rigging sequence (saves me some typing):
There is a careful balance in choosing your assembly steps between ease of assembly and ease of installation. Some modelers do hang all the ropes for the standing and running rigging from the masts, but are very meticulous in labelling each line with tags. Doing it this way can turn into a tangled mess if you are not careful. Most people set the masts in place after installing all the blocks on the yards, and sometimes with the running rigging attached to the mast assemblies, and then rig the standing rigging with all the running rigging lines hanging out of the way until later.
It becomes difficult to tie the lines to the belaying points on the rails, knightheads, and belaying pin racks while keeping the lines at the proper tension. It is much easier to secure the bottom ends of each running rigging line to the belaying point, and tie the opposite end to where it attaches to a yard or stay up higher, and the tension you want is easily maintained.
The best way I know takes a LOT of planning ahead and labelling the running rigging lines with paper tags. before setting the masts, ensure all blocks are attached to the yards, and the yards are installed. Also, tie all the running rigging lines to their belaying points on the hull. Use some thread to temporarily hold these loose ropes in groups hanging over the side so they don't get tangled. Install the masts and yards, rig the standing rigging, then start running the running rigging ropes for lifts and ties to support yardarms, and cargo hoists up through the blocks to their tie off points on the yards/staylines/whatever. Then attach the sails and rig sheets, clewlines, bowlines, and other lines used to control the sails. Yes, the shrouds and ratlines will become and obstruction to accessing the deck, and there's no getting around that. Start rigging with the highest sails and work downward, which will allow you the most access to the deck and belaying points for a longer time in the process, since the courses make access even worse. I usually rig the sails on the bowsprit, then the foremast, mainmast, and mizzen mast in that order. because of the difficulty in rigging a lateen sail on the mizzen mast, you may rig that before you rig the main course so you have more access with your tools and fingers to the deck that way. Always rig brace lines for controlling the angle of the yardarms last, since they would get in the way if rigged earlier.
Note: If you are angling your yardarms at an angle other than perpendicular to the hull, you should use a length of thread to install temporary braces to hold the yardarms in position at the proper angle and you rig the running rigging, or the running rigging will not have the correct tension. I usually tie a length of thread to a yard arm and run it forward, tying the other end to a mast or top or whatever works, and tension it to provide the desired yard angle. Then install running rigging. That way, all the yard on a mast have the same angle from top to bottom, and there is no stress on the yardarms and consequently its corresponding lifts, ties, and parrel. You don't want to break anything.
No matter what order you use on the first ship, you will change your order slightly for the next one in order to avoid some of the difficulties in access to tie-off points and running the ropes through tops and between the tangle of lines as things get closer to the end. I use a length of wire with a narrow loop bent on one end to draw lines through the tops. It's an invaluable tool to fishing the lines through places you can no longer get your fingers, tweezers, or forceps into. May the gods of patience be with you, and may fortune ever be in your favor.
- Joined
- Jun 13, 2022
- Messages
- 241
- Points
- 143

Lol … yeah, people who know me can’t believe the patience I have when they see my builds as many previously thought me to be impatien.Thank you for the advice. One thing this hobby does teaches you is patience!
It does save a lot of aggravation trying to belay the lines on belaying pins without breaking them off (I use wood pins) while keeping proper tension on the line you're rigging. Unlike those hang a lot of labeled lines all at once, I like to rig one line at a time and keep my sanity.I'm going to follow your sequence on my current build. Measuring and cutting the running rigging and starting the rigging at the belaying points makes perfect sense after stuggling on all my builds with belaying the lines last.
Last edited:
Agreed. One line to completion. One side then the other to keep everything 'even'.Unlike those hang a lot of labeled lines all at once, I like to rig one line at a time and keep my sanity.
Standing Riggen first- starting with the throats, then the forestay. backstay. stays between fore and main mast and finally between the main and mizzen mast.Some good advice here. In general, it's standing rigging first, then running rigging and I try to work bow to stern, bottom to top and inside out, but there will always be some lines that give you a special challenge.
Now about the running Riggen, there is two types -depending if you build your ship with or with out sail. first part is the running Riggen which are taken care of the yards and mast. the 3Th one is the one takes care of the sails. Now if with sails you may run into some difficulties. a small example. I have the complete Riggen nearly from warship- the uh Riggen and the Oriental one
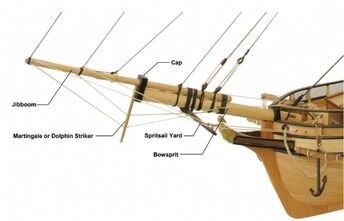
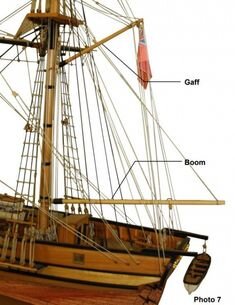
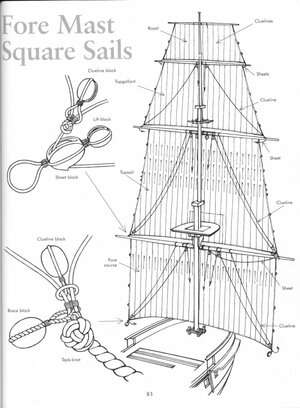
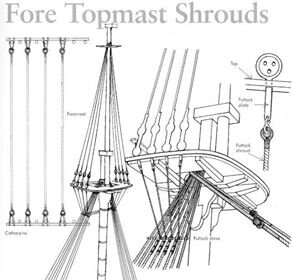
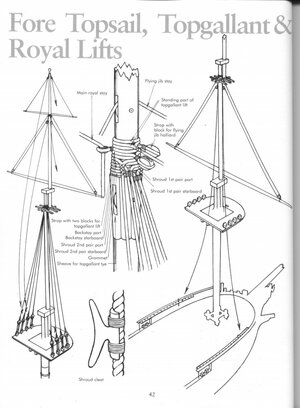
That is very well explained. As you mentioned, there are a lot of different ways to do the Riggenm add the sails etc. You will little by little find your way around. If you wants your ship with sails,. I would start as earlty pòsible to make mainly the Spritsails, as they will have to be fastened with Rings through the sail and then oner the stay. to do that on the model is difficult and can make some accident. general these rings are of metal and will have to be oppen to go through the sail and over the stay, where it will have to be closed again; i generally used to do that a soldering Glue m- like polyester cement in the plastics industry. take a tootpin and dip it lightly in the soldering glue on each end but careful, you have a second or two to add the ends together. after then solid. you san use any other soldering equipmentFrom an older post on rigging sequence (saves me some typing):
There is a careful balance in choosing your assembly steps between ease of assembly and ease of installation. Some modelers do hang all the ropes for the standing and running rigging from the masts, but are very meticulous in labelling each line with tags. Doing it this way can turn into a tangled mess if you are not careful. Most people set the masts in place after installing all the blocks on the yards, and sometimes with the running rigging attached to the mast assemblies, and then rig the standing rigging with all the running rigging lines hanging out of the way until later.
It becomes difficult to tie the lines to the belaying points on the rails, knightheads, and belaying pin racks while keeping the lines at the proper tension. It is much easier to secure the bottom ends of each running rigging line to the belaying point, and tie the opposite end to where it attaches to a yard or stay up higher, and the tension you want is easily maintained.
The best way I know takes a LOT of planning ahead and labelling the running rigging lines with paper tags. before setting the masts, ensure all blocks are attached to the yards, and the yards are installed. Also, tie all the running rigging lines to their belaying points on the hull. Use some thread to temporarily hold these loose ropes in groups hanging over the side so they don't get tangled. Install the masts and yards, rig the standing rigging, then start running the running rigging ropes for lifts and ties to support yardarms, and cargo hoists up through the blocks to their tie off points on the yards/staylines/whatever. Then attach the sails and rig sheets, clewlines, bowlines, and other lines used to control the sails. Yes, the shrouds and ratlines will become and obstruction to accessing the deck, and there's no getting around that. Start rigging with the highest sails and work downward, which will allow you the most access to the deck and belaying points for a longer time in the process, since the courses make access even worse. I usually rig the sails on the bowsprit, then the foremast, mainmast, and mizzen mast in that order. because of the difficulty in rigging a lateen sail on the mizzen mast, you may rig that before you rig the main course so you have more access with your tools and fingers to the deck that way. Always rig brace lines for controlling the angle of the yardarms last, since they would get in the way if rigged earlier.
Note: If you are angling your yardarms at an angle other than perpendicular to the hull, you should use a length of thread to install temporary braces to hold the yardarms in position at the proper angle and you rig the running rigging, or the running rigging will not have the correct tension. I usually tie a length of thread to a yard arm and run it forward, tying the other end to a mast or top or whatever works, and tension it to provide the desired yard angle. Then install running rigging. That way, all the yard on a mast have the same angle from top to bottom, and there is no stress on the yardarms and consequently its corresponding lifts, ties, and parrel. You don't want to break anything.
No matter what order you use on the first ship, you will change your order slightly for the next one in order to avoid some of the difficulties in access to tie-off points and running the ropes through tops and between the tangle of lines as things get closer to the end. I use a length of wire with a narrow loop bent on one end to draw lines through the tops. It's an invaluable tool to fishing the lines through places you can no longer get your fingers, tweezers, or forceps into. May the gods of patience be with you, and may fortune ever be in your favor.
La Couronne with yards set for wind from the port quarter, as evidenced by the flags and pennant. Angling the yards and sails allows a better view of the deck from one side of the model, plus it adds realism. Some choose not to rig sails because it can block your view of the rigging and other features.
View attachment 366869
Another thing mentioned is the difficulties of be around pins and/or other fasting methods. ONE of the reason, that kit manufactors in their instructions manuals cannot wait for a second to insert the decks, instead of making the hull first, then start one deck at the time, and making it finish. then add the next so on
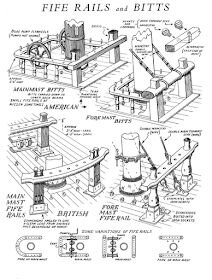
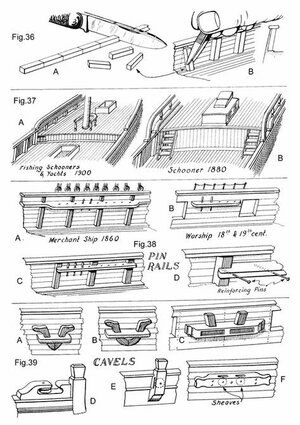
That is very well explained. As you mentioned, there are a lot of different ways to do the Riggenm add the sails etc. You will little by little find your way around. If you wants your ship with sails,. I would start as earlty pòsible to make mainly the Spritsails, as they will have to be fastened with Rings through the sail and then oner the stay. to do that on the model is difficult and can make some accident. general these rings are of metal and will have to be oppen to go through the sail and over the stay, where it will have to be closed again; i generally used to do that a soldering Glue m- like polyester cement in the plastics industry. take a tootpin and dip it lightly in the soldering glue on each end but careful, you have a second or two to add the ends together. after then solid. you san use any other soldering equipment
Another thing mentioned is the difficulties of be around pins and/or other fasting methods. ONE of the reason, that kit manufactors in their instructions manuals cannot wait for a second to insert the decks, instead of making the hull first, then start one deck at the time, and making it finish. then add the next so on
View attachment 373849
View attachment 373850
View attachment 373851
View attachment 373852
View attachment 373853


