MarisStella Ragusian Carrack by Signet [COMPLETED BUILD]

On to the catheads. They are to be made out of 5mm square walnut, but I didn't think I could make nice, closely fit 5x5mm square holes to retain them. And, I want anything sticking out of the hull to be sturdy, so wanted the catheads to extend toward the center of the hull, into a bulkhead. I felt I could to this best with a round hole and shaft, rather than square. So, I needed to turn round ends on my 5x5mm stock.

I first chucked the 5x5 stock up in my electric drill:
1685636808197.png
No, it doesn't chuck up well or centered, but it's in the ballpark (a saying I should probably use throughout this build: "It's in the ballpark!").

I then placed the walnut square strip through a piece of plastic tubing I had on hand. Holding the tubing, and rotating the square strip using the drill, I roughly turned the end of the strip to 3/16" diameter using my belt sander:
1685636970890.png
This wasn't extremely accurate, due to the loose fit of the tube, but at least it held it in place. If it were a snugger fit, it would be more accurate. I then chucked this turned round end in the drill, and did the same to the other end of my 5mm strip (one cathead would be at each end).

I then used tape to allow me to accurately locate and mark the center hole for the catheads:
1685637140262.png
and drilled 3/16" holes for them. I like to use a bradpoint drill when drilling holes like this, as they are both easy to center, and cleanly cut the OD of the hole:
1685637224234.png

I inserted the 3/16" drill to help locate the correct angle for the extended drill to the inside bulkhead. Using a level, I could measure the angle from horizontal of the drill, then marking where it hit the bulkhead:
1685637399532.png

ANGLE MEASUREMENT DEVIATION:
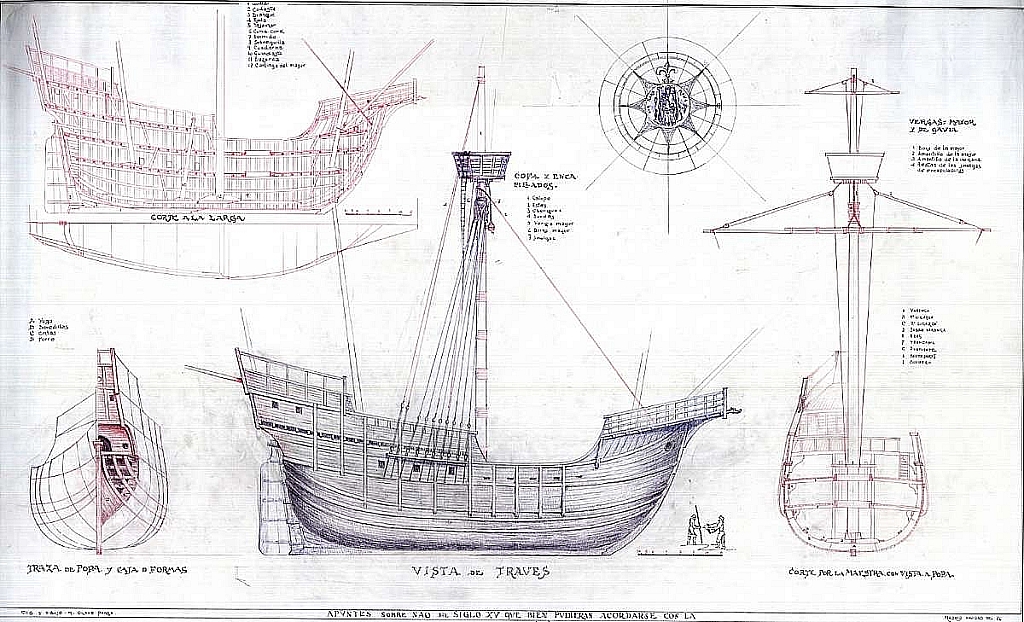
I will deviate a bit from my build to discuss level and angle measurement. I like to make sure various angles in my build are as accurate as I can make them. I've had the plans for this build scanned at Staples into PDF format, and converted that to PNG, so I can view the plans at any magnification on my 32" computer monitor. And I can bring the PNGs into my paint program of choice (the old Paintshop Pro), where I can accurately measure distances and angles, among other things. The scans converted to 100 dpi, so I can accurately measure any distance in pixels, and divide by 100 to get inches to 1/100".​
Paintshop Pro allows me to draw lines at angles, and by doing so and tracing over elements on the drawing, I can easily, quickly and accurately measure angles of masts, decks, basically anything. I can then go to my model, using those angle measurements, and accurately adjust those items on my model.​
Until recently, I had used a phone app called Bubble Level, to set these angles. I don't even have to have a true level surface; the app can be zeroed on my work desk, then I can measure the angle from that. This worked well with the phone, except 1) I had to remove the case, to get a more accurate measurement, 2) The phone is larger than ideal to fit in some areas and 3) I couldn't take photos of using it.​
Enter Temu.com. This recent (for me) gadget shopping paradise has given me the pictured above Digital Protractor Angle Finder for $6.37. It comes calibrated, with instructions on how to recalibrate, but can be temporarily "zeroed" to any surface (like my desk which is close but not quite level), reads to 0.01 degrees, with readings available in degrees, % slope, mm/m and in/ft. I now use this to measure angles on my model, vertical angles on my belt sander, pretty much everything. It's magnetic base holds to anything steel, and can be placed on a stiff straightedge for more accurate and longer-based measurements.​
Continuing:

Using Paintshop Pro, I measured the angle of the catheads above horizontal to be about 3 degrees; also, they are square to the hull, horizontally, where they attach. So, I used my trusty angle measurement device to mark where the drill bit hits the inner bulkhead:
1685638520115.png
I also taped the angle device to the top of my drill to attempt to get the angle right.

Then a measurement to be sure I'd obtained (approximately) the correct angle:
1685638600903.png
and also square to the sides:
1685638628137.png
The above view clearly shows where the drill enters the inner bulkhead.

I then made the same measurements and confirmations using the cathead material, with each end rounded and inserted. The inner hole can be easily adjusted, if necessary, to get the right angle and square:
1685638719966.png

Then the catheads were cut to the correct length, with about 2cm extending beyond the round section, and holes/slots were drilled to simulate pulleys in the catheads for the anchors:
1685638851123.png
For each slot, a through hold was drilled at each end, and a recessed, rounded area was milled to simulate the pulleys that would be mounted within. I would like to have used the brass pulleys I have, but the smallest are 1mm wide, and my slots are only 0.7mm wide. They'll be partly covered by the ropes, anyhow.

Catheads are now glued in place, all from the inside, to the hull and inner bulkheads:
1685638977885.png

I took some time to lay out the planking on the forecastle, as I wanted the planking sequence to match the remainder of the decking, but I wanted to be sure that the invisible crossmembers to which the planks were nailed, and on which ends of planks ended, were in logical positions (i.e. not right at the foremast, as that would be impossible), nor were any joints excessively close to the foremast. I laid this out on my computer and printed it out as a guide to planking:
1685639142626.png

Planking here is about half done, with hole for foremast marked:
1685639196894.png
As noted earlier in this build, I shimmed up around all the masts so that planking would be well supported near them.

Also notice in the above photo the last remnants of the expanding foam filler I used on the hull. Hard to believe at one point it looked like this:
1685639477339.png

Planking of the forecastle is now complete:
1685639549666.png
and brass bands have been added to the catheads, and the mast coat for the foremast.
1685639580201.png
The brass for the bands was taken from the "sprue" of the photo-etched brass parts included with the kit. Thicker than I'd like at 0.5mm, but I had no other thinner strip to use.

Not sure what to work on next. I have to make a bunch of cleats to fit on vertical braces on decks, but I hate working on those little things. Guess I'll have to see. Until next time!
 
Last edited:
Well, I've been ignoring those cleats for long enough, and decided I'd do something about that today. The reason I was ignoring making the cleats so much was not so much due to shaping them, but rather drilling a hole in each of the 0.7mm soft brass wire to mount them. Sure, I can drill small holes, but can I drill them centered in the 1.5x2mm base of these cleats? And perpendicular to the "ears". If you've seen my work (and previous cleats) you know the answer to that one.

There are two sizes of cleats included with this model, both laser cut, the smaller of which looks like this (after cleat blank removal):
1685930307729.png
The fact that the cutouts are so close in size to the cleats, being cut by a laser - duh, I thought to take advantage of that with a idea I just had.
I cut and sanded one edge of the pieces of walnut having the two sizes of cleat cutouts such that the cut was flush with the top of the cleat outline (outlined in red):
1685930966325.png
I then carefully centered the 0.7mm drill on the base portion of the cleat outline, using my drill press:
1685930999441.png
I then placed a cleat into the outline (it ended up held in the correct position, but not too tightly):
1685931091226.png
After drilling each one, the automatic ejection feature removed the cleat, allowing it to be removed from the drill:
1685931139814.png
(after stopping the drill). Later I would stop the drill before retracting, then retract to grab the cleat. Worked like a champ!

As I removed each drilled cleat, I placed it onto a piece of the brass wire being used to mount them:
1685931238239.png
As you can see by the above, two cleats done previous to this method (at the top) have un-centered wires, while the rest are pretty good. After I threaded the cleats further along the wire, I then placed a drop of CA and slid each to its "correct" location, to allow cutting the wire flush with the top of the cleat, and allowing 1.5mm or so left to place into drilled holes in their eventual location.

As each cleat with wire was removed, I chucked it up in a pin vise drill to sand it as required before use:
1685931402071.png
Finally, a photo of the poop deck with the cleats cemented to vertical braces using CA, and then used white glue to glue the braces in place:
1685931527016.png

I think I must have been born lazy so that I could save time and work by figuring out easier, quicker and more accurate ways of doing things. When I think back to my 50+ year engineering career, from a degree in Aerospace engineering to working in mechanical, electrical and computer engineering, and programming, most of it has actually been to make things quicker, better and more accurate for others. And I've enjoyed that. Viva la Lazy People!
 
Well, I've been ignoring those cleats for long enough, and decided I'd do something about that today. The reason I was ignoring making the cleats so much was not so much due to shaping them, but rather drilling a hole in each of the 0.7mm soft brass wire to mount them. Sure, I can drill small holes, but can I drill them centered in the 1.5x2mm base of these cleats? And perpendicular to the "ears". If you've seen my work (and previous cleats) you know the answer to that one.

There are two sizes of cleats included with this model, both laser cut, the smaller of which looks like this (after cleat blank removal):
View attachment 377886
The fact that the cutouts are so close in size to the cleats, being cut by a laser - duh, I thought to take advantage of that with a idea I just had.
I cut and sanded one edge of the pieces of walnut having the two sizes of cleat cutouts such that the cut was flush with the top of the cleat outline (outlined in red):
View attachment 377887
I then carefully centered the 0.7mm drill on the base portion of the cleat outline, using my drill press:
View attachment 377888
I then placed a cleat into the outline (it ended up held in the correct position, but not too tightly):
View attachment 377889
After drilling each one, the automatic ejection feature removed the cleat, allowing it to be removed from the drill:
View attachment 377890
(after stopping the drill). Later I would stop the drill before retracting, then retract to grab the cleat. Worked like a champ!

As I removed each drilled cleat, I placed it onto a piece of the brass wire being used to mount them:
View attachment 377891
As you can see by the above, two cleats done previous to this method (at the top) have un-centered wires, while the rest are pretty good. After I threaded the cleats further along the wire, I then placed a drop of CA and slid each to its "correct" location, to allow cutting the wire flush with the top of the cleat, and allowing 1.5mm or so left to place into drilled holes in their eventual location.

As each cleat with wire was removed, I chucked it up in a pin vise drill to sand it as required before use:
View attachment 377892
Finally, a photo of the poop deck with the cleats cemented to vertical braces using CA, and then used white glue to glue the braces in place:
View attachment 377893

I think I must have been born lazy so that I could save time and work by figuring out easier, quicker and more accurate ways of doing things. When I think back to my 50+ year engineering career, from a degree in Aerospace engineering to working in mechanical, electrical and computer engineering, and programming, most of it has actually been to make things quicker, better and more accurate for others. And I've enjoyed that. Viva la Lazy People!
Good morning. You pulled those cleats off..for sure. True story. Without that lazy fellow who decided he was tired of carrying and dragging heavy obstacles there would be no wheel…and so on and so on….Cheers Grant
 
Window & Deck Location - Discussion Requested.

I'd like to discuss the widows on the sides of the "cabin area" on this model. The following drawing, made from the kit plans, shows my problems with the location shown for these windows:
1686019243296.png
I have several problems with these locations for windows:
  • Allowing 9" for poop deck thickness and supports (probably should be more), the top of one window would end up above the ceiling.
  • Assuming the deck in this cabin area is a continuation of the quarterdeck adjacent to it, one window is about 37" above the deck, the other 57".
  • If instead the cabin deck is parallel to the windows, the distance from deck to bottom of windows would be 68" - much to high for any real use.
  • The windows cut into the main, exposed strake (sorry, not sure of the terminology for these), and this being a very thick, main (structural, I would think) member, that doesn't make sense to me. I would think that if at all possible, this would be avoided.
  • And yeah, I'm lazy, and don't like the idea of cutting out these strakes on the model, and do it neatly. But that's secondary (tertiary?).
Any thoughts, pro or con, concerning these window locations? Your thoughts are greatly appreciated.

To better locate the windows, IMHO it would be good to first locate the cabin floor & decking line. I have shown 3 possibilities (there are probably more):
  1. A continuation of the quarterdeck level, which matches outer hull planking and parallel to strakes in the area, shown in red, giving headroom of 7.7" to about 6'.
  2. A line parallel to the poop deck, giving constant headroom (about 7.7"), shown in purple.
  3. A line parallel to the original windows, giving about 7.7 to over 9'.
Solution 1 or 2 makes the most sense to me, unless the captain wanted a much more level floor in the cabin area. What do you think? How would floors in the cabin area be built on a ship such as this?

Anyhow, that is my rational for saying that I don't think the current/original window location makes much sense. I have made up two alternatives, both with windows located just under the strake rail, not cutting into it. The first has angles at about the same angle as original, making the sills more or less parallel with the floor, although this would depend on which floor we actually have:
1686020656715.png
This location for the windows makes much more sense to me. It avoids the structural strakes, and is a usable distance off the cabin floor.

My final idea is to do the same as the above, but with the windows vertical. Since all the outer structural buttresses, etc. are exactly vertical along the hull's length, this might be more in keeping with that look:
1686020898311.png
All the dimensions would be the same. The only difference is the tilt of the windows, whether they would be parallel to the lines/planking of the ship, a given distance off the cabin floor (wherever it may be).

Here are colorized versions highlighting window and bracing location (all of which will be stained dark on my model):
1686021450412.png

1686021466206.png

1686021483592.png

I kind of like this last version, but again: What do you think? What is most logical? What is most possible? What looks the best? I'd love your thoughts on this!
 
While I await the numerous response to my questions above, I thought I'd add some of the stern details. The laser-cut pieces are shaped well, and in general just need a bit of sanding and shortening at one end to fit between the wales:
1686088062539.png

In place, they add nicely to the stern detail:
1686088097262.png
Again, I have a lot of touch-up to do all over, but will wait to do that until later.

I think I'll grab a drink while waiting for all those responses about windows to come in..... :)
 
Window & Deck Location - Discussion Requested.

I'd like to discuss the widows on the sides of the "cabin area" on this model. The following drawing, made from the kit plans, shows my problems with the location shown for these windows:
View attachment 378038
I have several problems with these locations for windows:
  • Allowing 9" for poop deck thickness and supports (probably should be more), the top of one window would end up above the ceiling.
  • Assuming the deck in this cabin area is a continuation of the quarterdeck adjacent to it, one window is about 37" above the deck, the other 57".
  • If instead the cabin deck is parallel to the windows, the distance from deck to bottom of windows would be 68" - much to high for any real use.
  • The windows cut into the main, exposed strake (sorry, not sure of the terminology for these), and this being a very thick, main (structural, I would think) member, that doesn't make sense to me. I would think that if at all possible, this would be avoided.
  • And yeah, I'm lazy, and don't like the idea of cutting out these strakes on the model, and do it neatly. But that's secondary (tertiary?).
Any thoughts, pro or con, concerning these window locations? Your thoughts are greatly appreciated.

To better locate the windows, IMHO it would be good to first locate the cabin floor & decking line. I have shown 3 possibilities (there are probably more):
  1. A continuation of the quarterdeck level, which matches outer hull planking and parallel to strakes in the area, shown in red, giving headroom of 7.7" to about 6'.
  2. A line parallel to the poop deck, giving constant headroom (about 7.7"), shown in purple.
  3. A line parallel to the original windows, giving about 7.7 to over 9'.
Solution 1 or 2 makes the most sense to me, unless the captain wanted a much more level floor in the cabin area. What do you think? How would floors in the cabin area be built on a ship such as this?

Anyhow, that is my rational for saying that I don't think the current/original window location makes much sense. I have made up two alternatives, both with windows located just under the strake rail, not cutting into it. The first has angles at about the same angle as original, making the sills more or less parallel with the floor, although this would depend on which floor we actually have:
View attachment 378039
This location for the windows makes much more sense to me. It avoids the structural strakes, and is a usable distance off the cabin floor.

My final idea is to do the same as the above, but with the windows vertical. Since all the outer structural buttresses, etc. are exactly vertical along the hull's length, this might be more in keeping with that look:
View attachment 378040
All the dimensions would be the same. The only difference is the tilt of the windows, whether they would be parallel to the lines/planking of the ship, a given distance off the cabin floor (wherever it may be).

Here are colorized versions highlighting window and bracing location (all of which will be stained dark on my model):
View attachment 378041

View attachment 378042

View attachment 378043

I kind of like this last version, but again: What do you think? What is most logical? What is most possible? What looks the best? I'd love your thoughts on this!
Good morning. Wow- some good thinking here. Your logic is sound for sure - the placement of the kit windows does seem structurally wrong. I would imagine the inner deck of the cabin would be horizontal so your option 3 would also make more sense and is aesthetically appealing- IMHO. Cheers Grant
 
Window & Deck Location - Discussion Requested.

I'd like to discuss the widows on the sides of the "cabin area" on this model. The following drawing, made from the kit plans, shows my problems with the location shown for these windows:
View attachment 378038
I have several problems with these locations for windows:
  • Allowing 9" for poop deck thickness and supports (probably should be more), the top of one window would end up above the ceiling.
  • Assuming the deck in this cabin area is a continuation of the quarterdeck adjacent to it, one window is about 37" above the deck, the other 57".
  • If instead the cabin deck is parallel to the windows, the distance from deck to bottom of windows would be 68" - much to high for any real use.
  • The windows cut into the main, exposed strake (sorry, not sure of the terminology for these), and this being a very thick, main (structural, I would think) member, that doesn't make sense to me. I would think that if at all possible, this would be avoided.
  • And yeah, I'm lazy, and don't like the idea of cutting out these strakes on the model, and do it neatly. But that's secondary (tertiary?).
Any thoughts, pro or con, concerning these window locations? Your thoughts are greatly appreciated.

To better locate the windows, IMHO it would be good to first locate the cabin floor & decking line. I have shown 3 possibilities (there are probably more):
  1. A continuation of the quarterdeck level, which matches outer hull planking and parallel to strakes in the area, shown in red, giving headroom of 7.7" to about 6'.
  2. A line parallel to the poop deck, giving constant headroom (about 7.7"), shown in purple.
  3. A line parallel to the original windows, giving about 7.7 to over 9'.
Solution 1 or 2 makes the most sense to me, unless the captain wanted a much more level floor in the cabin area. What do you think? How would floors in the cabin area be built on a ship such as this?

Anyhow, that is my rational for saying that I don't think the current/original window location makes much sense. I have made up two alternatives, both with windows located just under the strake rail, not cutting into it. The first has angles at about the same angle as original, making the sills more or less parallel with the floor, although this would depend on which floor we actually have:
View attachment 378039
This location for the windows makes much more sense to me. It avoids the structural strakes, and is a usable distance off the cabin floor.

My final idea is to do the same as the above, but with the windows vertical. Since all the outer structural buttresses, etc. are exactly vertical along the hull's length, this might be more in keeping with that look:
View attachment 378040
All the dimensions would be the same. The only difference is the tilt of the windows, whether they would be parallel to the lines/planking of the ship, a given distance off the cabin floor (wherever it may be).

Here are colorized versions highlighting window and bracing location (all of which will be stained dark on my model):
View attachment 378041

View attachment 378042

View attachment 378043

I kind of like this last version, but again: What do you think? What is most logical? What is most possible? What looks the best? I'd love your thoughts on this!
Not knowing where the decks are, I like the bottom one with the windows parallel with the planks. I do not know what is historical accurate tho. This is where @Dean62 's creative and artistic license comes in I'll guess. :cool:

Just my 2 cents, and good luck with the descision making process.

Peter
 
Not knowing where the decks are, I like the bottom one with the windows parallel with the planks. I do not know what is historical accurate tho. This is where @Dean62 's creative and artistic license comes in I'll guess. :cool:
I'm not familiar with @Dean62, but I'm certain an amount of artistic license comes into play, even when examining actual shipwrecks. Thank you for responding.
 
Good morning. Wow- some good thinking here. Your logic is sound for sure - the placement of the kit windows does seem structurally wrong. I would imagine the inner deck of the cabin would be horizontal so your option 3 would also make more sense and is aesthetically appealing- IMHO.
But were the decks in cabins horizontal actually? That is the real question here. Aesthetics on the original ship design was certainly important, but I would think not as important as functioning windows. If they were going to pierce the hull with large holes, they would certainly make sure they were useful in their intent (of providing light and view at convenient levels).

I tend to think that decks would follow the lines, strakes and other decks of the ship. Let's see what I can find online from similarly shaped ships:

pirate-ship-600w-595115288.jpg

Decking not as curved as our Carrack, but definitely follows ship lines.

The following diagram is from a digital reconstruction of a 17th century Nau (Carrack):
1686153041630.png
a century newer than this Carrack, so curved lines and decks are not so pronounced.

The 1519 Carrack Victoria:
1-Plan-Carrack-Victoria-1512.jpg


All in all, I think the cabin decks in most ships flow along the lines of the exposed decks and the lines of the ship. So I am tending toward have the windows follow those as well (option 3).
 
Last edited:
I thought I'd work on the buttresses (I think Olha called them) or futtock riders, outer bracing on this style of ship, next. They are to be made up of 5x5mm square walnut, but I don't like the idea of gluing them all up, only to cut them down, so I bought some 5mm sheet to use. The 5 short buttresses to each side can be made of 5x5 stock, though, so I thought I'd start with them.

I used a contour gage to measure the shape of the hull at that point, then made inner, outer and piece templates for the parts:
1686243991822.png
I made each piece and cut the length to fit, as they vary in height along the length, numbering each piece and then stained them:
1686244066324.png

And then installed them in place along the ship:
1686244095035.png
I like the contrasting look of the stained wood; it accentuates one of the main things that makes these type of ships look unique.

The remainder of these will take much longer, each being made to the shape of the hull, and according to a detail in the kit plans:
1686244680074.png
they are vertical to the bottom of the keel, perpendicular to the side of the keel, but the outer surface is to be parallel to the hull where they attach, requiring more work. The above diagram also shows the sides are to be tapered, but since they vary in depth quite a bit, this would be especially hard to do and might look funny. Plus, no one else has done this on their model, maybe because of this. I am putting a small chamfer around the outer edges though.
 
Continuing on with the futtock riders, I made the longest ones next, which are just behind, and notch into, the foremast channels. As before, I used a contour gauge to measure the hull profile and then cut heavy paper templates to shape to the hull:
1686432618543.png

Using a scroll saw and spiral omnidirectional blade, I cut outside the profile at about a 15 degree angle. This angle is necessary because all futtock riders need to be perpendicular to the keel both horizontally and vertically, and as the hull is at a 15 degree angle to the keel where this particular futtock rider mounts, both inner and outer cuts need to be at that angle:
1686433012399.png
When fine-tuning the profile with a 1" wide belt sander, I also set the angle of the base plate to 15 degrees, to keep the proper angle and profile.

After rough shaping, the piece fits into place on the hull:
1686433139016.png

For the opposite side, I profiled only the inner outline at first, then marked the location of the wales, and finished that profile before cutting and shaping the outer profile:
1686433239742.png

After shaping and sanding, both pieces are finished:
1686433281062.png

I found that there were other futtock riders that could be made from 5x5mm square, rather than 5mm sheet, so made a set for one side using the same process:
1686433395259.png

I checked them for fit before final shaping:
1686433439147.png
and again after rough shaping:
1686433466891.png

After final shaping, sanding and staining:
1686433597945.png

When mounting each futtock rider, I used a square to insure they are vertical (perpendicular to the keel):
1686433673162.png
Tape marks the edge to aid in positioning when gluing them in place.

Now all are positioned and glued in place:
1686433744267.png

The foremast channels mount under the wale and over the nearby futtock rider, while the other channels mount ONTO the wales, and follow their contour. The curvature of the channels at the mizzenmast is very small, so can be neglected, but the channels for the mainmast must be curved to match the wales at the handrail area:
1686433912654.png
The channels need about 1.5mm of curvature, so I soaked them in hot water and bent them to about 3mm, hoping about half of that will remain after drying and release.

Bilge Pumps:
Looking for additional detail to (eventually) add to the model, the digital reconstruction of a 17th century Nau (Carrack) mentioned above includes two bilge pumps:
1686434488680.png
While the Carrack in the study is a later (circa 1606 vs 16th century), larger (keel length 30m vs 22.5m), Portuguese (vs Ragusian/Croatian) and ocean-going (vs Mediterranean), I would still think that bilge pumps would be appropriate. What do you think?
 
Continuing on with the futtock riders, I made the longest ones next, which are just behind, and notch into, the foremast channels. As before, I used a contour gauge to measure the hull profile and then cut heavy paper templates to shape to the hull:
View attachment 379061

Using a scroll saw and spiral omnidirectional blade, I cut outside the profile at about a 15 degree angle. This angle is necessary because all futtock riders need to be perpendicular to the keel both horizontally and vertically, and as the hull is at a 15 degree angle to the keel where this particular futtock rider mounts, both inner and outer cuts need to be at that angle:
View attachment 379062
When fine-tuning the profile with a 1" wide belt sander, I also set the angle of the base plate to 15 degrees, to keep the proper angle and profile.

After rough shaping, the piece fits into place on the hull:
View attachment 379065

For the opposite side, I profiled only the inner outline at first, then marked the location of the wales, and finished that profile before cutting and shaping the outer profile:
View attachment 379066

After shaping and sanding, both pieces are finished:
View attachment 379067

I found that there were other futtock riders that could be made from 5x5mm square, rather than 5mm sheet, so made a set for one side using the same process:
View attachment 379070

I checked them for fit before final shaping:
View attachment 379071
and again after rough shaping:
View attachment 379072

After final shaping, sanding and staining:
View attachment 379074

When mounting each futtock rider, I used a square to insure they are vertical (perpendicular to the keel):
View attachment 379076
Tape marks the edge to aid in positioning when gluing them in place.

Now all are positioned and glued in place:
View attachment 379077

The foremast channels mount under the wale and over the nearby futtock rider, while the other channels mount ONTO the wales, and follow their contour. The curvature of the channels at the mizzenmast is very small, so can be neglected, but the channels for the mainmast must be curved to match the wales at the handrail area:
View attachment 379079
The channels need about 1.5mm of curvature, so I soaked them in hot water and bent them to about 3mm, hoping about half of that will remain after drying and release.

Bilge Pumps:
Looking for additional detail to (eventually) add to the model, the digital reconstruction of a 17th century Nau (Carrack) mentioned above includes two bilge pumps:
View attachment 379081
While the Carrack in the study is a later (circa 1606 vs 16th century), larger (keel length 30m vs 22.5m), Portuguese (vs Ragusian/Croatian) and ocean-going (vs Mediterranean), I would still think that bilge pumps would be appropriate. What do you think?
Good morning. Not knowing this ship at all, if there is an historical justification to include them I would. They look like a gun part to include on the ship. Cheers Grant
 
Good morning. Not knowing this ship at all, if there is an historical justification to include them I would. They look like a gun part to include on the ship. Cheers Grant
I don't have any historical justification on this particular ship, although I've asked the designer of the kit. Just speaking for myself, if I were a sailor on a leaky Mediterranean ship in the 1500s, I'd greatly prefer elm tree pumps to using my hat.
 
As the remainder of the futtock riders go above and below the channels, and as it's difficult to obtain a good fit without them being there, I thought I'd continue next with the channels.

The channel bisects the upper and lower portion of the pattern area in this photo:
1686600015415.png

With the lower futtock rider in place, I can balance the foremast channel in place:
1686600051426.png
but it's hard to keep it there while measuring for the upper portion, so I worked on the channels:
1686600183638.png
I placed nails in each one to help position and support each channel in the correct place.

Per the kit, the foremast channels mount /below/ the wales, while the others mount /on/ them.
1686600290073.png

After putting a coat of varnish on the channels and adding "bolts", they're ready to go:
1686600348508.png
In retrospect, I probably could have used less "bolts" in the foremast and mizzenmast channels than I did, but they'll probably be okay. I decided to keep them a natural walnut color, while the futtock riders and other "trim" is stained dark.

These futtock riders are a pain to do right, with (for example) sides at 14 degrees to the hull, the slots for the wales at at 14 degrees to the keel and 8 and 12 degrees for the wales, then the tapering and rounding and - it's a pain. So I'm considering switching to deck furniture to work on next. Honestly, I'm trying to figure out what I have the least chance of breaking off or messing: the deck furniture and additions, or the futtock riders and channels. Guess we'll see.
 
Window & Deck Location - Discussion Requested.

I'd like to discuss the widows on the sides of the "cabin area" on this model. The following drawing, made from the kit plans, shows my problems with the location shown for these windows:
View attachment 378038
I have several problems with these locations for windows:
  • Allowing 9" for poop deck thickness and supports (probably should be more), the top of one window would end up above the ceiling.
  • Assuming the deck in this cabin area is a continuation of the quarterdeck adjacent to it, one window is about 37" above the deck, the other 57".
  • If instead the cabin deck is parallel to the windows, the distance from deck to bottom of windows would be 68" - much to high for any real use.
  • The windows cut into the main, exposed strake (sorry, not sure of the terminology for these), and this being a very thick, main (structural, I would think) member, that doesn't make sense to me. I would think that if at all possible, this would be avoided.
  • And yeah, I'm lazy, and don't like the idea of cutting out these strakes on the model, and do it neatly. But that's secondary (tertiary?).
Any thoughts, pro or con, concerning these window locations? Your thoughts are greatly appreciated.

To better locate the windows, IMHO it would be good to first locate the cabin floor & decking line. I have shown 3 possibilities (there are probably more):
  1. A continuation of the quarterdeck level, which matches outer hull planking and parallel to strakes in the area, shown in red, giving headroom of 7.7" to about 6'.
  2. A line parallel to the poop deck, giving constant headroom (about 7.7"), shown in purple.
  3. A line parallel to the original windows, giving about 7.7 to over 9'.
Solution 1 or 2 makes the most sense to me, unless the captain wanted a much more level floor in the cabin area. What do you think? How would floors in the cabin area be built on a ship such as this?

Anyhow, that is my rational for saying that I don't think the current/original window location makes much sense. I have made up two alternatives, both with windows located just under the strake rail, not cutting into it. The first has angles at about the same angle as original, making the sills more or less parallel with the floor, although this would depend on which floor we actually have:
View attachment 378039
This location for the windows makes much more sense to me. It avoids the structural strakes, and is a usable distance off the cabin floor.

My final idea is to do the same as the above, but with the windows vertical. Since all the outer structural buttresses, etc. are exactly vertical along the hull's length, this might be more in keeping with that look:
View attachment 378040
All the dimensions would be the same. The only difference is the tilt of the windows, whether they would be parallel to the lines/planking of the ship, a given distance off the cabin floor (wherever it may be).

Here are colorized versions highlighting window and bracing location (all of which will be stained dark on my model):
View attachment 378041

View attachment 378042

View attachment 378043

I kind of like this last version, but again: What do you think? What is most logical? What is most possible? What looks the best? I'd love your thoughts on this!
I like the center or second of three option show in diagrams, as I don't thinks the ships decks were completely flat the length of the shop and had some curve to them.
 
I don't have any historical justification on this particular ship, although I've asked the designer of the kit. Just speaking for myself, if I were a sailor on a leaky Mediterranean ship in the 1500s, I'd greatly prefer elm tree pumps to using my hat.
Good morning. True story. Apologies for my previous post, auto correct or my typo changed my “great” to gun. I would go for it they will look great on the model :D . Cheers Grant
 
I like the center or second of three option show in diagrams, as I don't thinks the ships decks were completely flat the length of the shop and had some curve to them.
Thanks, I'm leaning toward that choice as well. I'll decide after all the futtock riders and channels are in place, to see which looks best and most logical to me.
 
Good morning. True story. Apologies for my previous post, auto correct or my typo changed my “great” to gun. I would go for it they will look great on the model :D . Cheers Grant
Yes, I think I will be adding the pumps. The designer Zoran said it would probably have them, but felt they would not be visible. As they're usually just after of the mainmast, I think they will.
 
Continuing on with the futtock riders, I installed the foremast channels first and lower riders. I used pieces of scrap cut to length and taped in place to help position the riders:
1686773241579.png
1686773260013.png
and then added the riders above the channel:
1686773299416.png
The channels came out kind of light, with just varnish, lighter than the hull planking. Looks like there's no finish on it, so I may darken it some before I'm done.

For the "porthole" windows located beneath the foremast channels, I didn't want to drill out the hull, and didn't like the idea of just paint behind them, so thought I'd try something:
1686773558235.png
I drilled some recesses in a piece of scrap first to try, cut round "glass" from a plastic binder I had laying around, painted the matte side of the plastic black, and glued it in place in the recess with the shiny (glass side) facing outwards. Placing the window surround in place, I liked the look:
1686773675776.png
Easy to do, had a good look. I experimented trying to show drapes or blinds or something on the inside instead of all black, but it ended up looking like an error.

On to the hull then, to lay out and counterbore holes slightly for the plastic rounds:
1686773760355.png
Here, one hole is complete with the plastic and surround, one only has the plastic, and one is yet untouched:
1686773808600.png
The "glass" has a nice reflective look, depending on angle, so achieved what I was trying to.

A final (for today) look with the futtock riders so far installed and the windows:
1686773869937.png

That's it for today. Guess I'll work next on the 20 futtock riders required for the mainmast channels. :( At least they don't have the extreme angles of the ones at the foremast!
 
Back
Top