Hallo Tobias! Beautiful work. Once again, a question: how did you shape the S-shaped panel (image 420)?
You are using an out of date browser. It may not display this or other websites correctly.
You should upgrade or use an alternative browser.
You should upgrade or use an alternative browser.
LE ROCHEFORT - Harbour yacht from 1787 1:36 by Tobias (Monograph by ANCRE)
- Thread starter Tobias
- Start date
- Watchers 61
-
- Tags
- ancre group build le rochefort
@OlivierF , don't burn it under any circumstances, you're doing a great job.
Paul @dockattner , unfortunately I didn't take any more pictures of this part, but I have one from La Palme where I used this principle before. I cut it out with the fretsaw.
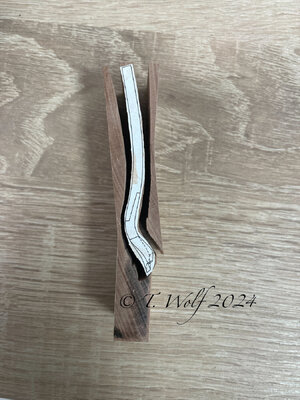
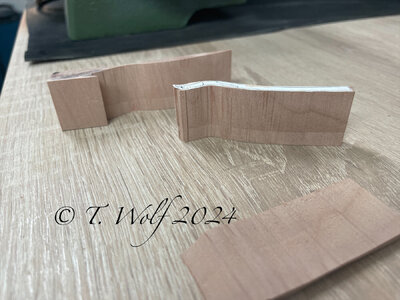
Paul @dockattner , unfortunately I didn't take any more pictures of this part, but I have one from La Palme where I used this principle before. I cut it out with the fretsaw.


And then sanded it to the line with a spindle sander? By hand? Sorry for all the questions. You work habits are so different from mine and I am trying to learn...@OlivierF , don't burn it under any circumstances, you're doing a great job.
Paul @dockattner , unfortunately I didn't take any more pictures of this part, but I have one from La Palme where I used this principle before. I cut it out with the fretsaw.
View attachment 438895
View attachment 438896
And then sanded it to the line with a spindle sander? By hand? Sorry for all the questions. You work habits are so different from mine and I am trying to learn...
Good morning Paul, no problem. Yes, it is sanded exactly to the line with the spindle sander, then I use a square and a pencil to mark the top and bottom edges as well as the middle one, which symbolizes the bend. These three lines then help me to stick the side view on. In the next step, the final shape is cut out again with the fretsaw, with a little meat on the edge. Now the first rough adjustments to the rear follow, the support on the upper crossbeam is adjusted with a fretsaw and file. When this fits, the wood on the side gets the finishing touches.
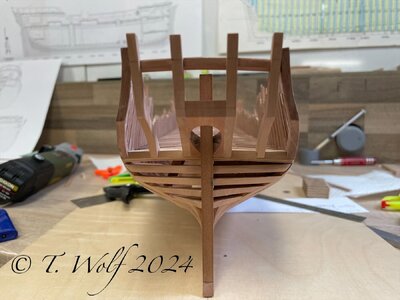
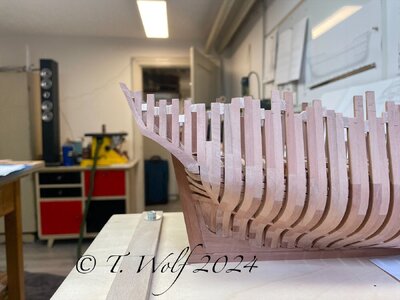
Thank you kindly, Tobias. The result speaks for itself!Good morning Paul, no problem. Yes, it is sanded exactly to the line with the spindle sander, then I use a square and a pencil to mark the top and bottom edges as well as the middle one, which symbolizes the bend. These three lines then help me to stick the side view on. In the next step, the final shape is cut out again with the fretsaw, with a little meat on the edge. Now the first rough adjustments to the rear follow, the support on the upper crossbeam is adjusted with a fretsaw and file. When this fits, the wood on the side gets the finishing touches.
View attachment 439033
View attachment 439034
View attachment 439035
True storyBeautiful work Tobias! The more I look at your efforts the more I want to toss my work in the fire and start over. You are truly an inspiration to all the rest of us mere mortals!
tu m’étonne Tobias travail comme un maître Bravo, mais chacun fait à son niveau , pour moi Tobias est ici d’une grande inspiration également ,et toi Olivier je pense que tu fais de très belles choses également.Beau travail Tobias ! Plus je regarde vos efforts, plus j’ai envie de jeter mon travail au feu et de recommencer. Vous êtes vraiment une source d’inspiration pour nous tous, simples mortels !
J’espéré qu’on pourra faire un jour, quand tout le monde aura fini son Rochefort, une rencontre internationale pour partager en live toutes nos aventures En tous les cas merci déjà beaucoup à vous tous pour tous ces partages
Last edited:
I like the formulation " I experimented a little bit" - and your experiment ended in the final solution -> voila!
Very good work
Very good work
- Joined
- Apr 20, 2020
- Messages
- 5,161
- Points
- 738

happy Easter my dear friend TobiasGood morning Paul, no problem. Yes, it is sanded exactly to the line with the spindle sander, then I use a square and a pencil to mark the top and bottom edges as well as the middle one, which symbolizes the bend. These three lines then help me to stick the side view on. In the next step, the final shape is cut out again with the fretsaw, with a little meat on the edge. Now the first rough adjustments to the rear follow, the support on the upper crossbeam is adjusted with a fretsaw and file. When this fits, the wood on the side gets the finishing touches.
View attachment 439033
View attachment 439034
View attachment 439035
Good evening everyone, it's been a while since there was an update, in my defense, the Admiralty wanted a new wall color in the living room and dining room, the end result was that all the rooms got a new coat of paint. Furthermore, spring is just around the corner and so I've spent the last few nice days in the garden.
Now for the important thing. Thank you all for your comments and the likes you have received.
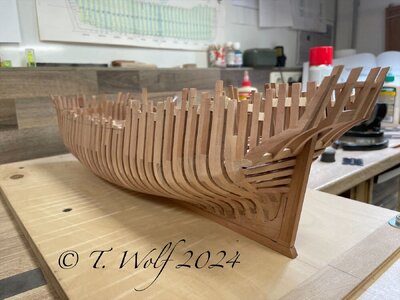
The next step was to make the waterway. This is not easy, it has to be adapted to the curvature of the inside, which at first doesn't seem that difficult, but the curvature is not consistent along the whole length. Unfortunately I am unable to take pictures of this process as you need both hands to work.
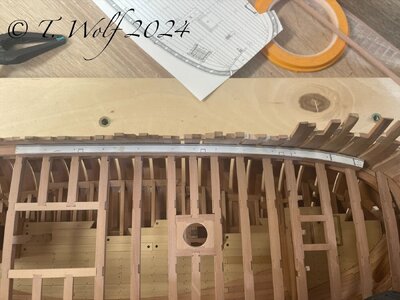
A quick explanation:
You determine the measurement from the plan, copy the sides with the waterway and cut it out of a board of the right thickness. Then hold it to the inside, take a fine pencil and transfer the slope to the profile of the waterway (front and back). I carefully sanded it down along the whole length and finally adjusted it with a scraper. Then mark the beams, mill them and adjust them again.
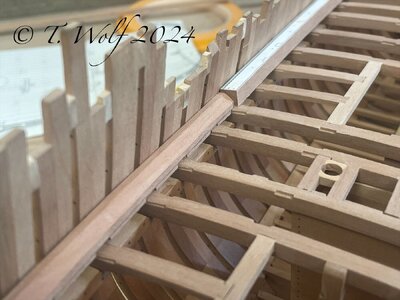
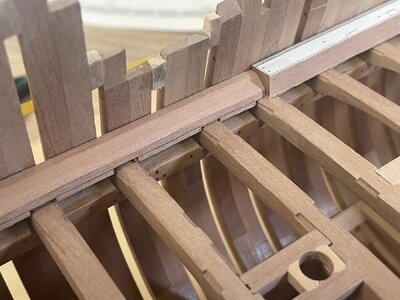
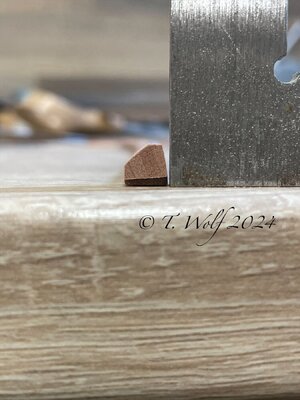
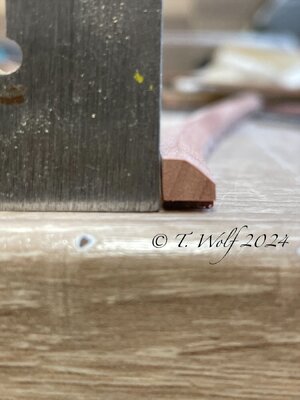
Now for the slope of the waterway on the inside:
You need two measurements for this, the thickness of the planks on the bulwark and the thickness of the deck boards. The waterway is already in place, now I took a sample of the plank on the bulwark and positioned it and then transferred it to the entire length of the waterway with a pencil, the same applies to the deck boards. Sand again and scrape off a little to get a fairly straight surface.
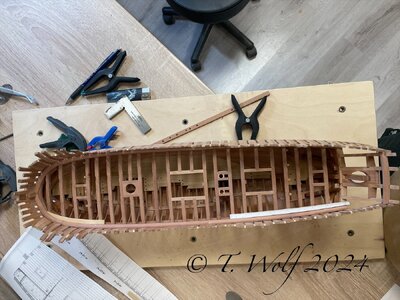
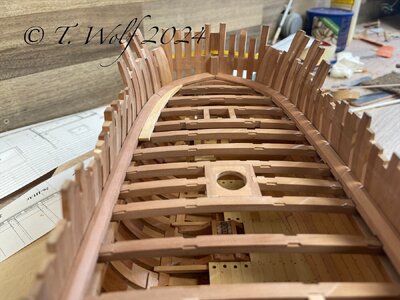
The advantage of scraping is that the pores in the wood do not get clogged and you get a much better finish when you finish the surface with oil or varnish.
Now for the important thing. Thank you all for your comments and the likes you have received.
The next step was to make the waterway. This is not easy, it has to be adapted to the curvature of the inside, which at first doesn't seem that difficult, but the curvature is not consistent along the whole length. Unfortunately I am unable to take pictures of this process as you need both hands to work.

A quick explanation:
You determine the measurement from the plan, copy the sides with the waterway and cut it out of a board of the right thickness. Then hold it to the inside, take a fine pencil and transfer the slope to the profile of the waterway (front and back). I carefully sanded it down along the whole length and finally adjusted it with a scraper. Then mark the beams, mill them and adjust them again.


Now for the slope of the waterway on the inside:
You need two measurements for this, the thickness of the planks on the bulwark and the thickness of the deck boards. The waterway is already in place, now I took a sample of the plank on the bulwark and positioned it and then transferred it to the entire length of the waterway with a pencil, the same applies to the deck boards. Sand again and scrape off a little to get a fairly straight surface.


The advantage of scraping is that the pores in the wood do not get clogged and you get a much better finish when you finish the surface with oil or varnish.
- Joined
- Oct 23, 2018
- Messages
- 527
- Points
- 353

Really nice progress, Tobias. The little English lady, you planned for the future is also on my list. Perhaps we have a really small group build.
Really nice progress, Tobias. The little English lady, you planned for the future is also on my list. Perhaps we have a really small group build.
Thanks Christian, as for the little lady, that would be a cool thing if we could build her as a small group. With your experience together it will be a lot easier. Let's keep that in mind because it will take some time and as we all know, plans can change.
Witaj
Bardzo żmudna trudna praca, dużo pomiarów i cierpliwości Tobiaszu masz, więc praca piękna . Pozdrawiam Mirek
Hello
Very tedious and difficult work, you have a lot of measurements and patience, Tobiasz, so it's a beautiful job. Regards, Mirek
Bardzo żmudna trudna praca, dużo pomiarów i cierpliwości Tobiaszu masz, więc praca piękna . Pozdrawiam Mirek
Hello
Very tedious and difficult work, you have a lot of measurements and patience, Tobiasz, so it's a beautiful job. Regards, Mirek
Last edited by a moderator:
Nice and precise work. Tobias. It starts ti accentuate her sheer.Good evening everyone, it's been a while since there was an update, in my defense, the Admiralty wanted a new wall color in the living room and dining room, the end result was that all the rooms got a new coat of paint. Furthermore, spring is just around the corner and so I've spent the last few nice days in the garden.
Now for the important thing. Thank you all for your comments and the likes you have received.
The next step was to make the waterway. This is not easy, it has to be adapted to the curvature of the inside, which at first doesn't seem that difficult, but the curvature is not consistent along the whole length. Unfortunately I am unable to take pictures of this process as you need both hands to work.
View attachment 440854
A quick explanation:
You determine the measurement from the plan, copy the sides with the waterway and cut it out of a board of the right thickness. Then hold it to the inside, take a fine pencil and transfer the slope to the profile of the waterway (front and back). I carefully sanded it down along the whole length and finally adjusted it with a scraper. Then mark the beams, mill them and adjust them again.
View attachment 440853
View attachment 440859
View attachment 440857
View attachment 440858
Now for the slope of the waterway on the inside:
You need two measurements for this, the thickness of the planks on the bulwark and the thickness of the deck boards. The waterway is already in place, now I took a sample of the plank on the bulwark and positioned it and then transferred it to the entire length of the waterway with a pencil, the same applies to the deck boards. Sand again and scrape off a little to get a fairly straight surface.
View attachment 440855
View attachment 440856
The advantage of scraping is that the pores in the wood do not get clogged and you get a much better finish when you finish the surface with oil or varnish.
Regards, Peter
Lorsque je mets du ballistol sur le laiton délicatement, je tache tout de même le bois  Vous avez fait comment pour que ça reste nickel ? Je suis obligé de poncer pour enlever l’auréole et forcément j’enlève le noire sur le carré, merci beaucoup d’avance et bravo pour votre taf
When I delicately put ballistol on the brass, I still stain the wood How did you do it to keep it nickel free? I have to sand to remove the halo and inevitably I remove the black on the square, thank you very much in advance and congratulations for your work
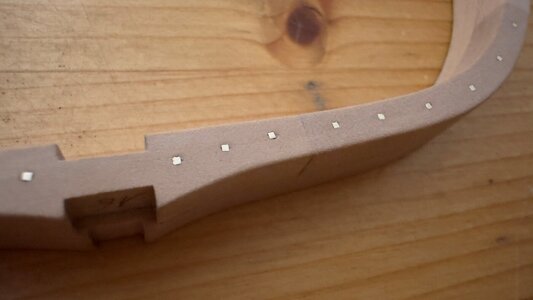
When I delicately put ballistol on the brass, I still stain the wood

Last edited by a moderator:
Lorsque je mets du ballistol sur le laiton délicatement, je tache tout de même le boisVous avez fait comment pour que ça reste nickel ? Je suis obligé de poncer pour enlever l’auréole et forcément j’enlève le noire sur le carré, merci beaucoup d’avance et bravo pour votre taf
When I delicately put ballistol on the brass, I still stain the woodHow did you do it to keep it nickel free? I have to sand to remove the halo and inevitably I remove the black on the square, thank you very much in advance and congratulations for your work
View attachment 441103
Hi Titoneri, I use a toothpick and dip it in and then I try to put just a little bit on the brass. Once it starts to discolor I dab it with a damp cloth.
Alternatively, in addition to what Tobias said (above), you can oil the holes and small surrounding area (a few times), then use Balistol.When I delicately put ballistol on the brass, I still stain the woodHow did you do it to keep it nickel free? I have to sand to remove the halo and inevitably I remove the black on the square, thank you very much in advance and congratulations for your work
D’accord merci beaucoupSalut Titoneri, j’utilise un cure-dent et je le trempe dedans, puis j’essaie d’en mettre juste un peu sur le laiton. Une fois qu’il commence à se décolorer, je le tamponne avec un chiffon humide.
Merci je vais essaye Pouce levéAlternativement, en plus de ce que Tobias a dit (ci-dessus), vous pouvez huiler les trous et la petite zone environnante (plusieurs fois), puis utiliser Balistol.D’accord e vais essai égal


