Lady Nelson - Amati 1:64

Congratulations on her completion my friend. I love everything about her - from the exquisite execution of the rigging to the beautiful wood colours on which I have commented many times - right through to her unmistakable character. And what a great gift to the good doctor!
 
Hello Don, I do congratulate you on complication of such a great little ship, WELL DONE. Where on Amazon did you find that goose neck third hand, it sure dose look very handy.
Regards Lawrencea]
Thanks @Graham and @Gennaro
The wood beneath the wales is Alaskan Yellow Cedar
A vert nice little top rigged schooner that will find a very appreciative harbor when she arrives. Well done. Rich (PT-2)
 
Hey All, here is the final instalment of the Lady Nelson. She is complete! :) Ship-1

View attachment 194969View attachment 194970View attachment 194971View attachment 194972View attachment 194973View attachment 194974View attachment 194975

There she is, I will keep her around for a few days before I take her to her final resting place. She is going to be a gift to Dr. Pillay here in Prince Albert.
Thanks so much for hanging around and for all the great comments and the likes.
I'll be starting another log possibly today or tomorrow
View attachment 194976View attachment 194977View attachment 194978View attachment 194979View attachment 194980View attachment 194981

That is her.
Thanks for hanging around to watch. Also Thanks for all the great comments and likes.
I'll be keeping the Lady around before I take her to her new owner. I am gifting her to a Doctor Pillay in town. Without going into a long story Doctor Pillay reached out and gave me some tremendous help early this past summer, so this is my way of thanking him. Hope he enjoys!!
You are all welcome to join me in my next build will be the HMS Ontario from MarisStella
Have A Good One
Very nice! You did a great job! The rigging is very clean too.
 
Very, very nice, well done and beautiful. I just catch up on your thread. Very nice gift too, done by yourself and with love.

Congratulations !!!!

Cheers
Daniel
 
Congratulations also from my side - very well done - a very fine model Thumbsup
And now?
Holidays from modeling or do you have already the next project in mind?
Hope to see a building log of the new one!
 
Hi Don,
this is stunning as the rigging is so nice, clean, and crisp. (lack of words). I would love to add this to the Gallery Showcase as I am working on adding it now if you do not mind. Anyone would be proud to display her. Congratulations !!!

Donald
 
I can't thank you enough for including all these detailed photos. They are proving to be a godsend for this first time builder. Amati and other model sellers would sell more if we could see such details.

Thank you very much,

Jim
 
I can't thank you enough for including all these detailed photos. They are proving to be a godsend for this first time builder. Amati and other model sellers would sell more if we could see such details.

Thank you very much,

Jim
Great precise detailing all the way. I appreciate that it looks like you went the extra detailing step to fair the blocks for nicely rounded entry and exiting falls and not the too common straight in and out that distorts the line at all sizes. Well done. Rich
 
Don,
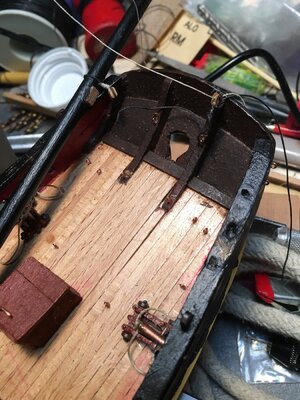
Is there any chance you could add a photo of the inside of the stern? I'm trying to figure out where all the lines attach around the tiller. Any others on how you tied off the rigging along the rest of the bulwarks would be fantastic.
Thank you,
Jim
 
Don,
Specifically along the sides of the tiller where the upper boom is tied off and the rest of the lines are tied down to the cleats and the eyebolts. Which goes where is not easily clear to me from the scant plans. Anything you can do would be greatly appreciated
Jim
 

Attachments

  • 44267E01-4284-4B90-AD9D-C6C596FE9C76.jpeg
    44267E01-4284-4B90-AD9D-C6C596FE9C76.jpeg
    304.7 KB · Views: 14
@Jim CT , for the boom there is a double block attached to the starboard knee with a eyebolt and a double block on the boom. The line is attached to the block on the boom this then runs to the block attached to the knee, up to the boom block, down again then up and down finally and belayed to the cleat attached to the knee. I could not see any cleats, in your picture, attached to the knee. For the gaff it is essentially the same but with single blocks and on the port side.
Does this help?
 
Don,
I held off on the cleat until I heard from you. I never would have gotten the doubleblocks from the drawings. I considered guessing that.

One last question, which model maker has the best instructions? I'd like to try another if there are companies that provide more direction.

Thank you very much.
Jim
That’s a tough question. I think member build logs and practicums beat kit instructions every time.
 
Back
Top