La Belle - Hachette Partwork - 1/30 scale

Thursday, August 24rd, 2023

The second element of the hawse locks, the one on which I put the maximum effort in terms of precision, is also finished and, in the following images, you can see it permanently fixed with glue.

Unfortunately this second element, which should have been perfect in theory, was not at all and, in order to be able to insert it in the correct position, I had to make very slight adjustments which, upon close observation, are noticeable.

Apart from this aspect, finally a decidedly difficult task in the building of this model has finally finished and this now allows me to be able to work according to the order of the Hachette issues in a more structured way than I have done in recent past, where I have often worked to do works partially present on various issues.

However, I am satisfied with the result achieved.

01 La Belle Photos/IMG20230823100137.jpg
embed


02 La Belle Photos/IMG20230823100154.jpg
embed


03 La Belle Photos/IMG20230823100200.jpg
embed


04 La Belle Photos/IMG20230823100210.jpg
embed


05 La Belle Photos/IMG20230823100223.jpg
embed


06 La Belle Photos/IMG20230823100227.jpg
embed


07 La Belle Photos/IMG20230823100240.jpg
embed


See you soon.
Jack Aubrey
great work, well done Jack
 
Friday, August 25th, 2023

I applied a quick coat of oil for wood to even out the color of the various pieces . .

01 La Belle Photos/IMG20230823111138.jpg
embed


In this second image you can see the slight adjustments I had to make on the portside hawse lock to be able to fix it in the correct position . .

02 La Belle Photos/IMG20230823111145.jpg
embed


Some general views of the model as it appears today . .

03 La Belle Photos/IMG20230823182128.jpg
embed


04 La Belle Photos/IMG20230823182144.jpg
embed


05 La Belle Photos/IMG20230823182154.jpg
embed


06 La Belle Photos/IMG20230823182216.jpg
embed


See you soon.
Jack Aubrey
 
Friday, September 29th, 2023

In this message I show the situation of the model about a week ago, after almost a month in which I have not published anything.
This was because there was little interesting material to show.

Instead it was a very challenging time to make the little things you can see. Why?
Because several problems have emerged resulting from errors made during the construction of the frames and hawse oarlocks.

Errors probably also mine, but which I am convinced can also be attributed to the way in which these pieces were built (obviously by following the assembly instructions). If Hachette had adopted a different method this would not have happened. We will return to the topic in a future message, hoping to clarify the matter.

The activities of this period were concentrated exclusively on applying the internal planking. Since the presentation of the model is different on the port side from the starboard side, the planking will be applied asymmetrically, so don't be scared if you notice this fact in the images: it is not a mistake but it is done on purpose.

In the next two images, notice the planking in detail on the bow and stern.

01 La Belle Photos/IMG20230920092810.jpg
embed


And precisely in image 01 you can observe a big problem: the internal curvature of the hawse oarlocks does not continue or follow the curvature of the lines of the hull in the part where the frames are. This fact forced me to operate in the horrible way you can observe in the photo. Luckily for me, as the model progresses, this eyesore will be less and less visible until it disappears with the pieces that will be added in this area in the next tasks.
We will see the causes of this error later.

02 La Belle Photos/IMG20230920092803.jpg
embed


03 La Belle Photos/IMG20230920092835.jpg
embed


04 La Belle Photos/IMG20230920092926.jpg
embed


05 La Belle Photos/IMG20230920092939.jpg
embed


Finally, the last photograph shows how even several frames are far from perfect, especially on the internal part. Here it is common to observe some frames where the planking does not rest on them. Assuming that the pieces to assemble the frames were precise, which I think is true, the error can only lie in the procedure for assembling them, a procedure obviously described in the instructions and followed correctly by me. We will also see in this case why and how we could have done better.

06 La Belle Photos/IMG20230920093049.jpg
embed


See you soon. In the next message we will try to understand the causes of these errors and how they could be avoided.
Jack Aubrey
 
Monday, October 23rd, 2023


In my previous message I highlighted two problems that arose during the installation of the stringers inside the hull.

The first problem, the one linked to the shape of the hawse oarlocks, is quite evident: its curvature does not exactly follow the trend of the stringers in the remaining parts of the hull. The problem could be due to an incorrect execution of the activities related to their building, quite complex in truth, or to the chosen construction method.

Honestly, I'm not able to understand what exactly happened: perhaps more effective templates were needed to more precisely define the internal and external shape of the piece. The kit offers two templates for the upper and lower ends, perhaps, to achieve a better result, others would have been needed in the intermediate areas.

The second problem, however, is linked to the shape of the frames themselves: some show a clear discordance with the previous or subsequent frames, resulting in a trend with humps on the stringers. This second problem is easier to control but highlights, in my opinion, an incorrect method for assembling the individual frames. In my opinion there would have been a more accurate one.

In my message of July 17, 2023 I showed some frames assembled according to the method proposed by Hachette. As you can see, Hachette supplies an MDF element that acts as a spacer for the upper ends of the frame itself. This element ensures that the frame has the right width.
However, nothing is provided to control the shape of the frame in the lower part of it.
To overcome this problem, see message dated 19 July 2023, with the clear intention of allowing a more correct assembly, at least from a mirrored perspective, I have prepared a grid over which to build the frame itself.
With hindsight I can write that it would have been better to have a printout underneath with the precise, total shape of the frame, as it's also recommended by various sources.

In theory I could have done it, as I have the original drawings of Boudriot's "La Belle" monography.

But it's a shame that these drawings are in a different scale so I hadn't thought it necessary to do all the work of modifying the drawings. And now I'm paying the price: for the external part of the frame the problem can be fixed later quite easily when I'll have to plank externally, but for the internal part this has almost always proven impossible.

I don't know how clear I was in my exposition. If you have problems following my reasoning, ask and I will try to do what I can to clarify.
Best regards, Jack Aubrey.
 
An interesting solution, but I don't fully understand it. How would you like to partially transfer the monograph from the 1/36 scale to the 1/30 scale and combine it with the rest of the set elements you already have ?
I must admit that the construction stage is already quite advanced and now any mistake will result in problems in the frame.

I wrote that I would have to assemble the different pieces that make up a frame having as an underlying reference point not the grid that I showed in my post of July 19th but the complete drawing of the frame. To do this I would have had to use the drawings of the various frames included in Boudriot's monograph, after having re-developed them in the scale of my model.
In Boudriot's monograph all the frame drawings are availabler. To obtain the drawing in the new scale I would have used a CAD program, in my case AutoCAD 2023, which allows me to do this without major difficulties. Unfortunately I trusted the method proposed in the Hachette files, and this was, in hindsight, my mistake, which made it more difficult for me to apply the internal planking. If I ever make another admiralty style model in the future I will try not to repeat the same mistake.
Approx. I understand that you want to remake the monograph to further work with the hachette set, but the original monograph in Jean Boudriot's book from 2012 has a scale of 1/48. For this project, the monograph was enlarged to a scale of 1/36, which resulted in it already containing errors in both sides - copy to drawing and next monograph printing. Not to mention the new version of this plan in 1/24 scale, which has also been enlarged once again with existing errors a previous print.

That's why I'm asking what will happen if you redo this plan from the 1/36 monograph scale with errors to your current 1/30 scale ?
For me, this 1/36 scale plan is poor quality, and you want to remake it again to a different scale. I mean only copies from 1/36 monograph to CAD which will result in the loss of the scale, next which you will it reduce to 1/30 then print again. You would have to catch these errors at the CAD program level so that there would be no problems later.
 
Hello,

La Belle's 1/24 monograph was printed in France in November 2000.
I bought it to make my film on the assembly of La Belle's frame, which I finished in 2008.

Bernard Huc
 
Tuesday, October 24thd, 2023

In the meantime, after my last message where I showed the progress made, I didn't stop working, but I continued to install other details until I even started the assembly of some beams.

First I had to finish the complete installation of the internal planking, on the bow and stern areas, interrupted however after a few frames, while in the central part of the hull the plankng is deliberately left asynchronous, i.e. with more planks on one side than the other.

Once this phase was completed I then installed the stern and bow garlands (I'm not sure this is the correct english term of italian naval term ghirlanda), details which are highlighted in the next two images. For the stern garlands I had no particular problems, while the two at bow had to be completely redo due to the well-known problem caused by the different internal shape of the hawse oarlocks. I also installed the mainmast basement. This detail can be seen in the second image below.

01 La Belle Photos/2023-10-06/IMG20231010170034.jpg
embed


02 La Belle Photos/2023-10-06/IMG20231010170052.jpg
embed


Then the work continued in the stern area with the installation of some beams and then the deck of the captain's cabin. This area seems successful to me and has increased my enthusiasm, enthusiasm that was diminished a little during the previous tasks, mainly the internal planking, due to the problems already highlighted.

03 La Belle Photos/2023-10-23/IMG20231023164322.jpg
embed


04 La Belle Photos/2023-10-23/IMG20231023164331.jpg
embed


05 La Belle Photos/2023-10-23/IMG20231023164338.jpg
embed


In the bow area for the moment I installed only the foremast basement, but here too there are interesting innovations coming.

06 La Belle Photos/2023-10-23/IMG20231023164342.jpg
embed


07 La Belle Photos/2023-10-23/IMG20231023164347.jpg
embed


08 La Belle Photos/2023-10-23/IMG20231023164401.jpg
embed


That's all for now, I'm also happy that, as I continue with the work, the evident mistake on the bow will become less and less visible until disappearing from sightview almost completely. Until next time.

Best regards, Jack Aubrey.
 
Hello,
beautiful work, I really like the warm tones of the wood.

A small detail that doesn't appear much in the monograph.
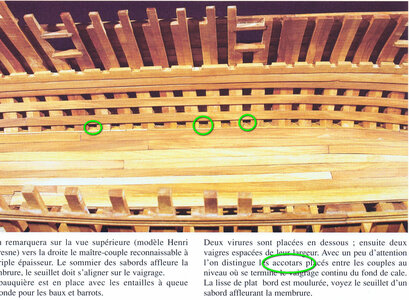
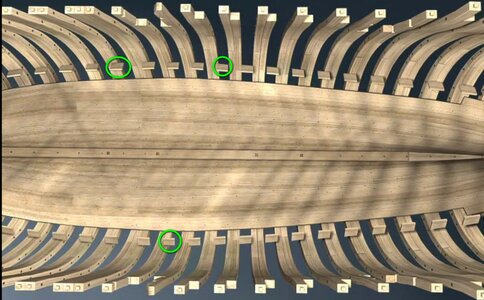
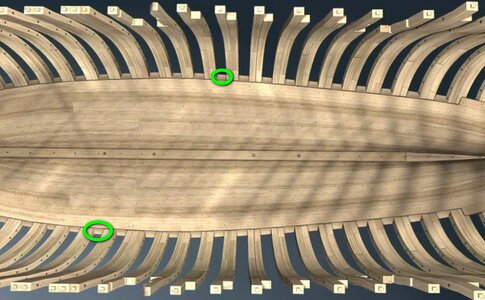
the "accotars" are small pieces of wood that fit between 2 couples at the top of the internal planking.
These pieces of wood prevented small objects from falling to the bottom behind the planking (like a cell phone, for example...).
You can see these pieces at time 2mn31sec in the film "La Belle 1684" and on page 141 of the monograph booklet.

Bernardaccotar_cr.jpgacotarfilm_cr.jpgacotarfilm_cr2.jpg
 
I'm trying to adopt a bi-lingual style of posting messages; perhaps may be useful to someone ?

Wednesday, October 25th, 2023

Il lavoro continua. Ho aggiunto un paio di nuovi bagli e, sopratutto ho aggiunto una paratia che divide la stiva di poppa dal resto dello scafo. Nelle due foto che seguono si può osservare la paratia abbastanza facilmente, sia davanti che dietro.

My work continues. I added a couple of new beams and, above all, I added a bulkhead that keeps separate the stern hold from the rest of the hull. In the following two images you can see this bulkhead quite easily, both front and rear.

01 La Belle Photos/2023-10-30/IMG20231025192030.jpg
embed


02 La Belle Photos/2023-10-30/IMG20231025192047.jpg
embed


Thursday, October 26th, 2023

Aggiunto altri due bagli. La paratia comincia ad essere meno visibile nelle foto. Osservare i dettagli nella stiva diventa sempre più complicato . . .

Here I added two more beams. The bulkhead is now starting to be less visible in these photos. Observing the details in the hold becomes from now on increasingly complicated . . .

01 La Belle Photos/2023-10-30/IMG20231026181422.jpg
embed


02 La Belle Photos/2023-10-30/IMG20231026181453.jpg
embed


Monday, October 30th, 2023

Altri bagli aggiunti: qui è presente una variante in coincidenza con un probabile apertura sul ponte. Queste foto, a differenza di quasi tutte le altre, sono state scattate alla luce naturale; da qui la differenza evidente di colore. Inoltre i bagli più chiari non sono ancora stati trattati con olio impregnante e ravvivante per legno.

Below other beams added: here there is a variant coinciding with a probable opening on the deck. These photos, unlike almost all the others, were taken in daylight; hence the obvious color difference. Furthermore, the lighter beams have not yet been treated with the wood impregnating and reviving oil that I usually apply.

01 La Belle Photos/2023-10-30/IMG20231030102953.jpg
embed


02 La Belle Photos/2023-10-30/IMG20231030103021.jpg
embed


03 La Belle Photos/2023-10-30/IMG20231030103031.jpg
embed


04 La Belle Photos/2023-10-30/IMG20231030103046.jpg
embed


05 La Belle Photos/2023-10-30/IMG20231030103059.jpg
embed


A questo punto è prevista una nuova paratia che dovrebbe creare una ulteriore nuova area nella stiva.

At this point a new bulkhead is planned which should create a further new separated area in the hold.

Best regards, Jack Aubrey.
 
Saturday, November 11th, 2023

In recent days the weather has been bad, even very bad, and so I haven't been able to work much in my workshop due to the low temperature and the lack of heating.

In the few suitable days I proceeded to add a couple of details.

In the first image you can see the installation of a new vertical bulkhead . . .

01 La Belle Photos/2023-11-10/IMG20231110172439.jpg
embed


In this other image the presence of two pillars which also act as ladders to access the hold. Evidently there was very little space on this ship . . .

02 La Belle Photos/2023-11-10/IMG20231110172456.jpg
embed


See you next time . . .

Best regards, Jack Aubrey.
 
Bonjour, dans votre massage #43 vous avez enduit votre modèle d'une huile.
Qu'avez-vous employé comme huile ?
 
Bonjour, dans votre massage #43 vous avez enduit votre modèle d'une huile.
Qu'avez-vous employé comme huile ?

Iniziamo con una prima immagine dove è presente il prodotto: si tratta di un olio per legno, disponibile anche in tonalità colorate, che io ormai tendo ad utilizzare al posto delle varie vernici tipo turapori, trasparenti acrilici o poliuretanici, ecc.

Let's start with a first image where the product is visible: it is a wood oil, also available in colored shades, which I now tend to use instead of various paints such as pore sealers, transparent acrylics or polyurethanes, etc.
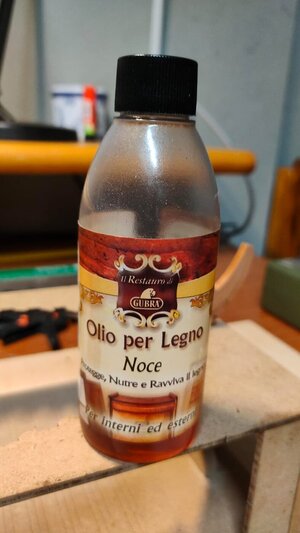
Immagine WhatsApp 2023-07-02 ore 15.03.19_a6a1fd24.jpg

Per l'applicazione di questo olio, che una volta penetrato è perfettamente asciutto e opaco, utilizzo un pennello non molto grande e spalmo l'olio sulla parte da impregnare. E' però necessaria una buona preparazione tale da rimuovere il più possibile tracce di colla in eccesso che altererebbero la penetrazione dell'olio. Quindi bisogna armarsi di pazienza e di carta vetro e "fare un po' di polvere".

To apply this oil, which once penetrated is perfectly dry and matt, I use a small brush and spread the oil on the part to impregnate. However, a good preparation is necessary to remove as much as possible traces of excess glue which would alter the penetration of the oil. So you need to arm yourself with patience and sandpaper and "make some dust".

Questa operazione però può anche essere evitata, se si ha un poco di pazienza e non ci si limita ad applicare l'olio una sola volta. Infatti ho notato che se l'olio non penetra dove c'è la colla, riesce comunque per capillarità a portarsi sotto la superficie sporca di colla e uniformare il colore del legno con il risultato che non si nota la presenza della colla in eccesso.

However, this operation can also be avoided if you have a little patience and do not limit yourself to applying the oil only once. In fact, I noticed that if the oil does not penetrate where the glue is, it still manages by capillarity to get under the glue-stained surface and standardize the color of the wood with the result that the presence of excess glue is not noticeable.

Applicare questo olio, che io uso nella versione non colorata, fa mutare il colore del legno, specialmente quelli scuri come il noce e il mogano in modo impressionante.

Applying this oil, which I use in the unstained version, changes the color of the wood, especially the dark ones like walnut and mahogany, in an impressive way.

Uno dei vantaggi di questo olio è che non tappa i pori del legno e quindi permette, anche dopo la sua applicazione, di utilizzare tranquillamente colla vinilica o alifatica sicuri che l'incollaggio che ne risulterà sarà come sul legno non trattato. Infine, nel giro di una decina di ore l'olio è totalmente assorbito dal legno e asciutto, non unge più e diventa anche lavorabile e carteggiabile se necessario.

One of the advantages of this oil is that it does not block the pores of the wood and therefore allows, even after its application, to safely use vinyl or aliphatic glue, confident that the resulting bond will be as on untreated wood. Finally, within about ten hours the oil is totally absorbed by the wood and dry, it is no longer greasy and also becomes workable and sandable if necessary.
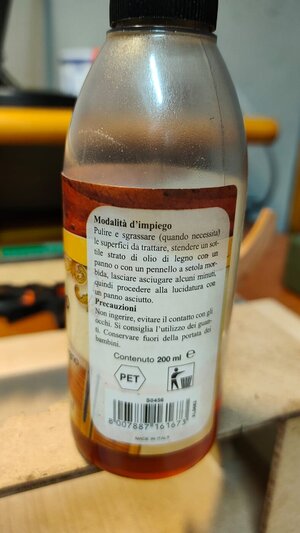
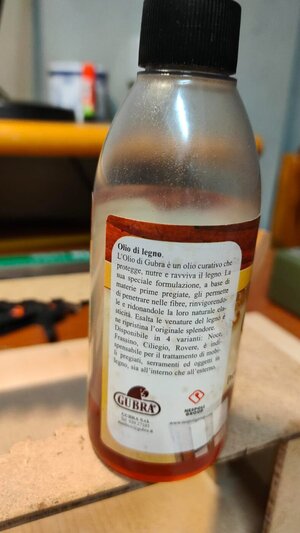
Immagine WhatsApp 2023-07-02 ore 15.03.15_7dc37f12.jpg

Immagine WhatsApp 2023-07-02 ore 15.03.17_2964711e.jpg
 
@jack.aubrey, is it possible to buy these colors online and how much does the product smell after application.
In the past, there has been talk of the product CLOU here at SOS, which I believe smells/gasses for up to several days.
Greetings Knut-
 
@jack.aubrey, is it possible to buy these colors online and how much does the product smell after application.
In the past, there has been talk of the product CLOU here at SOS, which I believe smells/gasses for up to several days.
Greetings Knut-

You will probably find on the internet a similar product, mine is probably available only on the italian marketplace. But in my opinion there are many products similar to this. For examle when I finished it some days ago I found in a DIY shop a totally equivalent product that works exactly the same.
Regarding the smell, it smells as oil, nothing more and nothing less. The smell also disappears when the product is totally absorbed by the wood.
 
Wednesday, November 15th, 2023

In recent days I started installing the beams in the bow area. However, before applying the beams, I had to install a small platform positioned at the bottom of the hold.

And here I ran into an error in the assembly instructions that made me install this platform in correspondence with the wrong frame: in short, I applied the platform starting from frame VI while the correct one was VII. The problem is that by the time I realized it, it was too late.

And this error emerged a few building instructions issues later, when I had to apply a bulkhead at the bow (similar to the other two I already applied at the stern): this had to fall exactly next to the platform but due to the error this was not possible and the bulkhead fell on it.

Consequently I took the liberty of modifying the model as you can see in the image below (and also in the last one). Purists will probably be shocked but unfortunately that's how it happened. This fact teaches me that it is always better to read well beyond the dossier you are working on.

-------------

In questi giorni ho iniziato ad installare i bagli nella zona di prua. Però, prima di applicare i bagli, ho dovuto installare una piccola piattaforma posizionata in fondo alla stiva.

E qui sono incappato in un errore presente nelle istruzioni di montaggio che mi hanno fatto installare questa piattaforma in corrispondenza di un ordinata sbagliata: in breve ho applicato la piattaforma a partire dall'ordinata VI mentre quella corretta era la VII. Il problema è che quando me ne sono accorto era ormai troppo tardi.

E questo errore è emerso alcuni fascicoli dopo, quando ho dovuto applicare una paratia a prua (simile alle altre due già applicate a poppa): questa doveva cadere esattamente a lato della piattaforma ma a causa dell'errore ciò non è stato possibile e la paratia vi cadeva sopra.

Di conseguenza mi sono preso la libertà di modificare il modello come potete osservare nell'immagine qui sotto (e anche nell'ultima). I puristi rimarranno probabilmente sconvolti ma purtroppo è andata così. Il fatto mi insegna che conviene sempre andare a leggere ben oltre il fascicolo su cui si sta lavorando.

01 La Belle Photos/2023-11-15/IMG20231115104704.jpg
embed


02 La Belle Photos/2023-11-15/IMG20231115104712.jpg
embed


03 La Belle Photos/2023-11-15/IMG20231115104723.jpg
embed


04 La Belle Photos/2023-11-15/IMG20231115104730.jpg
embed


05 La Belle Photos/2023-11-15/IMG20231115104800.jpg
embed


Alla prossima . .
See you nezt time . . .

Best regards, Jack Aubrey.
 
Back
Top