La Belle - Hachette Partwork - 1/30 scale

Wednesday,August 2nd, 2023

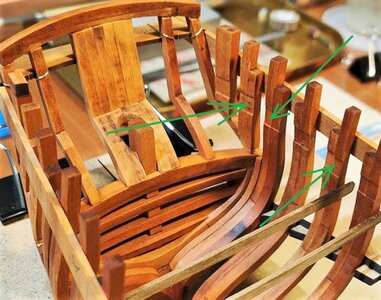
I'm working to assemble the transom and some stern frames.
The starting points; first of all some tests to verify that everything is ok . .

01 La Belle Photos/IMG20230606190110.jpg
embed


01 La Belle Photos/IMG20230606190132.jpg
embed


01 La Belle Photos/IMG20230606190141.jpg
embed


Once the check has been passed, I proceed to glue the various elements, after having definitively finished them . .

01 La Belle Photos/IMG20230625172454.jpg
embed


Adding new items to the transom . .

01 La Belle Photos/IMG20230629114147.jpg
embed


01 La Belle Photos/IMG20230629114200.jpg
embed


The transom practically finished, here for photographic reasons the model has been removed from the mounting slip . .

01 La Belle Photos/IMG20230629182120.jpg
embed


01 La Belle Photos/IMG20230629182135.jpg
embed


Finally the addition of the last elements and everything is finished. I thought it was a complicated job but everything went quite well.
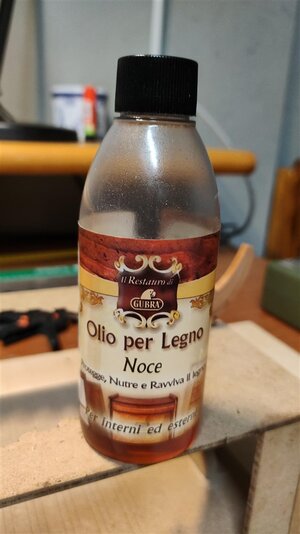
P.S. I applied some wood oil which amplified the color of the pear wood, anyway the main reason was to nourish the wood and avoiding it became too dry.

01 La Belle Photos/IMG20230702105653.jpg
embed


See you soon,
Jack Aubrey
 
Looking very good
and I agree with Paul completely - his words about your work and also about the early using of oil
BTW: interesting and good idea to have some small notches on the inside of the frames for taking over later on the clamps (I hope this is the correct term)
IMG20230702105653.jpg
 
Hello Jack. Your work is exemplary.

A thought for you to consider - when I applied finishes (linseed oil or wipe on poly) to my model early in construction I have (later) run into problems with adhesion. I'm hoping that won't be an issue for you!

I am and was aware of the problem. Then, years ago, I discovered a product in a DIY store based on straw oil, red oil and white spirit which is completely absorbed by the wood in a few hours and does not create any problems with the use of glue (both vinyl and aliphatic or cyanoacrylate). It also has the ability to infiltrate very deeply into the wood and even makes those unsightly, not perfectly removed, glue stains disappear. Since then I use it for all my models and it allows me to avoid the application of clear varnish.

IMG20230702150106_BURST000_COVER.jpg
 
Thursday, August 3rd, 2023

Now that the work on the transom is finished, it's time to work on the bow frames and the preparation of the hawse locks (or stanchions, I'm not 100% sure of the term).

In this message I show the first three bow frames already installed.

01 La Belle Photos/IMG20230708121917.jpg
embed


02 La Belle Photos/IMG20230708121926.jpg
embed


03 La Belle Photos/IMG20230708121934.jpg
embed


04 La Belle Photos/IMG20230708131554B.jpg
embed


See you soon, in the next message we will talk about the hawse locks.
Jack Aubrey
 
Friday, August 4th, 2023

Let's now see the process of preparing the hawse locks, according to the method proposed by Hachette.
The procedure itself is quite simple: the files are supplied with templates on cardboard to be cut out and glued, as shown in the following two images. The utmost precision in cutting out the templates and gluing them on the piece to be worked is very important.

01 La Belle Photos/IMG20230717150110.jpg
embed


02 La Belle Photos/IMG20230717150118.jpg
embed


At this point you are asked to remove from the piece thus prepared all the wood not covered by the two templates, applied to the thickness of the wood. The instructions propose a manual method through the use of files, rasps and abrasive blocks which, given the amount of wood to be removed, is at first sight a nightmare.

I solved the problem with an adequate use of the large Proxxon disk sander, after applying an abrasive disk of the proper grain and, above all, new.

With a little patience it is possible to complete this operation in a reasonable time and without superhuman efforts.
Only drawback is the dust that is produced. After the first piece I fell back on the intensive use of FFP2 anti COVID masks!!

Below the result on two elements prepared and already removed from the original tablet.

03 La Belle Photos/IMG20230804103909.jpg
embed


04 La Belle Photos/IMG20230804103922.jpg
embed


See you soon, in the next message we will continue to talk about the hawse locks.
Jack Aubrey
 
Saturday, August 5th, 2023

Once the first phase has been completed, which served to prepare the 6 elements that make up the hawse locks for one side of the hull, it is then necessary to assemble them (according to a method that I will not describe for the sake of brevity) by gluing them together.
At the end of this operation, a still rough piece is obtained which has the shape shown in the following two photos.

01 La Belle Photos/IMG20230717150034.jpg
embed


02 La Belle Photos/IMG20230717150350.jpg
embed


This piece must now undergo further processing to obtain the final product. The following photos show the finished piece on the outside. Now it also has to be worked on the inside but, tired of eating dust, I decided to take a break and finish it in a few days.
Furthermore, I still have to repeat the same process from the beginning to also prepare the piece for the other side of the hull: everything postponed to a date to be defined.
In the meantime, I've started working on another front, deciding to resume this activity when I can't put it off any longer.

03 La Belle Photos/IMG20230720171738.jpg
embed


04 La Belle Photos/IMG20230720171758.jpg
embed


05 La Belle Photos/IMG20230720171807.jpg
embed


See you soon, in the next message we will se the tasks of assembling the several frames on the keel.
Jack Aubrey
Good morning Jack. Immaculate modelling. The oil you use is just magical. Brings the wood to a wonderful deep, rich colour and allows adhesives later . I think we should all get some :D .Cheers Grant
 
Sunday, August 6th, 2023

Tired of making wood dust and seeing few results for such a job, I decided to give up the hawse locks for a while and to install the frames, starting from the stern and the bow and proceeding towards the center of the hull.

The work consists in positioning the frame to be glued in the keel and registering the width of the same on the shape of the mounting slip. To maintain the correct registration of the frame, I block it with a hard wood strip fixed with a drop of cyanoacrylate.

The subsequent fixing on the keel is then performed with aliphatic glue.
I proceed by gluing four/six frames at a time, partly aft and partly forward, then I wait for the glue to dry.

01 La Belle Photos/IMG20230717151342.jpg
embed


02 La Belle Photos/IMG20230717151351.jpg
embed


03 La Belle Photos/IMG20230717150815.jpg
embed


04 La Belle Photos/IMG20230717150826.jpg
embed


See you soon, in the next message we will talk again of assembling new frames on the keel.
Jack Aubrey
 
Monday, August 7th, 2023

The task to install new frames both aft and forward continues . .
In the following images you can see how the work proceeds quite quickly.

But at this point I changed the method used so far. As you can see from the pictures I removed the slats that went from starboard to port and which were used to keep the frame locked at the right width. Removing these temporary strips is a very simple task. I exploit a defect in the cyanoacrylate glue: a light tap with a small hammer is enough for the glue to come off without problems. Obviously it is then necessary to clean the wood from the glue but this is also simple.
Instead, I kept the slat on the last frame towards the center of the ship to avoid deformation.

Finally I applied a walnut strip horizontally: it starts from the first stern frame and reaches the one with the remaining slat and I fixed all the frames to it, again with cyanoacrylate glue. Being the frames flexible this trick aligned themselves according to the natural curve of the horizontal strip, forming a harmonious curve. This strip is temporary: it will subsequently be removed when the beam stringers and some internal planks will be installed inside the hull.

01 La Belle Photos/IMG20230727144520.jpg
embed


02 La Belle Photos/IMG20230727144531.jpg
embed


03 La Belle Photos/IMG20230727144550.jpg
embed


Furthermore, in this phase I had to prepare the openings for the gun ports. In this ship there will be three gunports on each side. The following photo shows one of these gunports in detail.

04 La Belle Photos/IMG20230727150951.jpg
embed


Finally, the same work carried out for the stern is also replicated on the bow.

05 La Belle Photos/IMG20230729142505.jpg
embed


Now there are still a dozen frames amidships to be installed and then I will have finished this operation, which was very interesting and stimulating.

See you soon, in the next message we will see the last frames in place.
Jack Aubrey
 
Tuesday, August 8th, 2023

I finally managed to fix all the frames to the keel and, thanks to a third horizontal stay rod strip, all the frames between them.
Now the whole structure, keel, frames and stern are connected and so there is no danger of a dangerous structure failure. Obviously I need to handle everything with great caution.

01 La Belle Photos/IMG20230731145726.jpg
embed


02 La Belle Photos/IMG20230731145736.jpg
embed


03 La Belle Photos/IMG20230731145749.jpg
embed


To verify the correctness of my system of temporary reinforcements and stay rods, I've extracted the hull from the building slip.
The whole array seems stable and doesn't deform. Very good.
I tried to put it back in the slip and this operation was also successful, even if I need a lot of calm and precision, so everything returns to the correct position.

04 La Belle Photos/IMG20230801104717.jpg
embed


05 La Belle Photos/IMG20230801104725.jpg
embed


See you soon, so I can consider this phase concluded and move on to the next phase.
Jack Aubrey
 
Wednesday, August 9th, 2023

At this point I noticed that I can still postpone the activities for the construction of the hawse locks (an activity that is causing me some problems that I still have to discover the cause) and continue with the installation of some details inside the hull. More precisely the keelson, the beam stringers (shelfs? dead points?) and the stringers. All elements that now do not concern the extreme part of the bow.

The keelson is an element that I had no difficulty installing. You can see it in the last image of this message. The only problem is the usual need to remove burnt laser cutting.

Instead for the installation of the beam stringers I had to solve the problem of using suitable clamps. The standard ones, usually used, are in this case completely unusable, both for these elements and, in the future, for the stringers.
At the end I found useful to use clamps consisting of a 6mm diameter bolt, two washers and a butterfly nut.
Their use is easily understood in the following images.

01 La Belle Photos/IMG20230804172809.jpg
embed


02 La Belle Photos/IMG20230804172818.jpg
embed


03 La Belle Photos/IMG20230805151952.jpg
embed


The whole matter sounds easy but required a significant amount of patience. But the goal was definitely achieved.
These "handcrafted" clamps will probably also be strategic for the next, plannes activities.

04 La Belle Photos/IMG20230805194102.jpg
embed


05 La Belle Photos/IMG20230805194114.jpg
embed


See you soon.
Jack Aubrey
 
Friday, August 4th, 2023

Let's now see the process of preparing the hawse locks, according to the method proposed by Hachette.
The procedure itself is quite simple: the files are supplied with templates on cardboard to be cut out and glued, as shown in the following two images. The utmost precision in cutting out the templates and gluing them on the piece to be worked is very important.

01 La Belle Photos/IMG20230717150110.jpg
embed


02 La Belle Photos/IMG20230717150118.jpg
embed


At this point you are asked to remove from the piece thus prepared all the wood not covered by the two templates, applied to the thickness of the wood. The instructions propose a manual method through the use of files, rasps and abrasive blocks which, given the amount of wood to be removed, is at first sight a nightmare.

I solved the problem with an adequate use of the large Proxxon disk sander, after applying an abrasive disk of the proper grain and, above all, new.

With a little patience it is possible to complete this operation in a reasonable time and without superhuman efforts.
Only drawback is the dust that is produced. After the first piece I fell back on the intensive use of FFP2 anti COVID masks!!

Below the result on two elements prepared and already removed from the original tablet.

03 La Belle Photos/IMG20230804103909.jpg
embed


04 La Belle Photos/IMG20230804103922.jpg
embed


See you soon, in the next message we will continue to talk about the hawse locks.
Jack Aubrey
For future work, maybe a small bandsaw to waste the bulk of the material would be a good investment. Beautiful work, do date!
 
Wednesday, August 9th, 2023

At this point I noticed that I can still postpone the activities for the construction of the hawse locks (an activity that is causing me some problems that I still have to discover the cause) and continue with the installation of some details inside the hull. More precisely the keelson, the beam stringers (shelfs? dead points?) and the stringers. All elements that now do not concern the extreme part of the bow.

The keelson is an element that I had no difficulty installing. You can see it in the last image of this message. The only problem is the usual need to remove burnt laser cutting.

Instead for the installation of the beam stringers I had to solve the problem of using suitable clamps. The standard ones, usually used, are in this case completely unusable, both for these elements and, in the future, for the stringers.
At the end I found useful to use clamps consisting of a 6mm diameter bolt, two washers and a butterfly nut.
Their use is easily understood in the following images.

01 La Belle Photos/IMG20230804172809.jpg
embed


02 La Belle Photos/IMG20230804172818.jpg
embed


03 La Belle Photos/IMG20230805151952.jpg
embed


The whole matter sounds easy but required a significant amount of patience. But the goal was definitely achieved.
These "handcrafted" clamps will probably also be strategic for the next, plannes activities.

04 La Belle Photos/IMG20230805194102.jpg
embed


05 La Belle Photos/IMG20230805194114.jpg
embed


See you soon.
Jack Aubrey
These are some of the simplest, most efficient and cost-controlled clamps I have seen to date. Brilliant idea!
 
These are some of the simplest, most efficient and cost-controlled clamps I have seen to date. Brilliant idea!
The big advantage with the La Belle is, that the open spcae between the frames is big enough to use such kind of clamping. f.e. on my Granado I have only mm which makes is really difficult
But the idea is great
 
Monday, August 21st, 2023

After the ritual mid-August break, I resumed work on the admiralty model "La Belle".
First I tried to postpone as much as possible the activities for the building of the hawse locks but, soon, I had to face the problem as it could no longer be postponed.

I had already anticipated that the realization of the hawse locks was creating problems for me and that I did not understand why the pieces necessary for these elements did not obtain, once assembled, the desired result.
During their construction I carefully followed the instructions which required the use of templates to generate the single pieces. Since there are two cubia oarlocks, one on the port side and the other on the starboard side, I put further attention into the preparation of the second, in the illusion of having done something wrong in the construction of the first. Sadly the second one also eventually proved to be a photocopy of the first one, so I've come to the conclusion that there must be (somewhere, but I don't know where) a design error in the single pieces.

I'll try now to explain what the problem is.
In the following photo I show that the trend of the hawse oarlocks in the lower part is illustrated by the template (which I have reproduced exactly here in wood marked with the letter "S", which I will then remove) to adapt to the lines of the hull at the bow. As you can see, the template shows a concave shape while the piece I made has an opposite shape, i.e. convex.
My mistake ?

01 La Belle Photos/IMG20230821125016.jpg
embed


Definitely, but motivated by the fact that there is absolutely no wood available inside, as you can see from the following photo.
Even if I wanted to, I could not have given a correct shape to the piece due to lack of raw material !!
So the solution is to add enough wood inside to allow for the desired shape to be achieved.
How to do ?

02 La Belle Photos/IMG20230821125031.jpg
embed


After several nights spent thinking, I decided to use part of the waste material deriving from the preparation of the individual elements in order to glue it in the right place inside the hawse oarlocks.
For example I post a picture of one of the discarded pieces for a single item.

03 La Belle Photos/IMG20230821125053.jpg
embed


Retrieving all the pieces I cut out as much wood as needed and glued it into the inside of the main piece, exactly where the corresponding piece fit. The photo below shows the new inside with the material added.

04 La Belle Photos/IMG20230821125103.jpg
embed


From this last photo you can see that now there is all the wood needed to finish the piece as it should be.
All that remains is to properly remove the excess wood and finish all our piece. Not an easy job but, at least, possible.

05 La Belle Photos/IMG20230821125112.jpg
embed


See you soon.
Jack Aubrey
 
Wednesday, August 23rd, 2023

Hawse locks:
after adding some material (pear wood) in the area inside the hawse locks, as explained in my previous message, today I proceeded to model the internal part of one of the two pieces.

All in all it wasn't a very demanding job, also thanks to the two power tools I used, very effective.

I then proceeded to finish the piece with gradually higher grade sandpaper and finally, after having carried out all the necessary checks, I proceeded to glue it definitively.

This element has proved to be a piece of incredible precision, which fits perfectly into its seat, as you can see in the attached images.
Incredible, I never imagined a similar result.

01 La Belle Photos/IMG20230822175653.jpg
embed


02 La Belle Photos/IMG20230822175700.jpg
embed


03 La Belle Photos/IMG20230822175706.jpg
embed


04 La Belle Photos/IMG20230822175716.jpg
embed


05 La Belle Photos/IMG20230822175733.jpg
embed


See you soon.
Jack Aubrey
 
Thursday, August 24rd, 2023

The second element of the hawse locks, the one on which I put the maximum effort in terms of precision, is also finished and, in the following images, you can see it permanently fixed with glue.

Unfortunately this second element, which should have been perfect in theory, was not at all and, in order to be able to insert it in the correct position, I had to make very slight adjustments which, upon close observation, are noticeable.

Apart from this aspect, finally a decidedly difficult task in the building of this model has finally finished and this now allows me to be able to work according to the order of the Hachette issues in a more structured way than I have done in recent past, where I have often worked to do works partially present on various issues.

However, I am satisfied with the result achieved.

01 La Belle Photos/IMG20230823100137.jpg
embed


02 La Belle Photos/IMG20230823100154.jpg
embed


03 La Belle Photos/IMG20230823100200.jpg
embed


04 La Belle Photos/IMG20230823100210.jpg
embed


05 La Belle Photos/IMG20230823100223.jpg
embed


06 La Belle Photos/IMG20230823100227.jpg
embed


07 La Belle Photos/IMG20230823100240.jpg
embed


See you soon.
Jack Aubrey
 
Back
Top