Kingfisher 1770 1:48 POF

Thank you, I have this in stock. So next time when I have to blackening brass I give it a try to dilute the casey. Is there a special amount? 1 part on 100 for example?
From my experience, I diluted with a ratio of 1:5, one part of Bras Black and 5 parts of water. There is no exact recipe, different bras alloy has a different percentage of components and, therefore will react differently. As Paul said, the slow curing process works the best. But the most important part is the cleaning, the surface MUST be spotless of oxidation and other fingers touching (oils). Vinegar removes oxidation, Ammonia removes the rest.

Happy blackening.
 
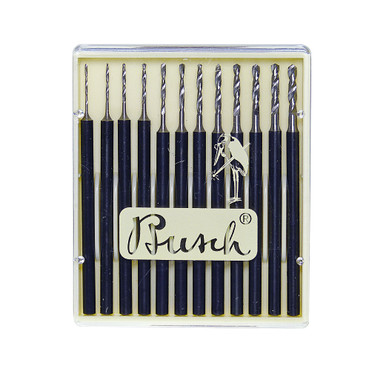
Where did you get your bits for drilling the holes, Paul? The holes look very small. And what size nails did you use?
Hi Vic! Nice to see you back here on the forum!

For wood I have been using cheap drill bits for electrical circuit boards:


But for drilling metal alloys I purchased better drill bits:


These are very pricey and I honestly don't know if they are truly needed...but you asked.

The holes I drilled are 0.6 mm and the nails have a 0.5 mm shaft and these particular ones have a 0.7 mm rounded bolt head. You can also find versions with flat heads.

When drilling holes in wood I use a powered mini drill (the cheap drill bits are very brittle and if you try to use them in a pin vice they just break). For drilling through metal I used a little drill press with a rotary tool. Hope this information helps you and/or others...
 
From my experience, I diluted with a ratio of 1:5, one part of Bras Black and 5 parts of water. There is no exact recipe, different bras alloy has a different percentage of components and, therefore will react differently. As Paul said, the slow curing process works the best. But the most important part is the cleaning, the surface MUST be spotless of oxidation and other fingers touching (oils). Vinegar removes oxidation, Ammonia removes the rest.

Happy blackening.
Thanks Jim, in the bunch of modelbuilding stuff I achieved a while ago, a bottle of the casey was included. Lucky me, so I will try it.
 
I mentioned in an earlier post that I wanted to take a shot at fabricating rudder hinges (pintles and gudgeons). The kit instructions called for a combination of plastic for the hinge parts and black paper/card stock for the straps. On the Vasa I make some faux hinges out of brass shim stock, but they were a pretty weak attempt.

Of course, fabricating actual hinges would mean that I needed to learn how to solder. Not exactly neurosurgery but my experience with soldering was limited to home repair/electronics.

My approach required adding brass bar stock (1.5 mm x 2.0 mm) to some thinner brass stock that would form the straps (1.5 mm x 0.3 mm).

View attachment 426352

View attachment 426353

I then did some preliminary shaping:

View attachment 426354

View attachment 426355

View attachment 426356

At this point I felt like I had something to work with...
You are a clever Genie, Paul.
 
Thanks, again, for all the nice comments and likes.

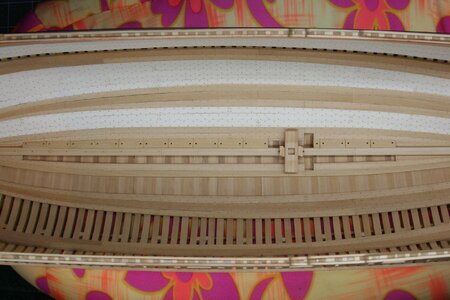
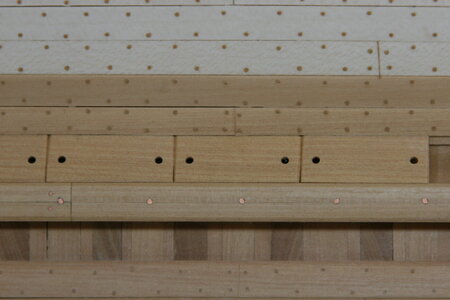
I have been working on a punch list of little things that were skipped along the way - hardly worth mentioning them all...except I have finally treenailed the inner hull planks (ceiling) and added the limber boards:

IMG_0389.JPG

IMG_0391.JPG

Running count is now just shy of (edit) 13,000 trunnels.

While I can still turn the ship upside down I'll add the gudgeons, and then return to the buildout of the interior...
 
Last edited:
She is a stunner, Paul. I just love the contrast of the lighter/darker-colored wood combination of the interior planking. Your tree nailing ranks alongside that of @Maarten Maarten's RC as my two favorite attempts at this technique - subtle but clearly visible.
 
Hi Vic! Nice to see you back here on the forum!

For wood I have been using cheap drill bits for electrical circuit boards:


But for drilling metal alloys I purchased better drill bits:


These are very pricey and I honestly don't know if they are truly needed...but you asked.

The holes I drilled are 0.6 mm and the nails have a 0.5 mm shaft and these particular ones have a 0.7 mm rounded bolt head. You can also find versions with flat heads.

When drilling holes in wood I use a powered mini drill (the cheap drill bits are very brittle and if you try to use them in a pin vice they just break). For drilling through metal I used a little drill press with a rotary tool. Hope this information helps you and/or others...
Appreciate it!
 
It’ looking great, Paul.
Running count is now just shy of (edit) 13,000 trunnels.
From one point of view, it is 'just' a number. On the other hand, without the treenails it would be 'flat planking'. Now it has a lively appearance in combination with the different colors of the wood.
Regards, Peter
 
Thanks for all the likes! You guys are all great!

Absolutely beautiful !
Thank you kindly.

She is a stunner, Paul. I just love the contrast of the lighter/darker-colored wood combination of the interior planking. Your tree nailing ranks alongside that of @Maarten Maarten's RC as my two favorite attempts at this technique - subtle but clearly visible.
Thanks, Heinrich. I'm not as sold on the two-tone thing as I thought I was going to be. But changing it was out of the question. I did some off-ship trials on staining to bring the color into a bit more uniformity but those trials failed miserably. American Holly does not take to stain well. Always learning...

Hi Paul,

See you are also a born silver smith looking at those hinges, maybe time for a new hobby?
Again very nice and crisp work.
So many hobbies - so little time. A least I'm not also a car guy...

Witaj
Drogi Pawle piękny ster i wnętrze, kołkowanie super . Powstaje piękny model. Pozdrawiam Mirek
Thank you Mirek. You are always kind to post nice things.

A lot of work, but it is looking great. Very well done.
Yes. A lot of work. I wish I could have gotten the treenails on the holly to match better but that wood is nearly white (and is too soft to draw down small enough).

It’ looking great, Paul.

From one point of view, it is 'just' a number. On the other hand, without the treenails it would be 'flat planking'. Now it has a lively appearance in combination with the different colors of the wood.
Regards, Peter
Thanks Peter. Of course that will all fade into the background as the build-out continues (which I think is good).

I agree with all the comments above, but.....

Did you count them once or two times to be sure about the amount?
One, two, three, four...

Of course I counted them one by one Steef! It took three days because my wife interrupted me around 8500 and I had to start over.
 
Thanks, again, for all the nice comments and likes.

I have been working on a punch list of little things that were skipped along the way - hardly worth mentioning them all...except I have finally treenailed the inner hull planks (ceiling) and added the limber boards:

View attachment 427961

View attachment 427962

Running count is now just shy of (edit) 13,000 trunnels.

While I can still turn the ship upside down I'll add the gudgeons, and then return to the buildout of the interior...
Amazing work Paul
How many hours did you need for this?
 
Amazing work Paul
How many hours did you need for this?
Gosh, I don't know Gilbert. I did them over several months rather than all at once. I can tell you that the human brain (and back) can only take treenailing for so long before you need to work on something else. In the middle of the installation process it all seemed hopeless (and foolish) - but looking back I guess I do like the overall appearance and sense of accomplishment.
 
Gosh, I don't know Gilbert. I did them over several months rather than all at once. I can tell you that the human brain (and back) can only take treenailing for so long before you need to work on something else. In the middle of the installation process it all seemed hopeless (and foolish) - but looking back I guess I do like the overall appearance and sense of accomplishment.
I can well imagine this, Paul. This is where you simply have to make the decision and be committed to it. The overall appearance is what makes it all worthwhile and is indeed a major accomplishment.
 
Back
Top