
Thanks Kurt. Not having so much luck with the ship's wheel but will keep trying....Creative methods to make the stern window frames and glass, well done.

You are using an out of date browser. It may not display this or other websites correctly.
You should upgrade or use an alternative browser.
You should upgrade or use an alternative browser.
HMS Medea (28) (1778) 1/48 scratch build
- Thread starter Masters Mate
- Start date
- Watchers 43
As you can see by the lack of posts, I got bogged down trying to build the ship's wheel. I (wrongly) thought I needed to complete it, mount it and run the steering lines back to the rudder before continuing with anything else. Here is where I got held up...
I planned to cut the wheels out in sections and fit them around the spokes....

After a lot of attempts I realised this was an unsound method and the parts were too small to butt glue and to hold their shape.

I made some good spokes with my cheap Chinese lathe but getting them a standard size was a challenge.

The hub (drum) was fine.


I started making new wheels out of Queensland Maple and might continue with that after I have had a break.

In the meantime I have set about tidying up a lot of half-finished parts of the build. More to come in the next few posts.
I planned to cut the wheels out in sections and fit them around the spokes....
After a lot of attempts I realised this was an unsound method and the parts were too small to butt glue and to hold their shape.
I made some good spokes with my cheap Chinese lathe but getting them a standard size was a challenge.
The hub (drum) was fine.
I started making new wheels out of Queensland Maple and might continue with that after I have had a break.
In the meantime I have set about tidying up a lot of half-finished parts of the build. More to come in the next few posts.
The upper planking is now complete inside and out. Gunports are cut out. The tops of the upper works are leveled. 


When I was unable to put the car out (threat of hail) I moved to my wife's bench and set up on my old bookbinding finishing press. It's an antique and a very useful clamp for holding books on various angles for gold tooling. Pretty good for holding a ship model as well.")

Next project was to plank in the stern.


After shaping and sanding, the stern windows were finally attached.

When I was unable to put the car out (threat of hail) I moved to my wife's bench and set up on my old bookbinding finishing press. It's an antique and a very useful clamp for holding books on various angles for gold tooling. Pretty good for holding a ship model as well.
Next project was to plank in the stern.
After shaping and sanding, the stern windows were finally attached.
It was always my intention to have a working rudder system and my inability to make a satisfactory double wheel so far held me up.
Then I decided I could go ahead anyway so I dry rigged the rudder and connected all the components with fishing line to prove it worked.

Satisfied with that, I then set about connecting the rudder pintles to the gudgeons.

Maybe should have started at the top but although it got harder and harder to fit each one I got there in the end.


The rudder works as it should and I hope that I will be able to pull the linen thread lines through with the fishing line when it comes time to attach it to the wheels. Now I can complete the planking of the gun deck.
I was relieved and pleased when the model sat squarely on it's keel on the dining table with no other support.


Then I decided I could go ahead anyway so I dry rigged the rudder and connected all the components with fishing line to prove it worked.
Satisfied with that, I then set about connecting the rudder pintles to the gudgeons.
Maybe should have started at the top but although it got harder and harder to fit each one I got there in the end.
The rudder works as it should and I hope that I will be able to pull the linen thread lines through with the fishing line when it comes time to attach it to the wheels. Now I can complete the planking of the gun deck.
I was relieved and pleased when the model sat squarely on it's keel on the dining table with no other support.
Very good progress, Ian, and some fine job on the rudder and gudgeons and pintles. Keep those photos coming, please.
Thanks for your encouragement Jim. Progress is slow and as my first build there are some serious challenges to overcome, but I still enjoy it immensely. Hopefully others can learn from my mistakes and avoid them in their own builds.Very good progress, Ian, and some fine job on the rudder and gudgeons and pintles. Keep those photos coming, please.

Hi Ian,As you can see by the lack of posts, I got bogged down trying to build the ship's wheel. I (wrongly) thought I needed to complete it, mount it and run the steering lines back to the rudder before continuing with anything else. Here is where I got held up...
I planned to cut the wheels out in sections and fit them around the spokes....
View attachment 272176
After a lot of attempts I realised this was an unsound method and the parts were too small to butt glue and to hold their shape.
View attachment 272177
I made some good spokes with my cheap Chinese lathe but getting them a standard size was a challenge.
View attachment 272178
The hub (drum) was fine.
View attachment 272179View attachment 272180
View attachment 272181
I started making new wheels out of Queensland Maple and might continue with that after I have had a break.
View attachment 272182
In the meantime I have set about tidying up a lot of half-finished parts of the build. More to come in the next few posts.
You can make the rims of your steering wheel on the lathe. First create the correct outer diameter. Then from the front side you hollow it out until you have the correct rim thickness. At last you cut it off and you will have a perfect rim in a fraction of the time when you have to do it by hand.
Hi Maarten,Hi Ian,
You can make the rims of your steering wheel on the lathe. First create the correct outer diameter. Then from the front side you hollow it out until you have the correct rim thickness. At last you cut it off and you will have a perfect rim in a fraction of the time when you have to do it by hand.
What a good suggestion. I am away for a few days but as soon as I get home I will give that a try. Thank you.
Time for some log updates. I've been trying to finish off various half-finished components before updating the log but that has caused a backlog of images.
Sanding, sanding and more sanding of the gun deck now complete.

I still have the waterways to do but now that my new scroll saw has arrived I'll do them soon.
I used this small chisel to simulate or emphasize joins between planks. I also found the pictured tool in my late father's tool box. I have no idea what it was used for. It had 4 rusty needles in the end which I replaced with two new ones. I then used it to prick simulated nail heads. My hand isn't as steady as I would like but I think the marks are in scale and will show up when I seal the deck.


Many more progress images to come....
Sanding, sanding and more sanding of the gun deck now complete.
I still have the waterways to do but now that my new scroll saw has arrived I'll do them soon.
I used this small chisel to simulate or emphasize joins between planks. I also found the pictured tool in my late father's tool box. I have no idea what it was used for. It had 4 rusty needles in the end which I replaced with two new ones. I then used it to prick simulated nail heads. My hand isn't as steady as I would like but I think the marks are in scale and will show up when I seal the deck.
Many more progress images to come....
I have spent several weeks struggling with the quarter galleries. With no templates and only 2 dimensional drawings to go by I've had difficulty working out the curves to build but with the use of paper and cardboard shapes and viewing images and build logs of other ships I've come up with something I can live with.


More...
More...
A bit more like it as the days progressed...


My camera sees more than I do and I'm not happy with the Queensland Maple as a finished timber (window columns). Even with the finest sandpaper and steel wool I haven't managed to get it smooth enough. I was planning using it for deck furniture and the hatches but will have to stain some Jacaranda instead.
More...
My camera sees more than I do
and I'm not happy with the Queensland Maple as a finished timber (window columns). Even with the finest sandpaper and steel wool I haven't managed to get it smooth enough. I was planning using it for deck furniture and the hatches but will have to stain some Jacaranda instead.More...
Our shipyard manager demanded that I re-paint the wales again before putting up any more images. As she also provides most of my meals and I've been in love with her for over 55 years I complied immediately.


I took the opportunity to paint down to the waterline. The slightly uneven edge will be covered by the beading over the upper edge of the copper plates.
I took the opportunity to paint down to the waterline. The slightly uneven edge will be covered by the beading over the upper edge of the copper plates.
Most of you will have worked out different ways to get around most problems and I'm no different. This trick might save someone losing a part into the bowels of their ship where it cannot be reached...
There was an ugly angle left between the stern frames and the hull (I know. It was a mistake by the builder...).

I cut a triangular piece to fill the hole but couldn't get it into position and hold it there with tweezers.

I punched a small hole in the face of the piece and glued in the tip of a toothpick.


I use quick dry wood glue (Selleys Aquadhere Quick Set for Aussie modellers. Not sure if it is sold elsewhere). You can position something like this and hold for 2-3 minutes if not under tension and it will then dry normally without moving.
Slice off the toothpick and a difficult positioning job done. If I had worked this out earlier I wouldn't have had to do so much fishing down into the bilge for parts which slipped from my tweezers...
There was an ugly angle left between the stern frames and the hull (I know. It was a mistake by the builder...).
I cut a triangular piece to fill the hole but couldn't get it into position and hold it there with tweezers.
I punched a small hole in the face of the piece and glued in the tip of a toothpick.
I use quick dry wood glue (Selleys Aquadhere Quick Set for Aussie modellers. Not sure if it is sold elsewhere). You can position something like this and hold for 2-3 minutes if not under tension and it will then dry normally without moving.
Slice off the toothpick and a difficult positioning job done. If I had worked this out earlier I wouldn't have had to do so much fishing down into the bilge for parts which slipped from my tweezers...
Finished off the inside of the transom.

Trust me. Those gun ports do line up, despite what the camera says!
I'm currently working on the caps on the transom.


Trust me. Those gun ports do line up, despite what the camera says!
I'm currently working on the caps on the transom.
- Joined
- Apr 20, 2020
- Messages
- 5,146
- Points
- 738

Dear IanFinished off the inside of the transom.
View attachment 281289
Trust me. Those gun ports do line up, despite what the camera says!
I'm currently working on the caps on the transom.
View attachment 281291
View attachment 281292
I like to see your work on the model, you have the ability to think outside the box and create creative working methods (the triangle of wood in the space, the use of two prongs to create a deck nail socket and more).
Well done

Thanks ShotaDear Ian
I like to see your work on the model, you have the ability to think outside the box and create creative working methods (the triangle of wood in the space, the use of two prongs to create a deck nail socket and more).
Well done
I have certainly taken on a difficult task to build from scratch as a first build. But I'm well committed now so I have to do the best that I can with limited resources.
Having lived on a farm for 40 years does help. Innovation is the only way to survive when you are faced with flooding, fire, drought, disease and price fluctuations.
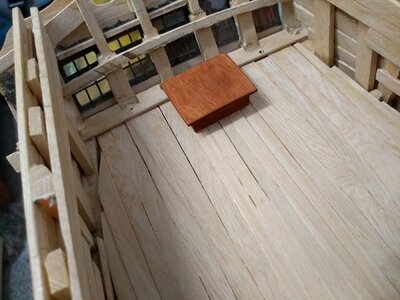
For a break from sanding and building quarter galleries I used some of my bookbinding skills to make an addition for the main cabin.
Whether correct or not, the head of the rudder protruded into the cabin. Some models show a bench along the stern, which would cover this if it was there.
I decided to make a scale chart table instead. 4ft x 2ft (1" x 1/2")

The wood is spirit dyed.

Added very thin green leather and gold tooled in genuine gold leaf. I should have used an even finer gold tool. Scale keeps catching me out !!

Printed a chart of the Western Islands - Azores - from 1770's, made a set of brass dividers and it's back to shipbuilding.

I love model building!!
Whether correct or not, the head of the rudder protruded into the cabin. Some models show a bench along the stern, which would cover this if it was there.
I decided to make a scale chart table instead. 4ft x 2ft (1" x 1/2")
The wood is spirit dyed.
Added very thin green leather and gold tooled in genuine gold leaf. I should have used an even finer gold tool. Scale keeps catching me out !!
Printed a chart of the Western Islands - Azores - from 1770's, made a set of brass dividers and it's back to shipbuilding.
I love model building!!
Attachments
Today I've started installing the gun deck scuppers.
At 1:48 scale the scuppers are made from brass tube 1.57mm outside diameter.
First I flared the end with a pricker, then flattened slightly with light taps with a hammer.


Twenty-three to go. Having fun !
At 1:48 scale the scuppers are made from brass tube 1.57mm outside diameter.
First I flared the end with a pricker, then flattened slightly with light taps with a hammer.
Twenty-three to go. Having fun !
Port side scuttles completed and that's enough for one day.

Well, you were right Maarten,Hi Ian,
You can make the rims of your steering wheel on the lathe. First create the correct outer diameter. Then from the front side you hollow it out until you have the correct rim thickness. At last you cut it off and you will have a perfect rim in a fraction of the time when you have to do it by hand.
I made both rims today on my small Chinese lathe. The wood is Persimmon. Very hard and no visible grain. I've polished a test piece with Linseed and Turpentine and think I might use those just for this wheel when it is assembled.


