- Home
- Forums
- Ships of Scale Group Builds and Projects
- HMS Alert 1777 1:48 PoF Group Build
- HMS Alert 1777 1:48 Group Build Logs
You are using an out of date browser. It may not display this or other websites correctly.
You should upgrade or use an alternative browser.
You should upgrade or use an alternative browser.
HMS ALERT 1777 cutter POF by shota70 [COMPLETED BUILD]
- Joined
- Apr 20, 2020
- Messages
- 5,182
- Points
- 738

Drogi Mirek,Witaj
Piękne zrobione armaty bardzo mi się podobają .Pozdrawiam Mirek
bardzo Ci dziękuję za wszystkie słowa wsparcia i komplementy, to budujące i pomocne, przyjacielu
Dear Mirek, thank you very much for all the words of support and compliments, it is both encouraging and helpful,my friend
- Joined
- Apr 20, 2020
- Messages
- 5,182
- Points
- 738

Happy New Year Shota! Please don't apologize for slow progress - sometimes we can only do what we can do. When I build, I also need proper time to sit down and work slowly - hasty and rushed work invariably turn into a mess.
Heinrich, my dear friend
I completely agree with you, our hobby requires both patience and applications. Thank you very much for all the words of encouragement and compliments, it helps me.
I wish you a happy and sweet new year and success in fulfilling all your wishes
- Joined
- Apr 20, 2020
- Messages
- 5,182
- Points
- 738

Hello dear friends
After two days of holiday meals and guests, I continued to prepare the blocks that required for the cannon carriages and the construction of the hooks required for the connections to the ship's hull and the carriages.
I chose a 2.6mm block for the single hole/rope ones and a 3.7mm block for the two hole/rope ones.
The blocks are made of boxwood.
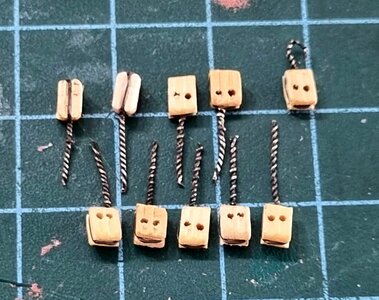
After I got a little tired of this Sisyphean work, I started working on a new and refreshing topic- assembly of ATOMSTACK A5 M40 Laser Engraving Machine Wood Cutting Upgraded Design Desktop DIY Laser Engraver.
You are most welcome to take a look at the new topic I opened and contribute your experience and knowledge, which will be welcomed and gratefully received.
After two days of holiday meals and guests, I continued to prepare the blocks that required for the cannon carriages and the construction of the hooks required for the connections to the ship's hull and the carriages.
I chose a 2.6mm block for the single hole/rope ones and a 3.7mm block for the two hole/rope ones.
The blocks are made of boxwood.


After I got a little tired of this Sisyphean work, I started working on a new and refreshing topic- assembly of ATOMSTACK A5 M40 Laser Engraving Machine Wood Cutting Upgraded Design Desktop DIY Laser Engraver.
Purchase and assembly of ATOMSTACK A5 M40 Laser Engraving Machine Wood Cutting Upgraded Design Desktop DIY Laser Engraver
Hello dear friends :) I opened the current topic to share with you the latest purchase that arrived about two days ago. Today after the holiday meals and the guests I was free to assemble it together. The machine purchased on Ali express at a good price for the capacity and output it is...
shipsofscale.com
- Joined
- Apr 20, 2020
- Messages
- 5,182
- Points
- 738

good evening dear friends
Tonight I had felt Satisfaction from the creative craft of the model,
because after weeks of work I was able to install the first cannon carts to the ship's deck with all the required rope and block system.
I would like to make a reservation and say that this is an initial installation for the sake of illustration while the final and permanent adjustments will be made when all 12 assemblies are ready.
I admit that it made me happy and motivated for the rest of the way

good night wishes and sweet dreams
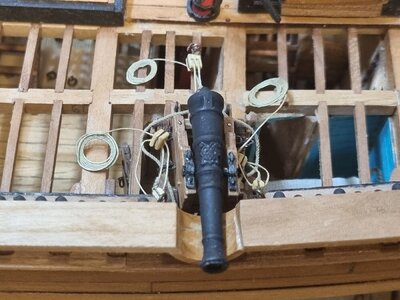
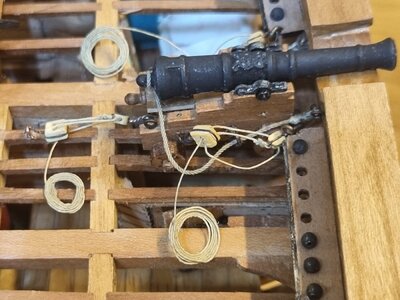
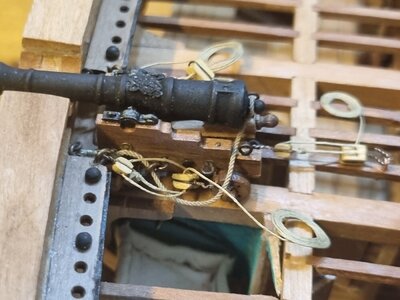
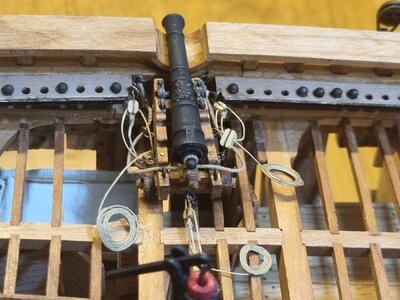
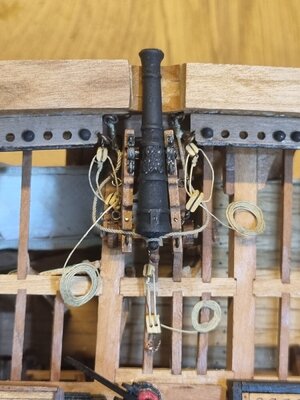
Tonight I had felt Satisfaction from the creative craft of the model,
because after weeks of work I was able to install the first cannon carts to the ship's deck with all the required rope and block system.
I would like to make a reservation and say that this is an initial installation for the sake of illustration while the final and permanent adjustments will be made when all 12 assemblies are ready.
I admit that it made me happy and motivated for the rest of the way
good night wishes and sweet dreams


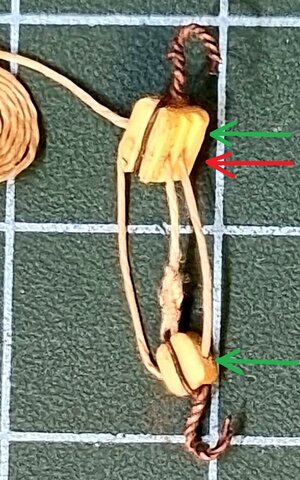
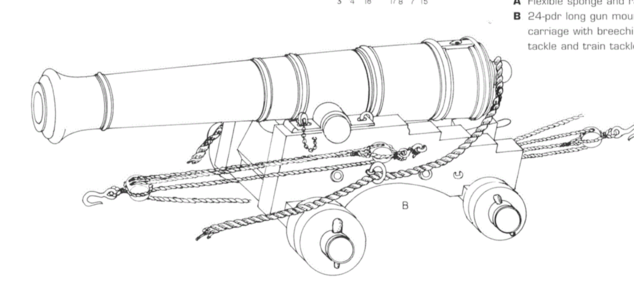
Hello, my friend! I am really glad that you have been delighted with the gun rigging. Rigging the gun is not easy. What I'd like to point out (if I am allowed), is that some of the blocks are installed opposite way. Pretend that you are the gunner and responsible for the right training tackle. Your task is to move the gun to the firing position. Take the end of the rope in your hand and try to pull... what happened? Hopefully, you will not hurt your palm.  In the way you assembled the train tackle, the shaves in the double block will not move (at all). I purposely let you pull the rope (virtually), so you could better understand how the block system works. Now take a look at the drawings below.
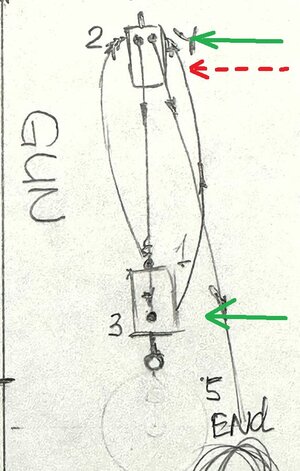
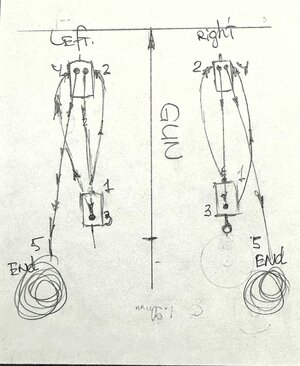
The hook with the single block connected to the eyebolt on the carriage side, The end rope passes through the first shave on the double block attached to the eyebolt near the gun port (left and right sides). The next, rope passed thru the single-block's shave and then thru the second shave in the double-block. The end is collied for later use. Here is my sketch.
I think with the skills you have, corrections will not take a long time Should you accept to make the change...

The hook with the single block connected to the eyebolt on the carriage side, The end rope passes through the first shave on the double block attached to the eyebolt near the gun port (left and right sides). The next, rope passed thru the single-block's shave and then thru the second shave in the double-block. The end is collied for later use. Here is my sketch.

I think with the skills you have, corrections will not take a long time
- Joined
- Apr 20, 2020
- Messages
- 5,182
- Points
- 738

Jim my dear friendHello, my friend! I am really glad that you have been delighted with the gun rigging. Rigging the gun is not easy. What I'd like to point out (if I am allowed), is that some of the blocks are installed opposite way. Pretend that you are the gunner and responsible for the right training tackle. Your task is to move the gun to the firing position. Take the end of the rope in your hand and try to pull... what happened? Hopefully, you will not hurt your palm.In the way you assembled the train tackle, the shaves in the double block will not move (at all). I purposely let you pull the rope (virtually), so you could better understand how the block system works. Now take a look at the drawings below.
View attachment 395478
The hook with the single block connected to the eyebolt on the carriage side, The end rope passes through the first shave on the double block attached to the eyebolt near the gun port (left and right sides). The next, rope passed thru the single-block's shave and then thru the second shave in the double-block. The end is collied for later use. Here is my sketch.
View attachment 395479
I think with the skills you have, corrections will not take a long timeShould you accept to make the change...
Thank you very much for the guidance and the detailed explanation, I will correct the mistake as soon as possible.
I'm publishing my work so that experts like you can have an opinion and help me develop, and for that I am grateful
- Joined
- Dec 16, 2016
- Messages
- 1,026
- Points
- 493

Hi Shota, Very nice, for me this post along with what Jimsky added is one of the better ones on canon rigging, not easy but with your good photos I might even be able to have a go myself. I’ve never tried to rig canons correctly before, I’ve always gone for a simple and easier rig. Ken.good evening dear friends
Tonight I had felt Satisfaction from the creative craft of the model,
because after weeks of work I was able to install the first cannon carts to the ship's deck with all the required rope and block system.
I would like to make a reservation and say that this is an initial installation for the sake of illustration while the final and permanent adjustments will be made when all 12 assemblies are ready.
I admit that it made me happy and motivated for the rest of the way
good night wishes and sweet dreams
View attachment 395456View attachment 395457View attachment 395458View attachment 395459View attachment 395460
- Joined
- Apr 20, 2020
- Messages
- 5,182
- Points
- 738

Hi Shota, Very nice, for me this post along with what Jimsky added is one of the better ones on canon rigging, not easy but with your good photos I might even be able to have a go myself. I’ve never tried to rig canons correctly before, I’ve always gone for a simple and easier rig. Ken.
my dear friend'sWitaj
Popraw ten takielunek drogi Shoto szkoda żeby tak piękny model miał taką nieprawidłowość. Czasem warto się cofnąć żeby być później zadowolonym . Pozdrawiam Mire
thanks for the support and compliments
I'm taking your words & Jimski's, to my and the mistake will come out/fixed
- Joined
- Apr 20, 2020
- Messages
- 5,182
- Points
- 738

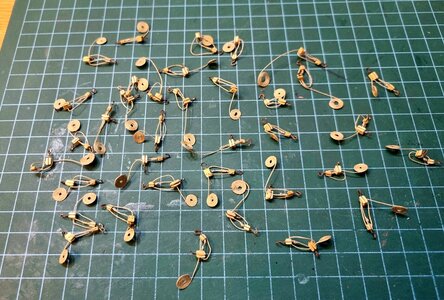
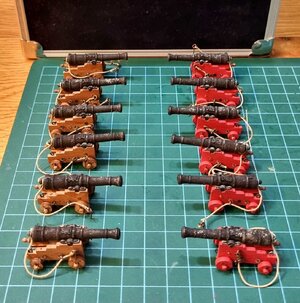
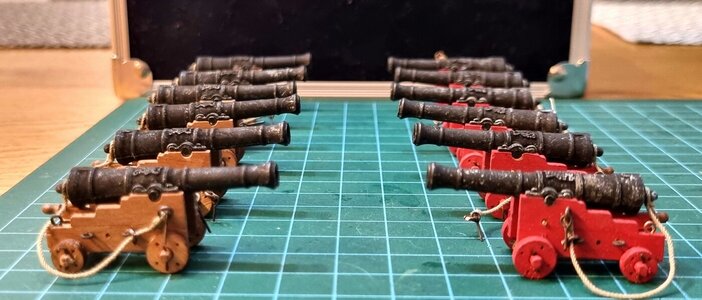
good evening dear friends
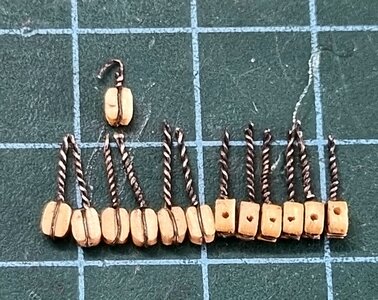
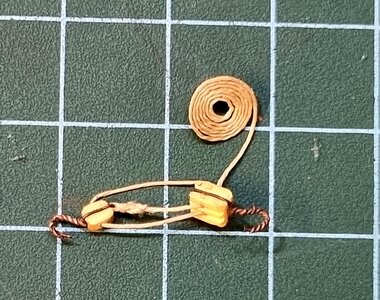
In the last week I continued to work on the set of ropes, blocks and hooks that anchor the cannon carts to the deck and side of the ship.
Since the current model has 12 cannons, I was required to make 32 sets of ropes and blocks, 3 for each cart and cannon.
I also finished installing all the cannons to the carts with the hinges closing the axis of the cannon as well as the rope ring for the rear ball end of the cannons.
I wish you all a pleasant evening


Impressive line-up Shota!
- Joined
- Apr 20, 2020
- Messages
- 5,182
- Points
- 738

thanks my Dear friend PaulImpressive line-up Shota!
Your post is very encouraging!
- Joined
- Sep 3, 2021
- Messages
- 4,277
- Points
- 688

Quite some power play!good evening dear friends
In the last week I continued to work on the set of ropes, blocks and hooks that anchor the cannon carts to the deck and side of the ship.
Since the current model has 12 cannons, I was required to make 32 sets of ropes and blocks, 3 for each cart and cannon.
I also finished installing all the cannons to the carts with the hinges closing the axis of the cannon as well as the rope ring for the rear ball end of the cannons.
I wish you all a pleasant evening
View attachment 396564View attachment 396565View attachment 396566View attachment 396567
Good morning Shota. Awesome and ready for action. Cheers Grantgood evening dear friends
In the last week I continued to work on the set of ropes, blocks and hooks that anchor the cannon carts to the deck and side of the ship.
Since the current model has 12 cannons, I was required to make 32 sets of ropes and blocks, 3 for each cart and cannon.
I also finished installing all the cannons to the carts with the hinges closing the axis of the cannon as well as the rope ring for the rear ball end of the cannons.
I wish you all a pleasant evening
View attachment 396564View attachment 396565View attachment 396566View attachment 396567
- Joined
- Apr 20, 2020
- Messages
- 5,182
- Points
- 738

my dear friend, thanks for your kind words and complimentsGood morning Shota. Awesome and ready for action. Cheers Grant
Much, much better! Great job, my friend. I am glad you chose to re-do!!


