
Anyone ever use "bondo" for filler? Thanks

You are using an out of date browser. It may not display this or other websites correctly.
You should upgrade or use an alternative browser.
You should upgrade or use an alternative browser.

On metal but not on wood. I use Dap-Pink
in the past, I've always used Dap all purpose wood filler. The stuff that comes in a tube and cleans up with water.On metal but not on wood. I use Dap-Pink
They make a pink one now that turns white as it dries so you know when it's OK to sand.
Are you referring to Dap dex spackling with the pink lid?They make a pink one now that turns white as it dries so you know when it's OK to sand.
Yup, that's it.... home depot.... thank youAre you referring to Dap dex spackling with the pink lid?

This stuffAnyone ever use "bondo" for filler? Thanks
Attachments
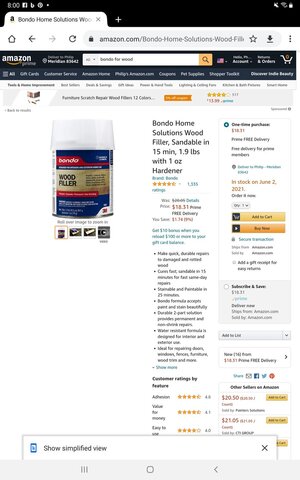

From my limited experiences, with two strip canoes and my Bluenose 64 scale model, I learned that if I took time and care in filing/shaping planks with repeated dry fit trials It is possible to have very tight plank edge joints which can be filled with a light rubbed application of Titebond and then sanded in an orbital manner with the sawdust filling the narrow crack. Tapering the plank edges or concave and convex hull areas is often needed. With finish sanding the glue and sanding dust rubbed in disappears from view, except for a macro photo. It takes longer but time and engagement is what the hobby is for me and not rushing things to be smeared or plastered over with filler. Even a second layer of planking has to be tightly laid and finished . . . unless you are going for a painted finish. Just a thought. Rich (PT-2)This stuff
I have this left over from doing wood repairs on rotted window trim on the house. Was thinking about trying it. Any ideas.?This stuff
I pretty much do all the above, except the titebond glue.From my limited experiences, with two strip canoes and my Bluenose 64 scale model, I learned that if I took time and care in filing/shaping planks with repeated dry fit trials It is possible to have very tight plank edge joints which can be filled with a light rubbed application of Titebond and then sanded in an orbital manner with the sawdust filling the narrow crack. Tapering the plank edges or concave and convex hull areas is often needed. With finish sanding the glue and sanding dust rubbed in disappears from view, except for a macro photo. It takes longer but time and engagement is what the hobby is for me and not rushing things to be smeared or plastered over with filler. Even a second layer of planking has to be tightly laid and finished . . . unless you are going for a painted finish. Just a thought. Rich (PT-2)
Any slow setting glue would work allowing time for the sanding to rub in the dust. RichI pretty much do all the above, except the titebond glue.
Sounds more like it would make one big messAny slow setting glue would work allowing time for the sanding to rub in the dust. Rich
Not at all. it is a very simple and clean process when the glue is applied with a hypodermic needle and syringe and localized sanding rubs it in. No mess at all and helps to fair the area out with the added light sanding. Rich.Sounds more like it would make one big mess
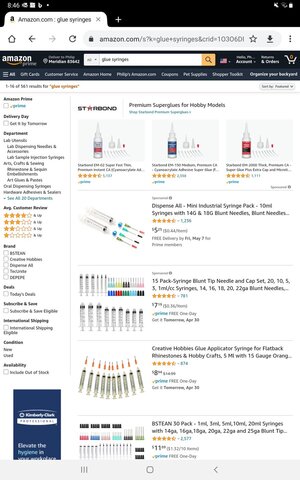
hypodermic needle. and I can imagine a large bore syringe.... Where in the heck am i supposed to get one of those.

As PT 2 wrote. If cracks isn't big, I place wood glue with my finger on the Crack and light sand the section. The Crack has now the filler of exactly the same wood color.
If you are going to paint, then wood filler for carpentry will do the job. Sand and paint.
If you are going to paint, then wood filler for carpentry will do the job. Sand and paint.
hypodermic needle. and I can imagine a large bore syringe.... Where in the heck am i supposed to get one of those.
Attachments
...well, now I've seen everything...

I have used 'Bondo' on miniature solid hulls that will be painted.
.... this one will be double planked
Go to your pharmacy store and ask for 3 ml syringe with a 1 1/2" x 1.2 mm needle. Those cost me a buck apiece so I bought 5. Using a water solubabale glue makes hot water cleaning periodicall of both the needle cover and the needle fairly simple to be used over and over. I did grind the point off for a flat end for general use but the sharp needle end works for filling narrow planking cracks for the over-sanding procedure. A thin wire can clean it out when the glue sets up in longer periods of not being used. The best solution to that was a set of fine reamers from Germany, a Broach Set of six, BRO-174.00, which are a square shape and clean out things very well. Rich (PT-2)hypodermic needle. and I can imagine a large bore syringe.... Where in the heck am i supposed to get one of those.