You are using an out of date browser. It may not display this or other websites correctly.
You should upgrade or use an alternative browser.
You should upgrade or use an alternative browser.
I believe that they are both are for lacing up your dead eyes off the model, and the lower Jig is adjustable, hope this helps,
Best regards John,
Best regards John,
What I do not understand is how to put on the bracing iron plate on one of the deadeyes after you laced up a pair of deadeyes.
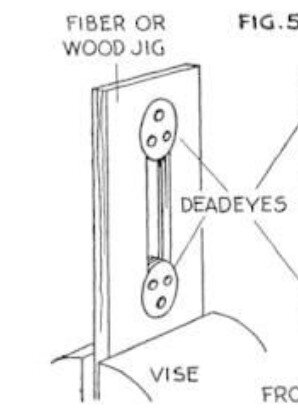
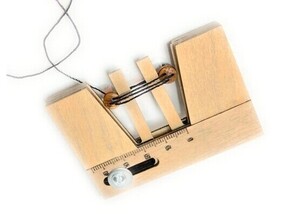
I think these gadgets are a solution looking for a problem. Just use home made jigs and tension the stays first, then lash the deadeyes, and they will all be even and have equal tension.I found these tools online but I don't understand how or where you would them.
View attachment 373495
View attachment 373496
With jig in place, holding the correct distance between the deadeyes, tension the shroud around the upper deadeye and tack it with glue to hold it in place.
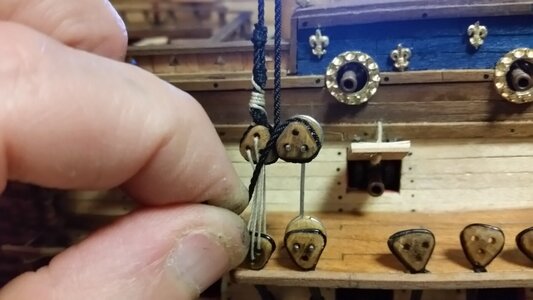
Seize the shroud lines together at the top of the deadeye, and seize the bitter end to the standing part higher up. Then remove the jig and lace the deadeyes in the proper fashion like the finished one on the right. The jig makes it easy. Make different sized jigs for the topmast and topgallant deadeyes made from smaller deadeyes and wire, made fast with CA glue.
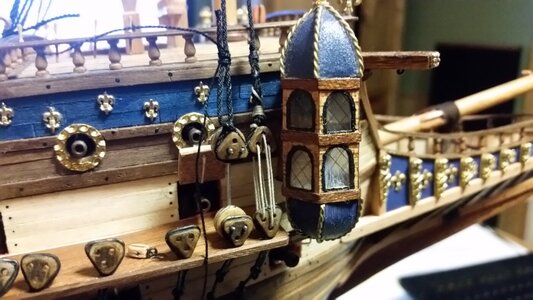
I have no idea how you would attach the laced deadeyes to the ship. I've been using homemade jigs but was curious when I saw the product on Amazon for less then $20
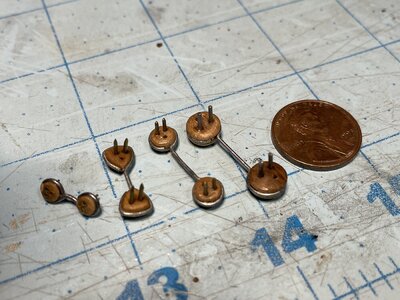
These are my deadeye tools. You make them from deadeyes of various sizes, pins or brass wire, paperclips reshaped around the deadeyes using hand tools, and CA glue to prevent the deadeyes from rotating in the wire. Nothing fancy, but very useful. The prongs have just enough friction such that a deadeye slipped over them won't slide off easily. These are for models 1:100 scale up. I will need one or two larger ones for 1:75 scale.

Last edited:
Nice. I did notice that the largest one has the "point" of the triangle pointing out while the smaller ones are pointing in. I was under the impression that they all pointed the same way. Can you enlighten me?
That's what you call, in the ship modelling business, a mistake. The jig was made a little too long, so to hold the deadeyes a bit closer together, the deadeyes with the pins in the jig were rotated 180 degrees to bring the pins closer together. It was faster than making a new jig, and it worked, just as long as you don't orient the deadeyes on the model in the same direction!Nice. I did notice that the largest one has the "point" of the triangle pointing out while the smaller ones are pointing in. I was under the impression that they all pointed the same way. Can you enlighten me?
Last edited:
Ah, mistakes, I've made a few, but then again, I've made a lot.
With apologies to Frank Sinatra.
With apologies to Frank Sinatra.
Well at least with my mistakes I done them my way,
My technique evolved to working without jigs to where I partly tie off the shroud leaving room for adjustment. Then I lace the deadeyes up and adjust both lines iteratively until I get the spacing I like, just eyeballing it.
I do have a question though. Is it the lacing between the deadeyes that provides the adjustment for the tension in the shrouds? You can see where I’m going with this question.
I do have a question though. Is it the lacing between the deadeyes that provides the adjustment for the tension in the shrouds? You can see where I’m going with this question.
Such jigs simplify lacing the lanyards but handling them after removal from the jig to attach shrouds and hounds is not easy - I've tried it and just end up with a tangle. Devices for spacing the deadeyes after attaching shrouds/hounds are not much use unless variable or numerous: if deadeye rows are to be horizontal then the spacing measured along the line of the lanyards will vary a lot over, say, ten differently angled shrouds. After several models I have settled on the sequence: 1) fix the lower deadeyes to the chain plate. 2) Fix a deadeye to one end of a shroud (on the bench) then lace it to a lower deadeye. 3) pass the other end of the shroud round the mast and form an adjustable loop at the other end : eg. double it back and tie a temporary seizing. 4) secure a deadeye on a widget (eg. bent wire or strip of wood with two pins in) to maintain its orientation. 5) Put the glue-smeared dead eye in the loop and adjust the height . 6) Tie the lanyard to seize the loop just above the upper deadeye. 7) When glue has set, remove widget and thread the lanyard through upper and lower deadeyes.I found these tools online but I don't understand how or where you would them.
View attachment 373495
View attachment 373496
First you have chainplates and lower deadeyes finished and assembled onto the chainwales. Then you attached the shrouds at the top first in pairs, then use the jig at the bottom to tension them and lace the deadeyes. The jig is there to set the length and tension of the shroud, not set the distance between the deadeyes. To get the top deadeyes parallel to the waterline and even with other deadeyes, you tighten the lacing to the proper amount. Doing it this way ensures even tension of the shrouds and there is no fighting a tangle of hanging lines. But, you must work in the manner most comfortable for you.Such jigs simplify lacing the lanyards but handling them after removal from the jig to attach shrouds and hounds is not easy - I've tried it and just end up with a tangle. Devices for spacing the deadeyes after attaching shrouds/hounds are not much use unless variable or numerous: if deadeye rows are to be horizontal then the spacing measured along the line of the lanyards will vary a lot over, say, ten differently angled shrouds. After several models I have settled on the sequence: 1) fix the lower deadeyes to the chain plate. 2) Fix a deadeye to one end of a shroud (on the bench) then lace it to a lower deadeye. 3) pass the other end of the shroud round the mast and form an adjustable loop at the other end : eg. double it back and tie a temporary seizing. 4) secure a deadeye on a widget (eg. bent wire or strip of wood with two pins in) to maintain its orientation. 5) Put the glue-smeared dead eye in the loop and adjust the height . 6) Tie the lanyard to seize the loop just above the upper deadeye. 7) When glue has set, remove widget and thread the lanyard through upper and lower deadeyes.
That second tool is USELESS. It breaks after 3 uses. Not will built and cheap. IMO
TI believe that they are both are for lacing up your dead eyes off the model, and the lower Jig is adjustable, hope this helps,
Best regards John,
- Joined
- Apr 2, 2021
- Messages
- 184
- Points
- 113

Oh yeah!These are my deadeye tools. You make them from deadeyes of various sizes, pins or brass wire, paperclips reshaped around the deadeyes using hand tools, and CA glue to prevent the deadeyes from rotating in the wire. Nothing fancy, but very useful. The prongs have just enough friction such that a deadeye slipped over them won't slide off easily. These are for models 1:100 scale up. I will need one or two larger ones for 1:75 scale.
View attachment 373953
Yep I made the same tools. They work good!
"Dooby, dooby, doo!" - I guess that was when he forgot the lyrics!Well at least with my mistakes I done them my way,
That second tool is USELESS. It breaks after 3 uses. Not will built and cheap. IMO
T
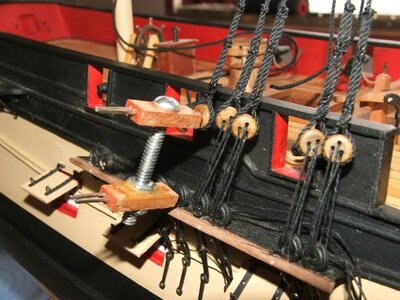
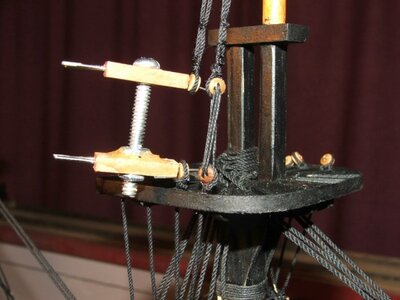
This is couple of small jigs that I made they come in handy,First you have chainplates and lower deadeyes finished and assembled onto the chainwales. Then you attached the shrouds at the top first in pairs, then use the jig at the bottom to tension them and lace the deadeyes. The jig is there to set the length and tension of the shroud, not set the distance between the deadeyes. To get the top deadeyes parallel to the waterline and even with other deadeyes, you tighten the lacing to the proper amount. Doing it this way ensures even tension of the shrouds and there is no fighting a tangle of hanging lines. But, you must work in the manner most comfortable for you.
- Joined
- Oct 25, 2022
- Messages
- 5
- Points
- 3

These jigs seem like they'd be more of a hassle than a solution. I haven't tried one yet however, but the shrouds are next on my "Royal Caroline 1749" (Mantua) so I'm researching ways to do it well. This may be it but I'm not so sure. I considered a build log but not sure.
I like the variable nature of these jigs. How about adding another wooden block that goes under the chain plate to create a way aof clamping it? Or perhaps A thicher lower block with a slot cut in it to acheive the same end.


