CRAZY IDEA - Great Stuff Expanding Foam for Hull Fillers

All good but I pose the question
1. Time to break down… 20 years?
2. How to fix (all)?
3. Adhesive for planking?

Glue alone is not recommended.
When I
1st started … I have 1 model with planking coming away for using industrial can-acrylic to …..

Now we’re ever possible I use cow glue, pin, pva.
Acid must be looked at or …
Again I try to get acid free card etc…

If your model is x years in your life time : ok.

Nowadays building materials is like the longevity of a building was 100 years now 30 / 40 years if lucky. Upvc windows pure virgin plastic to recycled to semi see the difference in a few years….

I’m unsure if this method is fast?
Using wooden blocks or ribs in my opinion is number 1.
Again depending on fully planked or inside show…

But
It’s a practice I’ve seen - especially for those radio controlled enthusiasts…
 
Hmmm…I used to use balsa blocks to fill in between hull bulkheads mainly because that was the prevailing wisdom among SoS forums. The last few models (POB 76ers of various scales) I have abandoned the effort to use fill blocks and actually have been just fine with the planking. I have discovered that a well shaped plank fits across the bulkheads nicely especially the sharp curves of a typical bow. So I make sure I pre-curve the plank so that when it is glued on there is no stress trying to pull the plank away from the bulkhead. Another part of this is well prepared bulkheads faired nicely so that there is maximum glue surface on the bulkheads for the planks. Extra effort in prepping the bulkhead fairing and setting the curves in the planks has eliminated the need for fill blocks for me.
 
Just found your thread. Seems you've got quite a bit of advice, all of it really good. I've tried this on a model once. The comment on controlling the expansion is one that is key, especially in small tight spaces. A fraction of a second too long on that nozzle and you've got a big foamy mushroom/wart growing out of your hull. Also, as stated, you're going to test it. Make the test as close to your application as you can. Two other points to offer. Foam can be found in different densities. Go as light as you can. The less dense it is you will find the easier it is to cut/sand. Use release agents where you don't want the foam to adhere to.
I don't think I'd mind the big foamy mushroom/wart, as it could be lopped off easily. And my intention is to use a foam cutter, which should work great, so I'd really prefer a denser material, but I'm not sure it exists in expanding foam (at a reasonable price, anyhow).
I had a summer job, between college semesters my freshman year where I sprayed this stuff commercially. After spraying a few million gallon crude oil tanks in Jersey City, New Jersey, that was enough for me.
I can understand that.
Personally, I wouldn't try it again on a model. And interestingly enough I just had a conversation with a materials specialist at a local distributor of special materials, Reynolds Advanced Materials. I shared my needs and she recommended a light weight epoxy putty. I specifically asked her about expanding foam, which they did have and she steer me away from the foam, citing expansion challenges. She recommended epoxy putties.

Here is their putty page.

I went with the Free Foam Air putty, which is the lightest density. I tested it and it is very workable for a couple of hours and fully cures in 24 hours. It sands well and can be sculpted with a variety of tools. I will be using it to fill voids in my ship's bulkheads. I will be using it to fill bulkheads inside the hull of my ship to support a false deck. Supporting a false deck or supporting outer hull planks, the principle is the same. I went with the trial size, which the representative conservatively estimated would fill 95 cubic inches. Trial size was like $36.

View attachment 362318
Interesting stuff. Looks like this doesn't really expand, but is moldable, and relatively lightweight, about the weight of wood. Pretty expensive, though, and would have to be stuffed into place, hopefully adhering to bulkheads, rather than filling them. Not doubt a sturdier solution, though.
 
Hmmm…I used to use balsa blocks to fill in between hull bulkheads mainly because that was the prevailing wisdom among SoS forums. The last few models (POB 76ers of various scales) I have abandoned the effort to use fill blocks and actually have been just fine with the planking. I have discovered that a well shaped plank fits across the bulkheads nicely especially the sharp curves of a typical bow. So I make sure I pre-curve the plank so that when it is glued on there is no stress trying to pull the plank away from the bulkhead. Another part of this is well prepared bulkheads faired nicely so that there is maximum glue surface on the bulkheads for the planks. Extra effort in prepping the bulkhead fairing and setting the curves in the planks has eliminated the need for fill blocks for me.
And an advantage is that there are a variety of clamps available for planking that fit onto bulkheads.
 
If nothing else, I'm sure this thread will supply some laughs. But still, it's an idea.

I am building the Ragusian Carrack by MarisStella, watching Olha's videos, etc., and she show, and everyone suggests, gluing a lot of support blocks between bulkheads to help support and glue planking (single planking in particular), and especially around large changes in curvature like the bow and stern. Modelers have used all kinds of wood for this, usually soft wood, and I've read about people using balsa as well. I think I remember someone saying sheet foam could be used, although that might be more wishful thinking.

Anyhow, I wonder about the possibility of using Great Stuff expanding foam (considered a low expansion foam) to fill the areas between the bulkheads. Yeah, I'm serious. I know, I know, quit laughing and pay attention. :rolleyes: Great stuff sticks to things very well (like members of a built-up hull), can be easily cut and sanded, even painted and filled. Using on a hull such as this:
View attachment 361616

it would fill many nooks and crannies (probably too much, so I may have to block off some areas to prevent it from going there), attach itself really well. Hopefully, careful filling would result in it standing proud of the bulkheads, and then that material could be easily cut off. My son has an electric wire foam cutter which would work quickly and more smoothly than sanding or using a Dremel and with less mess. Of course, final shaping would have to be by sanding.

Foam core wings and such are used for RC airplanes, and when covered with a thin wood or plywood are extremely strong. This method, I think, would actually help stiffen the hull and make it very strong, especially once covered with 1.5mm walnut strip planking.

Yeah, I know I've come up with this idea because I'm lazy. The idea of measuring and cutting numerous wood blocks to fit into the hull, then shape them all, does not sound like fun. And I know there isn't always an easy way out, but was wondering if anyone thinks this has a chance in Hades of working out?
I'm always experimenting and looking for new opportunities to build models...
But what goal are you pursuing to fill the spaces?
- Just level the bulkheads - it is enough to use insulating foam from the nearest Building materials store.
- You can also use balsa for two-layer planking or small models with small distances between bulkheads.
- or Do you need to form a surface for perfectly even planking and at the same time increase the area for gluing the planks (especially important for models with one layer of planks) - then it is better to use linden. Unfortunately, it is not available in the USA and the analogue is basswood, which I was not satisfied with because it is heavy and hairy and has a very bad habit of peeling... That is why I started using pine - the hull does not add much weight, it is even easier to sand than basswood and glues well on PVA glue!

Specifically in your case, I would recommend completely filling the spaces with wood. Because this model has a very specific planking. You will need to be able to clamp the plank in critical places to get the right bend, etc... Drive a nail with a clamp or bend with a soldering iron directly on the hull. You can't do that on foam!
 
All good but I pose the question
1. Time to break down… 20 years?
I understand that will will not break down over time if not exposed to UV rays (outdoors), in which case it has to be protected or coated. None of the foam on the model should be exposed.
2. How to fix (all)?
3. Adhesive for planking?

Glue alone is not recommended.
Any planking I do will be held on by glue alone, no doubt white glue. White glue also holds on expanding foam, although it could never be as strong as on solid wood.
When I
1st started … I have 1 model with planking coming away for using industrial can-acrylic to …..

Now we’re ever possible I use cow glue, pin, pva.
Acid must be looked at or …
Again I try to get acid free card etc…
Hopefully, any acid effects would be inside the model and not visible.
If your model is x years in your life time : ok.

Nowadays building materials is like the longevity of a building was 100 years now 30 / 40 years if lucky. Upvc windows pure virgin plastic to recycled to semi see the difference in a few years….

I’m unsure if this method is fast?
Fast to "install", fast to remove excess. Fast to correct problems? Maybe not.
Using wooden blocks or ribs in my opinion is number 1.
Again depending on fully planked or inside show…

But
It’s a practice I’ve seen - especially for those radio controlled enthusiasts…
 
I guess I haven't seen much to sway me back to trying foam again after my last debacle. It's balsa first and soft pine second both of which shape and sand well plus have a long life span with no degradation. Expanding foam - your choice but never again mine for building models
 
Thank you so much for posting, Olha. I really do appreciate it1
I'm always experimenting and looking for new opportunities to build models...
But what goal are you pursuing to fill the spaces?
- Just level the bulkheads - it is enough to use insulating foam from the nearest Building materials store.
I thought about that first, but thought the foam would be quicker and fit much better.
- You can also use balsa for two-layer planking or small models with small distances between bulkheads.
I would be tempted to use balsa, although this is only a single planked model and that is all the material I have. I think I will be lucky to accomplish this planking once, let alone twice.
- or Do you need to form a surface for perfectly even planking and at the same time increase the area for gluing the planks (especially important for models with one layer of planks) - then it is better to use linden. Unfortunately, it is not available in the USA and the analogue is basswood, which I was not satisfied with because it is heavy and hairy and has a very bad habit of peeling... That is why I started using pine - the hull does not add much weight, it is even easier to sand than basswood and glues well on PVA glue!
I guess I'm just lazy. Sanding seems to take forever, especially if the pieces of wood are not close to the right shape, which they won't be. I know you are able to do it, but the idea of sanding away most of pine 2x4's by hand seems impossible. I know I would try to use a power sander in some way, and probably ruin it. I have actually sculpted items from foam using an electric wire cutter, and it was neat and quick and worked really well. Of course, it wasn't a ship model. But I imagined overfilling the areas between the bulkheads and using the wire cutter to get close to the final profile neatly and with less work. I hoped that the foam would stiffen and strengthen the frame (I'm sure it will), but that I would still be able to plank it as I would a single-layer bulkhead hull, since PVA glue works well with it.
Specifically in your case, I would recommend completely filling the spaces with wood. Because this model has a very specific planking. You will need to be able to clamp the plank in critical places to get the right bend, etc... Drive a nail with a clamp or bend with a soldering iron directly on the hull. You can't do that on foam!
I certainly agree that I couldn't use a soldering iron with foam. I think if I were to use pine, I would have to remove most of the added bracing I have already placed in the structure. This is the structure I have as it is now:
1678760093471.png
1678760114186.png
This is a great concern to me. I guess I want my cake and eat it too. I want great results with less work. This may not work out well for me.

Again, thank you for your thoughts.
 
Last edited:
Signet…from the pictures posted above of the hull bulkheads I suggest not trying to add filler blocks. The bulkheads appear to be faired well and the bow and stern curves are not that severe. Just start laying down a first layer planking as is. You should be fine with no filler blocks!
 
Signet…from the pictures posted above of the hull bulkheads I suggest not trying to add filler blocks. The bulkheads appear to be faired well and the bow and stern curves are not that severe. Just start laying down a first layer planking as is. You should be fine with no filler blocks!
I'm considering the same thing (dreamt about it last night). I really liked the idea of foam, but that does limit the type of clamps used. The bulkheads in this kit are thin and fairly fragile; I've not had consistent luck puncturing them with pins just playing around. So I'm thinking I need to use clamps that clamp to the sides of the bulkheads, and I can't do that if I fill with foam or wood.
 
Try using CA gel. A drop at each bulkhead point…lay down the plank…hold in place with your fingers for a ten count…the plank should glue in place. That has been my experience. I rarely use pins or clamps. I start gluing a plank strip on the first two or three bulkheads…hold in place…then add drops of glue to the remaining bulkheads for the length of the plank. The down side to this approach is you need patience to hold down a plank long enough for the CA gel to cure…usually a ten to fifteen count. Anyway…that is how I have planked out my last few kits…
 
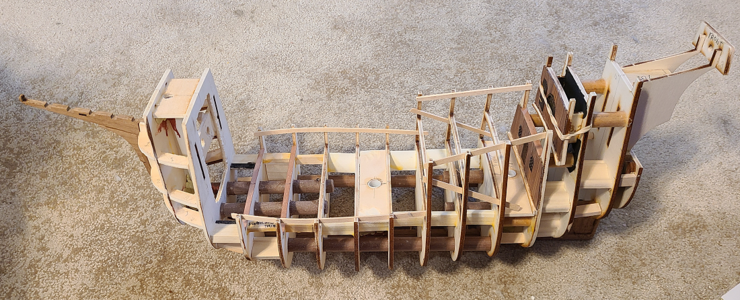
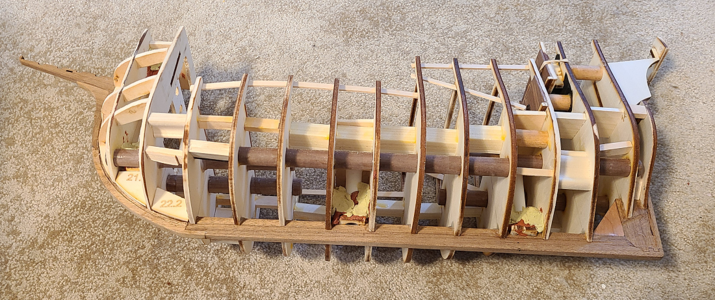
I've decided to try the using Great Stuff expanding foam to fill in between the bulkheads. The main purpose is to strengthen the structure and provide a backing for additional glue to adhere when gluing planks in place. The secondary purpose is that it seems like a neat idea, and wanted to try it. This is against most advice I have been given, including my wife's who said if this destroyed my kit, I wasn't getting another one.

My intention is to glue the planks to the bulkheads and/or foam, using white glue if possible, CA glue on bulkheads only if necessary, or maybe even a combination of the two (CA on bulkheads, white glue on foam). After applying the foam between bulkheads, I will use a hot wire foam cutter, primarily, to remove the majority of foam extending from the bulkheads, and sand to a final contour. As with similar filling using balsa or other wood, it doesn't need to fill every gap, just provide as much support as reasonably possible.

Going in, I wasn't sure how much foam I would actually use; if it starts running everywhere and messing stuff up, I'll stop. I'll start small, especially in highly curved areas needing support more, and just see what happens.

I started by trying to protect any finished areas, or large areas into which I would prefer the foam not go. I /think/ I can remove the foam from anywhere, but it will be neater and take less time if it is mostly where I want it to be. So I need to protect everything, even though I may not get that far. I started with the area above the main deck. I first took a piece of cardboard and located along its length the location of the bulkheads:
1679249784774-png.363757

Then I measured the inside width between inside of bulkheads, divided by 2, and marked that distance out from the edge of the cardboard. Then measured the extreme width, and did the same, and finally cut the piece to that outline.

The measured and cut cardboard fit like this:
1679249902452-png.363758

I traced this outline for the other side, but rather than cutting out for the bulkheads, I just bent the tabs up, and put both into place:
1679249970084-png.363759


I protected and glued into place the finished bulkhead 17, with doors, windows and planking, into place. I really don't want foam on any finished areas:
1679250115942-png.363760


You may recall I inserted pieces of plastic tubing for the 3 major masts to fit into, but the bowsprit simply goes through 2 holes in 2 of the bulkheads. When foaming this critical bow area, the internal portion of the bowsprit is exposed to any foam or filler:
1679250289186-png.363762

And yet, the bowsprit had to be in place when doing the foaming to allow it to be positioned correctly later (okay, I could have drilled through the foam, but didn't think of that then). To keep the foam from contacting the bowsprit and "gluing" it in place, I wrapped the end of the bowsprit in waxed paper and taped it in place:
1679250719956-png.363781

Even though the waxed paper is loose, by rotating clockwise during insertion, it stays in place fine.

This fuzzy picture shows the various protections in place, to keep foam away from things I don't want it to touch, or just limit its migration:
1679250831330-png.363783

The stern has been covered with tape as well. I used painters tape on areas which had been finished, and masking tape on areas that were not.

My intention was to do the foaming in the garage, where if it (or I) went wild, it would cause less damage (provided I kept it away from my wife's car, in which case I'd be moving out anyhow). But high temperatures today and in the near future are in the 50s F, and Great Stuff prefers closer to 75F. So I used a large trash bag to protect my desk, put on old clothes, and set up ready to foam away:
1679251024026-png.363784

1679251046483-png.363785


I began by foaming the bow area, around the bowsprit, which is most curved, knowing it needed the most support. My thought is to foam a little at a time, slowly, and stop if I ran into trouble (or preferably before it):
1679251148422-png.363786

One thing that surprised me is that the foam did not expand as much as I thought it would. I tried to keep the foam more or less level with the bulkheads.

I didn't take any more photos until I was finished; I ran out of foam, actually, not quite filling areas along amidships as I had intended, but I noticed that the foam had continued to expand, especially at the bow:
1679251711131-png.363787

1679251729953-png.363788


An hour or two later, as I write this, I notice the foam is still expanding:
1679251775743-png.363789

Looks like most areas will be filled when it's done.

I had intended to not post any of this until at least tomorrow, after which I would see the final effects of the foam to my model, and also show the removal of it, hopefully ending up with an excellent-looking result.

But - if I have to wait, so do you. I'm only posting the result to this point. I will discover the result tomorrow, and possibly/probably begin removal of excess foam then. So we will both find out, after tomorrow, whether I am continuing this build of a Ragusian Carrack, or if I have changed my goal to a 1/3 scale model of the Michelin Man. Fingers crossed, everyone, okay? :oops:
I hope it continues to go well!
 
I am looking forward
BTW: Did you prepare some "tunnels" for the masts?
 
Today I sawed and cut and trimmed and sanded the foam to a shape I can live with. No distortion, cracking, separation or any other problem occurred by using the expanding foam, other than it still being a fair amount of work to do (but I think less than doing it out of wood). Here, I'll simply show an in-progress photo and one of the "finished" product:
1679365735452-png.364098

1679365993333-png.364100


Rather than repeat the entire process along with my final thoughts on the method here, please go to the applicable post on MarisStella Ragusian Carrack by Signet. Thank you for watching. Please feel free to continue to comment here or on my main build log.
Looks like it worked great! Very glad toy didn’t have issues.
 
Was it possible to sand, or you have to cut with a knife?
The hot wire foam cutter worked best. A serrated saw or knife works well, but you can't get close to the bulkheads that way. Sanding dose not work very well, as the foam is too resilient and rubbery. The hot wire cutter worked well when brought against the bulkheads as a guide, but that does not allow for the cut foam to curve outward between two bulkheads.
 
Back
Top