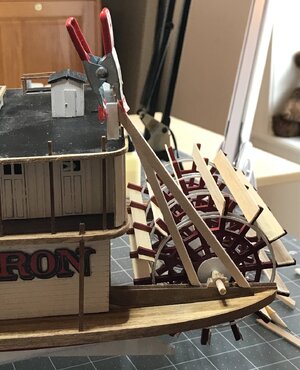
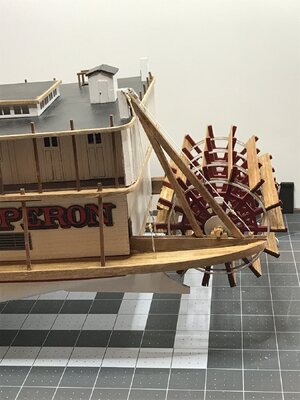
That paddlewheel is looking great Jan, it is an excellent re-start of your paddle steamer
You are using an out of date browser. It may not display this or other websites correctly.
You should upgrade or use an alternative browser.
You should upgrade or use an alternative browser.
Chaperon 1884 Stern Wheeler
- Thread starter Pathfinder65
- Start date
- Watchers 31
-
- Tags
- chaperon model shipways
Yup,I'm a novice and really have no idea of what I'm doing, but I think I'v stumbled across a minor problem.
The Stern Timbers.
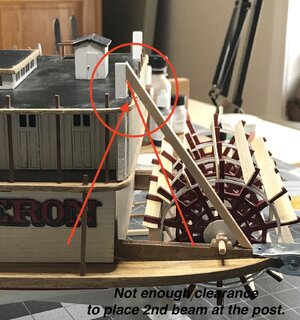
I've held off on doing the fancy scroll edging until I had the stern timbers in place. The red arrow points to the location for the start of the 2nd timber (red line) as per plan sheet #3.
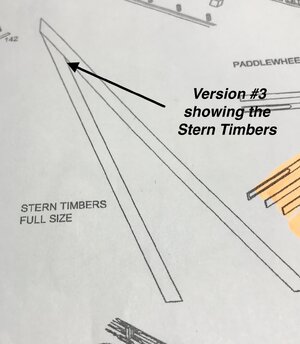
This shows the timbers butted up. Fortunately I didn't make two of these, because they would not have fit.
To further confuse the issue this plan shows another configuration.
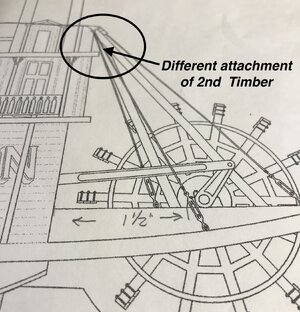
And also this plan
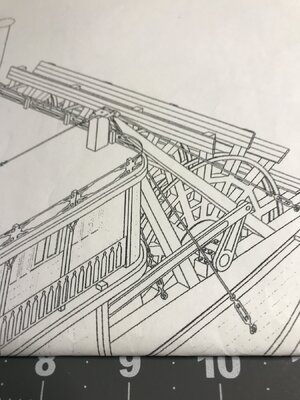
So there you have it.
I'm to going to think about this over a couple of s.
s.
Hmm, maybe I should go do something Knotical for a couple of days.
Jan
The Stern Timbers.

I've held off on doing the fancy scroll edging until I had the stern timbers in place. The red arrow points to the location for the start of the 2nd timber (red line) as per plan sheet #3.

This shows the timbers butted up. Fortunately I didn't make two of these, because they would not have fit.
To further confuse the issue this plan shows another configuration.

And also this plan

So there you have it.
I'm to going to think about this over a couple of
 s.
s.Hmm, maybe I should go do something Knotical for a couple of days.
Jan
Hi Jan. I will look tomorrow in Alan Bates Cyclopedium. I think he has some drawing about the construction of the stern wheel.Yup,I'm a novice and really have no idea of what I'm doing, but I think I'v stumbled across a minor problem.
The Stern Timbers.
View attachment 445543
I've held off on doing the fancy scroll edging until I had the stern timbers in place. The red arrow points to the location for the start of the 2nd timber (red line) as per plan sheet #3.
View attachment 445544
This shows the timbers butted up. Fortunately I didn't make two of these, because they would not have fit.
To further confuse the issue this plan shows another configuration.
View attachment 445545
And also this plan
View attachment 445546
So there you have it.
I'm to going to think about this over a couple ofs.
Hmm, maybe I should go do something Knotical for a couple of days.
Jan
Regards, Peter
Thank you Peter. I'll look forward to what you can find.Hi Jan. I will look tomorrow in Alan Bates Cyclopedium. I think he has some drawing about the construction of the stern wheel.
Regards, Peter
Jan
Add a few whiskeys and you will certainly have the solution Jan…I'm to going to think about this over a couple ofs.
Hi Jan. Some information from "The Western Rivers Steamboat Cyclopedium" from Alan Bates.
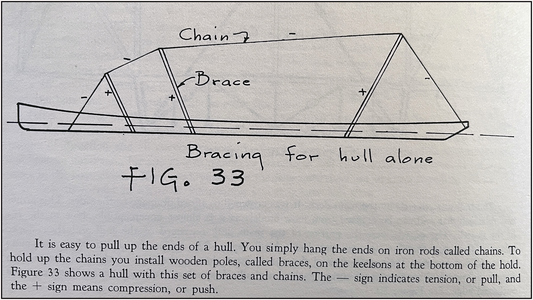
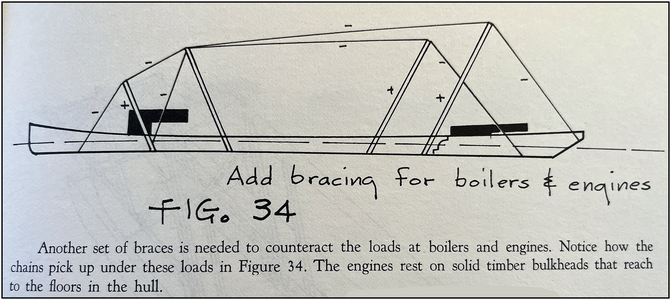
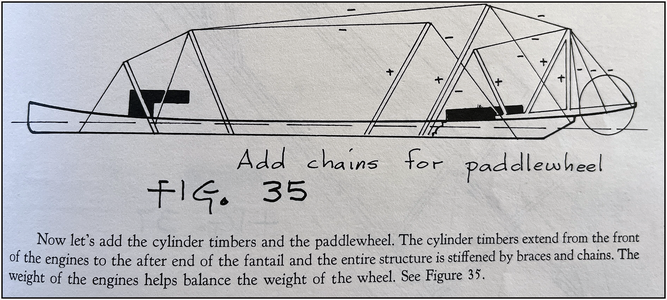
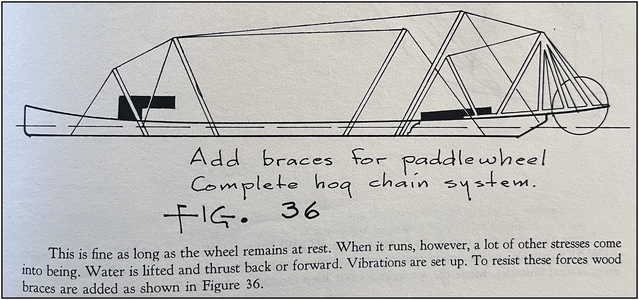
To under stand the function of 'Braces&Chains'.
About his drawings he wrote: "Remember this: Chains ALWAYS lift; Braces ALWAYS press down. Because of the strains on chains they ran straight from brace to brace. Don't run them around obstacles.'
To illustrate that with 4 drawings: And at the bottom of fig.33: The - sign indicaties tension of pull. And the + sign means compression of push:
Then the last picture of you post is understandable. I put some colors in your picture:
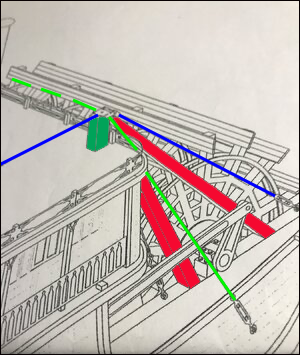
Blue: the chains length wise. To hold the wheel legs in position when the wheel is not in function and lifted the weight of the wheel.
Yellow: the chain sideways. To hold the sides forces of the structure. Often there is also a chain between both poles/braces. I don't know if the your plans shows that.
Red: the braces to resist the upwards forces when the wheel is in function. (See fig. 36) When the wheel and legs want to go up, those 2 (red) braces push them down and hold position.
Green: the standing brace, which transfers the forces to the hull. (The poles with the + in the fig's)
Hopefully this clarifies something of the principle of the Braces&Cahins.
Then the 1st drawing is also correct, with the front brace tapering to a point and in the corner between the rear (red) and the standing brace (green).
Not on the railing or side post as the 2nd drawing suggests.
Regards, Peter
To under stand the function of 'Braces&Chains'.
About his drawings he wrote: "Remember this: Chains ALWAYS lift; Braces ALWAYS press down. Because of the strains on chains they ran straight from brace to brace. Don't run them around obstacles.'
To illustrate that with 4 drawings: And at the bottom of fig.33: The - sign indicaties tension of pull. And the + sign means compression of push:


Then the last picture of you post is understandable. I put some colors in your picture:

Blue: the chains length wise. To hold the wheel legs in position when the wheel is not in function and lifted the weight of the wheel.
Yellow: the chain sideways. To hold the sides forces of the structure. Often there is also a chain between both poles/braces. I don't know if the your plans shows that.
Red: the braces to resist the upwards forces when the wheel is in function. (See fig. 36) When the wheel and legs want to go up, those 2 (red) braces push them down and hold position.
Green: the standing brace, which transfers the forces to the hull. (The poles with the + in the fig's)
Hopefully this clarifies something of the principle of the Braces&Cahins.
Then the 1st drawing is also correct, with the front brace tapering to a point and in the corner between the rear (red) and the standing brace (green).
Not on the railing or side post as the 2nd drawing suggests.
Regards, Peter
Last edited:
Wow, thank you Peter. That is a lot of information to absorb. Granted I’m working on a model and do not have a lot of experience, but looking at the paper plans and converting the data to the physical world I released that I had a bit of a problem.
Your post is a tremendous help. I think with a little more trimming I’ll have a working solution.
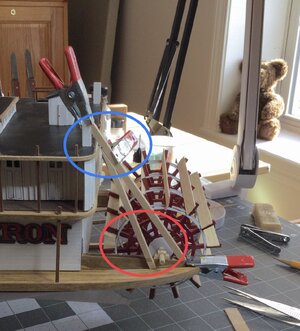
There is enough clearance for the fancy scroll work at the top of the timber (blue circle) and a bit more trimming required to fit the 2nd timber before the wheel hub (red circle).
The screen shot of the 3D Chaperon also shows a good look at the timber and cable/chain configuration at the paddle wheel.
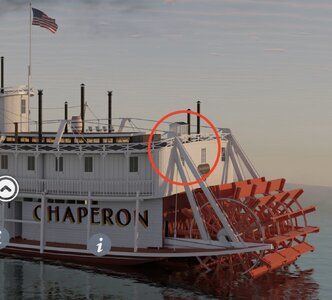
A lot to think about.
Jan
Your post is a tremendous help. I think with a little more trimming I’ll have a working solution.

There is enough clearance for the fancy scroll work at the top of the timber (blue circle) and a bit more trimming required to fit the 2nd timber before the wheel hub (red circle).
The screen shot of the 3D Chaperon also shows a good look at the timber and cable/chain configuration at the paddle wheel.

A lot to think about.
Jan
I wouldn't know a paddle-wheeler from a canoe - but that last picture seems to resolve the original problem of squeezing in two posts...
Yup, that is a very good photo of the stern timbers. A picture is worth a thousand words.I wouldn't know a paddle-wheeler from a canoe - but that last picture seems to resolve the original problem of squeezing in two posts...
Jan
Boom! Way to go Jan! That looks pretty much perfect!
Ha, don't know about that, but I did manage to complete it without breaking something.Boom! Way to go Jan! That looks pretty much perfect!
Jan
Good morning Jan. I’m with Paul here, it looks pretty fine to me…..and no sweat jars or broken parts- fun time. Cheers GrantHa, don't know about that, but I did manage to complete it without breaking something.
Jan
@Peter Voogt posted a great explanation of the anti-hogging cabling for sternwheelers. That prompted me to do a Google Image search to find some photos showing that cabeling.
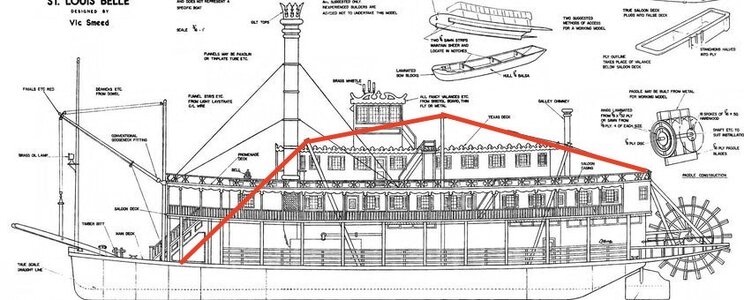
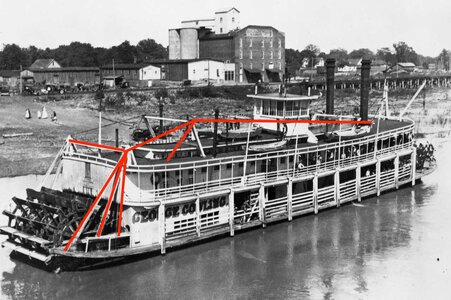
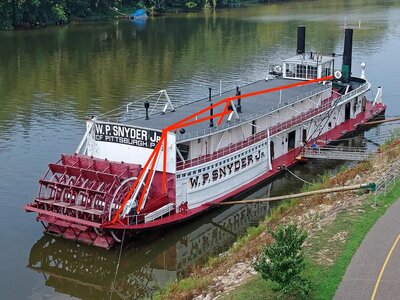
The kits style of the hogging cabling is about the same as the above picture.
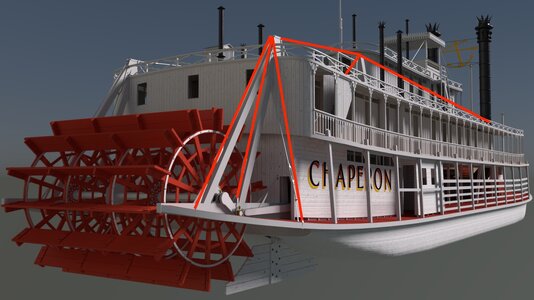
I thank Peter for his post. Another bit of nautical knowledge added to my shipbuilding encyclopedia .
Jan


The kits style of the hogging cabling is about the same as the above picture.

I thank Peter for his post. Another bit of nautical knowledge added to my shipbuilding encyclopedia .
Jan
Last edited:
Always nice to be able to contribute to understanding the 'why'. In this case the ‘braces&chains’.@Peter Voogt posted great explanation of the anti-hogging cabling for sternwheelers. That prompted me to do a Google Image search to find some photos showing that cabeling.
View attachment 446689
View attachment 446691
View attachment 446692
The kits style of the hogging cabling is about the same as the above picture.
View attachment 446693
I thank Peter for his post. Another bit of nautical knowledge added to my shipbuilding encyclopedia .
Jan
I am sure you will give your Chaperon a representative version.
Regards, Peter
Hog Truss Posts and Rigging:
I started the Hog Rigging. I've completed the Port side and I don't like it. The "FLAT" turnbuckles just don't "float my boat". I used half hitches to tie off the ends of the rigging. Those knots really stand out. So it's "Re-Do" time.
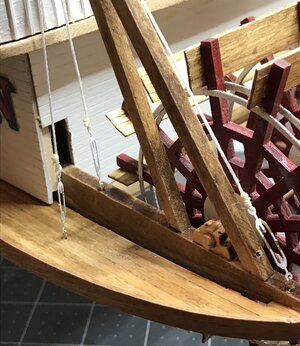
I haven't been successful in finding 1/48 scale turnbuckles, I think brass ones would be to heavy for the longer span, there isn't anyway to tension that without a work around.
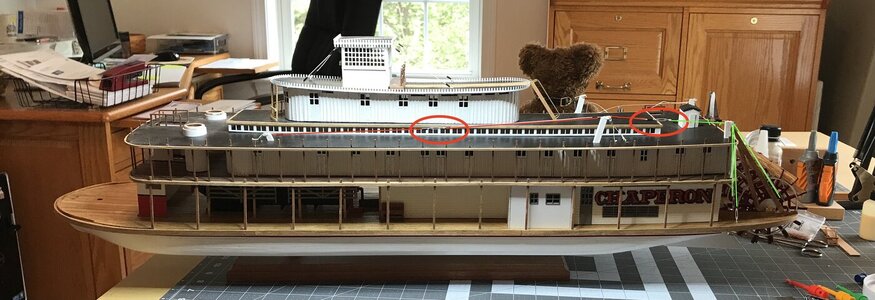
I tried to disguise the knots by covering them in shrink tubbing, BUT that just made things look worse. SO.. does anyone have a good source for other than brass turn buckles???
Jan
I started the Hog Rigging. I've completed the Port side and I don't like it. The "FLAT" turnbuckles just don't "float my boat". I used half hitches to tie off the ends of the rigging. Those knots really stand out. So it's "Re-Do" time.

I haven't been successful in finding 1/48 scale turnbuckles, I think brass ones would be to heavy for the longer span, there isn't anyway to tension that without a work around.

I tried to disguise the knots by covering them in shrink tubbing, BUT that just made things look worse. SO.. does anyone have a good source for other than brass turn buckles???
Jan
Last edited:
Just Google "Model Ship Turnbuckles" - lots of options! Happy spendingHog Truss Posts and Rigging:
I started the Hog Rigging. I've completed the Port side and I don't like it. The "FLAT" turnbuckles just don't "float my boat". I used half hitches to tie off the ends of the rigging. Those knots really stand out. So it's "Re-Do" time.
View attachment 447431
I haven't been successful in finding 1/48 scale turnbuckles, I think brass ones would be to heavy for the longer span, there isn't anyway to tension that without a work around.
View attachment 447425
I tried to disguise the knots by covering them in shrink tubbing, BUT that just made things look worse. SO.. does anyone have a good source for other than brass turn buckles???
Jan
 .
.


