Beginner, trying bounty boat by Occre.

Joined
Jul 30, 2023
Messages
12
Points
28

Hi.

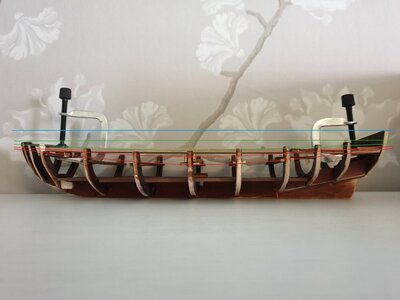
I bought this kit a few years ago, but it stopped when the time for planking the hull begins. I have read several guides, looked at YouTube. But I can´t figure out how to do this properly.

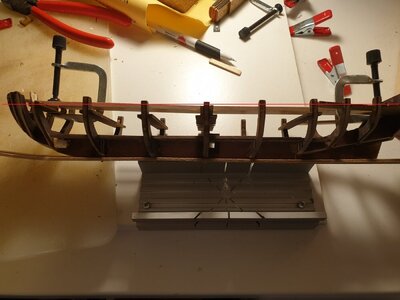
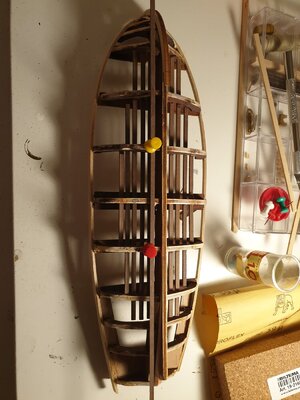
The picture show how it looks like now. I tried to plank, but I had to strips removed because it was not the right way to do it. The pic did not insert the order I wanted so I hope it will do anyway. Pic 2 should be the last pic as that's were I stopped.

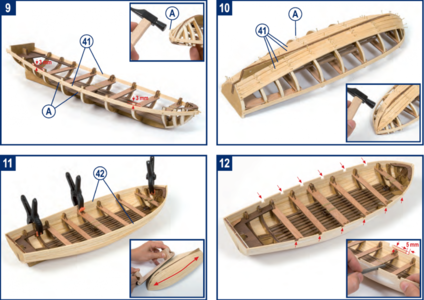
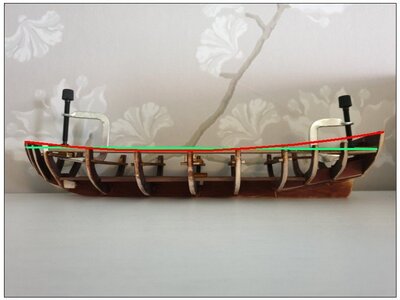
The instruction say begin with one strip 3mm down each bulkhead, That´s what I have done, and to get it around 3mm I had to edge bend the srip I know now that thats "wrong" to force the strip but I let it be for now because it makes the frame sturdy When I do it the right way I can remove the top plank. The strips are 5mm wide, and there should be a 8mm wide strip as the top strip that's why instruction say 3mm down. The last pic shows how it should look like I think like the red line. I also tried to start with garbord plank, I read a planking guide, they say put a Batten a distance as wide as garbord plank. They dont tell if it should be 5mm from keel on all bulkheads, because if thats the case I have to force the Batten in place. The problem with garboard plank is how to shape it at the bow.
20210617_180337.thumb.jpg.9570c2ef0f584e270e5e3ab454c60694.jpg.d7623971428f44f3a7681f9f72b0d44e.jpg20230731_190403.jpg738747355_Namnls.thumb.png.6bc52066c11d3218f7b80d1d6a8155f5.png.21e5f740110b9897ec41ae58b1c2776e.png1716353623_20210618_091706-kopia.thumb.jpg.f539ab253a677da2c72f2f713ef61802.jpg2101466741_Boatplankingline.JPG.2ade852d875f181d3ee8d99d6b560794.JPG
 
Likes does not make me progrees, advice does. Someone must have some experience to now how I should proceed.
 
Hey karkka.

Im not totally sure but in your description photo 9 shows 2 places where the first plank need to be 3mm lower than the bulkheads.
I would make sure the first plank is on those locations 3mm and don't force the rest to those 3mm. Just let the plank bend natural on the other bulkheads.
It is wood so you can always sand it or fill it, if it's not correct.

I hope another builder here have already built this model and have experience with occre to help you with a better answer or a building log of this model.
 
Planking is ALWAYS harder than it looks in the plans, or as described in the instructions! Even trying to recreate the actual full-size methods don't always scale. A lot of fiddling, head scratching, trial and error required. Failure is a great (if stern and demanding instructor) Cautious

Pete
 
makes the frame sturdy When I do it the right way I can remove the top plank. The strips are 5mm wide, and there should
I’ve spent decades laying out and installing strakes as they were done on the full size ships, but now Ive begun building theOccre kit of the Endurance. Since the model is double planked, I’ve decided to try the method shown in the instructional pics for the first planking as the main idea is to create the correct shape of the ship at this point. Furthermore, bulkheads which are supplied in the kitS, it is impossible to lay out the bands for planking as on the original. It ticks me off when model ship kits are produced using bulkheads and the box art states “just like the original”. Bulkheads by their very nature are not like the original ships. Remember we learn by doing, so don’t be afraid to jump in and try it. Good luck, Phil
 
If I want do it as real ships, then I read that start with garboard plank first, but then I may end up not getting 3mm from the top. and if I begin with the top, the garboard plank may be wrong. I also read that I should measure the middle bulkhead and / by width of planks, that way I know how many full width plank I need. and so many planks should run along all bulkhead. but I end up having 1-2mm width at the bow.

Maybe I should put the most top 8mm plank and plank down to the keel, then I know that plank would fit as it should, but problem is that I have to edgebend it if it should look like the red line in pic 5.

Can it be the case that the model ship can´t be planked the right way?
 
It is important that you know how the original ships were planked, but as I noted above, you cannot lay out and plank prototypically, because you are starting with a framework of bulkheads. The actual ships had wide ribs with only a small space between them. Use the method shown by Occre to establish the shape of the ship which will give you the base for the second planking. The research you have done is accurate and commendable, but you just cannot plank a ship which is supported only by bulkheads. With one kit like this I bought 2” thick basswood to fill the space between the bulkheads, then layed out the planking on a solid surface. There are some great books on this topic which explain the process of spiling by tapering planks where required or using stealers to close gaps between planks. With this Occre kit, you are trying to do the impossible and so many newcomers to this hobby get frustrated and never complete their first model. Phil
 
A perfect description of my experience!
As I said...It's a head scratcher.Cautious
 
Last edited:
I agree with the first plank is always the most difficult one. Like peter already mentioned.
But don't forget it's a hobby and it need a lot puzzling. Every ship is a new adventure to build.. just enjoy the adventure puzzle of building
 
Likes does not make me progrees, advice does. Someone must have some experience to now how I should proceed.
There are a lot of people who have built this kit. There is a Facebook page - Occremania- where people making Occre kits exchange ideas, tips and "how to's" on their kits. If you post your questions there, you will get spoke folks with the experience of this particular kit.
 
Try this. It is what I call the “natural lay” method. Up front, the downside is you will need to taper and shape some planks to fill in gaps. First lay a plank at the bulwark edge in the middle of the boat. Let that plank lay naturally, parallel to the keel, to each side to the bow and stern. Add a second plank below the first…snug to the edge…let that plank lay naturally to bow and stern. This second plank you can gently curve sideways to fit snugly against the edge of the first plank. Repeat for additional planks. You will start to get to a point where a gap will occur in the bow or the stern or both that is too wide to allow a natural fit. In this case let the plank lay naturally and then go back and shape a filler plank to fit the gap. Many modelers do not like this method as it is not very original or historic. But it will provide a way to get past your frustration and you will have a nicely planked hull for your efforts. Try to lay every plank in its natural form without excessive twisting up or down. You will also need to shape shorter planks to fill in the bow rise and the stern rise from the first plank. Hope this makes sense for you…
 
That’s a great way to plank a hull. The truth is that once the hull is painted no one will ever know how it was planked. Most importantly, we need to assure newbies to our complex hobby to start building and not get upset if it’s not always prototypically correct. It’s important to recognize that it takes years to learn all the details.
 
Daniel, Cool!
Thanks for the tip. I plan to do a variation on that method for my current Mamoli "Flying Cloud" project.
My belief is that as long as it looks believable, and the results are pleasing, how ya get there is yer own business,.
"Whatever gets ya through th' night!" Thumbsup ;)

Pete
 

danielsje: I can try that but somehow I need to fit the top plank that is 8mm and will go 5mm above the bulkhead. The pic did not show but it´s getting a second layer.​


danielsje: I can try that but somehow I need to fit the top plank that is 8mm and will go 5mm above the bulkhead. The pic did not show but it´s getting a second layer.​

You are still good for this technique…what I would do is plank the hull to the top of the bulwarks with the 3mm planks then add a 5mm strip on top…I would not try to fit the 8mm plank at all.
 
Last edited:
What I have found is that if the forward part of the plank is trimmed at the top edge toward the front, the plank will lie better and not bulge as much. On my Galilee Boat, I had to twist planks in three different directions over the course of the hull. Yes, sometimes the planks had to bend vertically, too. I also beveled the edges of the planks by trimming some wood on the inside along the edges. That made the boards snug up to each other better. I actually have two Galilee boats on this forum. You can click on the links below to see how I built them. I can tell you that it wasn't easy.
 
I have no idea how they got the top plank running so good at some pictures. I cant even put my plank on all the frames because of to much different height. I think it´s much easier to have a ship were you have a upper deck to start first plank against. So I thinking of getting another ship to start my journey. Maybe Occre Albatross, or Trinidad cross section then I don't have to deal with bending planks.
 
I`m going to try to plank the boat anyway. It´s better to even if it´s turn out to be incorrect so I get some wood experience.
You are right, just jump in and give it a go. You might be at the point where you are blinded by all of the advice - and everyone is right, but we all go about planking in a slightly different way with our own techniques and preferences. Slow and steady is the key, let us know how it goes.
 
Last edited:
Back
Top