You are using an out of date browser. It may not display this or other websites correctly.
You should upgrade or use an alternative browser.
You should upgrade or use an alternative browser.
- Joined
- Nov 15, 2022
- Messages
- 212
- Points
- 143

Tell that to John AliprantisI understand that the skeleton is so stiff that it could withstand a bomb explosion.
But why put a bomb with a timer inside, I don't understand. Well done. Kabommm
and he still will say it's crap
@NMBROOK how is the material quality ?
- Joined
- Jan 30, 2023
- Messages
- 250
- Points
- 158

I understood very well what was going on, I know this case. At the beginning I watched these movies. Now I prefer to be stupider but with knowledge from a less emotional source, with many mistakes and the awareness that someone takes my opinion into account (at least a little, then pours warm urine over it).Tell that to John Aliprantis
and he still will say it's crap
The bulkheads are thinner than I would prefer but so far the accuracy of the hull profile is extremely good, only requiring bevelling and not reshaping/packing when fairing the hull.
I have had to trim NO notches on anything so far but they are a little loose to start with.
Planking material, some variance in thickness and width but it is easy to work with.Quite liking the Birch but one or two strips contain knots.
The skeleton is only stiff because of the extra members I have put and the fact I planked either side of the keel first to keep it straight. This model must be built in a jig to keep it true if you follow the kit instruction's order of assembly
Nigel, nicely done with the decks and planking! Magic Mike
looking amazing. well done!
Thanks Guys
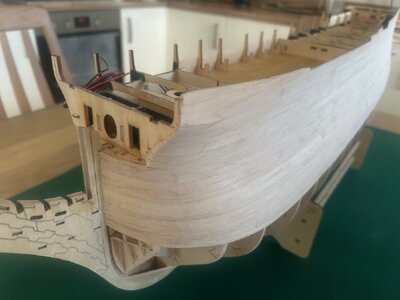
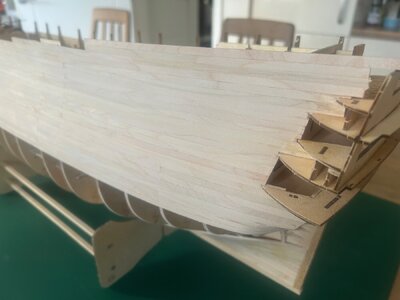
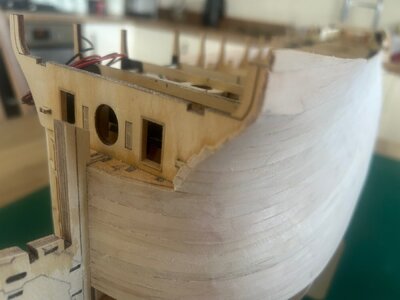
Moving forward slowly but surely, I have completed planking on the Portside as far as the instructions suggest before marking and cutting the ports out. I shall finish lining the inside of the "Bulwarks" in 0.8mm ply and trim the top of the hull before commencing planking the Starboard side.
The Portside planking has only been sufficiently sanded to enable marking out of the Gunports. I am not using the kit supplied linings, they follow the tumblehome and the cills will not be level athwartship so these will be scratch built. I will cover this in more detail at the time but the hull will be sanded again so this is why I am not going overboard. The planking is single thickness and 2mm thick. I plan on removing ONLY what is strictly necessary with sanding as not to weaken the hull.
Two points to note from the pictures;
The instructions have you planking the Beakhead bulkhead to early IMHO. Planking this before the hull means you will have up to 3.5mm thickness of Planking ends on show. I will plank this last so the beakhead planking runs to the outside of the hull giving a nicer appearance.
The transition at the base corner of the stern counter is an absolute sod to plank. Numerous sessions of soaking and bending using a soldering iron body was needed to shape these planks.
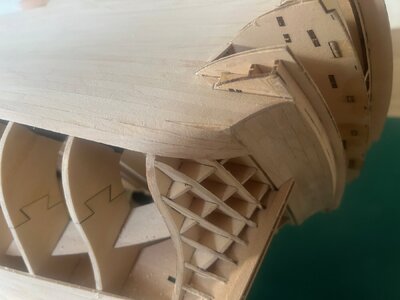


Good evening Nigel. Your work is so inspiring. Besides building incredible ships you share so much technique and advice on the how to. I certainly appreciate this. Cheers GrantFirstly, Happy New Year everyone. I have not been online much over the holidays as I have been focusing on family time but with some building in the stolen hours.
I have been following the instructions, well almostI will list my departure from the kit build so far rather than cover what is the instructions;
Keel drilled to take M4 steel rod that will be used to secure the model to the stand but also provide +ve and -ve for the 12v supply for the lighting
Kit battery tray repurposed to take digital voltage regulator to provide 2.9volt output for the LEDs eliminating resistors- as I side note, I fried two of the flickering LEDs from the light kit soldering the wires on despite using my smaller iron. You MUST use a heatsink between where you are soldering and the LED body. These LEDs contain tiny microchips and they do not like heat.Lesson learned, I will order another kit from AL in Spain, I plan on adding a few extra anyway.
More supports added to the deck beams fore and aft for the next level.
The upper "Bulwarks are being lined with 0.8mm ply from my stash, these will provide a backing for further dummy frame extensions, I do NOT plan on planking these areas but having exposed framing. No plans exist for the ship post refit, I reason as these areas are extensions of the original hull, there is some argument that these were not planked internally. Looking at Artesania's CAD model on You Tube, it is my interpretation that is what they had in mind when designing the kit then took a u-turn deciding to cover these areas with planking inside. If anything, this will add a talking point to the model and differ it from the masses.
Some pictures of where I am up to.I am working on the planking on the Portside at the moment from the waterline up, then I will revert to the Starboard side. I can get away with not working equally on each side now, the skeleton is so rigid it could withstand a bomb blast.No concerns of pulling it out of shape.
One tip for anyone building this model, I made a shaped former to bend the planks. Soaked them in water for two hours and then clamp in the former.Leave overnight to dry out and they keep their shape when released.My former can take four planks at a time speeding the process up slightly.Every build I have seen so far of this kit, including the one in the instructions exhibits some faceting in the transition of radiuses at the bow, ensuring the planks are accurately preshaped seems to have stopped this so far on my model.
View attachment 419375View attachment 419376View attachment 419377View attachment 419378View attachment 419379View attachment 419380View attachment 419381View attachment 419382View attachment 419383View attachment 419384
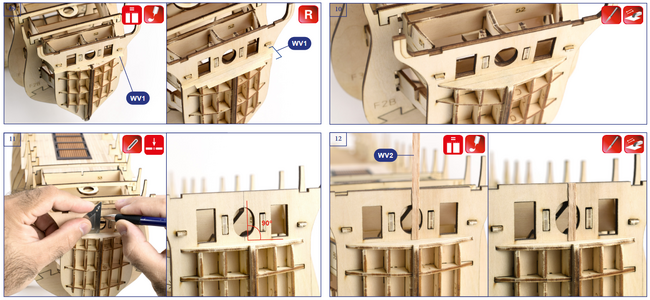
@NMBROOK Did you skip point 9-27 of the instructions specifically? I wonder if it would be better to fill the floor (at point 4) and only then lay the covering, wouldn't it be nicer ? What is your idea ?
View attachment 421233
Excellent question !
Yes these steps have been skipped deliberately.
The planking on the bulkhead has been skipped for now until all planking has been fitted and sanded flush
The beak deck planking has also been left until the first layer of hull planking has been laid. This area has two layers of planking. Not fitting the deck planks until after the first layer is done gives me only a 1.5mm "surround" to the planks.A 3.5mm "surround" would look disproportionate given the small area of planking and aesthetically unpleasing.
As a side note, the planks run athwartship in the instructions, this is wrong and should run fore and aft negating the need for additional support on the real vessel.
As a small follow on to that question, if anyone has any similar questions do not be afraid to ask.
As I stated at the start, the mission statement to myself was to build some really special from this kit without changing everything or spending an absolute fortune on replacement parts.
The beakhead bulkhead is a good example, improvements in appearance can be made without buying anything, just changing the order of work to that shown in the instructions which is completely free.
There will be many small "tweaks" like this and I do them on the fly and may forget to cover in my text, so once again please ask
What's interesting to me about the development of ship design is just how narrow and shallow the beak-head area has become. The head structure is proportionally long enough to service the sprit-mast, but earlier epochs were more expansive in the area of the beak-head bulkhead.
As always, Nigel, the work is truly first-rate!
As always, Nigel, the work is truly first-rate!
- Joined
- Jan 30, 2023
- Messages
- 250
- Points
- 158

This is one of those models where there will be a lot of difficult questions, some stages are a bit strange.As a small follow on to that question, if anyone has any similar questions do not be afraid to ask.
As I stated at the start, the mission statement to myself was to build some really special from this kit without changing everything or spending an absolute fortune on replacement parts.
The beakhead bulkhead is a good example, improvements in appearance can be made without buying anything, just changing the order of work to that shown in the instructions which is completely free.
There will be many small "tweaks" like this and I do them on the fly and may forget to cover in my text, so once again please ask
Your constructions have always been interesting, you usually make corrections or correct existing mistakes, I like it. New instructions from @Artesania Latina are very detailed and high quality, but in places it is done very chaotically, like a game of ping-pong, a little here, a little there, once the equipment, once deck covering, then some equipment again, back to covering, painting several times, sanding, painting... Finally, it's done correctly, but I don't like this kind of bouncing from bow to stern, with painting middle way. I usually make major corrections and change the order of construction myself. The problem is with people who don't think and do according to the instructions "because that's how it's supposed to be, the instructions say so", then problems arise.
This is one of those models where there will be a lot of difficult questions, some stages are a bit strange.
Your constructions have always been interesting, you usually make corrections or correct existing mistakes, I like it. New instructions from @Artesania Latina are very detailed and high quality, but in places it is done very chaotically, like a game of ping-pong, a little here, a little there, once the equipment, once deck covering, then some equipment again, back to covering, painting several times, sanding, painting... Finally, it's done correctly, but I don't like this kind of bouncing from bow to stern, with painting middle way. I usually make major corrections and change the order of construction myself. The problem is with people who don't think and do according to the instructions "because that's how it's supposed to be, the instructions say so", then problems arise.
I hear you. The order of assembly is not necessarily the optimum one. You can build the model following the instructions and succeed but you are not necessarily following the best path.I don't want to bash the instructions too much as they are light years ahead of the competition IMHO.
However, one error I will detail next weekend. The instructions show how to trim the top of the hull planking but later tell you to replace a section so it lines up with the forward edge of the poopdeck including detailing the repair to your paintwork!!!
Needless to say I will NOT be doing this and will be getting it right first time. I will cover this workaround in my next update and what builders should be doing not to fall down this rabbit hole.
- Joined
- Oct 8, 2021
- Messages
- 12
- Points
- 48

Hi Nigel, I havent been on this forum for a while, and even then not very often posting. I am currently building this same model, following the instructions (mostly in the sequence shown in the pictures), and am vlogging my adventure and putting it on that well known video site. I really like teh changes you have made, and now wish I had found your build before starting mine, but hey ho , we all do things differently and that's what makes our models unique
I will continue to follow your build
Bill
I will continue to follow your build
Bill
Hi Bill
I will check out your build, have you thought about posting a log on here?
I am keeping the changes subtle as overall the kit is pretty good out of the box. From eight feet away it will look stock, the many small changes will only come to light in close scrutiny.
I will check out your build, have you thought about posting a log on here?
I am keeping the changes subtle as overall the kit is pretty good out of the box. From eight feet away it will look stock, the many small changes will only come to light in close scrutiny.
Moving on I said I will highlight an error in the instructions.
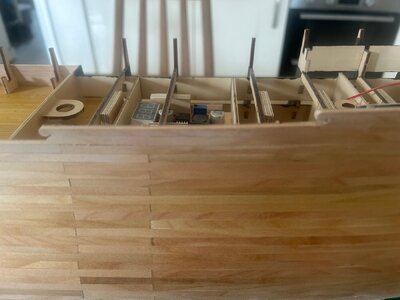
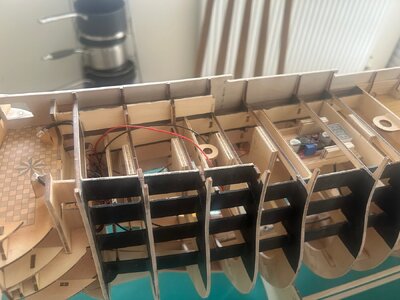
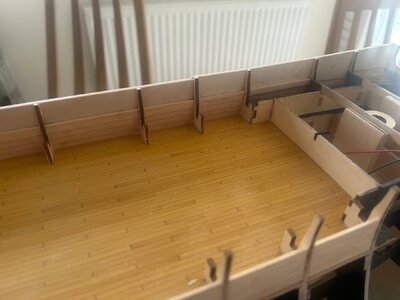
When trimming the upper edge of the hull, the instructions tell you to cut the hull vertically in line with one of the bulkheads at the forward end of the Poop.This is WRONG! Later you are told to carry out a patch repair to move the vertical edge forward. If you are doing a stock build use the kit's poopdeck template to determine where the cut is.It needs to be in line with the poopdeck forward edge on the template. I hope my pics illustrate this.
I have deviated further.The original should have scrolls on these height transition points and are even shown on the template but once again AL have simplified the design in their instructions. I shall be including these scrolls as they are a prominent feature on the St Petersburg plans.The positions have been moved slightly forward to "work" with the exposed framing to follow inside the bulwarks.
One further point, the template sheet as a 100mm mark on it to check for shrinkage.Mine measured slightly under and the template was 2.5mm short to the model. I will be working from the bulkhead positions and measuring the positions of the ports to combat this issue.
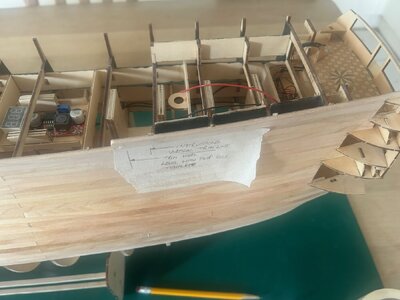
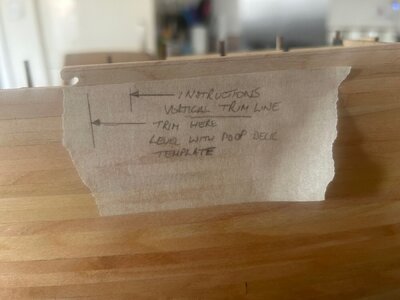
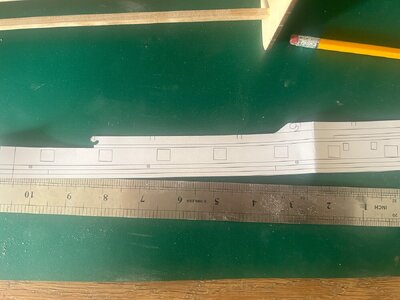


Last edited:
Nigel, are you finding that you have had to correct the sheer on this model - your pictures look sweet and fair - or did AL get that right?
Nigel, are you finding that you have had to correct the sheer on this model - your pictures look sweet and fair - or did AL get that right?
Marc they got it right, I have just set the height to the bulkhead tops as per instructions
- Joined
- Oct 8, 2021
- Messages
- 12
- Points
- 48

Hi NigelHi Bill
I will check out your build, have you thought about posting a log on here?
I am keeping the changes subtle as overall the kit is pretty good out of the box. From eight feet away it will look stock, the many small changes will only come to light in close scrutiny.
I hadnt thought of posting a log on here, when I've seen the standard of others ( especially yours) . I dont think I'm at the same level as you, but if I can get enough stills from my videos, then I may well start a log
Thanks for the suggestion
Bill


