Artesania Latina Santisima Trinidad 1/84

NMBROOK

Staff member
Forum Moderator
Joined
Jul 15, 2013
Messages
2,597
Points
688

Location
Yorkshire England
Hi All

I had mentioned in another thread that I have recently purchased this kit shortly after release. I had also stated that when I build her, I will do a much more detailed log than I do normally, mainly to highlight any potential issues others less experienced than myself will face.

I normally go to town modifying kits ( currently also working on a MUCH altered version of Artesania's Soleil Royal) but believe this kit has the recipe to make an excellent model that to the best of my knowledge, is a pretty close replica of the actual vessel.

My intention is to use as many as the stock parts as possible and in general follow the instructions but in some cases, tweak the order of play to make it easy to achieve a better result.

Now I had intended to park the kit in storage for a good while as I have many other projects, but I have thought this build should be started sooner rather than later, after all no point starting after several other logs are ongoing and some of the builders may have benefitted from my guidance.

I don't profess to be an expert but have been in this hobby for a long time and have learnt not only from others but also my own mistakes.

So, for the record the keel was laid on Saturday 4/11/23, which to my knowledge, will make this, the first build of this kit, documented on the net.

I have spent ten hours on the model so far and have already deviated from the instructions for what I perceive as a better way to assemble the skeleton, but using the stock parts.

For the meantime, I will leave you a picture of the kit and will begin with the first proper update at the weekend.

I only plan on spending limited time on this build, Soleil Royal remains my main focus.However, given I am almost building to the instructions, progress will be quicker than my other builds. This is a bit of a "relaxing" build for me.
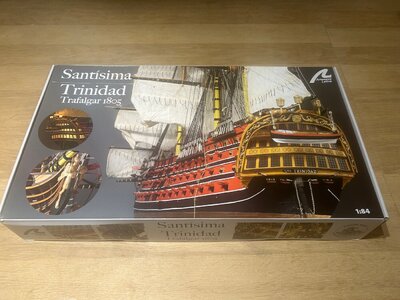
IMG_0985.jpg
 
Hi All

I had mentioned in another thread that I have recently purchased this kit shortly after release. I had also stated that when I build her, I will do a much more detailed log than I do normally, mainly to highlight any potential issues others less experienced than myself will face.

I normally go to town modifying kits ( currently also working on a MUCH altered version of Artesania's Soleil Royal) but believe this kit has the recipe to make an excellent model that to the best of my knowledge, is a pretty close replica of the actual vessel.

My intention is to use as many as the stock parts as possible and in general follow the instructions but in some cases, tweak the order of play to make it easy to achieve a better result.

Now I had intended to park the kit in storage for a good while as I have many other projects, but I have thought this build should be started sooner rather than later, after all no point starting after several other logs are ongoing and some of the builders may have benefitted from my guidance.

I don't profess to be an expert but have been in this hobby for a long time and have learnt not only from others but also my own mistakes.

So, for the record the keel was laid on Saturday 4/11/23, which to my knowledge, will make this, the first build of this kit, documented on the net.

I have spent ten hours on the model so far and have already deviated from the instructions for what I perceive as a better way to assemble the skeleton, but using the stock parts.

For the meantime, I will leave you a picture of the kit and will begin with the first proper update at the weekend.

I only plan on spending limited time on this build, Soleil Royal remains my main focus.However, given I am almost building to the instructions, progress will be quicker than my other builds. This is a bit of a "relaxing" build for me.

View attachment 405206
Good morning Nigel. I have a chair in the front row. I will follow and learn from this log. Cheers Grant
 
Salut Nigel
C'est avec plaisir et avec attention que je vais suivre ta construction, car je suis très intéressé par ce modèle
Marco

Hi Nigel

It is with pleasure and attention that I will follow your construction, because I am very interested in this model

Marco
 
Thanks everyone for your interest.Big first instalment to come tomorrow.

I will point out though I am pleased to see this is the first kit by Artesania that I know of that includes Cambered decks:)

New video on YouTube "behind the scenes of Santisima Trinidad" posted By Artesania. Only short but shows the fact they referenced the Monograph by Crespo on this vessel.

With so many things right with this kit, I am shocked that they goofed on the hull length on Soleil Royal, that could have been the best SR kit on the market had they got that right IMHO
 
Ok then, first proper post. Whilst I don't attempt to rewrite the whole instructions which are huge, I will focus on points worth noting not explained and obviously any deviation I make, whether it is process or a change for the kit parts.

When I mentioned this log previously, I explained that my intention was to build almost out of the box and bring the total cost as close to that of the Caldercraft Victory.

I will only replace items I feel detracts massively from the overall appearance and try to work with what is supplied for everything else.

From a financial point of view, CC's Victory retails at £1052.76 and this kit £655, leaving £397 to play with, sounds a lot but that will soon go.

Now one area of the model I can't reconcile is the deck planking, at 5mm wide is it grossly overscale and detracts from the model. I looked at all options over the last fortnight. Full thickness planks as in the kit and deck plank veneer on a ply subdeck.

Given the scale width of 3mm max I felt an open grain wood will detract from my hard work so despite what I said earlier, I have ordered 140 meters of 2.7mm by 0.7mm Boxwood veneer strips for this from Original Marquetry in the UK. These will be laid on a 1.5mm thick Birch ply subdeck not included in the kit

These strips are cleanly and accurately processed unlike some of the fuzzy stuff you can buy intended for models.I justified the cost of £190 by the fact that any scale fidelity I add to the deck fittings would be instantly lost against hugely overscale deck planking. Also, the deck is one of the few areas of this model that is unpainted so I reasoned it is the one area to add some finesse.

I will keep a running cost total and also reference the section of the instructions I am working on. This is to provide other builders a point of reference as I move through the build. I will not include tool, glue and paint costs as these need to be bought, no matter the kit.

Section 1

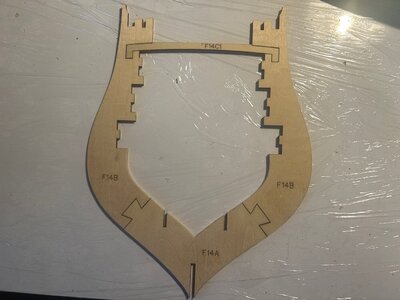
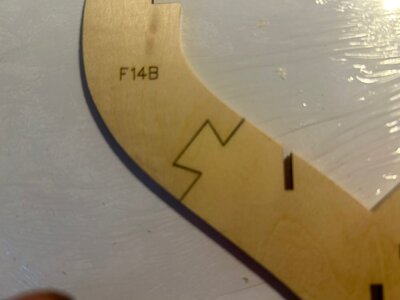
I first began assembling the parts that make up the bulkheads.It is quite clear that Artesania made no allowance for Kerf (cut) width of the laser when designing the parts and these are taken as is from their 3D model. This is not the end of the world but does need a careful workaround if you want an accurate hull skeleton.

It is important to apply wood glue to BOTH mating faces of these bulkhead pieces as you need to see a consistent brown line of even width when the dovetail joints are assembled ( PIC 2 ). Do not push the two pieces hard together or open right out, you effectively want an even gap all around the joint to maintain dimensional accuracy.This may sound pedantic but if you do not follow this you will introduce inaccuracies in the hull form which will need packing or oversanding to correct when you fair the skeleton prior to planking.

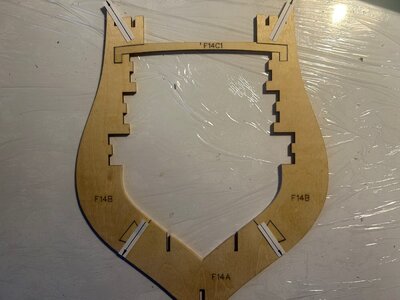
Having gone through the instructions several times, I decided to glue the deck beams in now rather than later as the instructions suggest. I the bulkhead has two deck beams though, I only glue in the lower one, the upper one to be fitted later.

These beams provide a necessary brace when it comes to adding the false cannon support strips and prevent the bulkhead tops from moving inwards and outwards.

In addition, when gluing these up on a flat surface covered with food wrap to prevent sticking, I checked the diagonals across the assembly as shown in the last picture to ensure they were the same. There is some slop in the joints caused by the Kerf and you can quite easily end up introducing asymmetry in the bulkhead (PIC 3).

This sounds like a lot of faff but after a couple it becomes an easy process.

IMG_1009.jpgIMG_1010.jpgIMG_1011.jpg
 
Last edited:
Back
Top