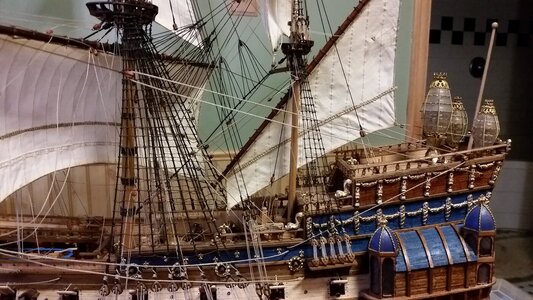
Yards before Ratlines and shrouds?

Joined
Oct 9, 2020
Messages
1,400
Points
393

Location
Fredericton, NB
Well, I have been pondering the question of whether I should install the yards before doing the shrouds and ratlines. I find it really hard to install the yards when the ratlines are in the way, yet all instructions I have seen always keep the yards to the end. What do you think?

Thanks in advance.
 
What about rigging the masts off the ship? I think this may be the solution I am looking for. But one must not forget to label everything otherwise it will be a confusing mess of lines. Next project will be done this way, I think
 
If you Pin the Yards to the Mast, then it should be simple to relocate them afterwards. I always pin ( kit nail/ wire, half depth drilled & pinned in both Mast / Yard pre final mast install), the yards on the masts to ensure the correct position, then remove, fit mast section( Level by level) and do the shrouds( Not ralines) and refit. This way you can adjust the yards whislt they are loosely held in place via pins. . You can do this for both clean and sail fitted, as the locating pin works as a third hand
 
Well, I have been pondering the question of whether I should install the yards before doing the shrouds and ratlines. I find it really hard to install the yards when the ratlines are in the way, yet all instructions I have seen always keep the yards to the end. What do you think?

Thanks in advance.
It may be crowded near the mast for setting yards using ties or jeers and rigging parrels when the shrouds are present, but rat-lining with yards in the way would be equally difficult if not more difficult. I suppose it comes down to a matter of preference. Before attaching yards, make sure all blocks for tacks and clue lines are on the yards before fitting, and that blocks for leech lines (or martnets), lifts, and ties/jeers on the masts or under tops.
 
I think I am going to try doing as much work as possible on the masts before actually putting them on the ship. I have yet to try that and it sounds like a good idea, at least as a concept. I foresee a rat's nest of ropes and an entangled mess, but I still want to try it. First I have to finish my current boat and then it's on to the Amati Bismarck.
 
If you Pin the Yards to the Mast, then it should be simple to relocate them afterwards. I always pin ( kit nail/ wire, half depth drilled & pinned in both Mast / Yard pre final mast install), the yards on the masts to ensure the correct position, then remove, fit mast section( Level by level) and do the shrouds( Not ralines) and refit. This way you can adjust the yards whislt they are loosely held in place via pins. . You can do this for both clean and sail fitted, as the locating pin works as a third hand
Agreed. I pin the yards as well. It makes things a lot easier.
 
I think I am going to try doing as much work as possible on the masts before actually putting them on the ship. I have yet to try that and it sounds like a good idea, at least as a concept. I foresee a rat's nest of ropes and an entangled mess, but I still want to try it. First I have to finish my current boat and then it's on to the Amati Bismarck.
It won't be a rat's nest if one line is rigged at a time. I have seen modelers hang a whole bunch of running rigging on the masts and yards before being fit onto the hull, and even though the lines are all tagged, all those lines hanging run risk of getting into a twisted mess. If you come up with a system of managing all those loose lines you could do it that way. Personally I had enough on my hands just threading one line through tops and past existing, belayed lines without crossing them. I think the hardest lines to reach were the lateen sail bowlines, at the bottom forward corner of the lateen sail, below the nock (forward end) of the lateen yard. They were buried between the main shrouds, behind the main topmast and crojack tack lines, and were very difficult to belay with a rigging fork and a hemostat. In almost all cases, it's easiest to tie a line to the belaying point and run it from bottom up, not from the top down. Best of luck !

1330 Lateen Tack and Sheet Lines, Topsail and Crojack Braces, and Main Course Braces  Rigged.jpg
 
Last edited:
thank you. I am going to give it a shot. If it turns out to be a disaster, I'll just go back to the traditional method. hemostat and tweezers or rigging tool
I like the idea of running the rigging from the belaying point to the top.


Isn"t this a wonderful hobby? I love experimenting with new ideas and seeing the results.
It's a careful balance of fear of breaking things with bravery of trying new things, all while making something that is complex and delicate.
 
In all of the masted period ship models I have done I have always completed the standing rigging before adding the yards and the subsequent running rigging. I prefer to have the stays and shrouds as open as possible to complete the ratlines. Then I worry about threading running rigging around and through the standing rigging. I also use the pin method for attaching yards suggestion noted above…drill a hole thru the yard and into the mast where you want the yard to rest then when it is time to attach the yards run the pin through the yard into the mast. A dab of CA gel will hold everything in place as you attach the running rigging tackle. What works for me is yards after ratlines and shrouds…and yes…the more rigging you add the more frustrating to weave new lines in place…including attaching yards…
 
Last edited:
I follow the mostly the same process as many. I'm thankful that this topic has been posted a few times as it has saved many of us frustration and aggravation if we were to flatten that learning curve ourselves. My basic working order priority/order is;

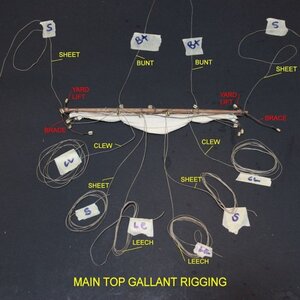
I build all yards, booms, etc., with all their components, exactly how Donnie has illustrated. I do secure all of those running lines to the close to yards with little rubber bands so they're not hanging loose, begging to get caught up in shrouds or anything else. When the yard is in place and I want to work on a line, bunt, clew, sheet, I snip the rubber band so only that line being worked on is hanging loose.

Standing Rigging
1) Bowsprit > Lower Fore Mast > Lower Main Mast > Lower Mizzen Mast
- Shrouds
- All Stays
2) Attach all Yards for Bowsprit, Fore, Main, Mizzen lower masts(no booms, just my preference). I don't work on the lines yet.

Once done, I follow the same order for Top, Top Gallant and Royals (if present).

For me, each milestone is rewarding enough for me to reenergize and look forward to the next, most challenging step to me and I'm sure for many; running rigging. But when I look at all the yards with their clean running lines secured with little rubber bands, everything looks neat, plenty of space to work. Without those rubber bands all the running lines would be hanging down, looking like a rat's nest, impossible to navigate. Sometimes that can be intimidating. Where do I start? How will I ever finish this?

So for the running rigging, I follow the same order, wherever I can, Bowsprit>Fore>Main>Mizzen (bottom to top). The last pieces are some of the slings and working rigging.

I need discipline and order. I don't think I could brush my teeth in the morning without a process!

Cheers,
Ken
 
I didn't realize that this topic was already discussed. I couldn't find anything. Sorry about that. And thanks for the info. Much appreciated
 
Back
Top