Vintage Billing Boats Cutty Sark - Sheathing the Hull?

Joined
Sep 23, 2021
Messages
137
Points
113

While my build is very much stalled in its box, all I am able to do at the moment is to make notes from Longridge’s book of the Cutty Sark, go through the plans and look at other build logs that I have found for when I do finally get the model underway. One of the things that I do want to do on my model is to sheath the hull. So, this is an interesting subject to throw out to fellow modellers for advice.

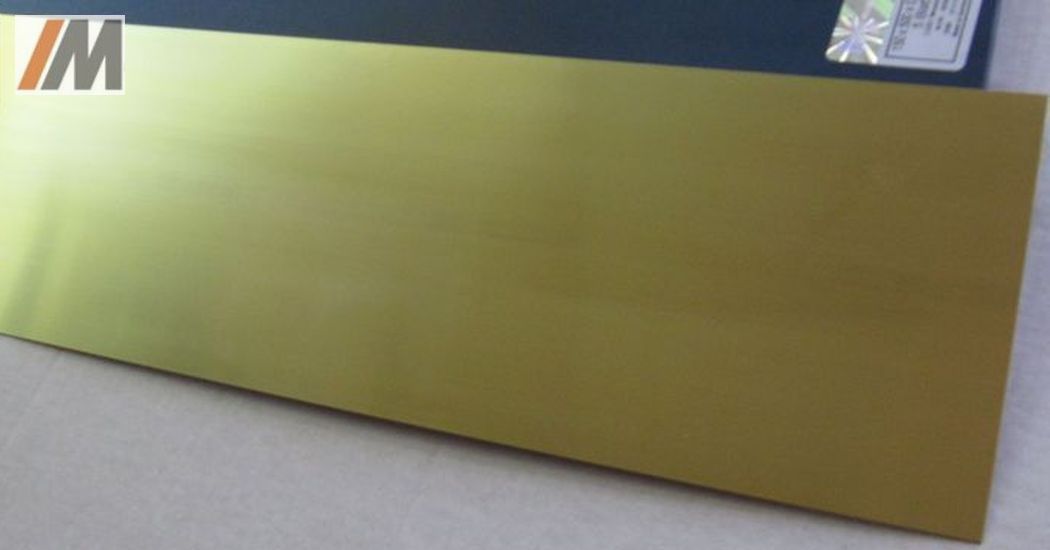
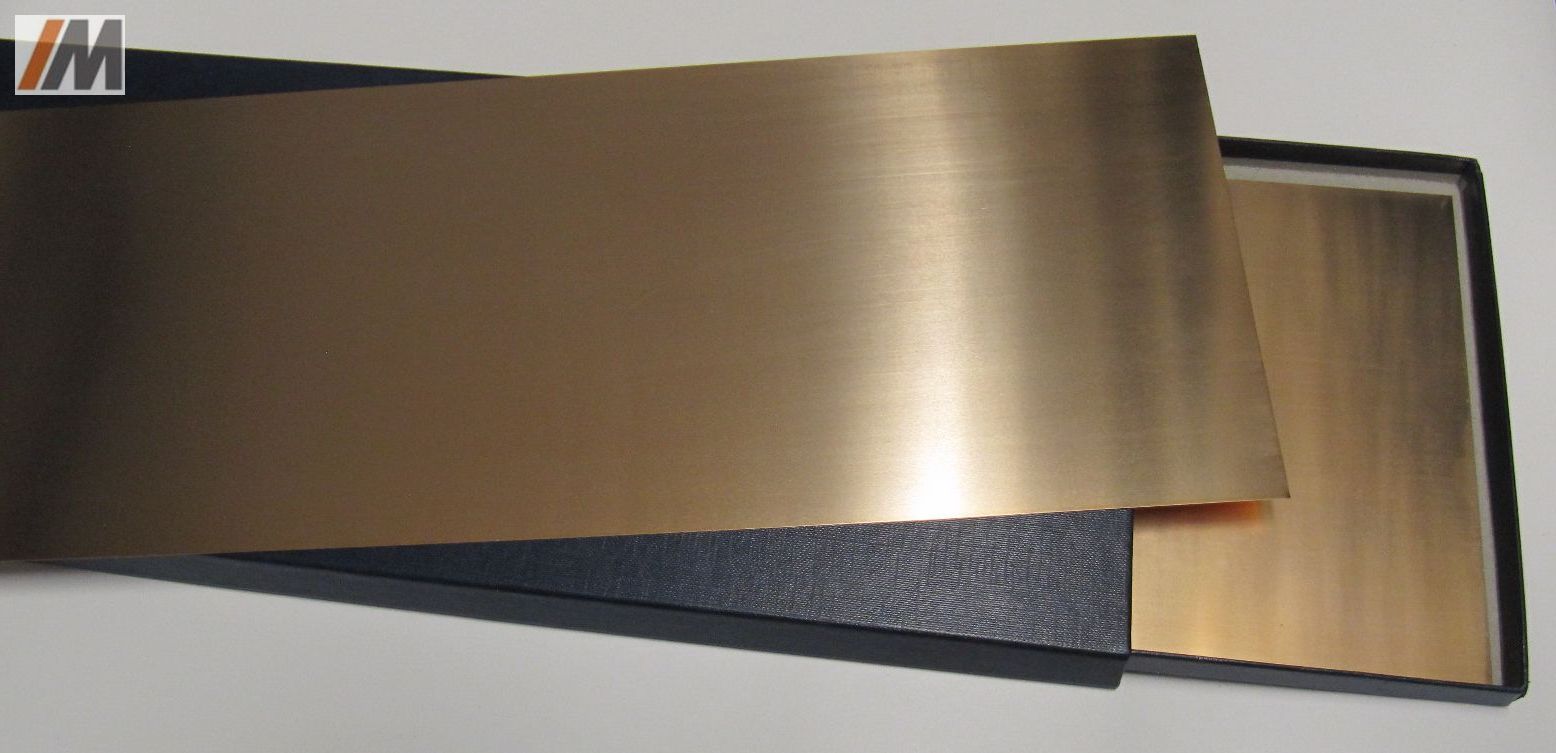
Most of the models of the CS that I have looked at have been sheathed with copper tiles or tape but Jock Willis’ original spec. for the Cutty Sark states “Yellow Metal Sheathing. Vessel to be sheathed from Keel to 18 ft water mark on top of paper and tar, sheathing to be smoothly put on, sheets to be 22, 24, 26 oz. metal”. So, the ship was sheathed in brass, not copper, from the boatyard. The yellow metal used at the time was a brass alloy known as “Muntz Metal” which is a 60/40 copper/zinc alloy. When you look at pictures of the Cutty Sark’s hull, the plates are the typical brassy gold/green in colour. So, copper plates or "copper” colour are actually wrong for the model. If I am keeping true to the ship, brass is the correct way to go - but how?

I found some useful images on the web here <
Photos of Cutty Sark in Greenwich, the hull under her glass roof (modelships.de) >

They show some nice detail of the plates and the brassy colour of the sheathing but it is also interesting to see that the hull plates show very little detail (seams and nails barely visible) from even a moderate distance away. Each plate is lapped under the top edge of the plate below and under the leading edge of the trailing plate but from a distance, the sheathing looks like it is almost continuous because it is so thin and smooth.

Plate/tape size (and thickness)?
The plates that were originally used on the CS were 4’x15” (122x38cm) and about 32-35 mil ( 0.8-0.9mm) thick with a tar and paper backing of ¼” thickness. Scaling the dimensions (including the backing) down would give a plate size of 16 x 5mm and a thickness of 0.09mm (give or take). When the ship was restored they used 120x40cm plates so pretty much the same. Two or three coats of paint (primer + metalized paint) would be around 0.08-0.1mm which would be the same as plates (so perhaps Billings is right to paint the hull?). Obviously the gain is that by adding plates it will give a more realistic metal and tile pattern appearance (but in reality, scaled down it would be near impossible to see the seam lines and nail heads).

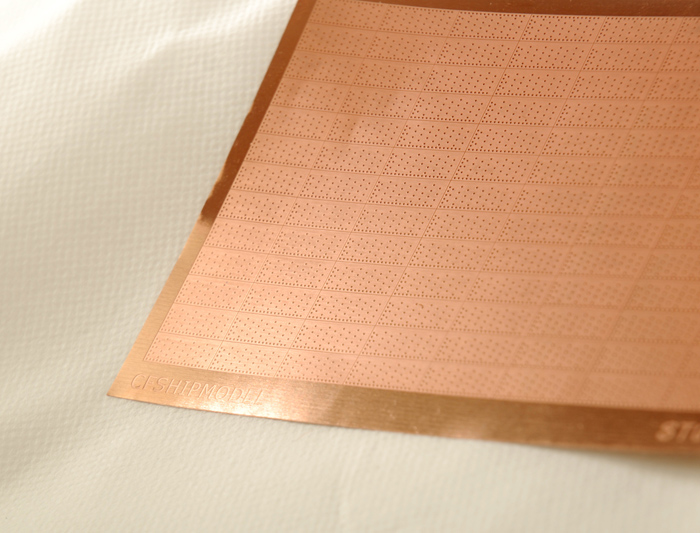
I have not found anybody who sells brass photo-etch tiles or foil tape. The only plates I have seen are copper and the closest match are ones from Amati which are 17x5x0.1mm.
Any comments about “brassing” the CS from fellow modellers are welcome! If anyone has “brassed” a hull rather than used the usual copper tiles/tape I would be really pleased to hear about how you went about that. Does anyone know of any sources for brass plates? I could make my own but I really don’t want to go to that level of time and effort unless I am really convinced that I should!
 
Very interesting subject.

You are right, that from a small distance you can see already only some horizontal lines, which are the small heads of the nailing

Giving some advise of th epossible method, you should define by yourself how you want to show her hull at the end

A) Like the actual museum shiny and polished hull - like a young bride at her wedding day

Screenshot 2022-10-12 091436.png Screenshot 2022-10-12 091206.png

Screenshot 2022-10-12 091400.png

B) Like she was looking before the fire and the last restauration - exhibited in the dry dock without the glas protection

Cutty_Sark_Stern.jpg Screenshot 2022-10-12 091543.png

C) in dry dock when she was old and used

cutty-sark-in-millwall-dry-dock-29021109184.jpg Screenshot 2022-10-12 092015.png 1665560257529.png

If "A" is your favourite, there are very thin brass sheets available (with 0,1mm thickness), so you could cut your own plates


or even foil with 0,05mm are available


This supplier offers also 0,01mm thick brass foils

If you like version "B" somehow the used sheets could be also bronze CuSn6, 2.1020, hart, S:0,05-0,3mm

bronze.jpg

 
Very interesting subject.

You are right, that from a small distance you can see already only some horizontal lines, which are the small heads of the nailing

Giving some advise of th epossible method, you should define by yourself how you want to show her hull at the end

A) Like the actual museum shiny and polished hull - like a young bride at her wedding day

View attachment 333862 View attachment 333860

View attachment 333861

B) Like she was looking before the fire and the last restauration - exhibited in the dry dock without the glas protection

View attachment 333858 View attachment 333863

C) in dry dock when she was old and used

View attachment 333859 View attachment 333864 View attachment 333866

If "A" is your favourite, there are very thin brass sheets available (with 0,1mm thickness), so you could cut your own plates


or even foil with 0,05mm are available


This supplier offers also 0,01mm thick brass foils

If you like version "B" somehow the used sheets could be also bronze CuSn6, 2.1020, hart, S:0,05-0,3mm

View attachment 333867

Hi Uwe,

thanks for the detailed reply. The pictures are very useful to decide which way I want to go. I quite like my models "fresh off the slipway" but shiny brass is a little bit too much. I would probably tone the shine down with some superfine grit (2500/3000) or use a mild etch solution and/or use a satin or matt lacquer to stope it oxidising and going black over time.

I have sourced some small test pieces of brass shim metal of various thicknesses that I have started experimenting with to make a few plates in order to see how easy it is for me to cut the brass accurately without bending/distorting the edges. Cutting the brass with scissor just rolls up the brass and turns the edges over so the only way I have found is to score with a scalpel and snapping the brass along the score line over the edge of a steel ruler. That works very well but cutting a full set of probably 3000 plates of exactly the same size by hand would be a really hard thing to do. The very thin shim foils (0.02-0.03mm) are almost like thick kitchen foil and they can be cut though relatively easily but it is also very easy to put dents and crinkles in the brass and removing them is almost impossible to do. It would be a lot of work but I may decide to go down that road if I am happy with how the test pieces look (I would need to buy lots of scalpel blades!). I may also try a fine ponce wheel to see if I can emboss a nail pattern into the brass but that is something I have never done so I would need to make a little jig, or something to stop the wheel drifting all over the place and finding the right pressure to emboss the brass and not end up distorting it.

I have not found anybody who offers photoetched brass plates like the copper Amati ones and having custom etching done is probably too expensive to do for one off projects like this one. I do know someone who makes their own etched printed circuit boards and I will talk to him because the copper etching process would also work on brass. He does have the photo-layout software so it would be very feasible to draw up the artwork for the nail head pattern and tile edges, but he only has the equipment to make small prototype boards and it would still be a big investment of time, effort and materials cost.

I will investigate further and see if I come up with another plan.

Dom
 
I have purchased an old Billings Cutty Sark kit NR 564, and also on order the current version. You could say I have a mild obsession with her, lol. My first big plastic kit was the Revel Model kit some 50 years ago and I also bought the IMAI plank of frame kit a few years later. The IMAI is still here, now contemplating selling it for the new Billings kit. Something about the lack of English in the instructions, and silverfish getting to the plans a little. But I have bought a Revel kit again to start me again and get back into model ship building, plastic to start then into wood.

I bought the Billings over the Artesania for 2 reasons, it showed it with the copper/brass below the waterline instead of timber and was on sale, even worthwhile getting it shipped from the UK to Australia. I have not checked the other forums to see which is the better kit, but I will, just for fun now. I have purchased both brands and seen the improvements in Artesania (Bounty) from one version to the current, so no doubt there will be similar with Billings.

Anyway, enough of my ramblings, I was so happy to come across this forum. I am wanting to bring realism to the model and put actual metal on it. I will be keeping a close watch on it. So far I am looking at putting some copper on and shaping it to the hull and with the right tools imitating the rivets and plates. Then doing some sort of weathering to dull the finish. I am not sure about cutting out individual plates. I may do strips and shape them, I am undecided. I will look for other forums on the site for applying copper in general but keep across this one for the Cutty Sark in particular.

Rob
 
I had once a talk with Tom from @CAFmodel and he told me, that he can offer photo etched plating according the needs and sizes requested.
So maybe you should try and contact him

He has these red copper sheets on his web-page, but there are others possible

 
I have purchased an old Billings Cutty Sark kit NR 564, and also on order the current version. You could say I have a mild obsession with her, lol. My first big plastic kit was the Revel Model kit some 50 years ago and I also bought the IMAI plank of frame kit a few years later. The IMAI is still here, now contemplating selling it for the new Billings kit. Something about the lack of English in the instructions, and silverfish getting to the plans a little. But I have bought a Revel kit again to start me again and get back into model ship building, plastic to start then into wood.

I bought the Billings over the Artesania for 2 reasons, it showed it with the copper/brass below the waterline instead of timber and was on sale, even worthwhile getting it shipped from the UK to Australia. I have not checked the other forums to see which is the better kit, but I will, just for fun now. I have purchased both brands and seen the improvements in Artesania (Bounty) from one version to the current, so no doubt there will be similar with Billings.

Anyway, enough of my ramblings, I was so happy to come across this forum. I am wanting to bring realism to the model and put actual metal on it. I will be keeping a close watch on it. So far I am looking at putting some copper on and shaping it to the hull and with the right tools imitating the rivets and plates. Then doing some sort of weathering to dull the finish. I am not sure about cutting out individual plates. I may do strips and shape them, I am undecided. I will look for other forums on the site for applying copper in general but keep across this one for the Cutty Sark in particular.

Rob
Hi Rob,

you may not have seen my original log of how I ended up with my vintage Billings kit it is here < CS Log >. I looked at a number of kits as well and the best around is probably the Sergal Mantua kit which does come with copper plates (see robertd's build log here < RD's Build > ). I had a poor experience with Artesania Latina with my Bluenose II build so I decide not to consider their CS kit (it may be absolutely fine, but I didn't want to be disappointed again). When I looked at the modern version of Billings CS I thought that the kit was way overpriced because I'm pretty sure there are no copper plates included and the instructions just show the hull painted with metallic paint as is the vintage one. In fact the modern BB version is almost identical to the vintage one except for including more laser cut wooden parts and wooden rigging blocks as opposed to the old style plastic ones. Had I not come across the Vintage kit when I did (and paid a stupid low price for it!) I would have gone with the Segal kit.

The CS is such an iconic ship to build I will definitely sheath my model, but I would like to go with brass because I think that would give a more authentic appearance. I am going to have a go at making my own brass plates but if that doesn't work out, I will probably go for the Amati copper photoetched plates which are high quality and are almost the correct size at 17x5mmx0.1mm.

Good luck with your build. I hope you start a log so that we can compare notes!

Dom
 
I had once a talk with Tom from @CAFmodel and he told me, that he can offer photo etched plating according the needs and sizes requested.
So maybe you should try and contact him

He has these red copper sheets on his web-page, but there are others possible

Thanks, I will look into that. I have since found a couple of companies in the UK that can also do custom etching but it looks quite expensive. I have sent them an enquiry with the plate dimensions and i will see what they can offer and price.

Dom
 
I had once a talk with Tom from @CAFmodel and he told me, that he can offer photo etched plating according the needs and sizes requested.
So maybe you should try and contact him

He has these red copper sheets on his web-page, but there are others possible

Thank you for this information. I had a look at this and it may be the solution I am looking for. Or at least offers another option as the riveting work has been done. I can make enquires based on the scale of teh vessel and freight costs. Interesting too as red copper is in between colours of brass and copper

Rob
 
Hi Rob,

you may not have seen my original log of how I ended up with my vintage Billings kit it is here < CS Log >. I looked at a number of kits as well and the best around is probably the Sergal Mantua kit which does come with copper plates (see robertd's build log here < RD's Build > ). I had a poor experience with Artesania Latina with my Bluenose II build so I decide not to consider their CS kit (it may be absolutely fine, but I didn't want to be disappointed again). When I looked at the modern version of Billings CS I thought that the kit was way overpriced because I'm pretty sure there are no copper plates included and the instructions just show the hull painted with metallic paint as is the vintage one. In fact the modern BB version is almost identical to the vintage one except for including more laser cut wooden parts and wooden rigging blocks as opposed to the old style plastic ones. Had I not come across the Vintage kit when I did (and paid a stupid low price for it!) I would have gone with the Segal kit.

The CS is such an iconic ship to build I will definitely sheath my model, but I would like to go with brass because I think that would give a more authentic appearance. I am going to have a go at making my own brass plates but if that doesn't work out, I will probably go for the Amati copper photoetched plates which are high quality and are almost the correct size at 17x5mmx0.1mm.

Good luck with your build. I hope you start a log so that we can compare notes!

Dom
Hi Dom,
I only bought the new CS as it was on sale at 40%off RRP, even though website prices were not showing true discount. By buying it and Occre Golden Hind and waiting for both to be shipped together (from UK) I saved a further 33% in shipping fees. Looked up the Seral Mantua kit and saw it has the copper plates included with the hull. Similarly the price is inhibitive. If's discounted price without shipping is the price I paid for both of the other kits with shippng. I too got my vintage one at a very low price. There was a current one going for $200AUD but I missed it by a week as I went with what I thought was a genuine supplier. By the time I got that sorted I missed out.

I will look at both the Amati copper plates and the recommendation from Uwek for https://www.cafmodel.com/products/red-copper-sheathing-53. They do a red copper sheathing at 1/48 scale 15x6mm, but say they can customize. I like hearing that they have gone to wood instead of plastic now. I am trying to source fittings I am missing for an old Billings Bounty kit 493. I have most. I have a fittings kit for the Spanks Galleon but cannot find the kit, it may be buried in the garage somewhere.

Similarly I picked up the current Artesania HMS Bounty for less than 1/3 of RRP. I had got a couple of 2nd hand kits but pieces missing from both of the previous version, one for only $30 AUD. Thought it was a miss print. No box but 90% there. The other was $100 AUD. That's another story.

Rob

Rob
 
Hi Rob,

you may not have seen my original log of how I ended up with my vintage Billings kit it is here < CS Log >. I looked at a number of kits as well and the best around is probably the Sergal Mantua kit which does come with copper plates (see robertd's build log here < RD's Build > ). I had a poor experience with Artesania Latina with my Bluenose II build so I decide not to consider their CS kit (it may be absolutely fine, but I didn't want to be disappointed again). When I looked at the modern version of Billings CS I thought that the kit was way overpriced because I'm pretty sure there are no copper plates included and the instructions just show the hull painted with metallic paint as is the vintage one. In fact the modern BB version is almost identical to the vintage one except for including more laser cut wooden parts and wooden rigging blocks as opposed to the old style plastic ones. Had I not come across the Vintage kit when I did (and paid a stupid low price for it!) I would have gone with the Segal kit.

The CS is such an iconic ship to build I will definitely sheath my model, but I would like to go with brass because I think that would give a more authentic appearance. I am going to have a go at making my own brass plates but if that doesn't work out, I will probably go for the Amati copper photoetched plates which are high quality and are almost the correct size at 17x5mmx0.1mm.

Good luck with your build. I hope you start a log so that we can compare notes!

Dom
Hi Dom,

I got a reply from Robert B in Perth. He used ZHL https://www.zhlmodel.com/ It comes in a roll with gum backing. Go to the Fittings tab and scroll down. Another option :)

Rob
 
Hi Rob,

I did consider the tape option, but in the end I decided it was not going to give me the finish that I am looking for. It looks very "shiny copper" and the rivets are embossed rather than crisply etched. I think for some models it is quite a good solution because the advantage of the tape is that you can probably cover the hull in a few hours and compared to plates it is far cheaper than anything else.

I did have replies from the people I contacted to see if they could custom etch some brass plates for me. One was way too expensive to consider, however the other one has quoted me something more in line with what I would be prepared to pay. I estimated that I would need six sets of the Amati photo etched plates which came to around £140-150 depending upon where you buy them and the people have quoted me £180 for a set of 3000 plates. It is still expensive, but as I said, I picked up my kit for next to nothing and even buying the plates, a set of CNC rigging blocks and a set of photoetch decor parts I will only be just over the retail price of the latest Billing version as being sold by Cornwall Model Boats. I am going to also buy some nice rope to rig the model but overall, I think the total cost of the project will be quite low as models go considering how many hours I will probably have to put into the build.

Dom
Hi Dom,
It does look shiny, but that may be dulled I am thinking through a weathering application. I also read a couple of articles, one who used it in strips and another who cut them into plates, so it is really up to the individual.

Rob
 
Hi Uwe,

thanks for the detailed reply. The pictures are very useful to decide which way I want to go. I quite like my models "fresh off the slipway" but shiny brass is a little bit too much. I would probably tone the shine down with some superfine grit (2500/3000) or use a mild etch solution and/or use a satin or matt lacquer to stope it oxidising and going black over time.

I have sourced some small test pieces of brass shim metal of various thicknesses that I have started experimenting with to make a few plates in order to see how easy it is for me to cut the brass accurately without bending/distorting the edges. Cutting the brass with scissor just rolls up the brass and turns the edges over so the only way I have found is to score with a scalpel and snapping the brass along the score line over the edge of a steel ruler. That works very well but cutting a full set of probably 3000 plates of exactly the same size by hand would be a really hard thing to do. The very thin shim foils (0.02-0.03mm) are almost like thick kitchen foil and they can be cut though relatively easily but it is also very easy to put dents and crinkles in the brass and removing them is almost impossible to do. It would be a lot of work but I may decide to go down that road if I am happy with how the test pieces look (I would need to buy lots of scalpel blades!). I may also try a fine ponce wheel to see if I can emboss a nail pattern into the brass but that is something I have never done so I would need to make a little jig, or something to stop the wheel drifting all over the place and finding the right pressure to emboss the brass and not end up distorting it.

I have not found anybody who offers photoetched brass plates like the copper Amati ones and having custom etching done is probably too expensive to do for one off projects like this one. I do know someone who makes their own etched printed circuit boards and I will talk to him because the copper etching process would also work on brass. He does have the photo-layout software so it would be very feasible to draw up the artwork for the nail head pattern and tile edges, but he only has the equipment to make small prototype boards and it would still be a big investment of time, effort and materials cost.

I will investigate further and see if I come up with another plan.

Dom
Hi Dom. I don't know if this is still relevant or how hard it might be for you you to get them but I saw Eskadra sells some really really nice brass sheathing plates. Screenshot_20230518_144825_Firefox.jpgScreenshot_20230518_144819_Firefox.jpg
 
Hi Dom. I don't know if this is still relevant or how hard it might be for you you to get them but I saw Eskadra sells some really really nice brass sheathing plates. View attachment 375055View attachment 375056
Hi Miguel,

Thank you for the information. The plates from Eskadra look quite good and would have been ideal but, I think given the current political situation with Russia, it is not an option.

I have not had much time to work on the ship recently but, I am doing the final sanding down of the hull so I will need to make a decision on what I will do for the sheathing fairly soon. I tried making some plates of my own but my efforts were not up to a standard (rubbish!) that I would use on the model and I gave up on that approach. I did also receive some quotes from two shops to make custom etched brass plates but in the end I decided that it was just far too expensive.


Dom
Yeah I thought so but still wanted to share the info in case you knew someone who could get them to you (or if someone else has the same issue). I, will certainly look to get some but not in the short term as the cutty sark is the last one on my list from the kits I already have (maybe 4 years from now if I become faster).

Looking forward to see how your cutty sark continues!
 
Back
Top