To victory and beyond ...

Yes, dafi knows how to do it, dafi hasn't forgotten anything ...

...

...

... the wrecking ball!

Victory-Shoulder-Blocks-240223_7580.jpg


Victory-Shoulder-Blocks-240223_7582.jpg


What happened again?

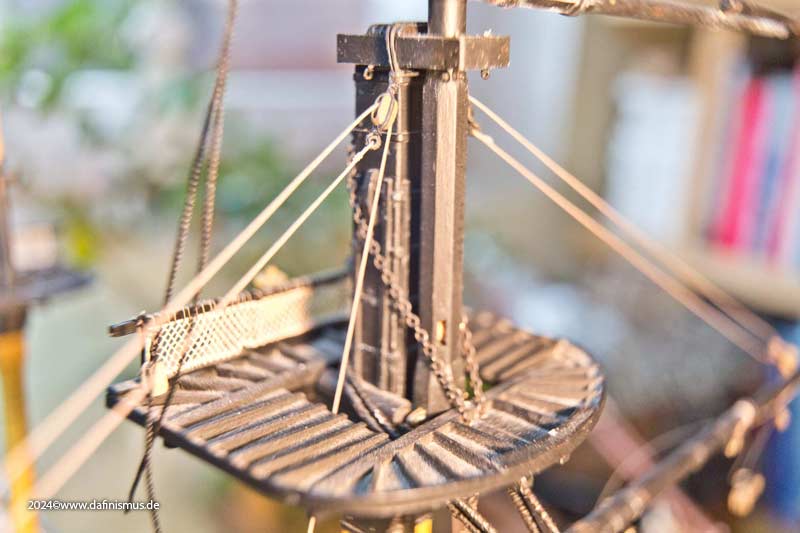
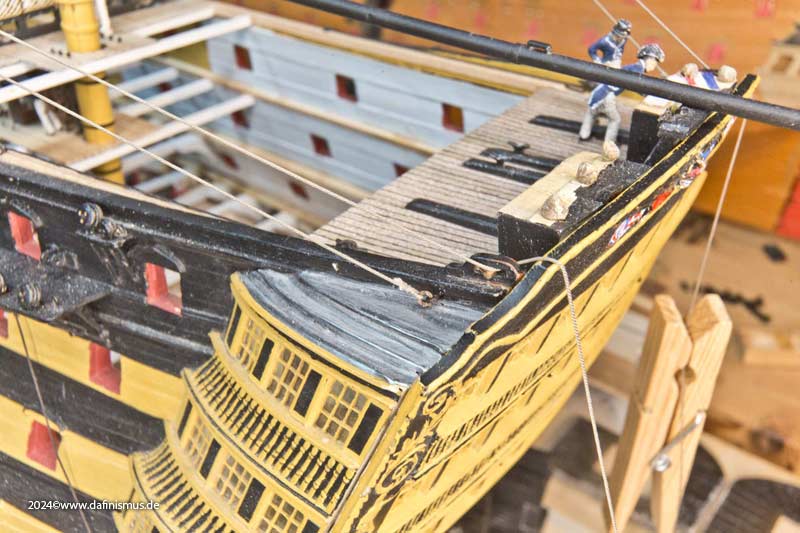
I always say it, my biggest problem is getting the big exhibit in P. out of my head.

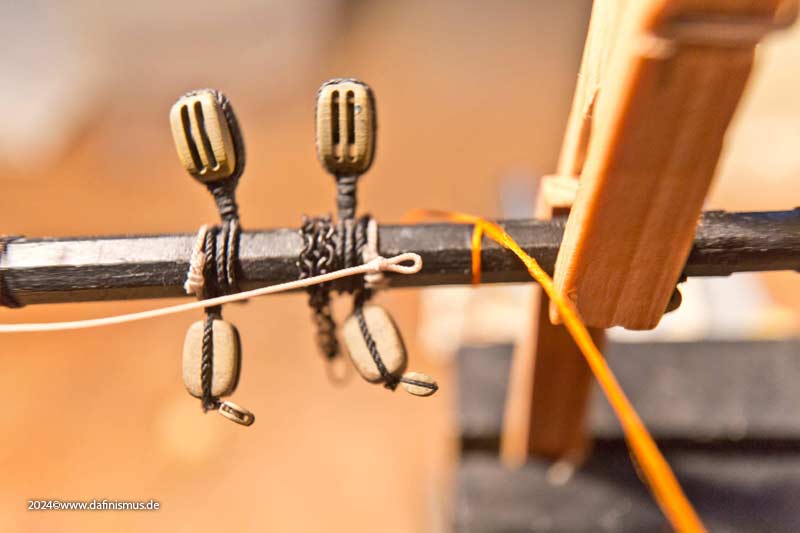
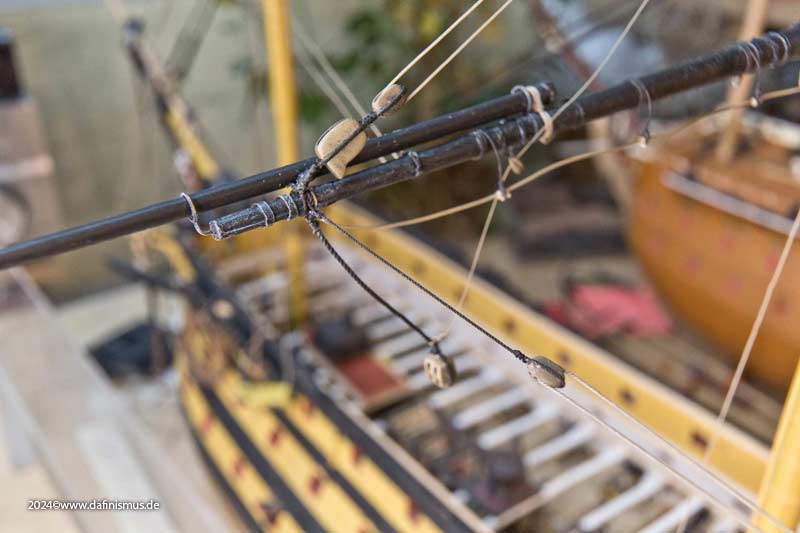
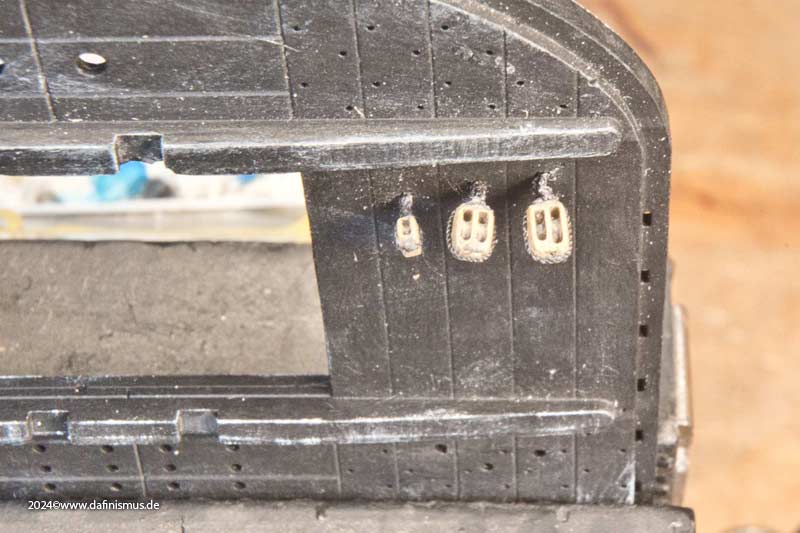
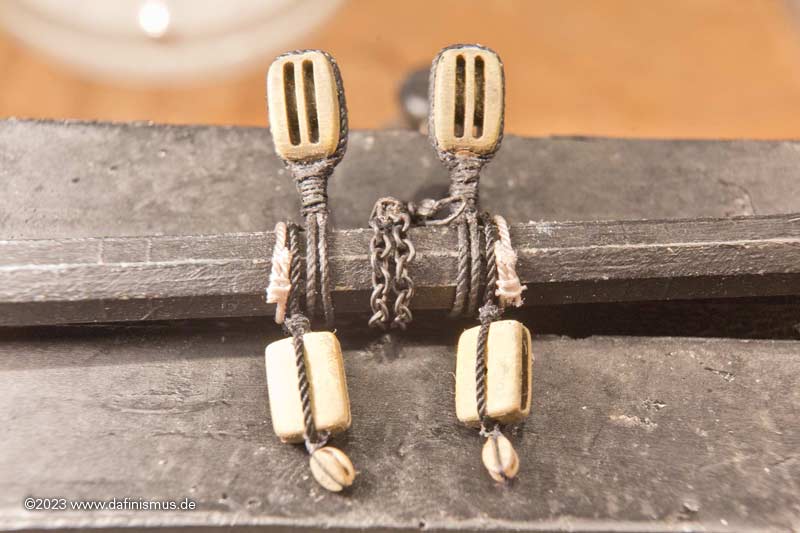
For almost 20 years now, I've been looking forward to those great special shoulder and quarter blocks that I discovered back then back there, building them exactly according to McKay and Bugler's plans and, in my exuberance, not even realizing that they are much rounder in the classic literature ...

Thank goodness there are some people in my german and english packs who are not so obsessed and have a keen eagle eye and have pointed this out to me. Thank you!

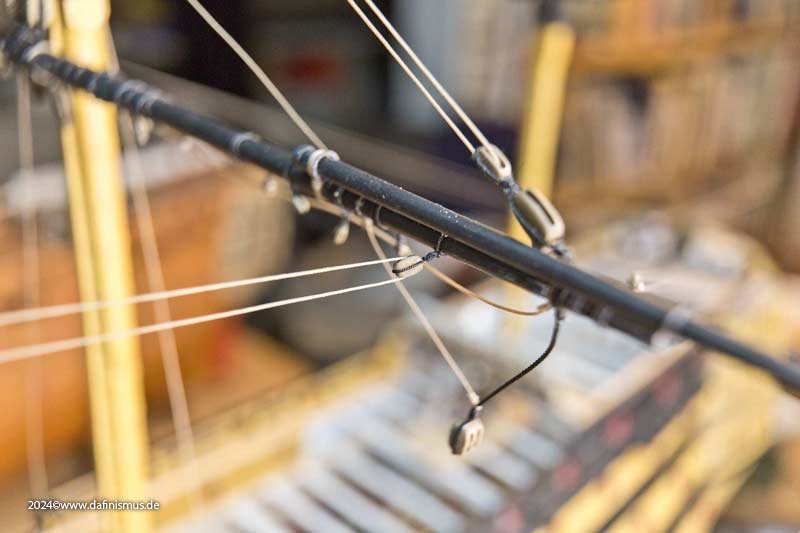
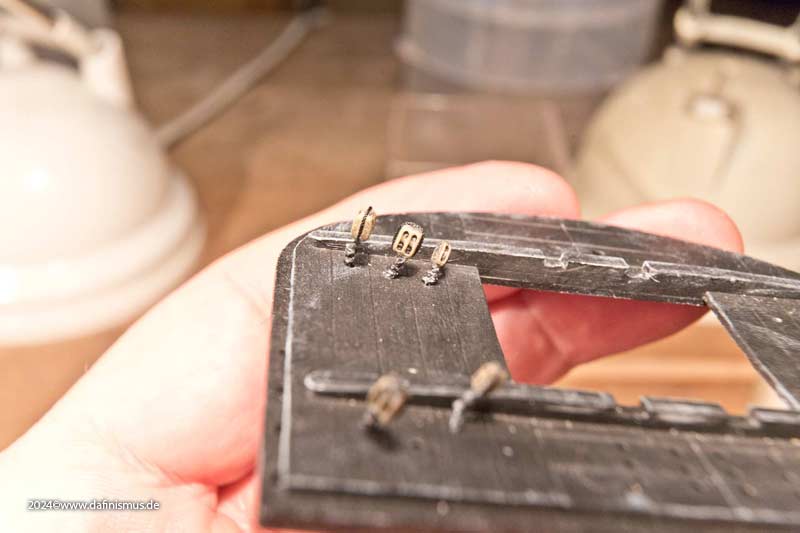
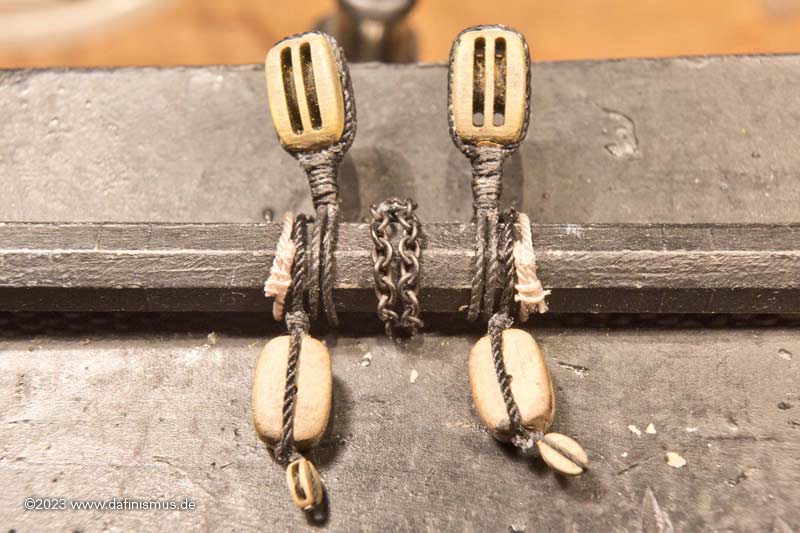
So I made new rounder blocks. I also finally did some research, as I was slightly irritated at the first pass when I noticed that these blocks on the foremast lower mast and topsail are all the same size, just like on the main mast lower mast and topsail. Thanks to druxey from the MSW for reassuring me and confirming this on the basis of Steel's information.

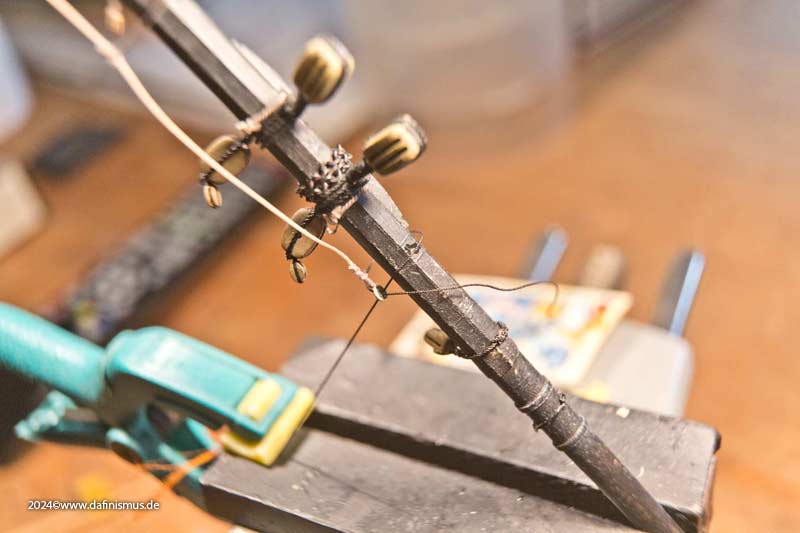
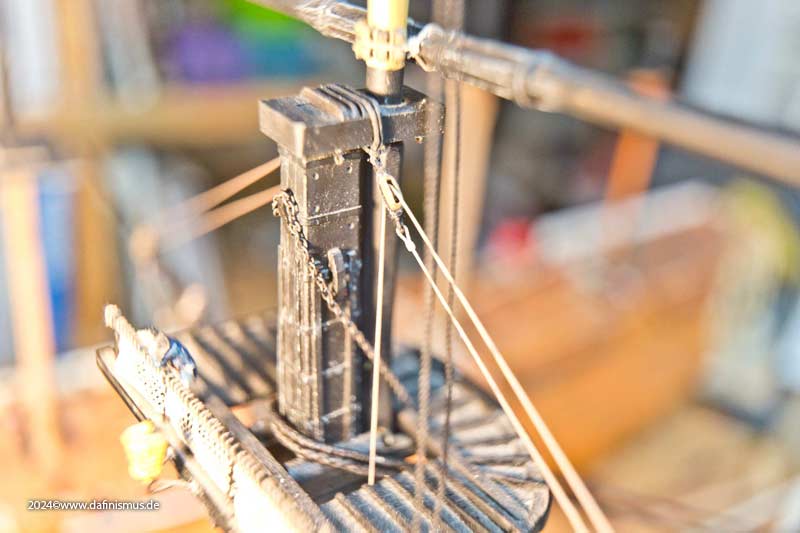
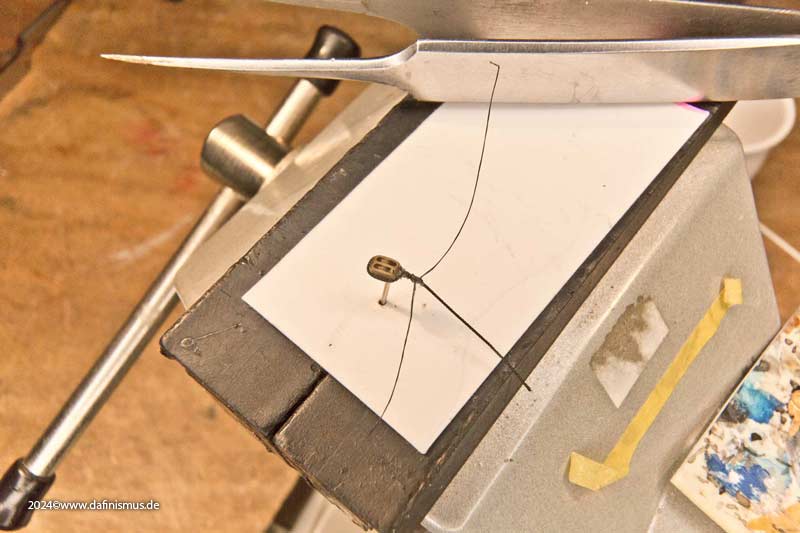
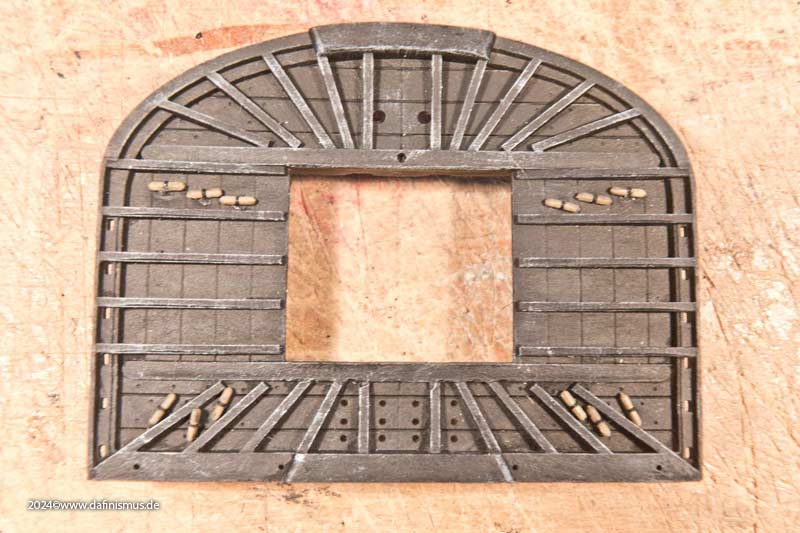
At this point, in response to a few questions, I would like to repeat the painting method: first, using an old disheveled brush, two layers of very thin paint in a darker brown, which is the base color. The thin paint makes it easy to get to the sides without pasting over the holes.

Victory-Shoulder-Blocks-240223_7569.jpg


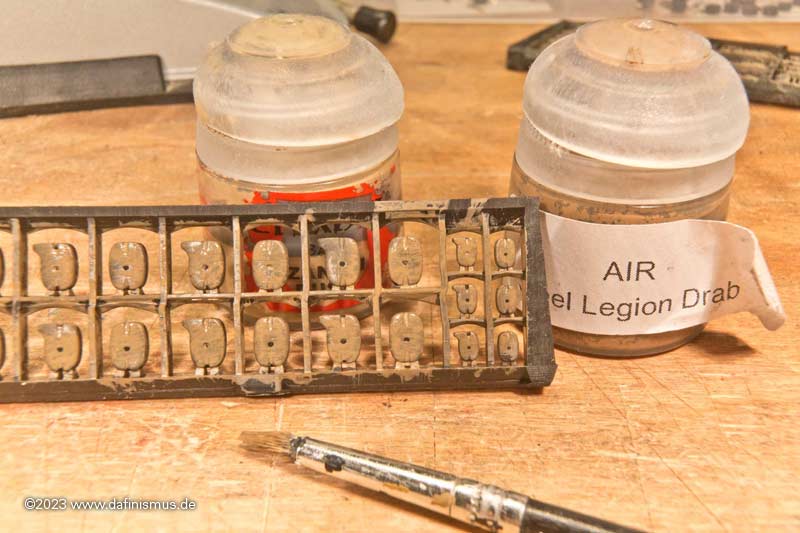
The highlighting color in a lighter brown, applied with a dry brush, is applied on top. This emphasizes the edges and the depths remain slightly darker, which gives optical depth. And the deliberately uneven application of color keeps the whole thing alive and no longer looks like plastic.

Victory-Shoulder-Blocks-240223_7574.jpg


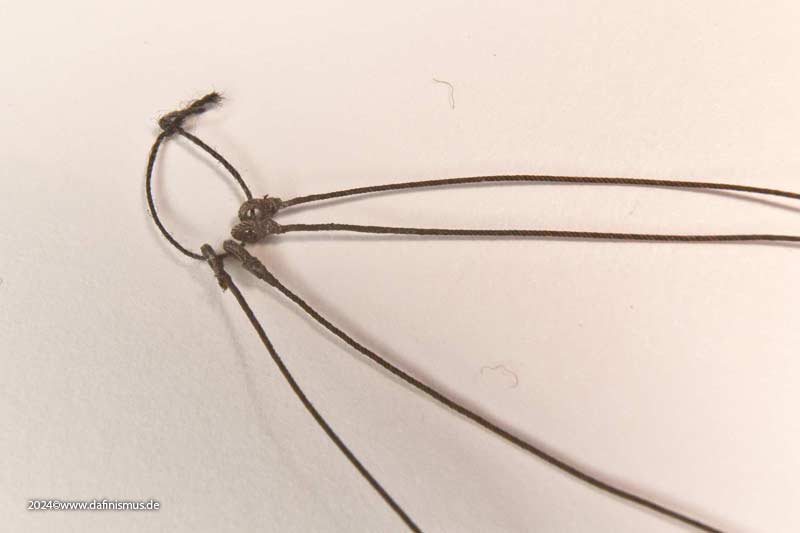
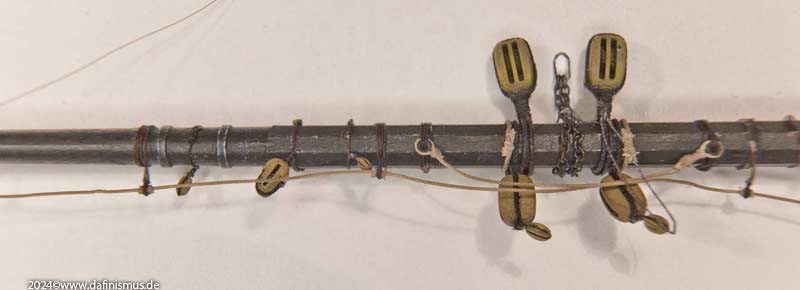
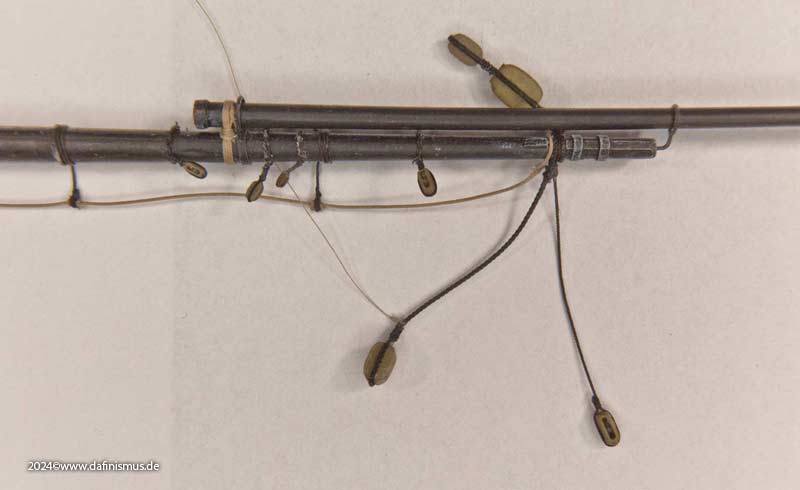
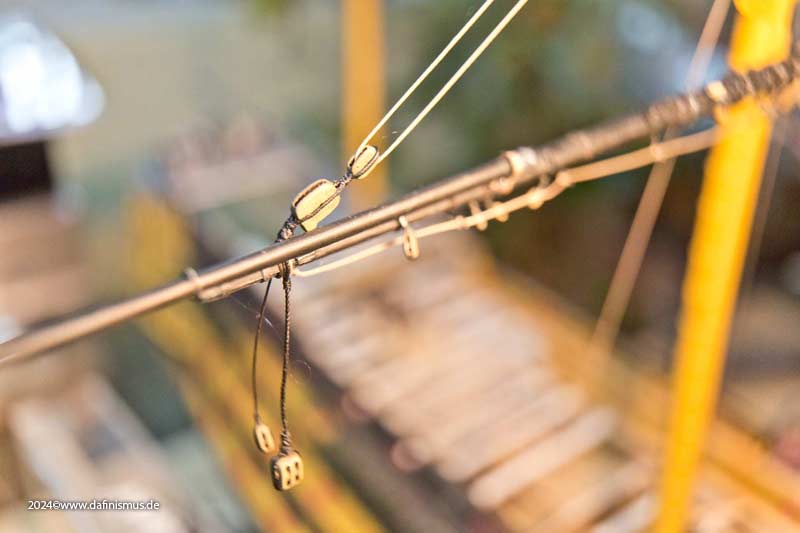
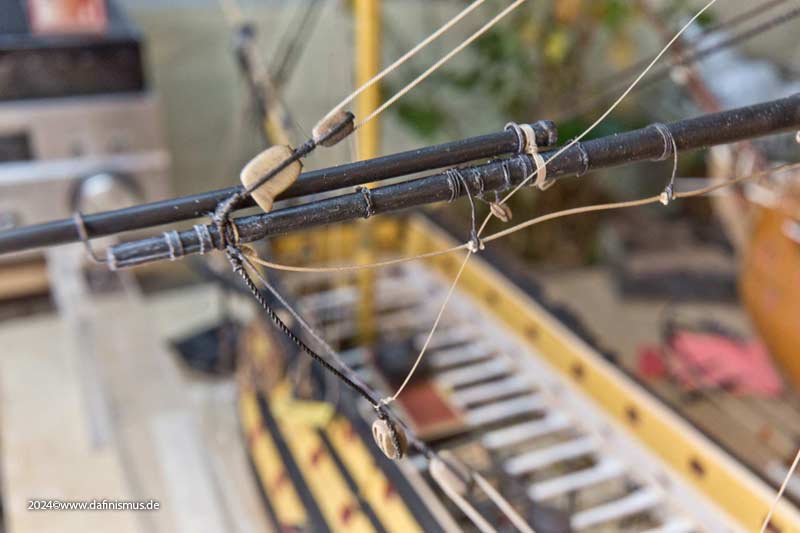
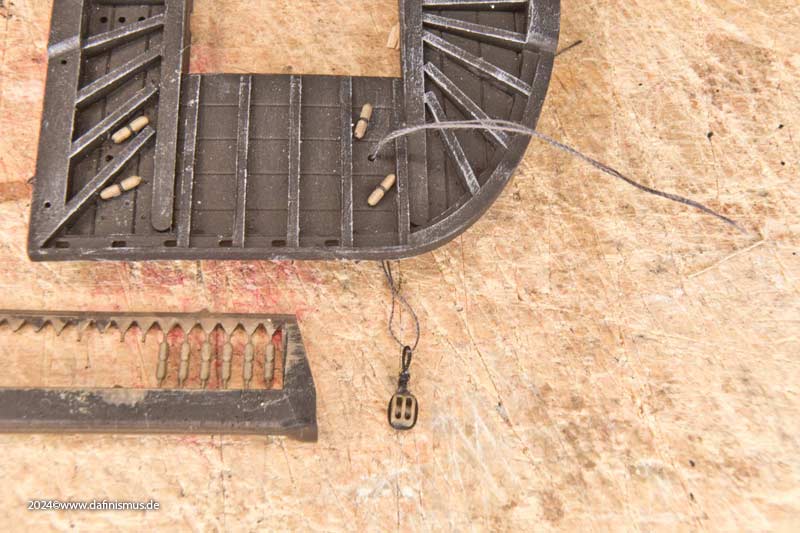
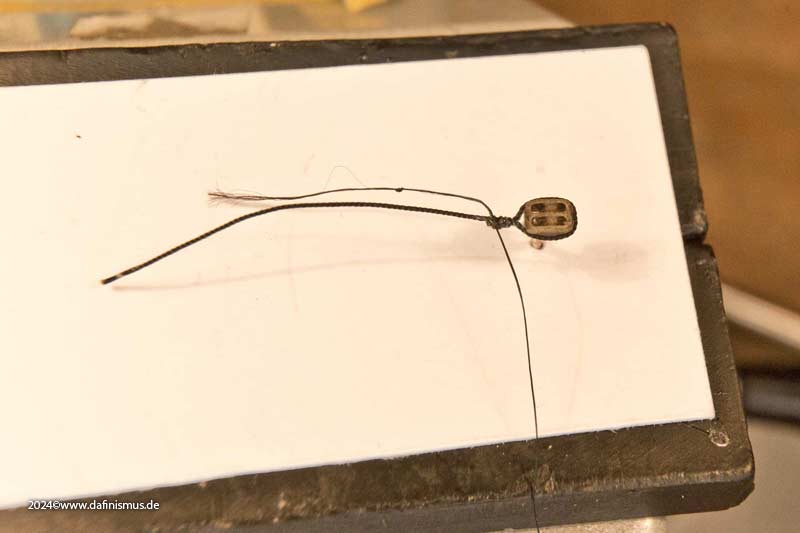
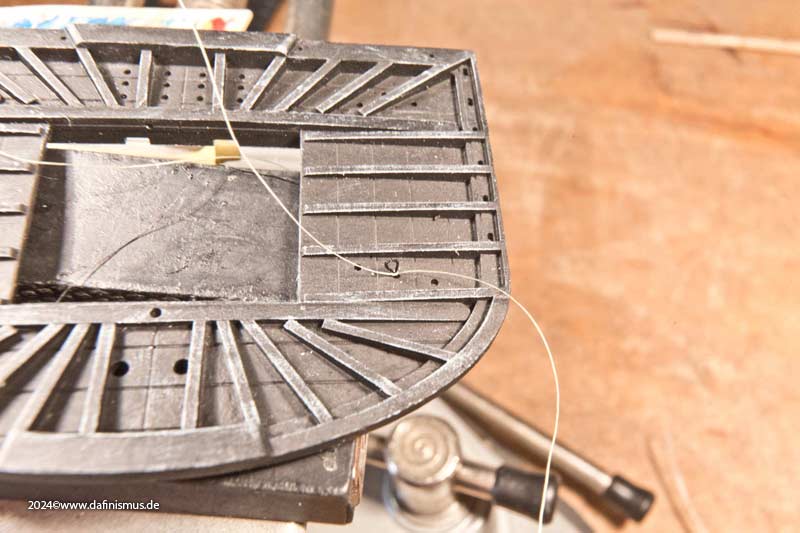
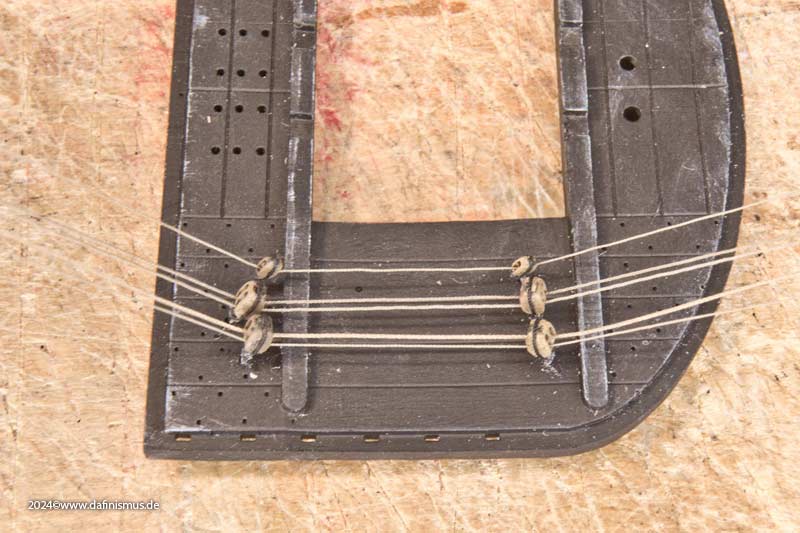
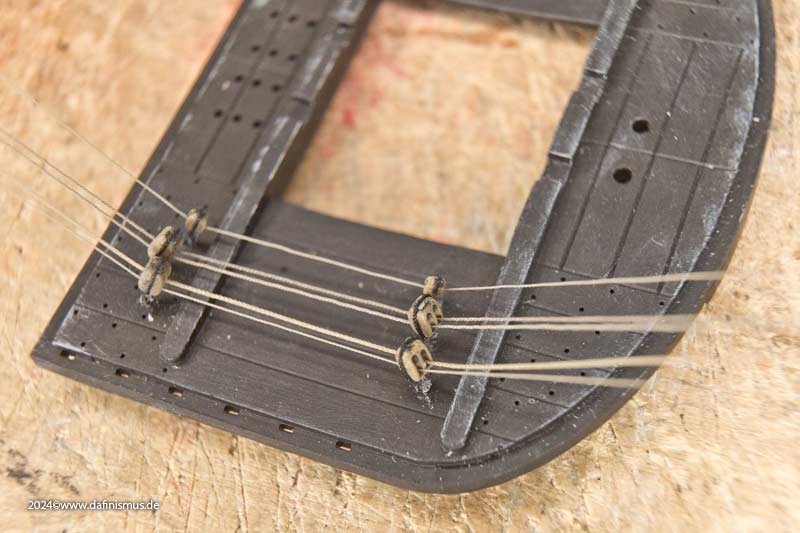
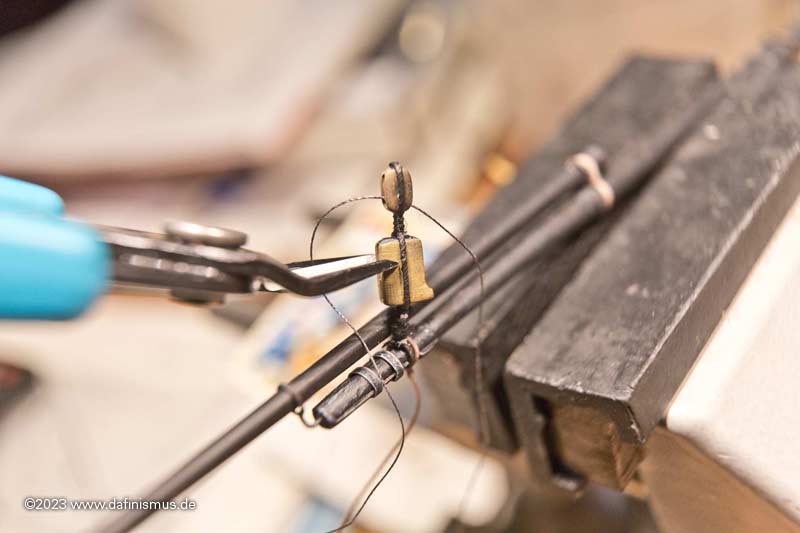
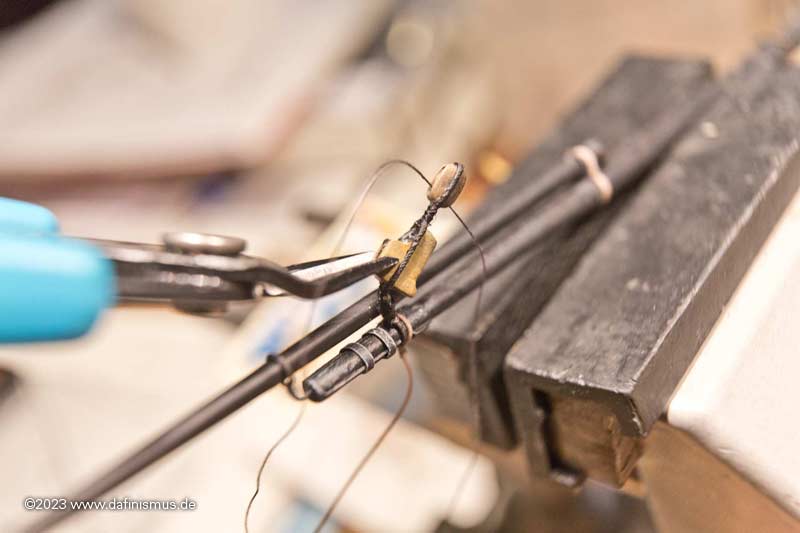
Then the grand finale: as the new round blocks are the same size as the old square ones, simply press the new ones back into the strop from the side and you're done.

Victory-Shoulder-Blocks-240223_7589.jpg


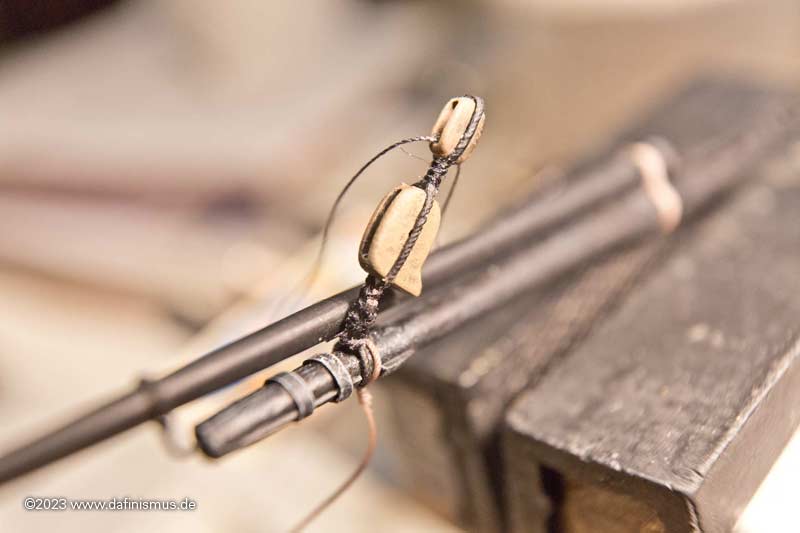
The same with the sheet quarter blocks, before - after :)

Victory-sheet-quarter-Blocks-240223_7591.jpg


Victory-sheet-quarter-Blocks-240223_7594.jpp


You see dafi still can do it ;-)

XXXDAn

PS: All those of you that already got a delivery of blocks will get a free upgade of the blocks in question :)
 
Just a small warning for those who follow the sequences of my build: Please remember to put the shrouds before putting up the stays! My stays are up for test purposes, I will still have to reopen the lanyards, take the stays off, fit pendents and shrouds and then finally reset the says and its lanyards :)

All the best, DAniel
 
Well, what can I say. I'm only away for a few weeks because of work and already my tinkering room doesn't want to let me back in ...

"What does THIS strange man want here?!" was one of the nicer questions I had to listen to ...

After some persuasion à la "man cave whisperer", I was allowed to do something in there after all. In the meantime, I had revised my lists of blocks for the Victory again. I had noticed that McKay had left out some quite some blocks in the AOTS and that there were also some errors among them. I had therefore plowed through the entire Steel of 1795 and worked through the various entries, compared them and selected the most plausible variant, possibly adding variants. All in all, there were significantly more blocks added, both the standard blocks and the special types. But more on that later.

The last thing I did was to replace the square shoulder blocks, which are used on the ship today and which McKay also shows, with contemporary round ones. The main yard continues to serve as a model playing field. Here is a reminder of the last status.

Image


Image


Next came 3 x 2.5 mm blocks on each side for the belly and nock gordings.

Image

Check on the tweezers whether the paint application is complete and either brush on the tweezers immediately ...

Image


... or after the block has been pinned. Place a strop around the fixed block as described before ...

Image


... and checked the length in place. Since the block hangs in front of the yard, the legs must of course be different lengths.

Image


The pointed tweezers with clamping function do a good job here, first one side ...

Image


... and neatly trimmed, and the other and you're done
:-)


Image


Here is a comparison of the simplified version with a simple knot on the top of the yardarm and the more correct solution with a lashing.

Since the lashing is tricky to thread, a classic needle helps.

Image


And this is how it should look
:-)


Image


With this technique, I'm now just as fast for the small blocks as I am for the large ones
:-)


XXXDAn
 
Awesome work Dan, our collective education enrichens as always. I just showed this to Darlene and she was blown away with the detail. ( She is used to my 1/48 WW1 aircraft models where you can read the instruments)
 
After the leechline and bowline blocks had worked out so well, we continued with the tricing lines of the yard tackles pendants.

The block on the yard tackle pendant was hauled to the yard with the outer tricing line and the lower block with hooks was hauled with the inner tricing lines to the shrouds to be hooked/fastened there. Unlike other load rigs, the yard tackles were not struck off when not in use, but were also used as to support the braces in strong winds or for other purposes.

And so that the whole thing doesn't get too boring, this time the blocks are 7" and 8", i.e. 2 mm in my scale. But it doesn't matter, it works just like the others
:-)


First on the filed needle, then stropped in as usual ...

Image


... and succeding the function test.

Image


Fits. Then, as usual, tied the eyes with the pointed clamping tweezers and quickly put them all on the leash, such a stopped block is too quickly inhaled.

Image


And to show that you can get these blocks to the yard even with sausage fingers like mine ...

Image


... you just have to make sure that you …

Image


… get not tangled. And already finished.

Image


You can clearly see the noticeable difference between the 2 mm block of the tricing line and the 2.5 mm blocks of the leechline.

The tricing line is one of the thinnest in the entire rigging, here hanging loosely with the yard tackle in use ...

Image


... and with the yard tackle pulled up.

Image


For the sake of completeness, the inner tricing line next to the 4 mm clue line block.

Image


XXXDAn
 
Hallo Daniel,
you know, that with the age, the eyesight is getting worse and worse (step by step) - the fingers are starting to shake etc.....
and you are getting smaller and smaller with your modelling .....
Wahnsinn was du da machst
 
Last edited:
Yes, it was a hell of a ride through model makers universe that I was taken through out the last years. Right from the humble beginnings straight forward obb down to the heavy seas to the Arsenal Exhibition in Rochefort, as mentioned by Uwek in another thread. Yes this build started to have a life of it´s own, his own superior will and I am very privileged that it granted me the honor to be part of it.

And yes too, my litte Vic was the only sailing ship build originating from plastic in the great Exhibition du Modelisme naval. But almost nobody realised this, even when seen in company with all this superior build wooden arsenal models . And hush, do not tell, I think she did rather fine, very fine :)

f93t7021p154038n5_pZwcBiuM.jpg

f93t7021p154038n10_xpLOvIQn.jpg

f93t7021p154038n8_atkJErRQ.jpg

f93t7021p154234n2_RKIpuTzo.jpg

... hihihihihi, that´s Uwe in the picture by the way :)
f93t7021p154234n9_vtJqSQeY.jpg

And here too, together with our "Delegation allemande" and our french host.
f93t7021p154234n3_DCuMJeOc.jpg

f93t7021p154234n10_uJvhCUsM.jpg
f93t7021p154234n11_KBrFxHLA.jpg


Let me get you a small retrospective from this ride.
tbc.

XXXDAniel
Your Victory is amazing!

Bill
 
And at some point we got serious with the foot horses. First the thimbles were tied into the stirrups and the four-pack on each side was secured against being breathed away.

Victory-Blocks-240415_8487.jpg


Then average out the distances for the stirrups.

Victory-Blocks-240415_8489.jpg


For the distance between the thimble and the upper reference point, I made a small 9 mm gauge so that the distance is even when being glued down. Then 3 turns with the free end and glued that on too. When all 4 stirrups were in place, the foot horse was pulled through the thimbles and secured with an external knot before and after the thimble to prevent it from slipping through.

Victory-Blocks-240415_8495.jpg


Then a short standing test, and lo and behold, it looks quite plausible.

Victory-Blocks-240416_8507.jpg


Then knotted the eye on the inside of the foot horse to secure it. It was THE perfect eye. But I had overlooked the fact that the clamp on the other side of the yardarm went further out than expected, see orange thread ...

... so I cut off the eye and spliced in an extension, luckily it's hardly noticeable at this point, uffz.

Victory-Blocks-240421_8511.jpg


This time the length was better and the eye was lashed with 4 turns on the other side of the yard.

Victory-Blocks-240421_8514.jpg


Here is the finished ensemble and ...

Victory-Blocks-240425_8527.jpg


... even our little able seaman was happy with it up there.

Victory-Blocks-240425_8561.jpg


XXXDAn
 
Thank you Jim and SG1!

The main yard was finally also finished so far, here is an overview of the collection of all the blocks that have now snuggled together. Always seen from both the front and the aft. And as already written earlier, the stirrups and foot horses will only be smoothed and provided with gravity during the final installation.

Victory-Blocks-240425_8522.jpg


Victory-Blocks-240425_8531.jpg


The center of the yard with the chain sling ...

Victory-Blocks-240425_8546.jpg


Victory-Blocks-240425_8527.jpg


... and the yard arm, 9 blocks in 8 sizes :-0

Victory-Blocks-240425_8533.jpg


Victory-Blocks-240425_8523.jpg


Then came the exciting moment, the test hanging :)

First the lifts.

Victory-Blocks-240425_8554.jpg


Victory-Blocks-240425_8559.jpg

Victory-Blocks-240425_8549.jpg


Then the yard tackles with outer tricing line.

Victory-Blocks-240502_8701.jpg


And usually as last the braces.

Victory-Blocks-240502_8704.jpg


Victory-Blocks-240502_8695.jpg


And there is another little tidbit that is not normally seen on models. According to Steel, the rope slings were replaced by chain slings in wartime, as can be seen in the pictures of the lifts. Consequently, the forward-facing preventer braces should also be fitted. These replaced the double pendant of the braces of the 1760s. For this purpose, the brace was attached to the rearmost shroud of the foremast, ran to a block on the front of the yard, back to a block on the rearmost shroud and from there to the forecastle.

Victory-Blocks-240502_8709.jpg


Exciting.

XXXDAn
 
WOW! This is dantastic Dan.
Lololol.....made a spelling mistake and invented a new word for your work!
It's Dantastic!!!!
Time for a printing update methinks.
 
Thanx Pete, and the art of modeling is alraedy known as dafinism :)

The next adventure and small intermezzo were the blocks under the fore fighting top. Here, leech- and buntline run colorfully mixed with the braces of the sprite sail yard and top yard through a wonderful collection of blocks.

The first attempt was the classic way of doing the strop first ...

Victory-Blocks-240426_8630.jpg


... and then pull it through to the top from below and push the toggle through the upper loop.

Victory-Blocks-240426_8650.jpg


It worked, but it was a rather messy and uneven act.

Victory-Blocks-240426_8667.jpg


Then prepared another block, but didn't tie the top loop ...

Victory-Blocks-240426_8670.jpg


... and pushed the free end from the bottom to the top, tied a loop there with an auxiliary thread and brought the free end back down.

Victory-Blocks-240426_8672.jpg


Now I was able to pull the loop at the top tight from below, insert the toggle and adjust the length with the free ends of the binding, knot everything and neaten the whole thing.

It looks much better :)

Victory-Blocks-240427_8678.jpg


You can see the 3 different blocks, with the outer one having two differently sized wheels.

This is due to the fact that there are four rope thicknesses in use at this point, resulting in simply beautiful details.

Victory-Blocks-240427_8684.jpg


Victory-Blocks-240427_8685.jpg


And it also looks very tidy from above.

Victory-Blocks-240427_8689.jpg


And if one wonders about the different layout of the battens, very simple: the Admirality Order from 20. Nov.1802 defines the tops of great ships to be done out of fir instead of oak and to be fitted in two halves :)
This made the tops less haevy and far more easy to be exchanged if damaged.

Yay!

XXXDAn
 
Great update Dan. I showed this and your blocks to a friend who does 1/44 aircraft and he was blown away with the fidelity of your work and the quality of the printed blocks. Might get him into ship modelling yet.
 
my friend you are crazy, but I did not know that you are so crazy
BTW: It was great to meet you and all the other friends during last weekend in Augsburg
I am happy to have a crazy friend :cool:
 
my friend you are crazy, but I did not know that you are so crazy
BTW: It was great to meet you and all the other friends during last weekend in Augsburg
I am happy to have a crazy friend :cool:
The pleasure is completely on my side too!
XXXDAn
 
Back
Top