
You are using an out of date browser. It may not display this or other websites correctly.
You should upgrade or use an alternative browser.
You should upgrade or use an alternative browser.

I want to use my small lathe to tapper my mast and yards on my Le Soleil Royal which are quite long!! but when I attach the dowels have a shimmy when turning any ideas on how to resolve so a lathe can be used
What make of lathe is it and does it have a tool post or are you hand turning ,
best regards John ,

You need dowels big enough to turn down the wobble, and unless you have a tapering attachment it's best to sand the taper on the lathe.
- Joined
- Jan 21, 2022
- Messages
- 397
- Points
- 238

It is a Chinese brandWhat make of lathe is it and does it have a tool post or are you hand turning ,
best regards John ,

Hi Bandido
The proposal of OldMan258 doing the tapering with sanding is the less complicated and in my opinion the best way unless you build a model in 1:10 or 1:5 scale. Using 3 to 7 cm broad cut sandpaper ribbons(starting with coarse to fine grades) and holding and squezing it gently around along the rotating mast and moving to the ends to be tapered .Slighly holding and pressing the sandpaper along the mast you can also control the shimmy dancing of the mast piece.
I use in the attachment shown primitive assembly system for tapering with good results.
You should just imagine that mast wood piece is a wild horse , which you have to tame it using sandpaper ribbons.
Kind Regards")

The proposal of OldMan258 doing the tapering with sanding is the less complicated and in my opinion the best way unless you build a model in 1:10 or 1:5 scale. Using 3 to 7 cm broad cut sandpaper ribbons(starting with coarse to fine grades) and holding and squezing it gently around along the rotating mast and moving to the ends to be tapered .Slighly holding and pressing the sandpaper along the mast you can also control the shimmy dancing of the mast piece.
I use in the attachment shown primitive assembly system for tapering with good results.
You should just imagine that mast wood piece is a wild horse , which you have to tame it using sandpaper ribbons.
Kind Regards

Hi Bandido!
Like our colleagues I also tapered my masts and yards using sandpaper. I used two sanding blocks holding one on each side of the wood. This sanding generates lots of heat and the blocks protected my fingers/hands! I got rid of the wobble by 1: making sure I was in the true center on each end, and 2: using the lightest possible mounting pressure side to side. If I pushed in too firmly it caused the piece to bend and wobble.
Hope this helps a bit.
- Joined
- Jan 21, 2022
- Messages
- 397
- Points
- 238
that is what I was trying to do ,sand the taperYou need dowels big enough to turn down the wobble, and unless you have a tapering attachment it's best to sand the taper on the lathe.
Thanks for the info! Will Play around a bit to see what works best but what you have suggested will help especially the true center not easy on a 9mm dowel but that is the miniature world of modelling!Hi Bandido!
Like our colleagues I also tapered my masts and yards using sandpaper. I used two sanding blocks holding one on each side of the wood. This sanding generates lots of heat and the blocks protected my fingers/hands! I got rid of the wobble by 1: making sure I was in the true center on each end, and 2: using the lightest possible mounting pressure side to side. If I pushed in too firmly it caused the piece to bend and wobble.
Hope this helps a bit.
- Joined
- Jan 21, 2022
- Messages
- 397
- Points
- 238
Hi Bandido!
Like our colleagues I also tapered my masts and yards using sandpaper. I used two sanding blocks holding one on each side of the wood. This sanding generates lots of heat and the blocks protected my fingers/hands! I got rid of the wobble by 1: making sure I was in the true center on each end, and 2: using the lightest possible mounting pressure side to side. If I pushed in too firmly it caused the piece to bend and wobble.
Hope this helps a bit.
Thanks for the info I will play around a little with some old dowels I have laying around to get some practice on the lathe!!Hi Bandido
The proposal of OldMan258 doing the tapering with sanding is the less complicated and in my opinion the best way unless you build a model in 1:10 or 1:5 scale. Using 3 to 7 cm broad cut sandpaper ribbons(starting with coarse to fine grades) and holding and squezing it gently around along the rotating mast and moving to the ends to be tapered .Slighly holding and pressing the sandpaper along the mast you can also control the shimmy dancing of the mast piece.
I use in the attachment shown primitive assembly system for tapering with good results.
You should just imagine that mast wood piece is a wild horse , which you have to tame it using sandpaper ribbons.
Kind Regards
View attachment 322141
I user a drill with the dowel placed in the chuck. Some masking tape can be used to protect the end of the dowel from the clamp, but I prefer to have an extra 1/2" (12mm) of length to the dowel and not use tape. I put on a heavy leather glove on my sanding hand (heat protection) and hold a square of sandpaper folded into a strip. Turn on the drill and begin tapering the dowel with regular checks on thickness at various places on the mast-to-be. My sanding technique is to start at the unclamped/small end of the mast and sand toward the base about 2 inches. Then back to the end of dowel. On the next pass, pull the sandpaper back 4 inches and return it to the end. Continue this until you get to the base and then reverse the process. This method results in a fairly consistent taper. You have to stop occasionally to knock the sanding dust out of the sandpaper to get it to work well.
Your lathe will work, you just need to engage the tail stock or a steady rest. Sanding is probably the best method as using gouges is difficult to have an even taper. You can use the tail stock and keep the tail end full size while reducing close to the end to size and taper, then cut off the excess.
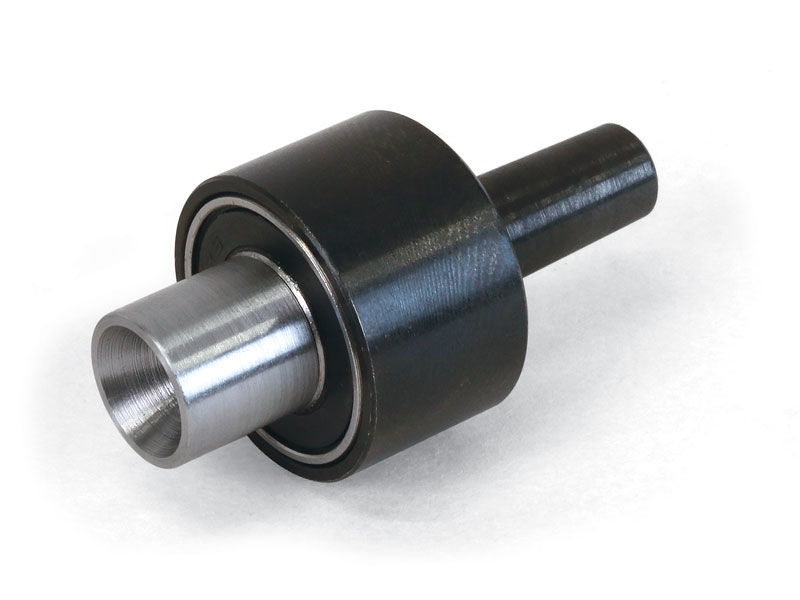
From an earlier post:
I bodged my noddy Mantua lathe to stop the tail of long, thin spars from flailing.


The large wooden block slides. The 'negative' tail stock holds an embedded ball race (OD 15 mm, ID 1 0mm )
I have filled several of these with short lengths of 10 mm dowel then drilled them out with a variety of sized holes.
The free end of the dowel being worked on can be pushed into, or through the appropriate sized bearing.
A 10 mm mast will fit into an unbushed bearing. A 12mm mast cannot be accommodated but is probably stiff enough not to cause problems. If necessary a plugged bearing with a spike in the middle could be made.
The arrangement appears to work effectively.
I bodged my noddy Mantua lathe to stop the tail of long, thin spars from flailing.
The large wooden block slides. The 'negative' tail stock holds an embedded ball race (OD 15 mm, ID 1 0mm )
I have filled several of these with short lengths of 10 mm dowel then drilled them out with a variety of sized holes.
The free end of the dowel being worked on can be pushed into, or through the appropriate sized bearing.
A 10 mm mast will fit into an unbushed bearing. A 12mm mast cannot be accommodated but is probably stiff enough not to cause problems. If necessary a plugged bearing with a spike in the middle could be made.
The arrangement appears to work effectively.
- Joined
- Apr 28, 2020
- Messages
- 112
- Points
- 88

People have mentioned putting the dowel in a drill chuck and sanding the taper. I have a lathe, but I use ti in the same way. I don't try to actually wood turn the flexible dowel. I chuck it in the headstock and then sand the turning dowel with a folded piece of sandpaper.. Take your time-- it's easy to go too far!
- Joined
- Oct 15, 2017
- Messages
- 986
- Points
- 403

Just a couple of things, a couple already mentioned. For long pieces of dowel stock, you can use a center finder to mark the center of the dowel, drill a small hole to secure the cone of the live center in the tail stock. If the piece is so long it still wobbles in the middle a Steady Rest can be used to support it in the middle of the dowel. Some manufacturers make reverse (concave) live centers, made specifically for holding dowels or any round stock for the purpose of tapering masts. I'm not sure how available they are however. I do have one for my Sherline lathe.
Sherline: "This live center was designed at the request of our model shipbuilder customers to turn their ship masts."
 www.sherline.com
Just one other recommendation, and this may be obvious. If you are going to use sandpaper, use blocks as suggested by Paul. Do NOT use a piece of sandpaper in your hand and grip it around the dowel. It can potentially overlap and pull your thumb of fingers into a bad place.
Best of luck"
Captain Obvious
Sherline: "This live center was designed at the request of our model shipbuilder customers to turn their ship masts."
Reverse Live Center - Sherline Products
Just one other recommendation, and this may be obvious. If you are going to use sandpaper, use blocks as suggested by Paul. Do NOT use a piece of sandpaper in your hand and grip it around the dowel. It can potentially overlap and pull your thumb of fingers into a bad place.
Best of luck"
Captain Obvious
I know the lathe vs. drill issue divides the room, but I've always found Jeff's drill technique superior to using a lathe. With longer spars it is more challenging because of the potential for wobble but if you go slow it works fine. Use a variable speed drill and go slow and use increasingly fine grit sandpaper.I user a drill with the dowel placed in the chuck. Some masking tape can be used to protect the end of the dowel from the clamp, but I prefer to have an extra 1/2" (12mm) of length to the dowel and not use tape. I put on a heavy leather glove on my sanding hand (heat protection) and hold a square of sandpaper folded into a strip. Turn on the drill and begin tapering the dowel with regular checks on thickness at various places on the mast-to-be. My sanding technique is to start at the unclamped/small end of the mast and sand toward the base about 2 inches. Then back to the end of dowel. On the next pass, pull the sandpaper back 4 inches and return it to the end. Continue this until you get to the base and then reverse the process. This method results in a fairly consistent taper. You have to stop occasionally to knock the sanding dust out of the sandpaper to get it to work well.

I only have an 18” lathe. It was too small for my biggest yard on my SR. I used the drill method and wound up breaking the yard. I actually was able to use the lathe with gouges. It saved me a lot of time once I got the hang of it. I did have about one extra inch of wood on each end to put in the chuck. I made sure all my chisels were super sharp.
- Joined
- Jan 21, 2022
- Messages
- 397
- Points
- 238
I think I figured a way to remove the wobble of the dowels used a water line gauge I had sitting around to hold the piece works great!!well I will be using my small lathe and the dowels do wobble due to the speed of the lathe 880 rpm the rest idea is interesting!! but thanks to all for your input this site is just GREAT!!

Here's how I do the tapering for spars/yards. I have a small "eBay" beading lathe (~$35) that I use for this task, but I remove the pointed end stock from the bearing. This will be my support for at the middle of the yard. I mark the mid-point, the points where tapering ends, where the yard is cut further in at the ends (if necessary), and the ending points for each end of the yard. I put some tape around the mid-point to a thickness that it is snug in the bearing (you need to push it into the bearing. One end of the spar is tightened into the drill chuck. I worked up a couple of pictures to help show the setup. The dowel was just a scrap piece and does not represent a real spar I was working on.I user a drill with the dowel placed in the chuck. Some masking tape can be used to protect the end of the dowel from the clamp, but I prefer to have an extra 1/2" (12mm) of length to the dowel and not use tape. I put on a heavy leather glove on my sanding hand (heat protection) and hold a square of sandpaper folded into a strip. Turn on the drill and begin tapering the dowel with regular checks on thickness at various places on the mast-to-be. My sanding technique is to start at the unclamped/small end of the mast and sand toward the base about 2 inches. Then back to the end of dowel. On the next pass, pull the sandpaper back 4 inches and return it to the end. Continue this until you get to the base and then reverse the process. This method results in a fairly consistent taper. You have to stop occasionally to knock the sanding dust out of the sandpaper to get it to work well.

The yellow triangle points to the end of the spar where I used a square file to file in the small end of the spar (not very well done in this quickly done example). The blue triangles point to the place where the tapering will end. I use sandpaper of various grits using a similar technique to how I do masts but scaled back a bit in accordance with the smaller sizes of yards. I find the sandpaper gives me much more control that trying to use lathe cutting tools (but then I don't have good quality cutting tools for a lathe so your mileage may differ).

A closer picture of the yard when it is nearly done. Blue represents the file in area for the end of the spar, yellow is the end of the taper point, and red indicates where you can see the tape holding the spar in the bearing. Once you finish one side, the dowel is reversed, and the same technique is used to taper the other end.
I have used this technique successfully on a couple of models to date. Check this post out to see what the yards look like when taken off the lathe. https://shipsofscale.com/sosforums/...1-1-64-jefft-completed-build.6647/post-193078
I should also mention that I have moved the motor back on the rail as far as it can go in order to get the maximum length for the tapering process.