

A few years ago, I was running out of time to finish up a ship model for a contest I wanted to enter. I needed a set of ship's boats in a hurry. Specifically, I wanted a pinnace, 2 whaleboats, and a gig, in 1:96 scale. I combed all the catalogues in hopes of finding anything that I could quickly super-detail into a level of quality that would be worthy of the ship I was finishing. Although I found a couple of sources, they were both temporarily sold out. I considered simply carving out some hulls and presenting them with tarps tied on. But I also knew that if I wanted a real shot at a win in the contest, these boats needed to be much more detailed than that.
So this little build log is really about the method I used to create the hulls which were ultimately successful in the over-all project. I assume that I am not the first ship modeler to do something like this, so I would love to receive any comments from the group about how the technique might be enhanced. And if you find some inspiration here, well then I will have shared back a tiny bit of what you guys have already given to me.
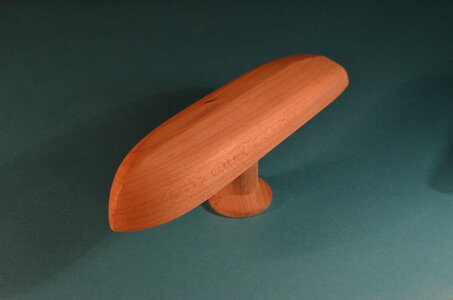
Step 1: Basically laying out and carving a solid hull, using a very dense wood. This is hard maple. Obviously the finished product will only be as accurate as this initial solid wood form.

This is the finished form which has been sanded to a very fine finish. To help with perspective, it's actually 4-1/2" long. Note the narrow flat area for the keel and stem pieces. We'll be applying hose fabric and resin to this form, so it is extremely important that the wood be thoroughly treated with a quality automotive-type wax to prevent the resin from adhering to the form. I found carnauba wax to be good. On some other boats, I tried paraffin wax which did allow the cloth/resin hulls to pop off easily, but polyester resin makes paraffin wax bubble up. That gave me a rough surface inside the hull which I was able to sand sufficiently to use those boats, but it was a lot of unnecessary work. So I recommend applying 4 or 5 coats of carnauba wax and you'll get a super smooth hull interior.

This is 2 layers of pantyhose stretched and stapled over the form. The cardboard pieces helped produce a smoother stretch over this pinnace hull, but staples alone were sufficient on some other hull types.

On this pinnace hull, I used epoxy resin which worked well. If you use epoxy, you should probably let it set up for several days to a week as it remains a little too easy to bend out of shape when removed from the form too soon. Polyester resin is firm and easy to work with in a few hours. There is obviously room for further experimentation with waxes and resins. Still, I was pretty happy with all of my results. Only threw away one hull.

This photo was taken after several rounds of sanding and adding resin in the low places, and of course, a final finish sanding. No additional layers of pantyhose have been added as 2 layers provides a hull thickness fairly close to scale for this project. In my first attempt to lay up a hull this way, I tried adding the cloth and resin one layer at a time. Not good! Both layers at the same time gives the best result.

Adding keel, stem pieces, and rub rails helps to stiffen the hull considerably.

A light touch with the Dremel will trim the sheer to the wood form. I think I used a sanding stick for the final few thousandths.

A close-fitting cradle will be a blessing once the hull is removed from the form.

Clean separation, and there's the rub strip I mentioned earlier. The hull may need some coaxing to come off the wooden form. Thin card stock, plastic, or a draftsman's metal erasing guide can be slipped between the 2 pieces along the sides of the hull to get it started. Then it should pop right off.

Note the finish inside the hull. This is what I got by using West System epoxy resin to saturate the cloth,, and carnauba car wax on the wooden form.

Now the framing begins. This is mostly boxwood and ca glue. It helps a lot to pre-bend the frames to an approximate shape before pushing them into place with ca glue. I used an electric soldering iron for the rough bend. You don't have to be terribly neat about the gluing, just accurate. That's because it's fairly easy to go back as soon as the glue sets and scrape away any excess. Also, if a frame is not exactly in the right position, they're easy to pop out again for a re-fit or a start-over without harm to the hull.


And done.

Here are one of the whalers, and the similar gig, that I also made for the ship model.

So this little build log is really about the method I used to create the hulls which were ultimately successful in the over-all project. I assume that I am not the first ship modeler to do something like this, so I would love to receive any comments from the group about how the technique might be enhanced. And if you find some inspiration here, well then I will have shared back a tiny bit of what you guys have already given to me.
Step 1: Basically laying out and carving a solid hull, using a very dense wood. This is hard maple. Obviously the finished product will only be as accurate as this initial solid wood form.
This is the finished form which has been sanded to a very fine finish. To help with perspective, it's actually 4-1/2" long. Note the narrow flat area for the keel and stem pieces. We'll be applying hose fabric and resin to this form, so it is extremely important that the wood be thoroughly treated with a quality automotive-type wax to prevent the resin from adhering to the form. I found carnauba wax to be good. On some other boats, I tried paraffin wax which did allow the cloth/resin hulls to pop off easily, but polyester resin makes paraffin wax bubble up. That gave me a rough surface inside the hull which I was able to sand sufficiently to use those boats, but it was a lot of unnecessary work. So I recommend applying 4 or 5 coats of carnauba wax and you'll get a super smooth hull interior.
This is 2 layers of pantyhose stretched and stapled over the form. The cardboard pieces helped produce a smoother stretch over this pinnace hull, but staples alone were sufficient on some other hull types.
On this pinnace hull, I used epoxy resin which worked well. If you use epoxy, you should probably let it set up for several days to a week as it remains a little too easy to bend out of shape when removed from the form too soon. Polyester resin is firm and easy to work with in a few hours. There is obviously room for further experimentation with waxes and resins. Still, I was pretty happy with all of my results. Only threw away one hull.
This photo was taken after several rounds of sanding and adding resin in the low places, and of course, a final finish sanding. No additional layers of pantyhose have been added as 2 layers provides a hull thickness fairly close to scale for this project. In my first attempt to lay up a hull this way, I tried adding the cloth and resin one layer at a time. Not good! Both layers at the same time gives the best result.
Adding keel, stem pieces, and rub rails helps to stiffen the hull considerably.
A light touch with the Dremel will trim the sheer to the wood form. I think I used a sanding stick for the final few thousandths.
A close-fitting cradle will be a blessing once the hull is removed from the form.
Clean separation, and there's the rub strip I mentioned earlier. The hull may need some coaxing to come off the wooden form. Thin card stock, plastic, or a draftsman's metal erasing guide can be slipped between the 2 pieces along the sides of the hull to get it started. Then it should pop right off.
Note the finish inside the hull. This is what I got by using West System epoxy resin to saturate the cloth,, and carnauba car wax on the wooden form.
Now the framing begins. This is mostly boxwood and ca glue. It helps a lot to pre-bend the frames to an approximate shape before pushing them into place with ca glue. I used an electric soldering iron for the rough bend. You don't have to be terribly neat about the gluing, just accurate. That's because it's fairly easy to go back as soon as the glue sets and scrape away any excess. Also, if a frame is not exactly in the right position, they're easy to pop out again for a re-fit or a start-over without harm to the hull.
And done.
Here are one of the whalers, and the similar gig, that I also made for the ship model.
Attachments
Last edited:


 pugwash! Now I'm reading you loud and clear. We're on the same page with this for sure. I didn't mention in my post that I may possibly have had more fun bringing these little boats into existence than any other single ship modeling experience I've ever had. Time was short and yet they came together quickly and surprised me with the result I was able to get. In my experience new ideas are usually followed closely by a plague of set backs and re-starts. These little boats came pretty close to being pure fun.


