Le Mercure ANCRE Plans

Hello everyone!

My sincere apologies for my absence and also for not replying to the thoughtful birthday messages. Thank you for these!

I am making good progress and post some photos of my work in the last few days.

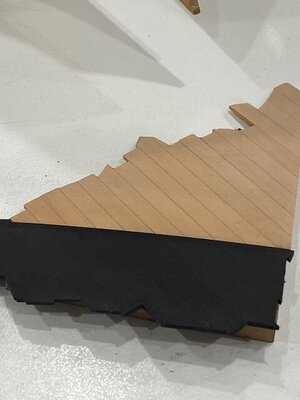
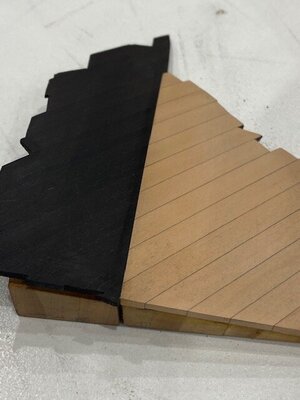
I am making the stern piece before I start the hull planking. The reason for this is the hull planking wraps back on to the stern and the very end of each hull plank sits directly on top of a stern piece with a very tight join. I cannot disrupt this join in any way.

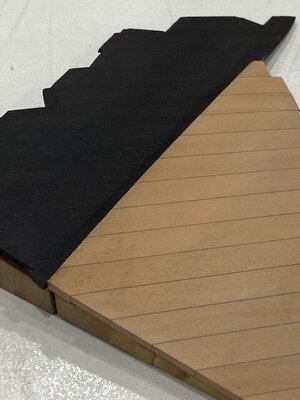
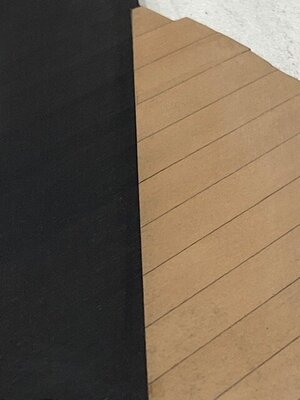
My stern is going to be made from pear and black hornbeam planked on a 45 degree angle as per the plans. Each pear plank will turn in to a black hornbeam plank and the delineation between pear and black hornbeam will occur along a clearly defined straight line (which joins the bottom edge of the wales on the hull). This will become obvious as I start the hull planking so please look out for future photos to explain this better.

My technology is not conventional as I actually make the pear and black hornbeam planking off of the model rather than planking directly on the stern piece itself. This gives me a lot of flexibility.

Note in two of the photos where I am holding the black hornbeam against the pear (with the pencil line) that this join is not finished yet. I was experimenting with sanding methods to allow a perfect join and now know how I will do this.

The black hornbeam I have is incredibly black. The piece you see in the photo is made from about 10 planks with no varnish or any sort of finish at all.

You will also notice one black hornbeam plank that has been steamed and bent (almost 90 degrees) and is ready to attach to the hull!

My plan is to have the hull planking (main wales and below) completed in the next 4 months.IMG_2482.jpgIMG_2485.jpgIMG_2497.jpgIMG_2498.jpgIMG_2489.jpgIMG_2488.jpgIMG_2507.jpgIMG_2508.jpgIMG_2500.jpgIMG_2501.jpgIMG_2510.jpgIMG_2511.jpg
 
Last edited by a moderator:
I managed to get in to my workshop for 2 hours today to create one join between the pear and black hornbeam on the stern. This is doing very carefully because the pieces sit on an angle to the stern but the join must follow a straight line.

This has not been glued and still needs some pencil lines removed and a light sanding. It is being held in position only with sticky tape.

I also have another piece of black hornbeam (for the hull planking) being bent in my jig after steaming.

IMG_2540.jpg

IMG_2530.jpg

IMG_2528.jpg

IMG_2520.jpg
 
Last edited by a moderator:
Looking very good - and you are working with really good timber - high quality material
How do you make the small and very fine line between your pear planking?
 
Hi Uwe - the caulking is achieved with paint between the planks. I have some photos of the "before" in some earlier posts. I apply a thin layer of paint to the edges of the planks before I glue them. I have experimented with various methods but I personally like the subtleness of paint. It gives a finer line than paper (which is what Dr Mike uses). When the model is finally finished with varnish or shellac the lines will stand out a fraction more.

I attach some more photos of my work from today.

The pear and black hornbeam have now been glued together. The entire piece will have a final sanding after the nails are inserted (much later after the hull planking is complete). There is minor black dust on the pear (from the black hornbeam) which will be removed later during the final sanding.

I know it may seem pointless to post a photo with such little progress but my focus is on the join between the two woods (pear and hornbeam) and trying to achieve this with absolutely no gaps or spaces between them whilst preserving the 45 degree angle and achieving an absolute straight line. I see small tasks such as these as a project in themselves and plan this very carefully.

If you look very carefully you can see the faint lines of the black hornbeam planks which coincide with the pear planks.
 

Attachments

  • IMG_2563.jpg
    IMG_2563.jpg
    42.6 KB · Views: 17
  • IMG_2559.jpg
    IMG_2559.jpg
    43.1 KB · Views: 20
  • IMG_2561.jpg
    IMG_2561.jpg
    44.9 KB · Views: 20
  • IMG_2560.jpg
    IMG_2560.jpg
    41.1 KB · Views: 20
Last edited:
My time in my workshop today was limited as I am preparing dinner for some guests!

However, I have managed to make progress on the stern pieces. They are not finished yet. They will require further sanding tomorrow, but not much.

Once they have been sanded I will glue them to the model and start the hull planking.

IMG_2575.jpg

IMG_2577.jpg

IMG_2591.jpg

IMG_2585.jpg
 
Last edited by a moderator:
They are fitting very good - very accurate work my friend
I hope the dinner was tasting?
Problem is every time, that the guests are coming more often, when the food and drinks are too good - than you have less time for modeling
 
Such beautiful and fine craftsmanship - I am speechless.
 
Thank you for the comments!

Some minor progress....

The 2 stern pieces are now glued to the hull but not completely sanded.

I demonstrate how I attach the planks to the hull with my first plank of black hornbeam. I use screws and washers to hold it tight and in the correct position.

The first hornbeam plank is actually very tricky. It must bend in multiple directions and is quite thick (approx 4.5mm) making the bending more difficult. At the bow it is close to 90 degrees. This first row of planking must also create the line for all of the remaining planking so I attach it very carefully. All lines has been pre-drawn on the hull in advance. Not only did I use steam but I also had to use my heat gun for the final touches. It felt like hours of work for only 1 plank :)!
I allow an extra 1mm on the thickness of plank for final sanding.

Tomorrow I will apply the glue since my "dry fit" has worked well.IMG_2629.jpgIMG_2630.jpgIMG_2627.jpgIMG_2623.jpg
 
Last edited by a moderator:
The first is the most important one - better to spend one hour more, but it will reduce the work and problems later on with the following planks.
Looking very good - wish you good success with final installing the plank
 
Thank you Uwe.

Some more minor, but very important progress.
I have attached the first row of main wales to the hull on both sides.

This is not a substantial amount of progress to show in photos. This first row of planks has taken quite a bit of time to position correctly. I carefully marked the correct position of this row of wales on every one of the 56 frames on both sides with reference to the plans. Then I joined the dots with a line of "best fit" (which occasionally veers fractionally off of a dot to maintain smoothness). My wales follow that line as closely as possible.

The remaining rows of planks should be a little quicker as I now have the reference line. Last night I steamed the bow planks for the next row of planks and am going to attach those very early next week.

IMG_2782.jpg

IMG_2783.jpg
 
Last edited by a moderator:
The very rear plank of that top row of the wales has now been attached. This one is tricky as it has to line up perfectly with the plank in front of it but also with the exact bottom on the black hornbeam on the stern whilst maintaining the correct curve between the two.

My plank runs long which will allow me to sand it much later and not round the edges.
Then, after the entire hull has been planked and sanded I will cut this plank so it finishes flat against the stern.

IMG_2867.jpg

IMG_2871.jpg

IMG_2873.jpg
 
Last edited by a moderator:
@tonphil1960 - many thanks and very nice to hear from you! I hope you are safe and well during these troubling times :)

There is not much to show except that I have dry fitted one more plank at the bow (it still needs some minor work before gluing). My young son asked me to take to him to the zoo this weekend to see his favourite animals - two very beautiful parrots. The trip to the zoo cut in to my modelling time!

I am actually experimenting with plank bending using 28% ammonia rather than steam. I will post some photos shortly and may even try and take some video if I can convince my son or wife to hold the camera while I show the pliability of the plank...

IMG_2945.jpg

IMG_2811.jpg
 
Last edited by a moderator:
Two planks and two parrots - all four are looking very good
I can understand your son, that these two are his favourites :cool:
 
Yes, they are magnificent parrots indeed! Very sadly the blue Hyacinth Macaw is endangered in the wild.

Today I removed my first ever planks from Ammonia after 18 hours of soaking.

I must say the results of Ammonia are very impressive. Tasmanian Oak is almost like rubber. You can bend it easily in multiple planes with very low chance of it breaking.

I also soaked some Black Hornbeam as a test. This is also very flexible in multiple planes and can easily be bent in 2 planes simultaneously to follow a complex line at the bow. I made a short video showing how the black hornbeam can be bent immediately after removing it from the solution. Please bear in mind the bend is almost 90 degrees (which is hard to see in the video) and the plank is 5mm thick. Further, the plank also bends upwards (in a separate plane) quite significantly to follow the line. Normally with steam this would be very difficult to achieve. This could all be done easily by hand in one action with Ammonia.

Video can be seen here:

Ha ha, in one part of the video you see three hands. I am not 3 handed - they extra hand belongs to my wife :)

Screen Shot 2021-10-20 at 2.36.51 pm.png
 
Last edited by a moderator:
Just a question. I read somewhere that ammonia is not that good to the wood, because it destroys the cells of the wood. Thats why it bends so easy after the use of ammonia. Of am I wrong about this?
 
HI Steef66,
You could be right. To be honest I am not sure. It would be interesting if there was an industrial chemist on the forum who might be able to advise.
My colleague Dr Mike, uses Ammonia regularly without any issues (and has used it for years) and has encouraged me to consider this instead of steam. I just can't achieve the strong bends in multiple axis with steam.

The wood will be glued on to the model with no further stress for the rest of its life so I can't see how the weaker fibres could be an issue. Perhaps if the wood was being used in a structural capacity it could be a problem. However, I could be wrong and perhaps in 5-10 years the planks on my model will dissolve or disintegrate or something like that!

I welcome further thoughts on this...
 
Back
Top