Very nice work, Paul!
You are using an out of date browser. It may not display this or other websites correctly.
You should upgrade or use an alternative browser.
You should upgrade or use an alternative browser.
Kingfisher 1770 1:48 POF
- Thread starter dockattner
- Start date
- Watchers 111
- Joined
- Aug 8, 2019
- Messages
- 4,239
- Points
- 688

I use it at the moment too during model building.The parts looks very nice and sharp, Paul.
Yes, another model builder using tissue paper for his model.
Regards, Peter

Paul - I'm late to your new build. Looking for a seat --- OH, I just found one already in the "nosebleed" section lol - PS: I brought my binoculars,
I'll just fine....Good luck, looks to be a nice change from a hundred years ago...
I'll just fine....Good luck, looks to be a nice change from a hundred years ago...
Beautiful work Paul. I can see how machine milling will produce remarkable finishes with sub mm tolerances, but I don't understand how you achieve such apparent fine edges with hand sanding. Your dental training, I'm sure coming into play here. Remarkable, I love it!
It's mainly down to the wood - Castello Boxwood is a superb close grained hardwood that cuts and sands beautifully. Kingfisher was the first model I built using this material, and all the edges are sharp - better than with Cherry.Beautiful work Paul. I can see how machine milling will produce remarkable finishes with sub mm tolerances, but I don't understand how you achieve such apparent fine edges with hand sanding. Your dental training, I'm sure coming into play here. Remarkable, I love it!
Of course, skill with the sanding medium is also needed, and I would say Paul has got that in spades!
Ted
Just the smallest of updates so you know I'm still alive. Been at my office more than I like recently and then got sick (not THAT sick - but this year's flu is a doozy).
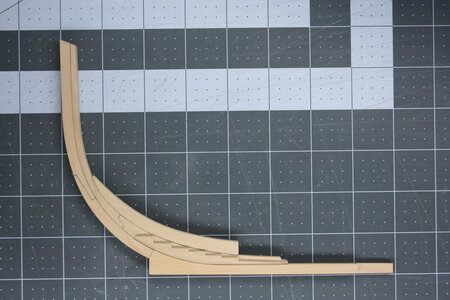
Added a few more pieces to the forward centerline. There are more bow pieces to be installed but that's it for the present time.

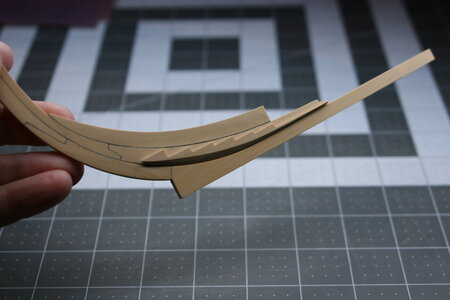
Here you can see a bevel added to the lower apron:

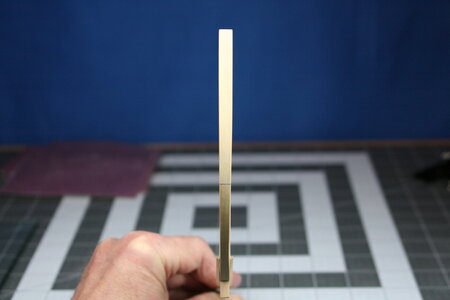
And the stem has been tapered from top to bottom:

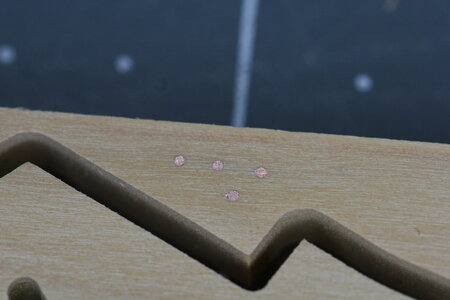
And these are the latest in my experiments for bolts. I was able to draw down copper wire in a jeweler's drawplate to about 0.41 mm which gives a bolt just under 2 cm (0.8 inches).

Next, I'll turn my attention to the stern deadwood.
Added a few more pieces to the forward centerline. There are more bow pieces to be installed but that's it for the present time.

Here you can see a bevel added to the lower apron:

And the stem has been tapered from top to bottom:

And these are the latest in my experiments for bolts. I was able to draw down copper wire in a jeweler's drawplate to about 0.41 mm which gives a bolt just under 2 cm (0.8 inches).

Next, I'll turn my attention to the stern deadwood.
Looking sharp Paul. Well done. 
Great job, mon ami, I had no doubt you would do an outstanding job building your model.
- Joined
- Jan 9, 2020
- Messages
- 10,378
- Points
- 938

This beautiful joinery, Paul and I think you have their bolt sizes spot on! To me that looks very realistic and very much in scale - not something that is always the case in many POF models being built. This is a very good start.
Looking great, Paul.
- Joined
- Oct 23, 2018
- Messages
- 546
- Points
- 353

Hi Paul,
the parts are looking excellent. But you don't need the caulking everywhere. Between lower apron, upper apron and fore deadwood it is normally not necessary. Have a look in your Antscherl.
If you do not want to use tree nails I would recommond you black monofil for fisihing. 0.4mm is an excellent diameter. For the keel you could also use bigger diameters. With boxwood I have drawn treenails until 0.6mm Thin veneer is a good source for producing wooden treenails.
Last edited:
Good morning Paul. You were born to build this Kingfisher. The caulking is perfect. The copper bolt test- how much does copper change over time? Initially it may be a little “shinny “ on the boxwood? Cheers GrantJust the smallest of updates so you know I'm still alive. Been at my office more than I like recently and then got sick (not THAT sick - but this year's flu is a doozy).
Added a few more pieces to the forward centerline. There are more bow pieces to be installed but that's it for the present time.
View attachment 352600
Here you can see a bevel added to the lower apron:
View attachment 352601
And the stem has been tapered from top to bottom:
View attachment 352602
And these are the latest in my experiments for bolts. I was able to draw down copper wire in a jeweler's drawplate to about 0.41 mm which gives a bolt just under 2 cm (0.8 inches).
View attachment 352599
Next, I'll turn my attention to the stern deadwood.
Hi Paul, this looks very clean and accurate. I agree with Christian that you don't have to caulk everywhere, but it still looks very impressive.
Very sharp Paul, this will be a show piece. 
Hi Paul,
the parts are looking excellent. But you don't need the caulking everywhere. Between lower apron, upper apron and fore deadwood it is normally not necessary. Have a look in your Antscherl.
If you do not want to use tree nails I would recommond you black monofil for fisihing. 0.4mm is an excellent diameter. For the keel you could also use bigger diameters. With boxwood I have drawn treenails until 0.6mm Thin veneer is a good source for producing wooden treenails.
Thank you gentlemen. I did note that Antscherl specified caulking for only below the waterline. But I wasn't sure where to make the transition - and what if that transition took place on timbers that were half under and half above the water? Anyway, in my inexperience I chose for the 'easier' task.Hi Paul, this looks very clean and accurate. I agree with Christian that you don't have to caulk everywhere, but it still looks very impressive.
Plus, I enjoy the challenge of getting good joins - its far more difficult with cellulose caulking (thus, NOT the easier task
But now a question for you (or anyone). I was not planning on caulking the timbers on the frames. But would the same rules apply? How would you guide me?
Last edited:
Good thoughts Christian. Unless I read wrong, bolts were common on the centerline framing and then treenails in the frames? Or maybe I have confused myself with all the research. Please advise.If you do not want to use tree nails I would recommond you black monofil for fisihing. 0.4mm is an excellent diameter. For the keel you could also use bigger diameters. With boxwood I have drawn treenails until 0.6mm Thin veneer is a good source for producing wooden treenails.
Ahh, the question I too have been asking myself. My trials with brass bolts were even more shiny and I doubted they would 'age' over time. Uwe (@Uwek) used copper on one of his models and they appear to be slowly darkening. I would not like to try to chemically darken/burnish these if I can avoid it for fear of 'ruining' the blond box (yes, I have seen the technique of sealing the wood first but the results have been mixed at the macro level).The copper bolt test- how much does copper change over time? Initially it may be a little “shinny “ on the boxwood?
Thank you for all the likes and kind posts my friends!
Hello Paul, as far as I have read so far and as I have understood it, only the areas that are in direct and permanent contact with water are sealed.
I would not seal your frames, i.e. joints. I hope that I have understood correctly what you meant by frame.
I would not seal your frames, i.e. joints. I hope that I have understood correctly what you meant by frame.
I was thinking of the frames that establish the shape of the hull. No caulking on those pieces right? Between futtocks for example.I hope that I have understood correctly what you meant by frame.
- Joined
- Oct 23, 2018
- Messages
- 546
- Points
- 353

It is not necessary to use caulking for the frames. There is planking inside and outside on the frames. The thick stuff is normally on top of the joints, which will protect the joint.


