HMS Victory - Corel - Cross section

That would be great for future builders of this great ship. I don't think I would be inclined to build a second. I might one day attempt to rebuild the stern gallery with "new and improved" parts if such should ever become available. But for now, its up to me and those others building this version of the Victory
 
Last edited:
If you want just a kit.. ok
But it is no way a weekend or … project.
It will make into a good mantelpiece looker.
If like me - you want something else : bit realistic …

The two half’s are a pig to get symmetrical - I joined them and built an extra length bobbin for sanding but even then ….

The materials were ok but the sand was awful ….

The side on build plan was difficult especially vertical members….

Not an easy kit …

I bought the Ocra monthly kit of HMS Victory. A few tweaks and extras …. I was a happy bunny.

In between scratch / kit ….

Definitely not a 1st time kit for beginners …

There is a book - in which a model maker made this. Sorry my brain is not functioning. He made 4 or 5 books… one kit he built was William 100+ gun off the line. Sadly burnt / killing an admiral on board.
This massive kit is back breaking but makes into a beautiful model - seen it in Eastbourne model shop fully built. Straight from the box. It’s big, very big….

A project I wish to make but not from a kit.
English Lime wood, black bean, bit of pear and apple for some carvings. Not sure cut away areas or part ribs to just a full build. A project for my 70’s :))) I hope!
Plus my modelings skills might have improved :)

Good luck and hope you make it! And pleased with it.
Mine took 2 years …. On / off / work / moving / kids etc….
Grant,
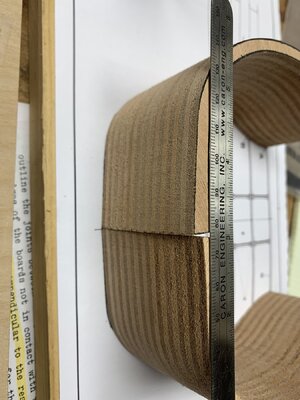
I just started the Corel Victory section.. I put it back in the box and wrote an e mail to Corel regarding the symmetry of the hull pieces. Reading your post, I think you had the same problem. With the hull piece face down on a flat surface (glass) the side are off plumb about two mm. Put them together, the error adds to four mm! So could you give me a bit more detail on how you overcome this problem? THANKS

Bob Walters
Portland, OR

IMG_2115.jpg
 
To get over the problem I made my own ribs.
I tried sanding down and adding extra wood but in the end : what a mess, even cowboy builders rejected it. Design and make from scratch or take one 1/2 and copy. I done this method. Obviously you have choice of woods and open sections…
To my mind - expensive kit with little update build ability fore thought.
A Simple laser / routed joining ribs + inserts.

Kit could have extra like gates to internal compartments etc…

In my opinion : a lot of money for inaccurate / badly thought out kit. Remember the plastic kits with inaccurate moulds to large amounts of flashing to poor quality parts?

Not what I expect from Corel and cannot recommend.
 
I found the same problem and I was able to "de-warp" mine with a 6" Jorgensen clamp and lots of Titebond II.... Good luck with your build. Please do not follow the kit's instructions other the basics, i.e., what dimension of planking for the outside and inside, height and spacing of the decks. Look at Y.T.'s post of various books you can use to help build an accurate representation of the ship's mid-section.
 
To get over the problem I made my own ribs.
I tried sanding down and adding extra wood but in the end : what a mess, even cowboy builders rejected it. Design and make from scratch or take one 1/2 and copy. I done this method. Obviously you have choice of woods and open sections…
To my mind - expensive kit with little update build ability fore thought.
A Simple laser / routed joining ribs + inserts.

Kit could have extra like gates to internal compartments etc…

In my opinion : a lot of money for inaccurate / badly thought out kit. Remember the plastic kits with inaccurate moulds to large amounts of flashing to poor quality parts?

Not what I expect from Corel and cannot recommend.
I agree. I'm hoping that my model of Corel's Vasa will not have drastic problems as well. Already have found a couple. For instance, the foremast is not properly positioned and will have to be relocated. Some of the figures are not accurate as depicted in photos of the actual ship.
 
Trying to de-warp can cause future problems. Strongly advise not too.
Laminate pieces is another way.
 
Yes follow instructions but!!! Think 5/6 things ahead.
If you want rings to tie up cannon or internal structures too ….

I feel the kit is poor quality - extremely disappointed with the name Coral.

Someone needs to contact them but I think in this economic situation they will not retool.

Shame as a Chinese kit or …. Beats them hands down with 2 legs to spare.

Yes kit bashing but …. We all learnt from point.
 
To get over the problem I made my own ribs.
I tried sanding down and adding extra wood but in the end : what a mess, even cowboy builders rejected it. Design and make from scratch or take one 1/2 and copy. I done this method. Obviously you have choice of woods and open sections…
To my mind - expensive kit with little update build ability fore thought.
A Simple laser / routed joining ribs + inserts.

Kit could have extra like gates to internal compartments etc…

In my opinion : a lot of money for inaccurate / badly thought out kit. Remember the plastic kits with inaccurate moulds to large amounts of flashing to poor quality parts?

Not what I expect from Corel and cannot recommend.
THANK YOU for the quick reply.. I tried the warping bit but the idea of frames intrigues me. I tried contacting a laser cutting business here in Portland, but had ne reply. So I looked at my prewar bandsaw and it said 'go for it'! I ordered some 1/8" ply and plan to cut about six frames. Then I'll frame in the gun ports and entrances. I haven't had much luck cutting gun ports in a planked hull. I built the Mamoli Constitution and it turned out pretty good. The Billings Jylland were paint on, but the Panart Gun Place didn't go so well.

THANKS AGAIN

Bob Walters
I suggest a wood like lime or similar. Others on the forum can suggest better?
Plywood can splinter etc… …. No need laser …
Trapezoid Shape pieces over lapping at joints.
Cut out carefully.
If? Real perfection then blacken glue (joints).
Small infill chocks between ribs.
Sand. Using various + dowel shapes.
I made up dowels/sanding sticks and then glued abrasive to it. Used my bench drill + raising jig. One bobbin sander made.
Ordinary drill does same job.
Making your own equipment will play dividends in future.
Mini drill grinder and jig saw using old 00 gauge train motors and metal film containers … best 2 months of making. I use them constantly.
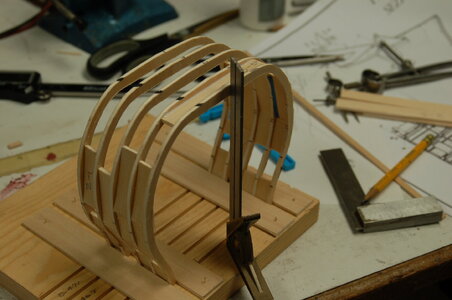
I want to THANK YOU for the rib idea. I did use 3mm ply and glued a copy of the rib drawing to one piece. Then I used double sided tape and added five more pieces. A band saw and drum sanders on a drill press made the ribs. I didn't experience splitting. I figured out the correct spacing for the five ribs (that took awhile) and cut slots in a piece of plywood for holding the ribs while I glued spacers. Not pretty but this model is planked inboard and outboard. Before planking I 'framed' the gun ports and entrance. DSC_0003.JPG Thanks again for the suggestions and ideas.
Bob Walters
Portland, OR
 
Back
Top