
I will add a Pic, where I have made some smaller changes, as the ratlines goes not completely until the Top. You will need to add cord a few cm from the top, which are going up to Crosstree and further upHi Steg, I used in my time a piece of a plank (from the Planking) cut into the seize between the ratlines and then a small intersection for the shrouds. The system with this paper in the Backside with its markings was not known to me, until late. Then on either side I used to add a Cloose Pin, to maintaine the distance. El CAPI
Stay safe

You are using an out of date browser. It may not display this or other websites correctly.
You should upgrade or use an alternative browser.
You should upgrade or use an alternative browser.
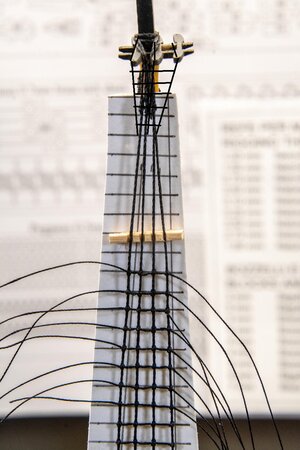
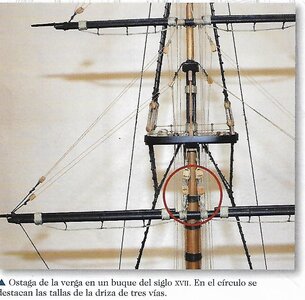

Photo to show the jig before I continue the ratlines. Still working my way up. Should finish today.I will add a Pic, where I have made some smaller changes, as the ratlines goes not completely until the Top. You will need to add cord a few cm from the top, which are going up to Crosstree and further up


I’m enjoying and learning from your log on how to do the masts and rigging. I finally completed the last details of the hull on my Pegasus. Your ship is looking great!


Great job. Especially like the gunport covers. I skipped those because I keep breaking off small parts while working on the rigging.I’m enjoying and learning from your log on how to do the masts and rigging. I finally completed the last details of the hull on my Pegasus. Your ship is looking great!View attachment 205395View attachment 205396View attachment 205397
 Might have to add them near the end. Thanks for the photos. Nice to compare builds.
I know what you mean. I keep breaking off the cannons from their mounts. Tapped the rudder too hard and broke the lever fitting 'inside' the little housing. Will need to break the glue bond of the housing to repair it. Really irritating!Great job. Especially like the gunport covers. I skipped those because I keep breaking off small parts while working on the rigging.
Very nice looking build. The copper cladding looks really well done.I’m enjoying and learning from your log on how to do the masts and rigging. I finally completed the last details of the hull on my Pegasus. Your ship is looking great!View attachment 205395View attachment 205396View attachment 205397
Hence why the Admiral calls my shipyard the swearing room.I know what you mean. I keep breaking off the cannons from their mounts. Tapped the rudder too hard and broke the lever fitting 'inside' the little housing. Will need to break the glue bond of the housing to repair it. Really irritating!
Two think here. I am pretty sure, you as more than 90% are doing: Insert all decks as fast as possible- Wrong- Then am sure too, that you use the DUMMY guns -another enemy of mine: I inserted the decks after the Hull was planked. All decks even the one that never comes with the KITS- the Lowest deck. It is not that difficult but too much to add here. I did all the Hull first with Galleries, ankers etc, and paint. The hull with spray, but all the reinforcement planks- mainly painted Black outside, so the colour did not mix. Not the lower deck prepared with Full gun carriage -this you will do yourselves. Add the Gun pipes and made sure, they were well Glued and added a little reinforcement (which cannot be seen) and so on to the next deck the main deck. Here too, make to FASTEN your pin rails very -With a nail or screw inserted at the bottom. There is nothing worse than main Pin Rail around the main mast after all your Riggen is done. I Speak of a very BITTER experience here. There is no way to fasten it again, other to from beginningI know what you mean. I keep breaking off the cannons from their mounts. Tapped the rudder too hard and broke the lever fitting 'inside' the little housing. Will need to break the glue bond of the housing to repair it. Really irritating!
The experience I'm gaining from this build will go with me to my next one, and the one after that. For me the mistakes I have made are what make it possible to understand what others are talking about in their builds as well as understanding the plans and instructions that come with the kit. This along with being able to follow the pro's such as yourself on this forum make this hobby enjoyable. My irritations I speak of are only temporary and usually directed at myself for being clumsy or not paying attention to the plans like I should.Two think here. I am pretty sure, you as more than 90% are doing: Insert all decks as fast as possible- Wrong- Then am sure too, that you use the DUMMY guns -another enemy of mine: I inserted the decks after the Hull was planked. All decks even the one that never comes with the KITS- the Lowest deck. It is not that difficult but too much to add here. I did all the Hull first with Galleries, ankers etc, and paint. The hull with spray, but all the reinforcement planks- mainly painted Black outside, so the colour did not mix. Not the lower deck prepared with Full gun carriage -this you will do yourselves. Add the Gun pipes and made sure, they were well Glued and added a little reinforcement (which cannot be seen) and so on to the next deck the main deck. Here too, make to FASTEN your pin rails very -With a nail or screw inserted at the bottom. There is nothing worse than main Pin Rail around the main mast after all your Riggen is done. I Speak of a very BITTER experience here. There is no way to fasten it again, other to from beginning
absolutely nothing to complain about. well done sailorI’m enjoying and learning from your log on how to do the masts and rigging. I finally completed the last details of the hull on my Pegasus. Your ship is looking great!View attachment 205395View attachment 205396View attachment 205397
I received the .004 thread and it was way to small, like spider silk so I ordered some 0.1mm thread and see if that will be any better. What size in mm do you use for ratlines.?On this Pic. You can see the difference between the thickness of Shrouds and Ratlines. Generally 1-4/5
I received the .004 thread and it was way to small, like spider silk so I ordered some 0.1mm thread and see if that will be any better. What size in mm do you use for ratlines.?
It depends on very much of the Scala, but I did it that way -calculating the Ratlines to around 1/2 -1/3 of the thickness of your Strouds.. 0,9 mm Shroud around 0.2 mm for Ratlines.
Attachments

Completed majority of the standing rigging. I'll start the mizzen yards next. I like to work from the top down because I have a habit of breaking off parts of the lower rigging trying to work on the upper stuff. I don't like to work having to reach over things.


Absolutely WELL DONE STGCS. 10 out of 10
Thanks for the UPGRADE.Absolutely WELL DONE STGCS. 10 out of 10
Better make that an 8 out of 10 El Capi . I was going back over everything before I moved on to the next sheet and saw a big mistake. Luckily it was an easy fix. I had attached the fore topgallant stay to the wrong spot. I moved it down to the correct position. Better go back and do another check just in case. You can compare the this shot with the last post and see what I had done.Absolutely WELL DONE STGCS. 10 out of 10

Close call, would have caused issues later for sure.
The old "measure twice cut once" rule. Looking closer at what I'm doing from now on.Close call, would have caused issues later for sure.