Good morning all. New to the site, but not to modeling (although I might as well be). My last model was an AJ Fisher Wanderer a couple of decades ago. Have finally reached full retirement and can devote the time and effort needed to make a good model. Built a couple of ships just to revive and improve the skills. Working on converting a Kate Cory to the whaling schooner Margaret for my wife's BFF. You can guess what her name is. Having trouble with the curved fife rail. Had similar problems, as I recall, with like items on the Wanderer. Using a Dremel and am constantly shattering the piece. Any help would be gladly appreciated. Thanks.
You are using an out of date browser. It may not display this or other websites correctly.
You should upgrade or use an alternative browser.
You should upgrade or use an alternative browser.
- Joined
- Dec 1, 2016
- Messages
- 5,149
- Points
- 728

can you show us what the issue is
Dave,can you show us what the issue is
Thanks for the reply. Don't have a decent digital camera in the house, but maybe I can describe the problem. Am using a Dremel grinding stone to shape the inside curve of the rail and using a Dremel grinding wheel to cut as close as possible to the outside curve, then trying to finish up with the stone. Been using fairly thick basswood from my decades old stash of wood and I'm not sure of the thickness. At some point in the process, usually quite close to the finish, the rail breaks. I have tried slowing down the Dremel RPMs, but it doesn't seem to help. After several failed attempts I thought I would come here.
Is this a rail that goes around one of the masts, or along the inside of the hull bulwark? The Dremel turns at a very high speed. You may be better off shaping with hand tools.
Hope that helps,
Jeff
Hope that helps,
Jeff
Jeff,Is this a rail that goes around one of the masts, or along the inside of the hull bulwark? The Dremel turns at a very high speed. You may be better off shaping with hand tools.
Hope that helps,
Jeff
Got plenty of good tools. Will give it a shot. Thanks.
Jeff,
Got plenty of good tools. Will give it a shot. Thanks.
Jeff,Jeff,
Got plenty of good tools. Will give it a shot. Thanks.
Only saw half of your response. It is the one around the mast.
yeah, even when you slow it down, it still has a very high RPM. Try with hand tools and go slow. Don't try to take off a lot of material at one time. use only very slight pressure.Jeff,
Only saw half of your response. It is the one around the mast.
Wilco. Plan to cut out a "close enough" piece, use a file to get the rough shape, then sand to final shape.yeah, even when you slow it down, it still has a very high RPM. Try with hand tools and go slow. Don't try to take off a lot of material at one time. use only very slight pressure.
- Joined
- Dec 1, 2016
- Messages
- 5,149
- Points
- 728

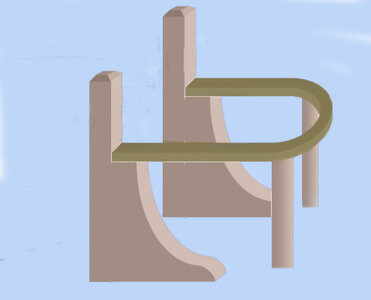
is this the piece that looks like a horse shoe

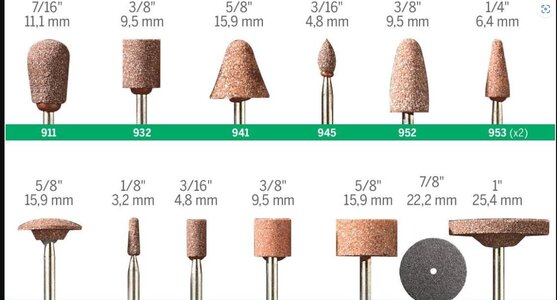
Am using a Dremel grinding stone to shape the inside curve of the rail
are you using stones that look like this? these do not work very well on wood they require pressure against the wood to cut.

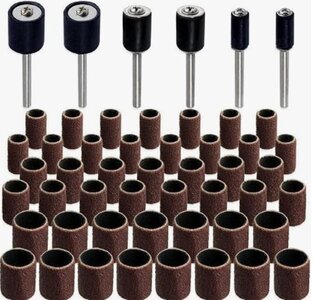
you need to use sanding drums like there

i am building the Sultana out of Basswood and it is a great wood to use but it is soft and will break easy. I would suggest getting a harder wood. I can see right in the curve the grain will be running across from inside the U to the outside and that will be very weak. Another way to beef up the piece is to coat the underside with glue like a CA glue or wood glue.

Am using a Dremel grinding stone to shape the inside curve of the rail
are you using stones that look like this? these do not work very well on wood they require pressure against the wood to cut.

you need to use sanding drums like there

i am building the Sultana out of Basswood and it is a great wood to use but it is soft and will break easy. I would suggest getting a harder wood. I can see right in the curve the grain will be running across from inside the U to the outside and that will be very weak. Another way to beef up the piece is to coat the underside with glue like a CA glue or wood glue.
Dave,
That is exactly the piece I am trying to build. Have been using the stones because I ran out of the sanders. Will have to order more. I (barely) remember having similar problems 20 years ago with the mast caps on the Wanderer. Used a mechanical drill on the hardest wood I could find. I believe it was plywood. I think that after many failures I ended up gluing the broken pieces together and covering up with a heavy coat of paint, hence the current building of a couple of "eh" models this time to revive and build skills before I tackle to ones I really want to enjoy. Like the wood glue idea very much. Will keep that in mind when I get to the mast caps.
That is exactly the piece I am trying to build. Have been using the stones because I ran out of the sanders. Will have to order more. I (barely) remember having similar problems 20 years ago with the mast caps on the Wanderer. Used a mechanical drill on the hardest wood I could find. I believe it was plywood. I think that after many failures I ended up gluing the broken pieces together and covering up with a heavy coat of paint, hence the current building of a couple of "eh" models this time to revive and build skills before I tackle to ones I really want to enjoy. Like the wood glue idea very much. Will keep that in mind when I get to the mast caps.
Dave,Dave,
That is exactly the piece I am trying to build. Have been using the stones because I ran out of the sanders. Will have to order more. I (barely) remember having similar problems 20 years ago with the mast caps on the Wanderer. Used a mechanical drill on the hardest wood I could find. I believe it was plywood. I think that after many failures I ended up gluing the broken pieces together and covering up with a heavy coat of paint, hence the current building of a couple of "eh" models this time to revive and build skills before I tackle to ones I really want to enjoy. Like the wood glue idea very much. Will keep that in mind when I get to the mast caps.
Success. I got advice from you and Corsair and used both. I found an old piece of plywood (with the holes I drilled in it over 20 years ago) and my last sanding drum. I used that to get the general inside curve. Used a grinding wheel to make the initial cuts for the outside, then finished the cuts with a hand saw. Once I got close I used files to get symetrical. I am about to finish up with sandpaper, but I used your idea of supergluing the botton to strengthen the piece. Am waiting for that to dry. Thanks again for your very helpful advice.
Glad we could help !Dave,
Success. I got advice from you and Corsair and used both. I found an old piece of plywood (with the holes I drilled in it over 20 years ago) and my last sanding drum. I used that to get the general inside curve. Used a grinding wheel to make the initial cuts for the outside, then finished the cuts with a hand saw. Once I got close I used files to get symetrical. I am about to finish up with sandpaper, but I used your idea of supergluing the botton to strengthen the piece. Am waiting for that to dry. Thanks again for your very helpful advice.
Jeff,yeah, even when you slow it down, it still has a very high RPM. Try with hand tools and go slow. Don't try to take off a lot of material at one time. use only very slight pressure.
Success. I got advice from you and Corsair and used both. I found an old piece of plywood (with the holes I drilled in it over 20 years ago) and my last sanding drum. I used that to get the general inside curve. Used a grinding wheel to make the initial cuts for the outside, then finished the cuts with a hand saw. Once I got close I used files to get symetrical. The plywood was twice the thickness needed and I went slow (hard for me) and used a hand saw to cut it in half once I got the general shape. I am about to finish up with sandpaper, but I used Dave's idea of supergluing the bottom to strengthen the piece. Am waiting for that to dry. Thanks again for your very helpful advice.


