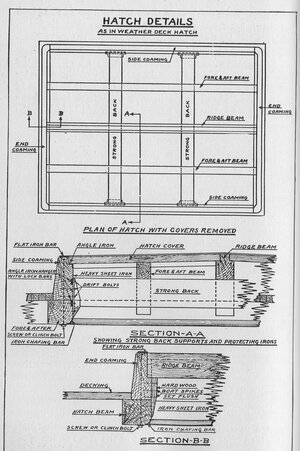
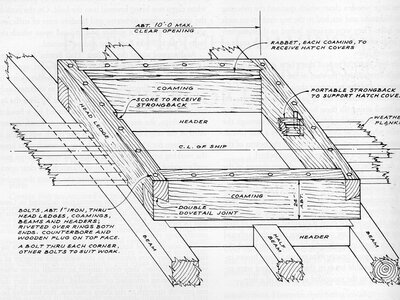
hatch coamings

Dave Stevens (Lumberyard)

Sponsor: dlumberyard
Staff member
Sponsor
Joined
Dec 1, 2016
Messages
5,136
Points
728

i have seen on a number of models with coamings for hatches, gradings and deck structures are done with a 45 degree angle at the corners like this.
A corner like this would pull apart and leak. Starting out i did the same thing thinking that makes a nicer corner rather than just butting the pieces together.
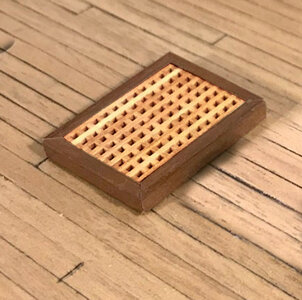
COAMING1.jpg

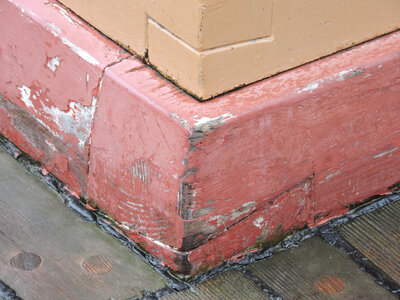
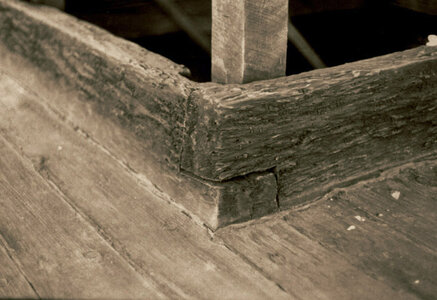
On real ships the corners are joined using a lap scarf and that looks like this
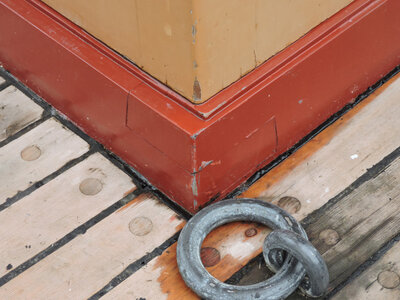
DS8.jpg

here are another examples in the first image you can also see the corner of the companion way with the lap scarf.
DS5.jpg

hatch 3.jpg

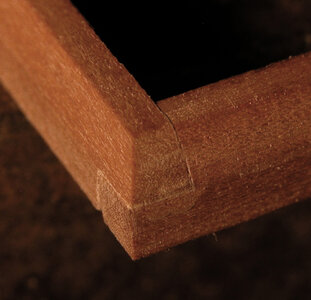
this is a correct corner joint for a coaming on a model
hatch coaming 20.jpg


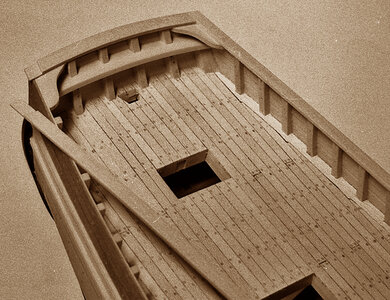
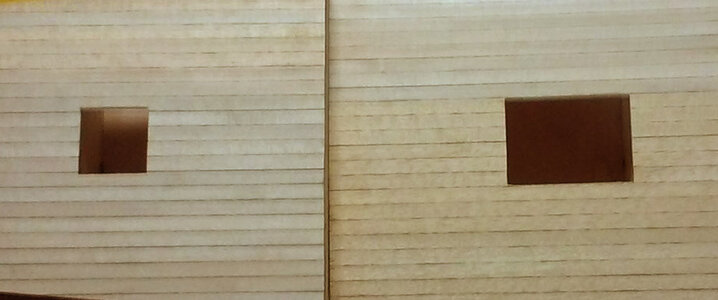
when planking a deck model builders will run the ends of the planking to the edge of the opening and set the coamings on top of the planking like this
h65.jpg

hatch way1.jpg

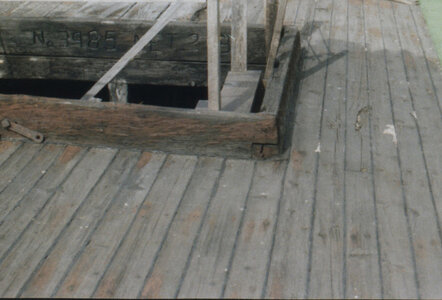
hatch coamings on real ships sat on the beam and the deck planking ran up to and butted the side of the coaming. so you need to install the coamings first then lay the deck planking. Here you can see the coaming is sitting directly on the beam, there are no deck planks between the bottom of the coaming and the deck beam.
hatch view.jpg


The average person viewing a model would never know the difference or ever spot such a detail, it is more a personal little detail or if you are planning on entering into competition.
 
That's one thing that puzzles me on my build (La Belle 1684). Coamings, according to Boudriot, are placed on top of planking, not beams. Go figure. Thanks for the informative post.
 
i have seen on a number of models with coamings for hatches, gradings and deck structures are done with a 45 degree angle at the corners like this.
A corner like this would pull apart and leak. Starting out i did the same thing thinking that makes a nicer corner rather than just butting the pieces together.

View attachment 231442

On real ships the corners are joined using a lap scarf and that looks like this

View attachment 231445

here are another examples in the first image you can also see the corner of the companion way with the lap scarf.

View attachment 231446

View attachment 231447

this is a correct corner joint for a coaming on a model

View attachment 231466


when planking a deck model builders will run the ends of the planking to the edge of the opening and set the coamings on top of the planking like this

View attachment 231448

View attachment 231450

hatch coamings on real ships sat on the beam and the deck planking ran up to and butted the side of the coaming. so you need to install the coamings first then lay the deck planking. Here you can see the coaming is sitting directly on the beam, there are no deck planks between the bottom of the coaming and the deck beam.

View attachment 231456


The average person viewing a model would never know the difference or ever spot such a detail, it is more a personal little detail or if you are planning on entering into competition.
These half-lapped corner joints make much more sense than a mitered corner. Thanks for sharing these photos. Rich (PT-2)
 
That's one thing that puzzles me on my build (La Belle 1684). Coamings, according to Boudriot, are placed on top of planking, not beams. Go figure. Thanks for the informative post.
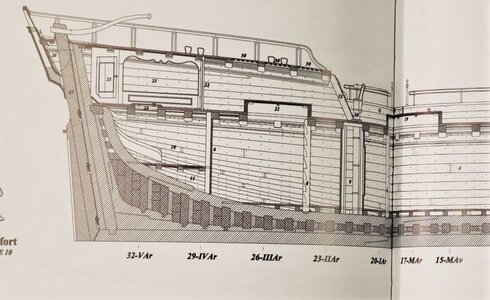
You are correct. Jean Boudriot and also Delacroix are showing them sitting on top of the deck planking
So it seems that the french did it differently

Rochefort
IMG_13121-Rochefort.jpg

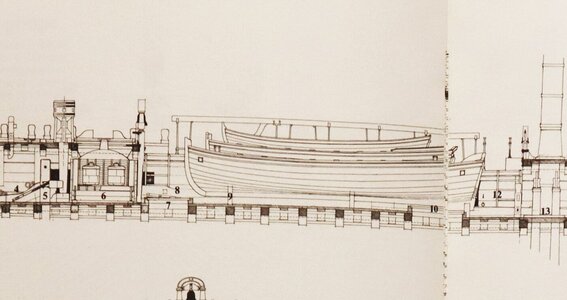
Belle Poule
IMG_38651 Belle Poule.jpg

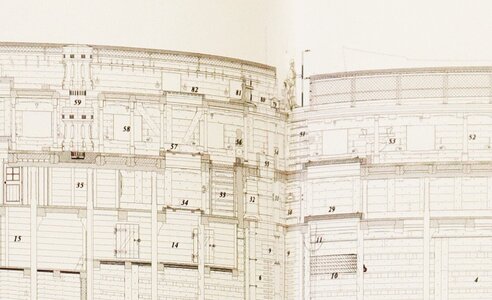
Egyptienne
IMG_39831 Egyptienne.jpg
 
Instruction from Artesania L. shows mitered coamings.

that information is from a hobby kit and not a historical source. kit instructions can say anything

You are correct. Jean Boudriot and also Delacroix are showing them sitting on top of the deck planking
So it seems that the french did it differently


this can be true but then again maybe these guys are correct or maybe not

this is the type of subject that sometimes turns into a heated debate and at times turns into name calling or attacking someone, It is not the point to prove who is right or wrong or defending historical accuracy or building a model your way, it is about presenting information. From the earliest times of ship building in North America to the last of the wooden ship historical information seems to point to coamings sit on the beam and not on the planking and corners are not at a 45 degree angle. How it was done in different countries at different time periods is up for question and if you have that information post it.
note the dove tail joinery at the corner in the second illustration, that was found on shipwrecks as early as the 1830s in north America and it stands up to logic, that joint is strong far stronger than a 45 degree joint.


You're absolutely right, but the 'correct' angles are more difficult to realize. That's because many people avoid them.

that is so true take the easy way, some builders even scribe in a joinery line and create a fake joint rather than make the actual joinery. For me that is the joy of wooden ship building "working with wood" and challenge myself to do scale joinery. If i were judging in a competition would i take points off for faking joinery? no, judging that against someone who actually does it right? well they win the points hands down.


hatch01.jpghatch02.jpg
 
I understand that. But it goes to show that models being assembled with mitered coamings will be quite common as most will not research the joinery used on ships. They'll follow the instructions. Including me. Especially on a first-build huh?
 
i understand that Phil kit builders follow provided instructions, could be why contests have different categories for kit built models and scratch built models. A kit builder follows instructions that might be correct or not as where a scratch builder has no instructions and has to go the extra mile to research something in order to build it.

As in every hobby, craft, art, sport there is the hobby then the armature, the pro and at the top the purest where every tiny detail is scrutinized for historical accuracy and quality of workmanship. There are those who play for the gold and those who just like to sit home and tinker and all is good at every level. To hand cut a double dove tail joint 1mm in size is not for everyone and quite frankly 99% of people viewing the model don’t care.

I for one love the thrill of the chase to run down the answer of how it was done and why it is done that way and can I do it in scale.
I certainly admire your enthusiasm and attention to detail. I certainly have a lot to learn.
 
As I started all of this, my knowledge has grown and I am starting to see finer details that I just was not aware of. It just depends on how far the modeler wants to take things. When I started, I just built the kit "as is" as I just did not know any better. There is A LOT that I still do not know and still learning.
Thanks Dave for pointing out these details that can make a model stand out. Of course, the "observer" also has to know what to look for and at these "contests" the judges really know what to look for. Dave with your knowledge and experience, I am sure that you can take a 5-minute look at a model and see all sorts of things that some of us miss completely.
For me, I try to build the model that I am happy with (even knowing I might be leaving out some extraordinary details).
Very well said Donnie. I happen to agree that building a model that I'm happy with is where I'm right now. On my latest build I accidently placed the coamings on my VASA correctly but had the grating running wrong (which I wasn't aware there was a correct way). I actually liked the correct way better so I changed it.
Thank you @Dave Stevens (Lumberyard) as well for further educating me on this.
 
To the best of my knowledge shipbuilders tried to avoid exposed end grain. Water easily wicks up end grain and this often leads to rot so it is easy to see why comings would sit on the beam and cover all the plank ends. The half lap doesn't hide all end grain but at least hides half the grain on each timber. And it is stronger and not as likely to open as wood shrinks and swells
 
To the best of my knowledge shipbuilders tried to avoid exposed end grain. Water easily wicks up end grain and this often leads to rot so it is easy to see why comings would sit on the beam and cover all the plank ends. The half lap doesn't hide all end grain but at least hides half the grain on each timber. And it is stronger and not as likely to open as wood shrinks and swells
Possibly that is the reason for the small 3/4 column wraps of corners on the Bluenose and other schooners deck furnishings. ??? Rich
 
Absolutely, great observation. Additionally rounded corners are preferred on any obstruction one might fall onto in a sea.
 
Last edited:
Absolutely, great observation. Additionally rounded corners are preferred on any obstruction one might fall onto in a sea.
I had continually scabbed shins from passing through the bulkheads along passageways in the carriers that our squadrons were deployed upon back in the 60's. Some scar tissue still remains from the lower edges which were around 10 or 12 inched above the passageway deck. Rich
 
Back
Top